General Howitzer’s Field Guide to Memoir 44

A Memoir 44 Strategy & Tactics Community

GENERAL HOWITZER

Scenarios

Explore Memoir ’44 battlefields, maps, and player statistics.

GENERAL HOWITZER

Campaigns

Relive historic campaigns through linked Memoir ’44 battles.

GENERAL HOWITZER

Strategy Tips

Sharpen your tactics and take command of the battlefield.

GENERAL HOWITZER

Field Manuals

Explore field guides and manuals for your next battle.

GENERAL HOWITZER

Tournaments

Find Memoir ’44 tournaments, events, and fellow commanders.

GENERAL HOWITZER

My War Room

Track your battles, campaigns, achievements, and next mission.

The road to Raate

The road to Raate

Scenario details

Battle date January 5, 1940
Year 1940
Theater Eastern
Country / location Finland
Map type Overlord
Campaign Russo-Finnish: Winter War
Operation Russo-Finnish War
Source SFTF
Author JDRommel
Scenario number 19441

Place Battle Reports on a scenario page, or specify its scenario name in the shortcode.

Link

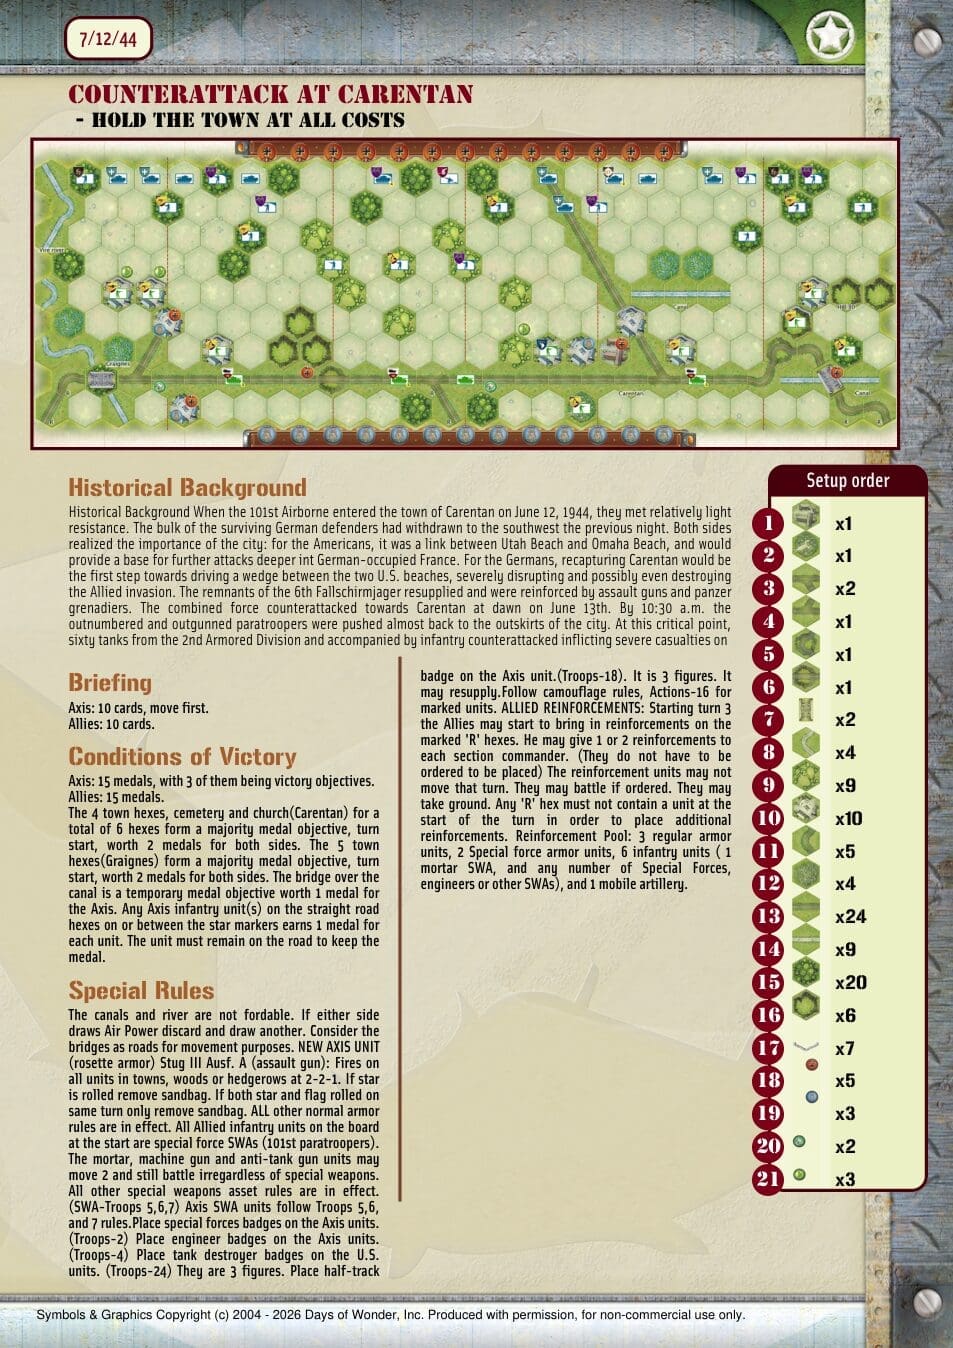
Counterattack at Carentan — Hold the town at all costs

Counterattack at Carentan — Hold the town at all costs

Counterattack at Carentan — Hold the town at all costs

Brown-shaded Counterattack at Carentan scenario sheet

Victory

15 medals
Axis: at least 3 objective medals

Card Balance

Allies: 10
Axis: 10

First Player

Axis

Conditions

Countryside / towns

Context

Historical

Location

Carentan and Graignes, Normandy, France

Year

1944

Theater

Western Front

Map Type

Overlord

History

When the 101st Airborne entered the town of Carentan on June 12, 1944, they met relatively light resistance. The bulk of the surviving German defenders had withdrawn to the southwest the previous night. Both sides realized the importance of the city: for the Americans, it was a link between Utah Beach and Omaha Beach, and would provide a base for further attacks deeper into German-occupied France. For the Germans, recapturing Carentan would be the first step towards driving a wedge between the two U.S. beaches, severely disrupting and possibly even destroying the Allied invasion. The remnants of the 6th Fallschirmjager resupplied and were reinforced by assault guns and panzer grenadiers. The combined force counterattacked towards Carentan at dawn on June 13th. By 10:30 a.m. the outnumbered and outgunned paratroopers were pushed almost back to the outskirts of the city. At this critical point, sixty tanks from the 2nd Armored Division and accompanied by infantry counterattacked inflicting severe casualties on…


Carentan was the hinge connecting Utah and Omaha beaches—and we weren’t surrendering one small inch! The 101st seized the town on June 12, 1944. When the Germans came roaring back the next morning, our paratroopers dug in and fought like crazy. Then sixty tanks of the 2nd Armored Division thundered into the fight! With infantry driving forward and artillery pounding away, they smashed the counterattack and sent the Germans reeling back several thousand yards. Carentan stayed ours—and the link between the beaches held firm!

~~ General Howitzer


Summary

German forces counterattack toward Carentan, where the U.S. 101st Airborne must hold the town until reinforcements can enter. Carentan, Graignes, the canal bridge, and the marked road determine the objective medals.

Objectives

Allies: 15 medals. Axis: 15 medals, including at least 3 victory-objective medals.

  • Carentan: The four town hexes, cemetery, and church form a six-hex majority objective, checked at turn start, worth 2 medals to either side.
  • Graignes: The five town hexes form a majority objective, checked at turn start, worth 2 medals to either side.
  • Canal bridge: A temporary objective worth 1 Axis medal.
  • Marked road: Each Axis infantry unit on the straight road hexes on or between the star markers earns 1 medal while it remains there.

Battlefield

Normandy countryside with towns, a church and cemetery, woods, hedgerows, roads, canals, the Vire River, and bridges. The river and canals are not fordable. Treat bridges as roads for movement.

Troops

Allies: The starting infantry represent the 101st Airborne and use the special-force SWA rules in this scenario. U.S. tank destroyers have 3 figures. See the map for the starting deployments and badges.

Axis: Infantry, special forces, engineers, SWAs, StuG III assault guns (rosette armor), and a 3-figure half-track that may resupply. See the map for the starting deployments and badges.

Allied reinforcement pool

  • 3 regular armor units
  • 2 special-force armor units
  • 6 infantry units, including 1 mortar SWA; the others may be special forces, engineers, or other SWAs
  • 1 mobile artillery unit

Starting on Allied turn 3, 1 or 2 reinforcements may be given to each section commander on the marked R hexes. Placement requires no order; an entry hex must be empty at turn start. New units cannot move that turn, but may battle if ordered and may take ground.

Allied Strategy

Axis Strategy

Special Rules

The canals and river are not fordable. Discard Air Power and draw another card. Treat bridges as roads for movement.

StuG III Ausf. A (rosette armor): fires on units in towns, woods, or hedgerows at 2-2-1. A star removes a sandbag; if both a star and a flag are rolled on the same turn, only remove the sandbag. All other normal armor rules apply.

Starting Allied infantry are special-force SWAs (101st paratroopers). Mortar, machine-gun, and anti-tank-gun units may move 2 and still battle; all other SWA rules apply (Troops 5, 6, 7). Axis SWAs follow Troops 5, 6, 7. Mark Axis special forces (Troops 2), engineers (Troops 4), U.S. tank destroyers (Troops 24; 3 figures), and the Axis half-track (Troops 18; 3 figures; may resupply). Apply camouflage (Actions 16) to marked units.

Allied reinforcements start on turn 3: place 1 or 2 per section commander on marked R hexes that were empty at turn start. No order is needed for placement. They cannot move that turn; they may battle if ordered and may take ground. Pool: 3 regular armor, 2 special-force armor, 6 infantry (1 mortar SWA; the others may be special forces, engineers, or other SWAs), and 1 mobile artillery.

Strategy and Tactics

General Howitzer Battle Reports

Counterattack at Carentan — Hold the town at all costs

Community results · All commanders

Allied win rate—
Average medals per side
Allies—Axis—
Submitted AARs
0Games reported

No AARs for this scenario yet. File the first field report.

Allied victories0
Axis victories0

Scenario: 28529   Design: LooneyLlama (bibliography update: October 14, 2015); archived by kkuster24.

Original Days of Wonder scenario archive

Scenario map and text reproduced from the supplied scenario PDFs. Symbols & Graphics Copyright (c) 2004–2026 Days of Wonder, Inc. Produced with permission, for non-commercial use only.

Peleliu Landings [Overlord]

Peleliu Landings [Overlord]

Peleliu Landings (Overlord)

memoir 44 scenario

Listen up. When our boys hit Peleliu, they weren’t stepping onto some quiet stretch of sand — they were walking straight into a hornet’s nest carved out of coral and steel. The Japanese didn’t waste men on the beaches; they dug themselves into the ridges, the caves, and the guts of that island, building a fortress designed to bleed us dry.

The 1st Marine Division landed under murderous fire — artillery, machine guns, everything the enemy could throw. They took casualties by the score, but they kept pushing, clawing their way off those beaches yard by yard. By nightfall, they’d carved out a foothold. Not victory — just a place to start swinging.

Peleliu wasn’t taken in a day. It was a slugging match, the kind where grit and guts matter more than numbers. And the Marines proved that when the chips are down, America’s fighting men don’t back up — they break through.

~~ General Howitzer

13 VP’s

card

Card Balance:

Allies – 11

Axis – 8

Complexity:

5/5

Conditions:

Beach

beach

Context:

Historical

Location:

Palau Islands

Year:

1944

Theater:

Pacific

Campaign:

Guadalcanal Campaign

Summary:

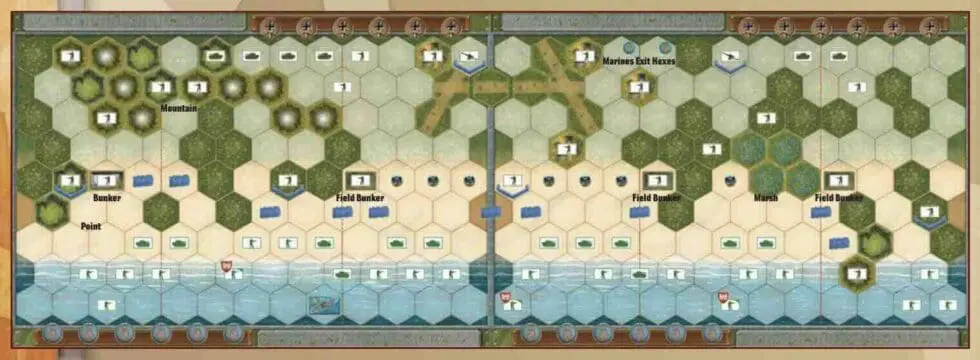
This is an Overlord game, so make use of the Jungle Command cards, two per side.

Objectives:

12 Medals including Territorial Control, and Exit Row medals and a sudden death hex all for the Japanese.

Terrain:

Beach and jungle terrain, and mountains, and an airfield.

Troops:

Allies –  Infantry, Armor, Destroyers

Axis – Infantry, Armor, Artillery

Special Rules:

1. Majority  Temporary Territorial Control  – whomever controls 3 of the 4 buildings of the airfield

2.  Exit Row Medals – to any Marine forces that exit

3.  Imperial Japanese Army Command rules – Seishin Kyoiku Doctrine (SKD), Yamato Dashi Concept (No Surrender), Banzai War Cry

4.  US Marine Corps rules – Gung Ho! rule – activate one extra unit more than the card played indicates

5.  Airfield rules – no movement restrictions, no combat restrictions, no line of site restrictions

6.  Jungles – Movement, must stop; Battle, only if starting in, or adjacent to hex; blocks Line of Sight;

7.  Minefields,

8.  Marshes,

9.  Mountain terrain – only Infantry may move onto Mountains; Battle, up the mountain reduces dice by two; blocks Line of Site

10.  Destroyers – attacks at 3,3,2,2,1,1,1,1


medal allies

🔥 Winning as Allies

1.  The Marines should avoid the Japanese up in the mountains on their left flank.  There is little to be gained in that sector.  Instead direct your forces at an angle towards the center, to bring pressure to bear towards the airfield.

2.  The two Exit hexes for the Marines are an excellent and achievable goal.  Work your way through the jungle and send some of our boys home to safety!

3. You have a warship at your disposal on your left flank.  Use it at every opportunity to degrade the enemy forces.  It is close enough to the center, that you can provide some good support for the forces fighting on the center beach.

4.  The Marines are able to use their Gung Ho! ability to command one additional unit – but only in one section at a time.  So the Command-In-Chief (CIC) should decide which sector requires the additional unit to be ordered, to either shore up a section that needs additional defense, or to enhance an attack with one additional unit to command.

5.  You start the battle with three Engineer units.  Get them off the beach and into the jungle as soon as possible. They will be able to overcome the jungle terrain protections, ignoring them at Close Assault, and being able to roll three dice for each attack. This will help to quickly blunt the Japanese SKD abilities.

BIG PICTURE STRATEGY FOR BOTH SIDES:

1.  Because this is an Overlord game, hand management becomes critical.  At the start of the game, both sides have plenty of cards to fight with. The Allies get 11 cards, and the Axis get 8.  But because they can spend up to three cards per turn, and only get replenished at the rate of 2 cards per turn, each side will begin to run out of playable cards, about half-way through the game, and will have to resort to Initiative Rolls for one of their Field Commanders.

2.  The center two sections are where most of the action is going to take place.  As the Marines push up toward the Airfield, and the Japanese bring their Armor out from behind the mountains, they will all converge for an awesome bloodbath on the central beach.

3.  This is a long scenario with 13 Victory Points.  This means strategic hits, and good defensive moves, so that you are attacking the enemy from places of protection, will slowly build up to a successful attack, unit by unit. This scenario is not won in a single decisive attack.  You will need to use your forces everywhere for a total war attack methodology.

4.  This is an Overlord game, so be sure to understand the rules for how the Commander-In-Chief (CIC) distributes cards, and who is authorized to attack in which sections.  Clarify before the game starts, any special rules for how to apply multi-sectional cards, and Tactic cards.  The official Days of Wonder Overlord rules can be found here on the General Howitzer site.


medal axis

🔥 Winning as Axis

1.  You have a number of powerful Armor which are capable of doing great damage to the enemy on the beach. But they are blocked in by your Infantry.  So get the Infantry moved out of the way, and take a couple of turns to attack the unprotected and helpless forces on the beach.

2.  Keep a few forces close to the Airfield, which is a Permanent Majority Medal Objective.  If the enemy controls three of the four building hexes at the end of their turn, this will earn a Permanent Medal Objective.

3.  Also keep a few forces close to the Exit hexes to prevent the enemy from escaping, and earning medals.

4.  Because of the Seishin Kyoiku Doctrine (SKD), your full force Infantry units get to roll one extra dice in Close Assault attacks.  If you move your forces quickly forward onto the beach, you can capture the Marines at their weakest, and with your extra dice rolls, either kill them, or push them back into the sea for retreat kills.  (Although it should be noted that historically, the Japanese attacked the beach from a distance and waited for the Marines to come to them, all the while inflicting heavy losses upon them for each territorial gain.)

5.  You have two Artillery units which can reach all the way to the beach.  Use them at every opportunity to attack the enemy from a distance. Do not move out your forces too early to the beach.  Make them come to you, and keep hitting them with the Artillery as they approach.

Author:

Days of Wonder

Link:

Place Battle Reports on a scenario page, or specify its scenario name in the shortcode.

Tigers in the Snow

Tigers in the Snow

Tigers in the Snow

“Tigers in the Snow”—that wasn’t just a clever title, it was the actual truth of what happened in the Ardennes. Peiper and his SS boys came charging with their big, shiny King Tigers, the heaviest brutes the Germans could throw on a battlefield. They thought those monsters would smash through anything in their way.

But tanks don’t win wars by themselves. The snow was deep, the roads were narrow, and fuel was scarce. Our boys—American infantry, artillery, and tankers—kept hammering them from every side, day after day, bleeding them dry. Those great Tigers ended up stuck in the woods, running on fumes, while our men boxed them in.

In the end, Peiper’s vaunted force had to abandon their precious tanks right there in the snow. The lesson? I don’t give a care how thick your armor is—when you run into Americans who won’t quit, you’ll find out that guts, brains, and relentless pressure beat steel every time.

13 VP’s

card

Card Balance:

Allies – 9

Axis – 9

Complexity:

5 (Overlord)

Conditions:

Winter

winter

Context:

Historical

Location:

Normandy, France

Year:

1944

Theater:

Western

Campaign:

Normandy

Codename:

Summary:

Objectives:

13 VP’s, including a bridge Territorial Objective Medal.

Battlefield:

Winter countryside with a river, roads, hills, and many hedgerows.

Troops:

Allies – 13 Infantry, 10 Armor, 4 Artillery

Axis – 14 Infantry, 8 Armor, 4 Artillery


medal allies

Allied Strategy:

1.

medal axis

Axis Strategy

1. 

Battle Reports

Author:

Days of Wonder

Link:

Place Battle Reports on a scenario page, or specify its scenario name in the shortcode.

Battle of Dubno – Brody

Battle of Dubno – Brody

Force vs. Finesse: Battle of Dubno - Brody

Scenario_Toulon_start_Allies

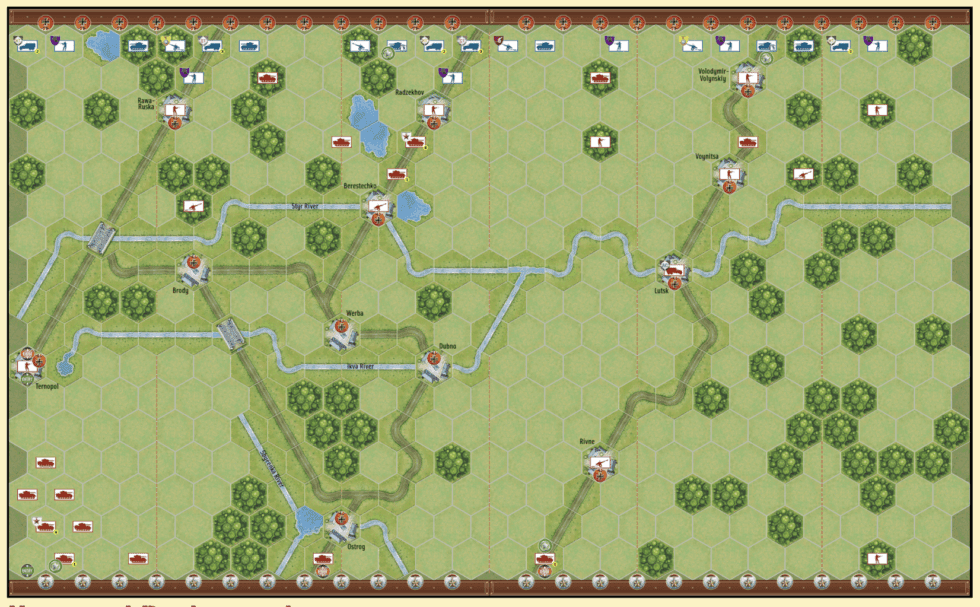
The Battle of Dubno–Brody (June 23–30, 1941) was one of the largest tank battles of World War II, fought during the opening phase of Operation Barbarossa between Germany’s Army Group South and the Soviet Southwestern Front.

Results:

  • German Panzer forces decisively defeated the numerically superior Soviet armored units, destroying or capturing thousands of tanks.

  • Soviet forces suffered catastrophic losses and were forced into retreat.

Strategy:

  • The Germans used fast, coordinated Panzer thrusts and encirclement tactics to neutralize Soviet armor.

  • Soviet forces, hampered by poor coordination, mechanical breakdowns, and weak communications, failed to execute an effective counteroffensive.

General Howitzer summarizes its impact:
That win at Dubno–Brody blew the road wide open for the Germans into Ukraine and straight toward Kiev. It showed the Soviets their armor doctrine was a mess, and they paid for it in steel and blood. But they’re stubborn—those losses lit a fire under them, and the lessons they learned there would come back to bite the Germans hard later in the war.

24 VP’s (!)
[ This is a ‘break-lord’ scenario ]

card

Card Balance:

Allies –

  • 4 cards for each half of the board

Axis –

  • 6 cards for each half of the board

Complexity:

5

Conditions:

Countryside

countryside

Context:

Historical

Location:

Russia

Year:

1941

Theater:

Eastern Front

Campaign:

Codename:

Operation Barbarossa

Summary:

Objectives:

24 VP’s, plus many other conditions. Read the PDF special rules.

Terrain:

Countryside with rivers and roads 

Troops:  (check the PDF for specific the specific troop deployments)

medal allies

Allied Strategy:

1.  

medal axis

Axis Strategy

1. 

Author:

Willem Boersma

Complete Scenario Link:

https://generalhowitzer.com/bsk-pdf-manager/battle-of-dubno-brody/

Place Battle Reports on a scenario page, or specify its scenario name in the shortcode.

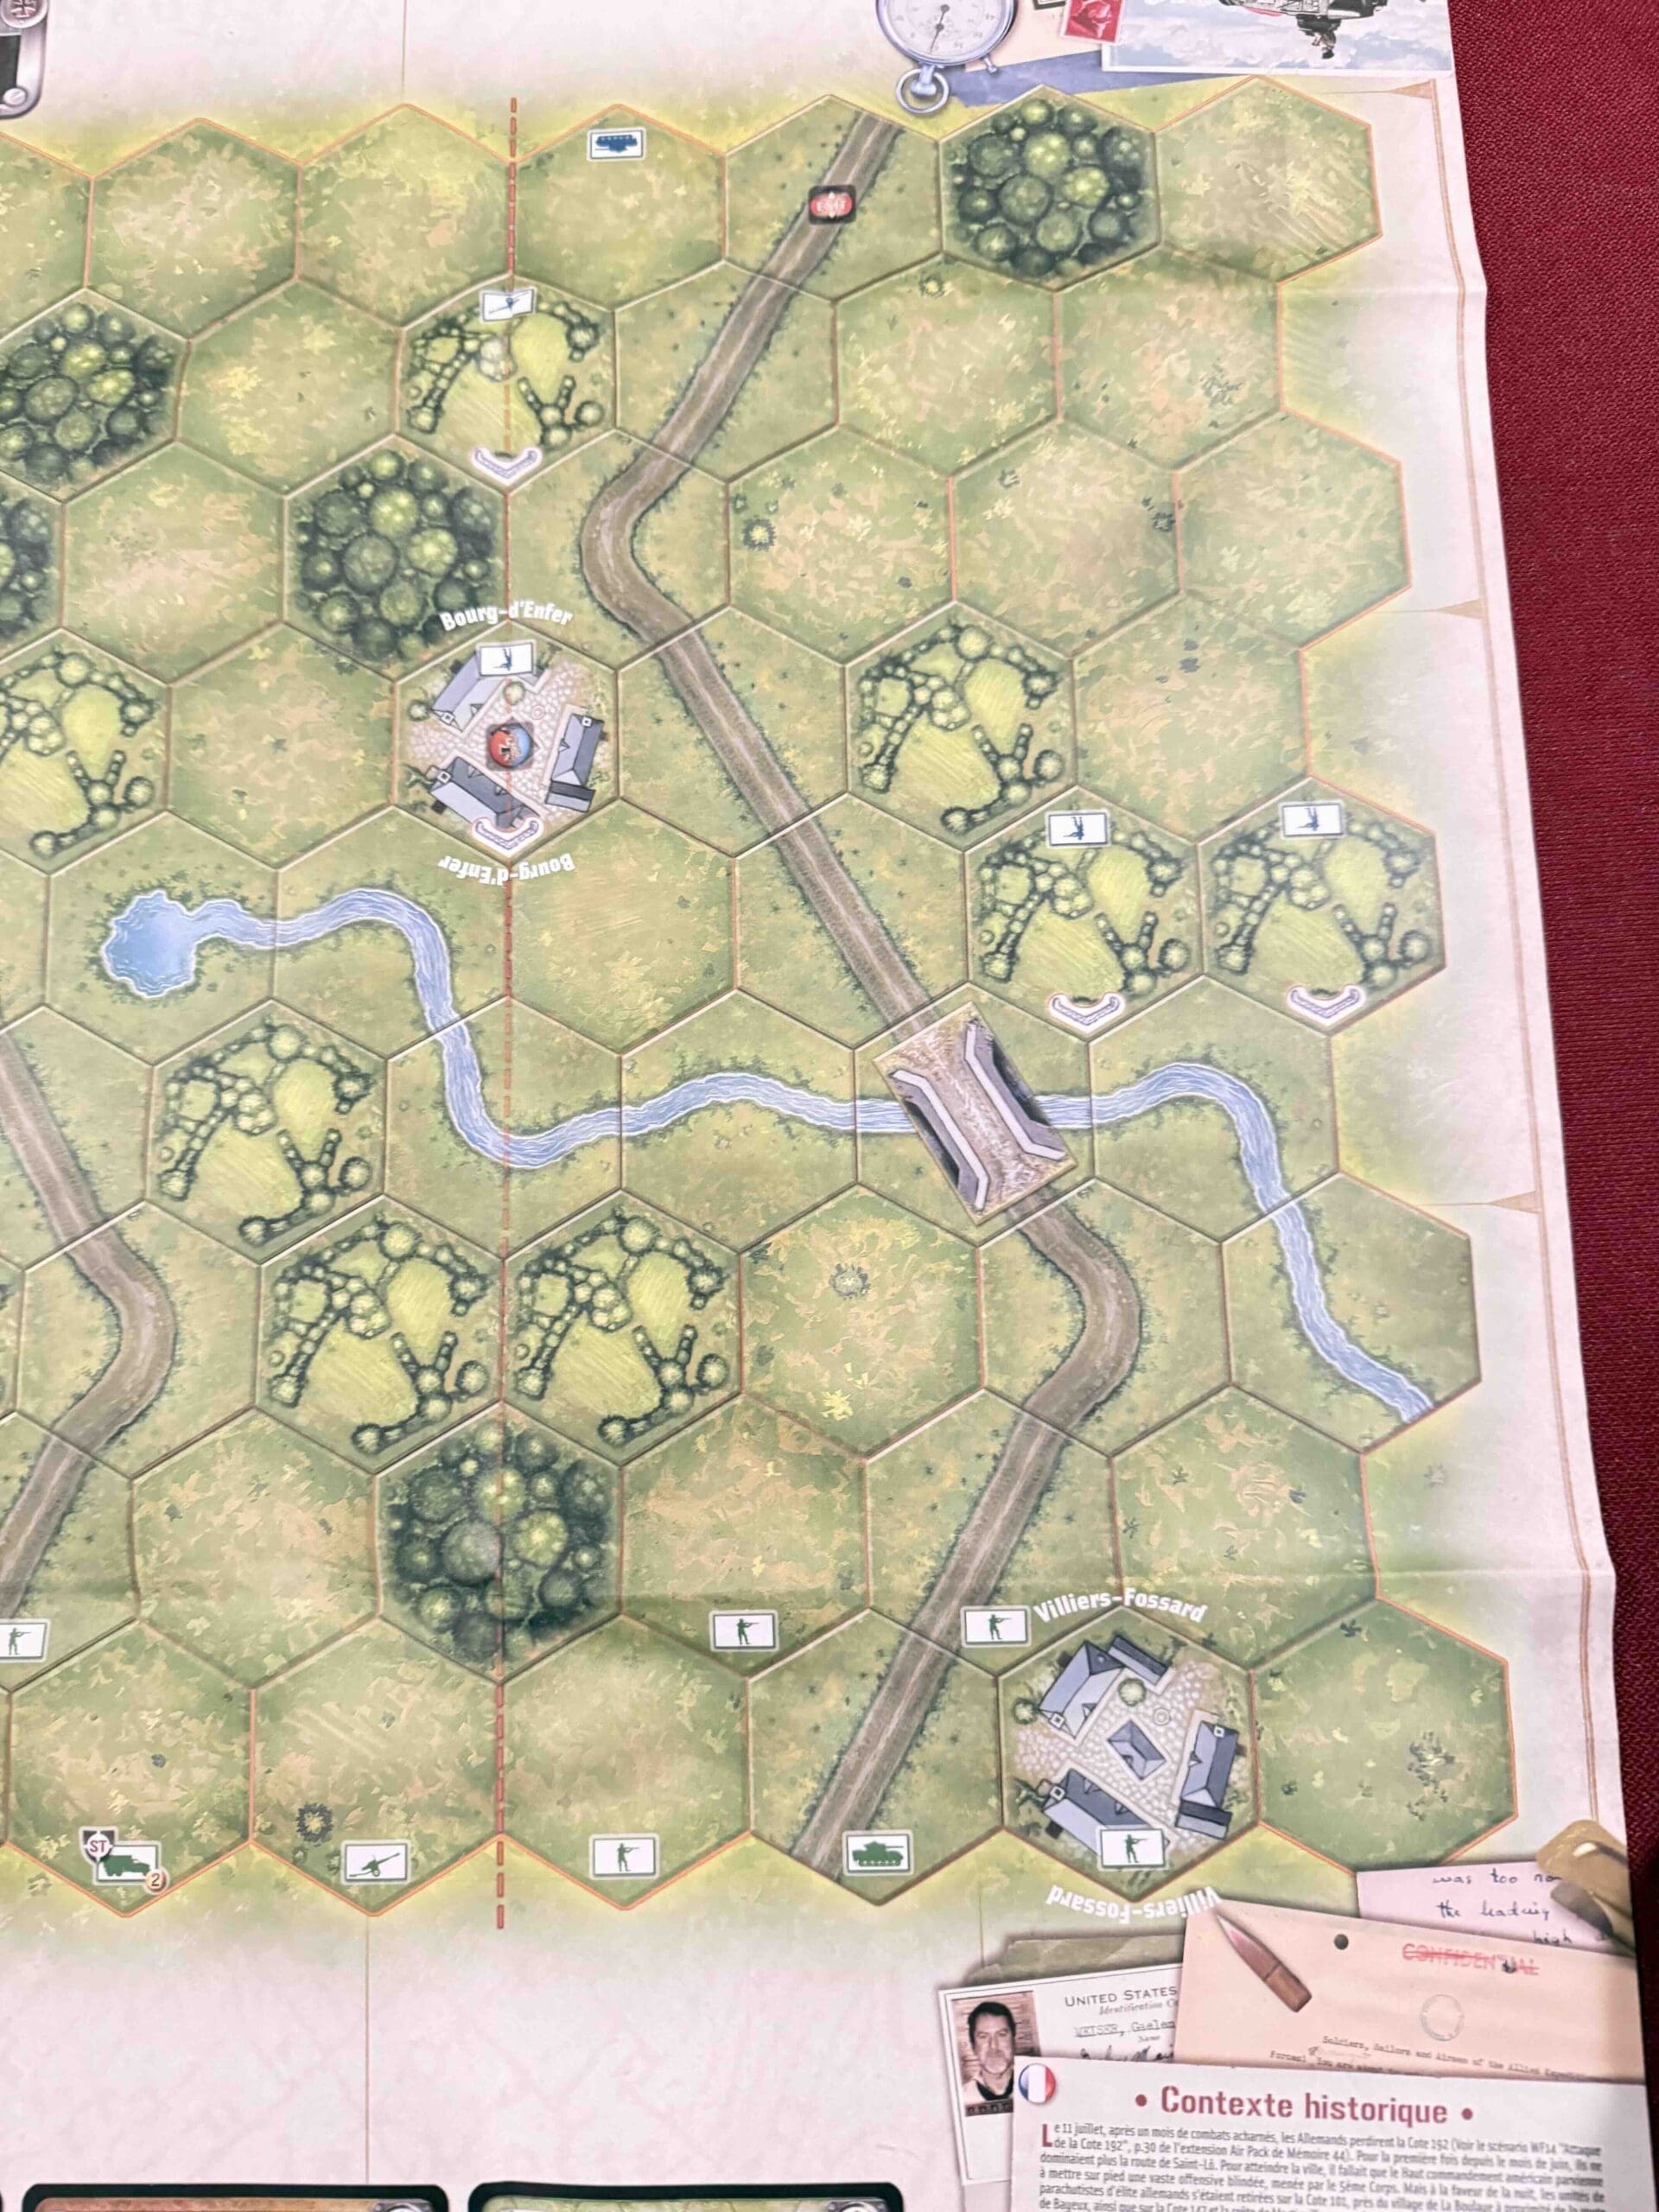
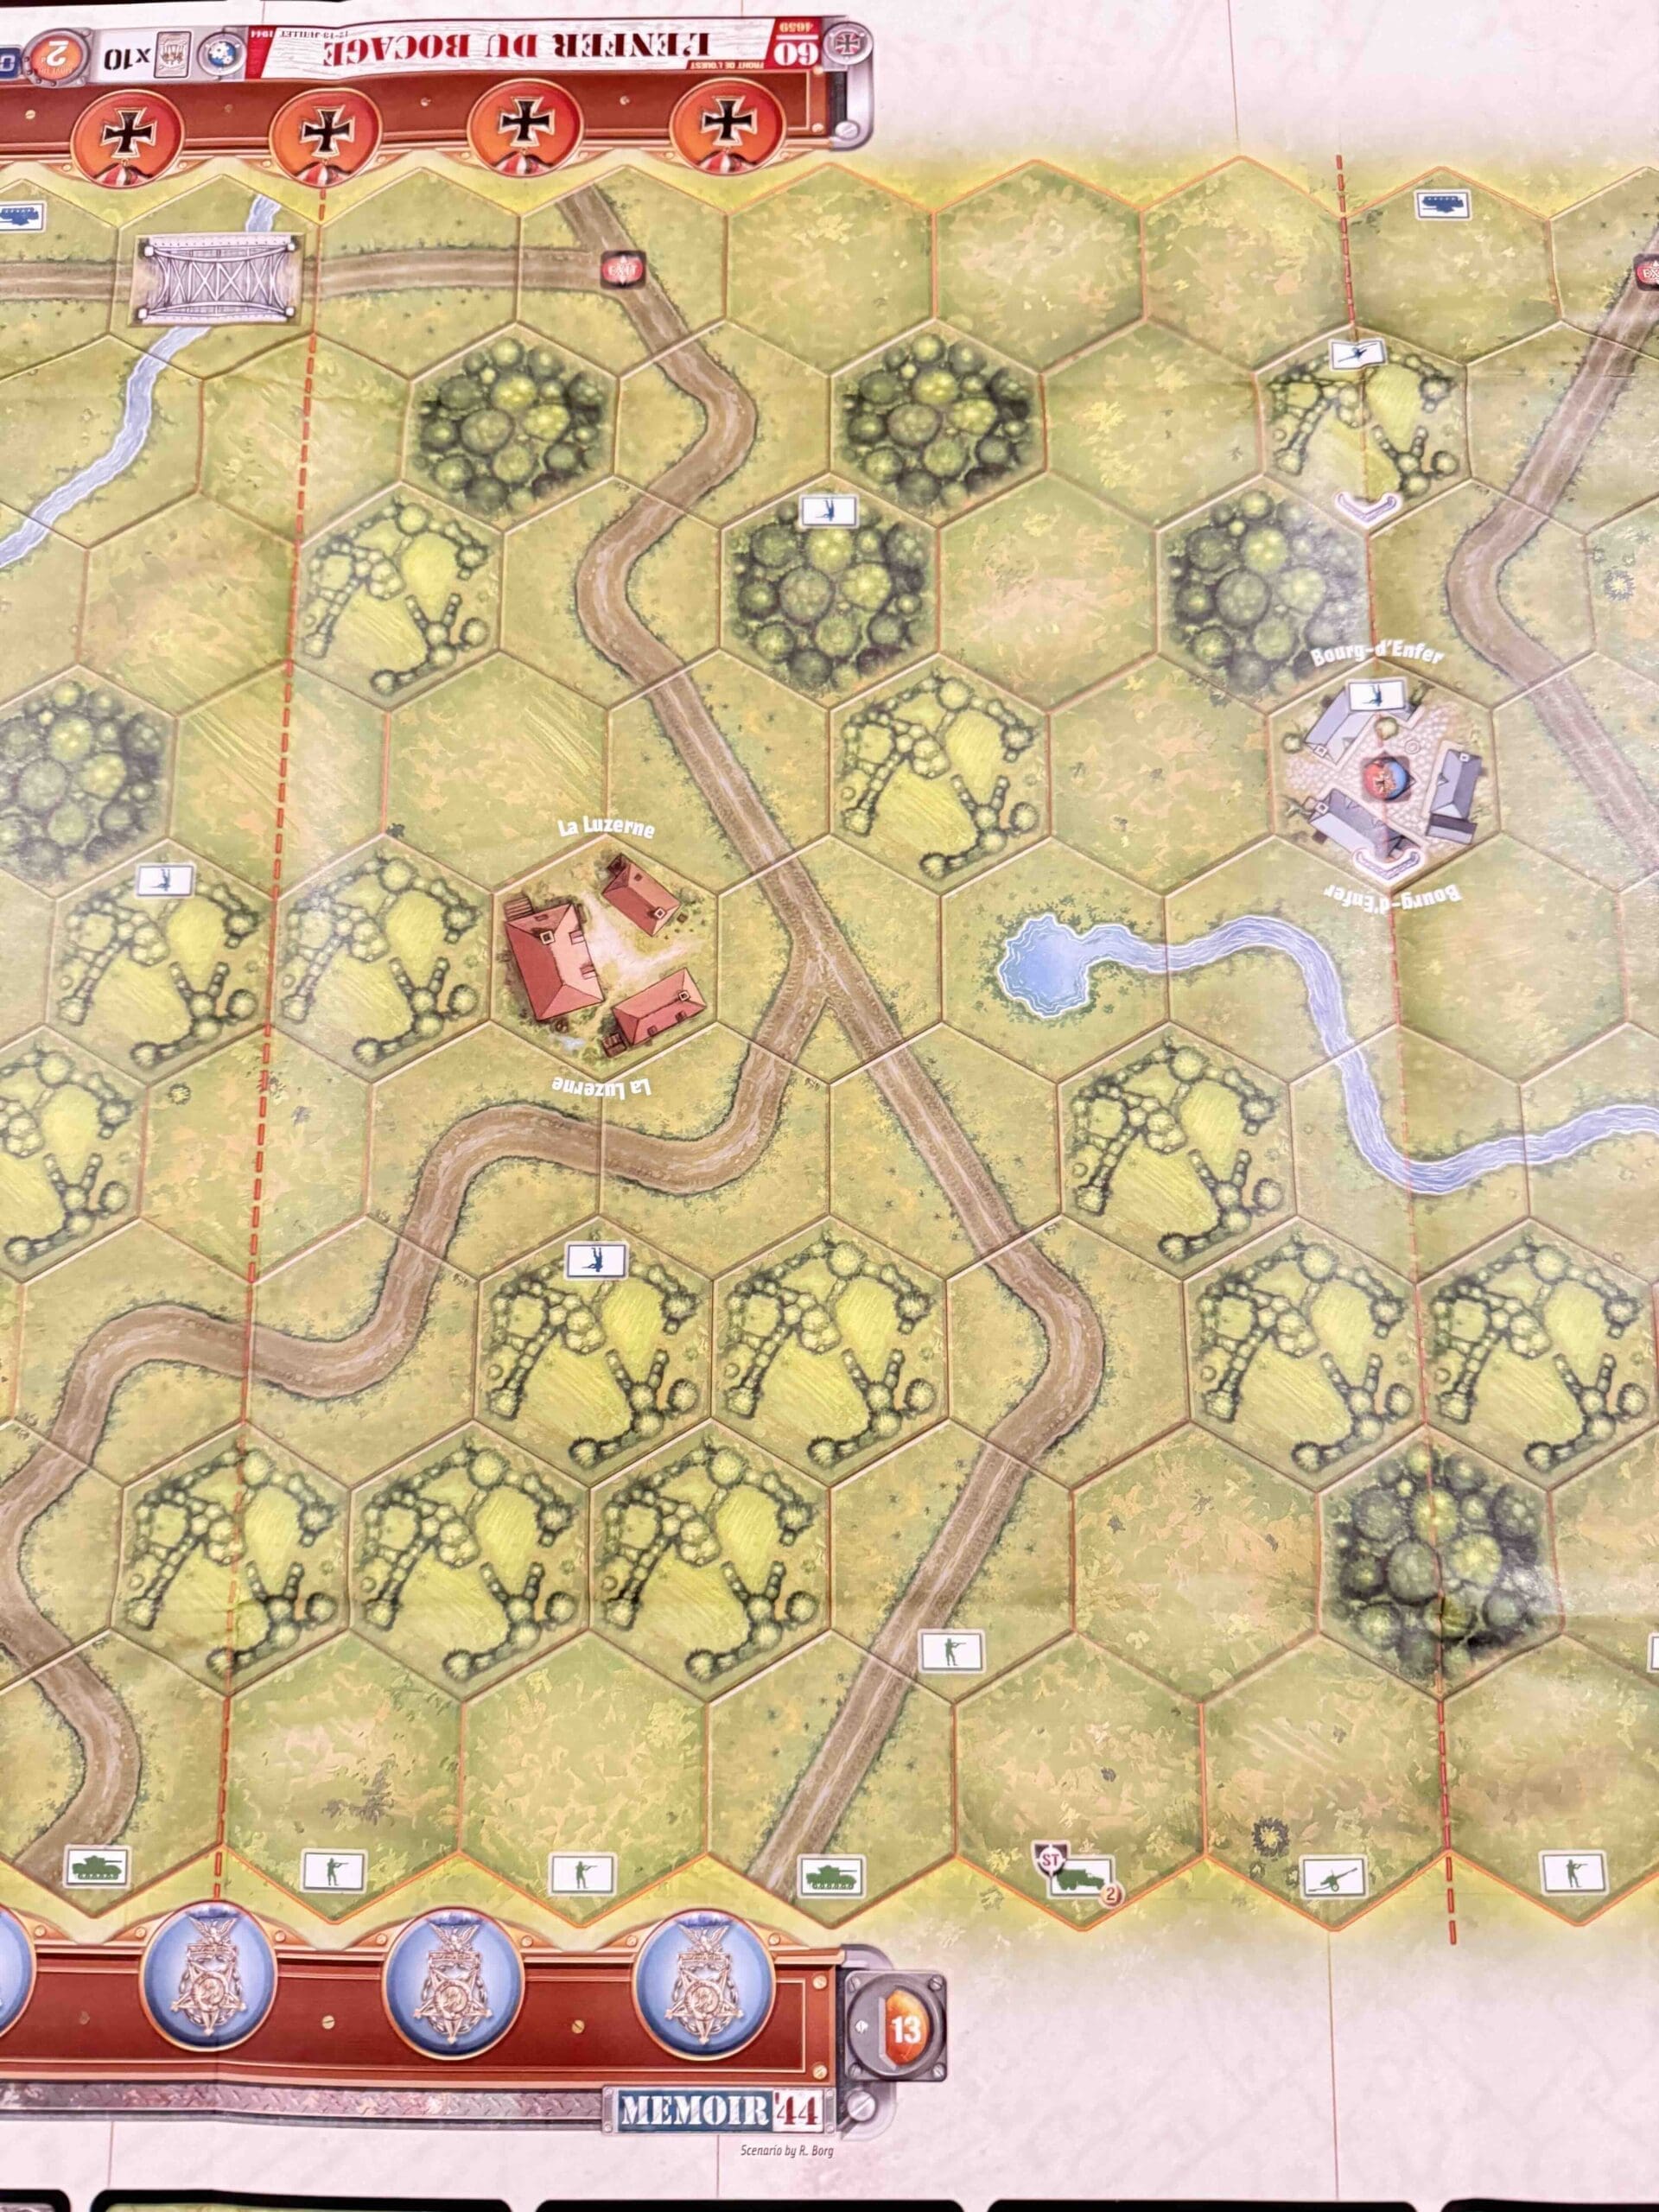
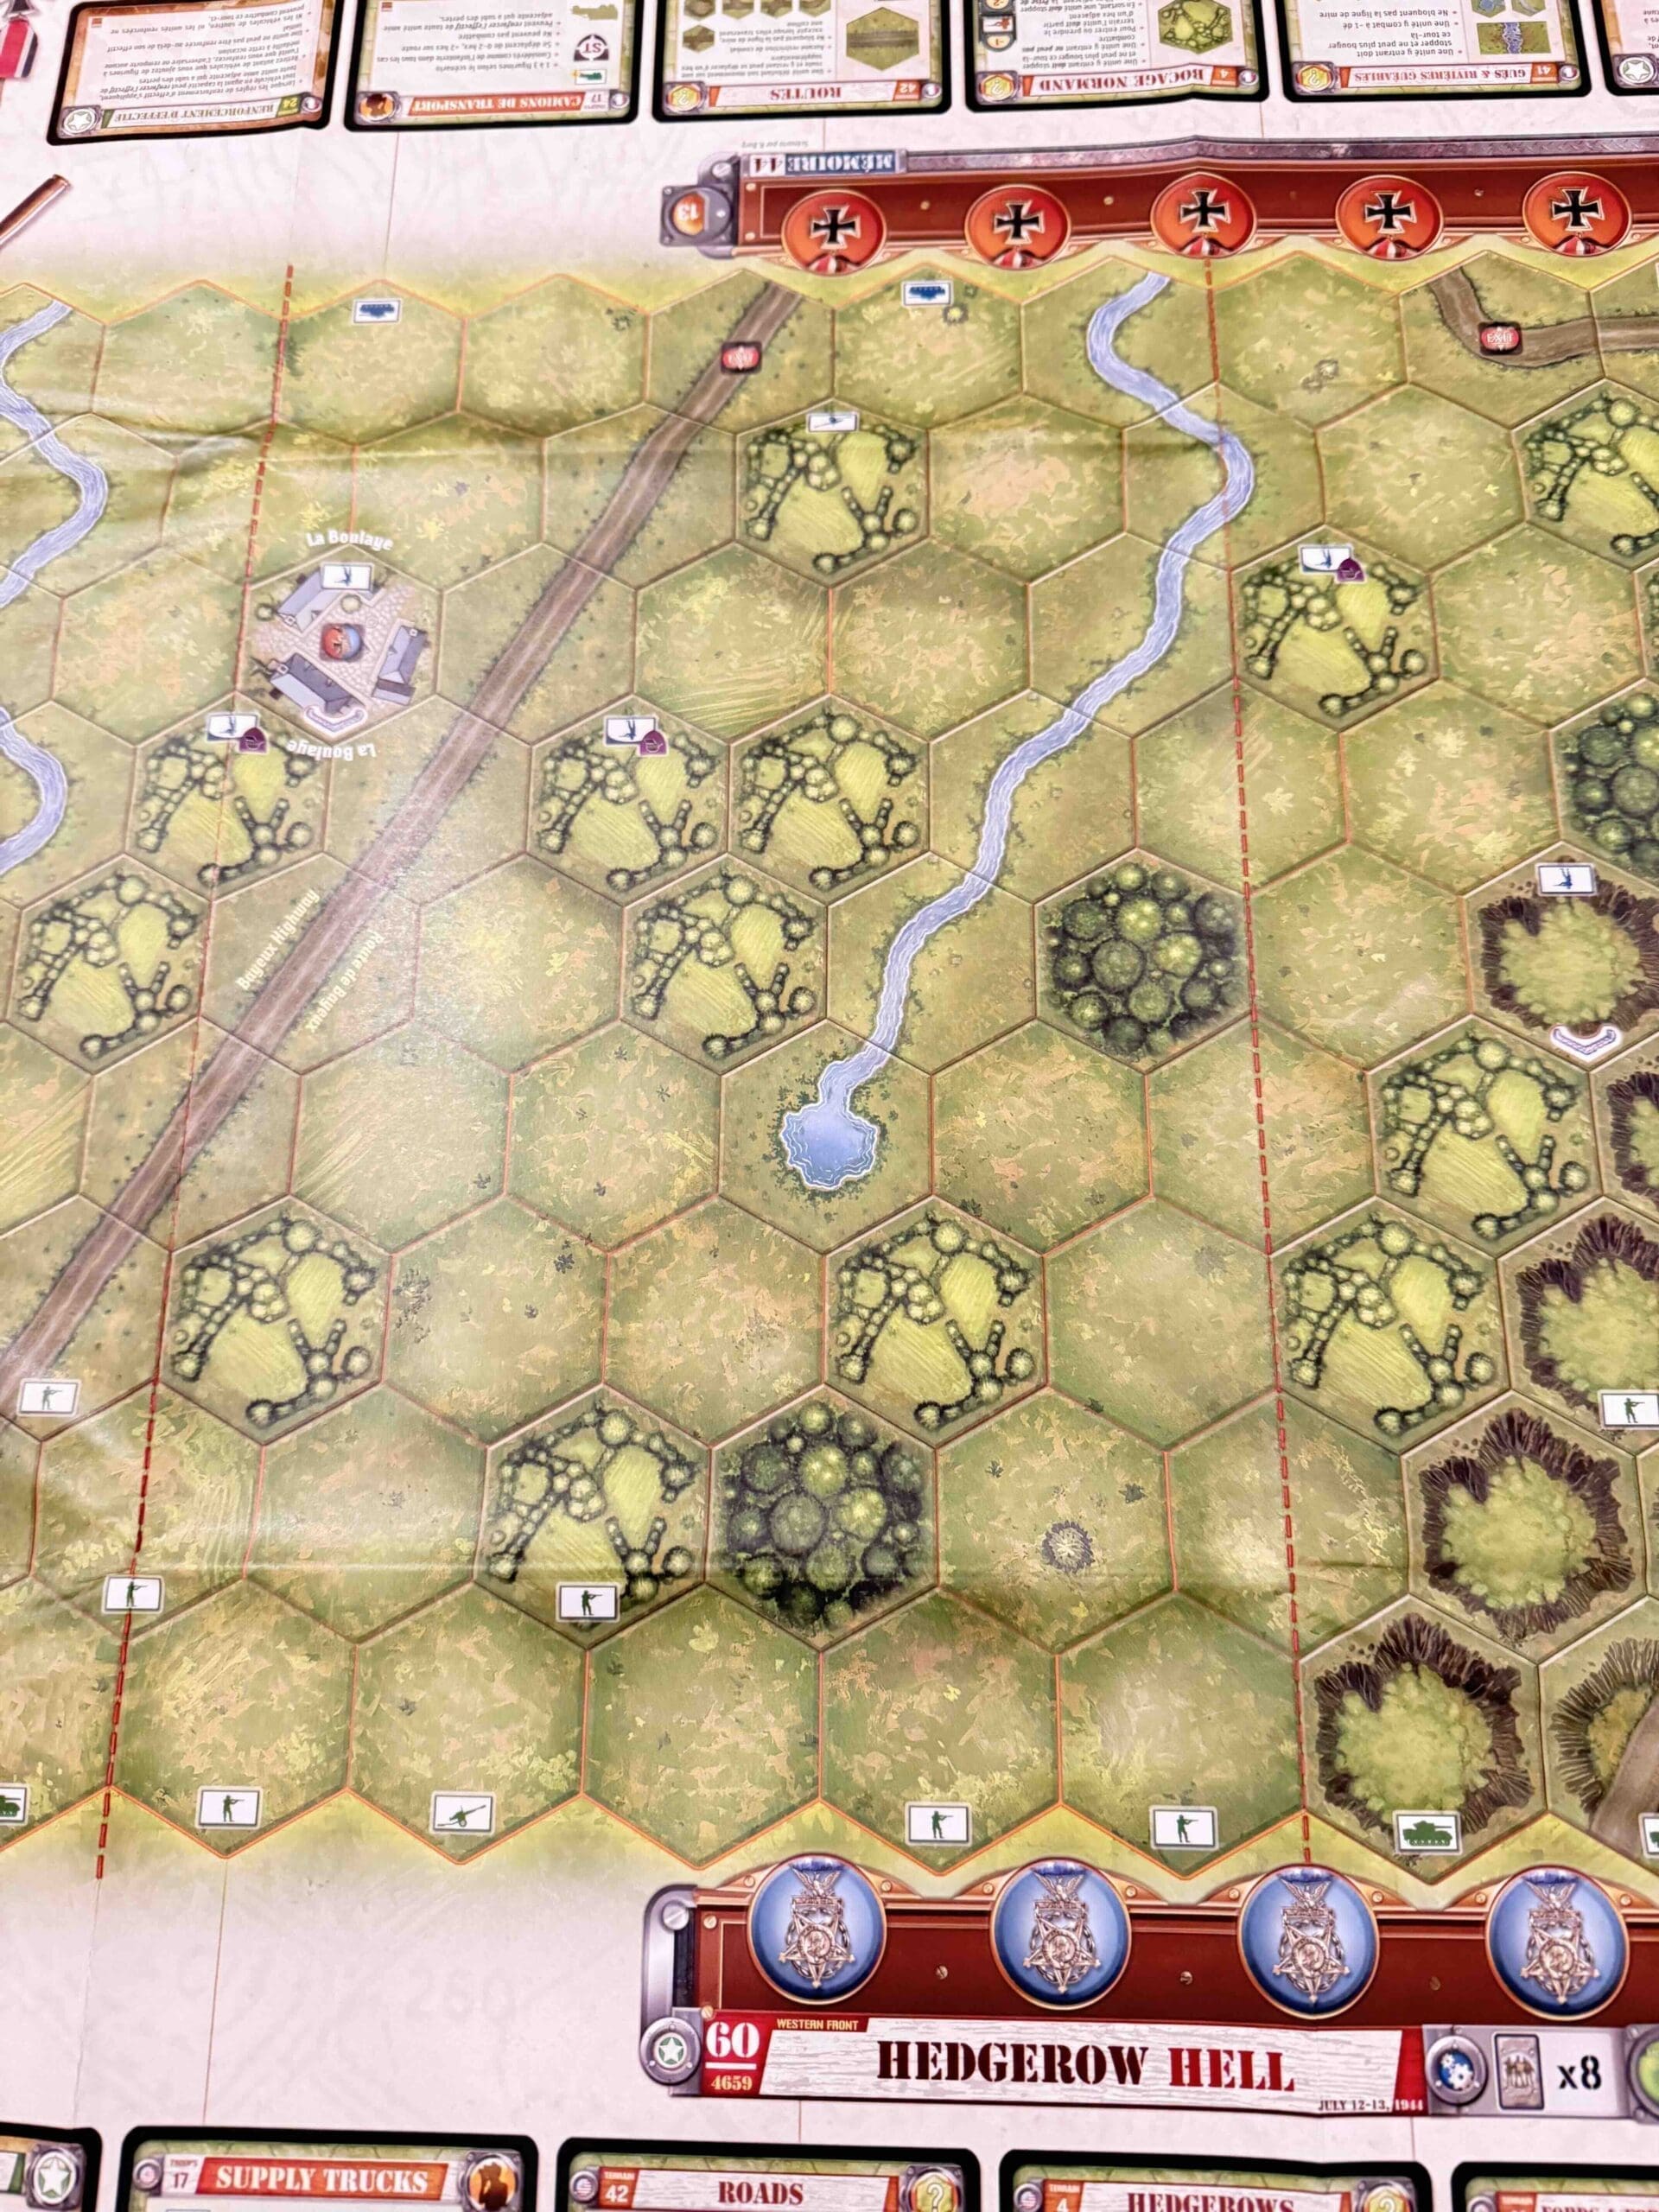
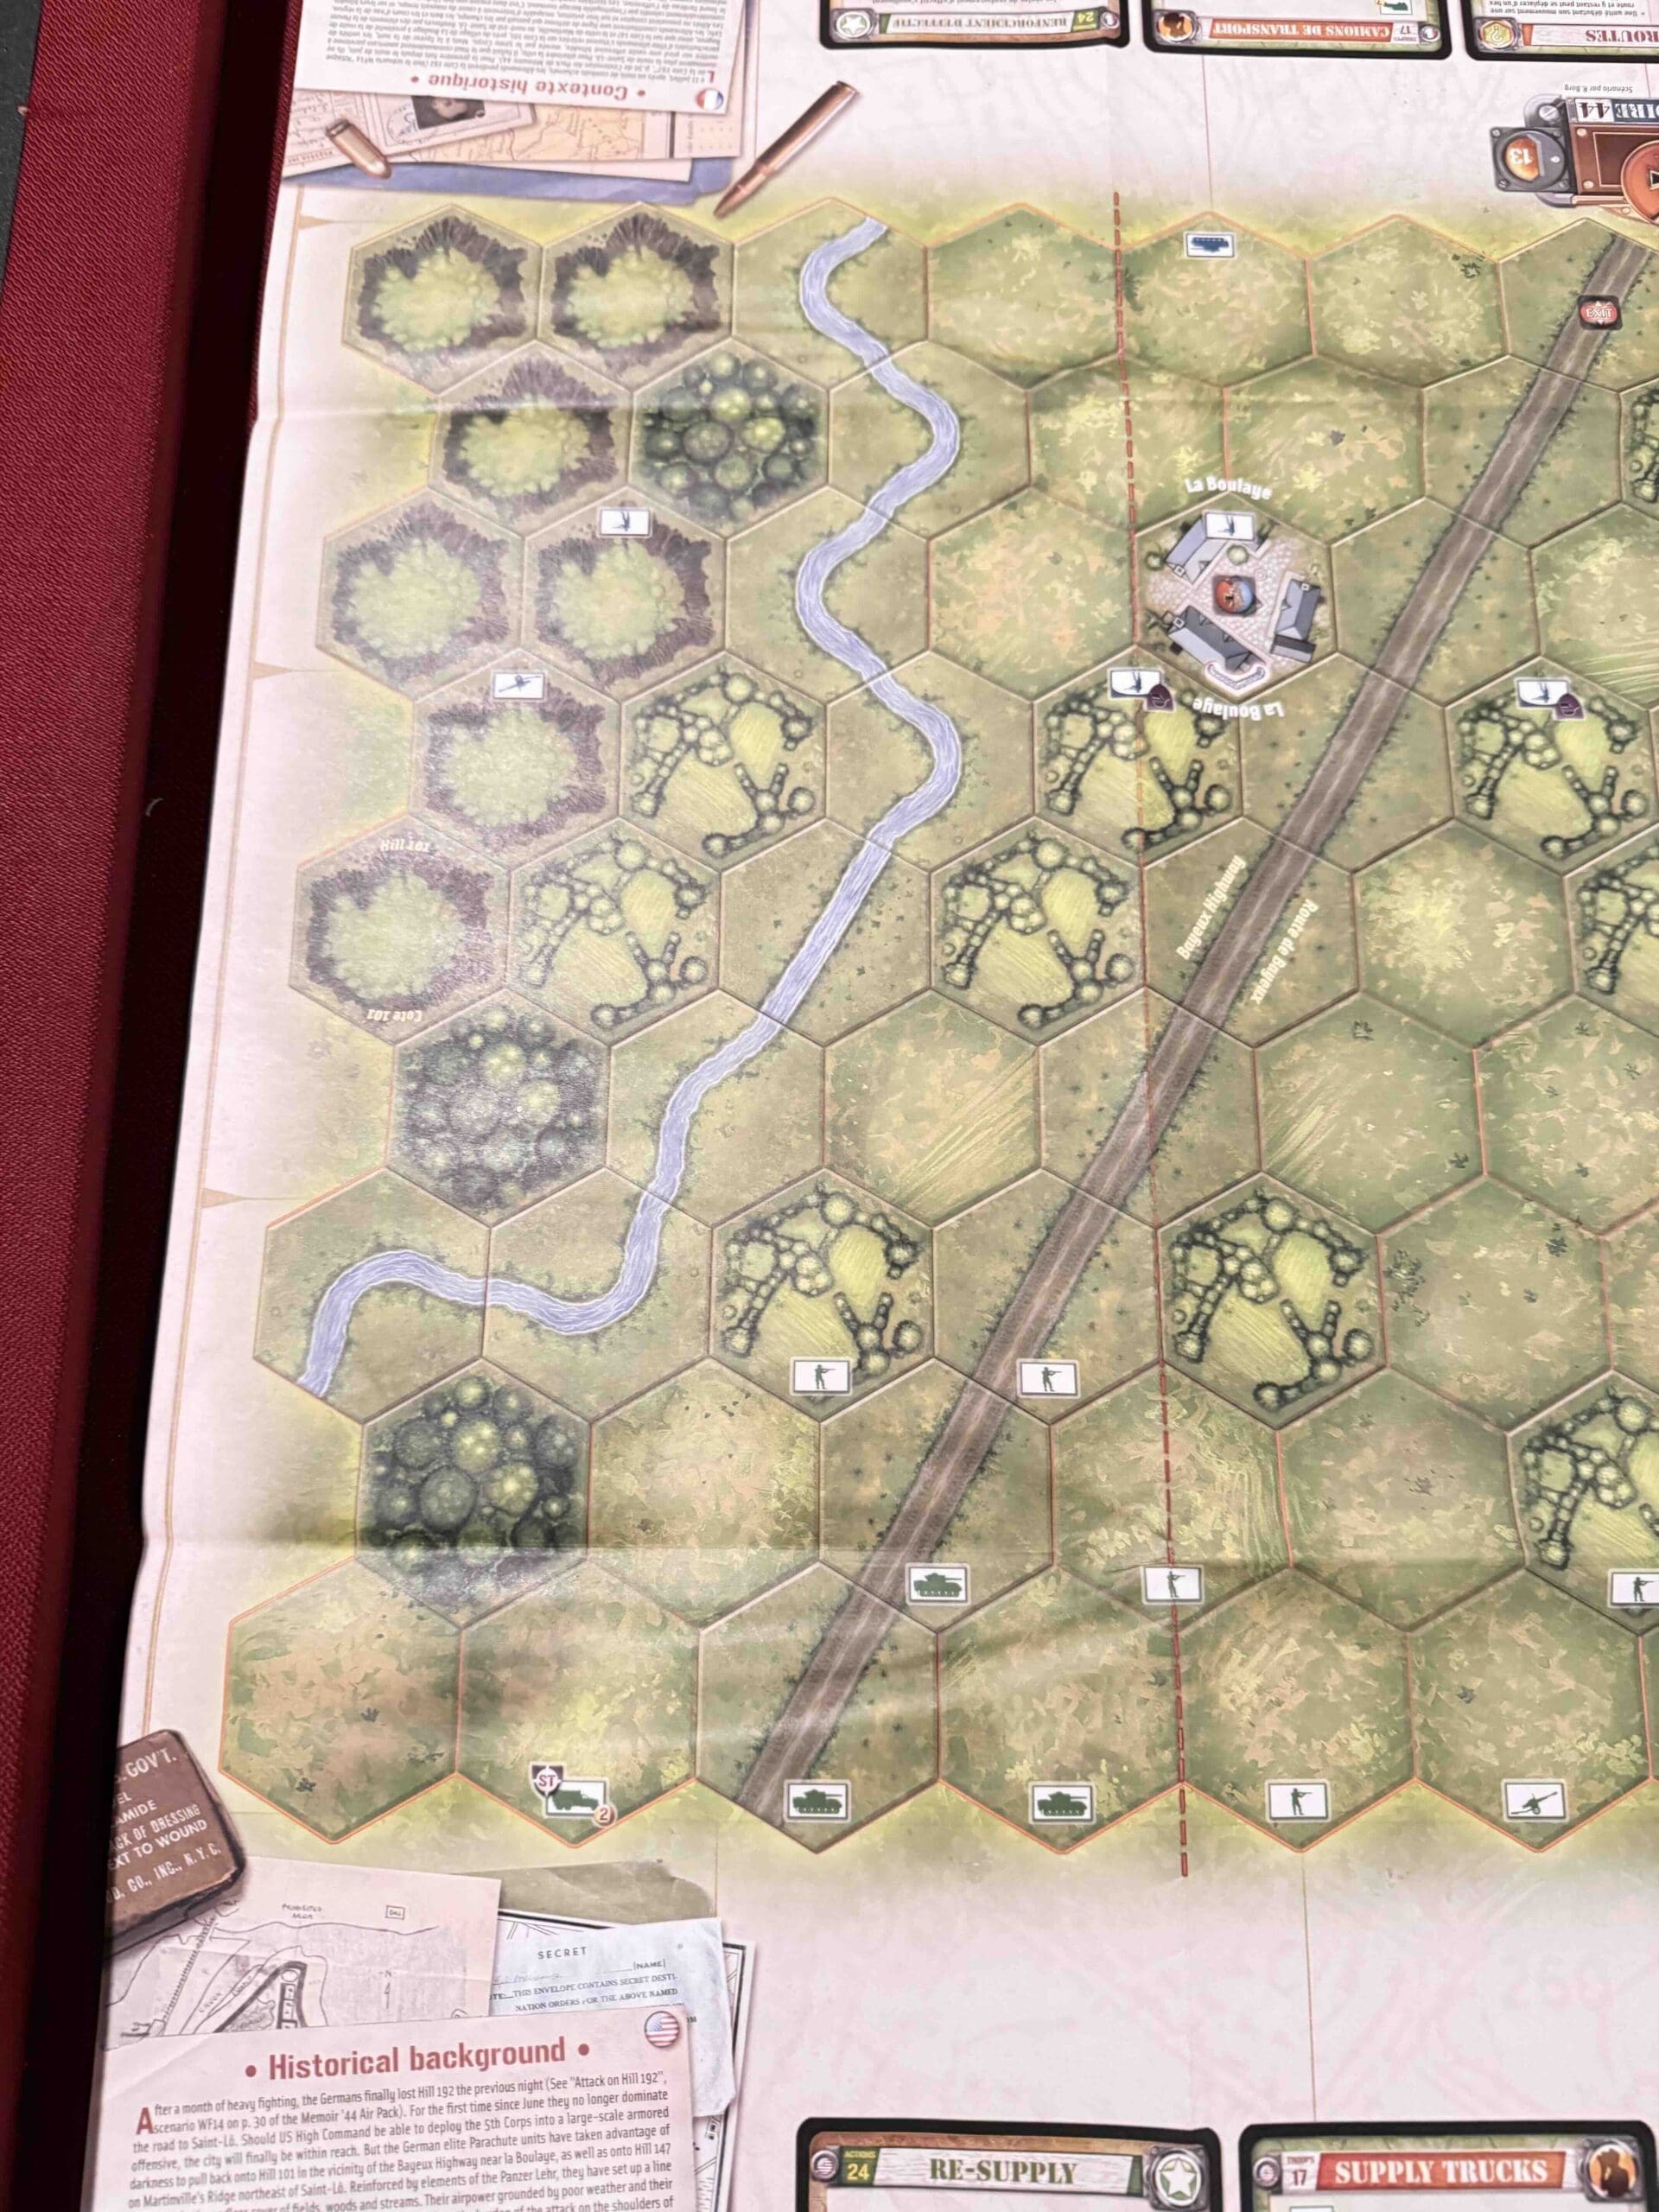
Hedgerow Hell

Hedgerow Hell

Hedgerow Hell

Here’s a brief summary of the Battle of Hedgerow Hell in July 1944:

  • When & Where:
    July 1944, in the dense hedgerow country of Normandy, France.

  • Context:
    After the D-Day landings, U.S. forces faced stiff German resistance in the bocage (hedgerow) terrain, which made attacks and movements extremely difficult.

  • The Battle:
    Fighting was slow and brutal—close-quarters combat with tanks and infantry often forced to blast through thick hedgerows. German forces used the terrain to launch ambushes and hold up the American advance.

  • Outcome:
    Despite the difficulties, American troops adapted with new tactics and overcame German defenses, breaking out of the hedgerows and paving the way for the later launch of Operation Cobra.

Here is General Howitzer’s comments on it:

“Listen up, men! July ‘44 in Normandy—the damn hedgerows were like fighting in a jungle made of dirt and stone, and the Germans knew every inch of it. We called it Hedgerow Hell, and that’s exactly what it was.

We started on July 1st, smashing forward, inch by inch, day by day. Those Germans were dug in like ticks, every hedgerow a fortress, every field a killing ground. But our boys didn’t back down—they learned to blow holes in those hedgerows with explosives, and we turned those obstacles into stepping stones.

Week by week, we kept at it—infantry, tanks, engineers working together, and by the end of July, we’d beaten the bastards back. We learned to fight smarter, and we learned to hit ‘em so hard they couldn’t catch their breath.

July 25th—Operation Cobra—that was the payoff, boys! We broke out of that green hell and took the fight back to where they didn’t have those hedgerows to hide in.

So remember this—no matter how tough the terrain or how deep the enemy’s dug in, we keep pushing, keep killing, and never let the bastards stop us!”

13 VP’s

card

Card Balance:

Allies – 8

Axis – 10

Complexity:

5

Conditions:

Countryside

countryside

Context:

Historical

Location:

Normandy, France

Year:

1944

Theater:

Western

Campaign:

Normandy

Codename:

Summary:

Objectives:

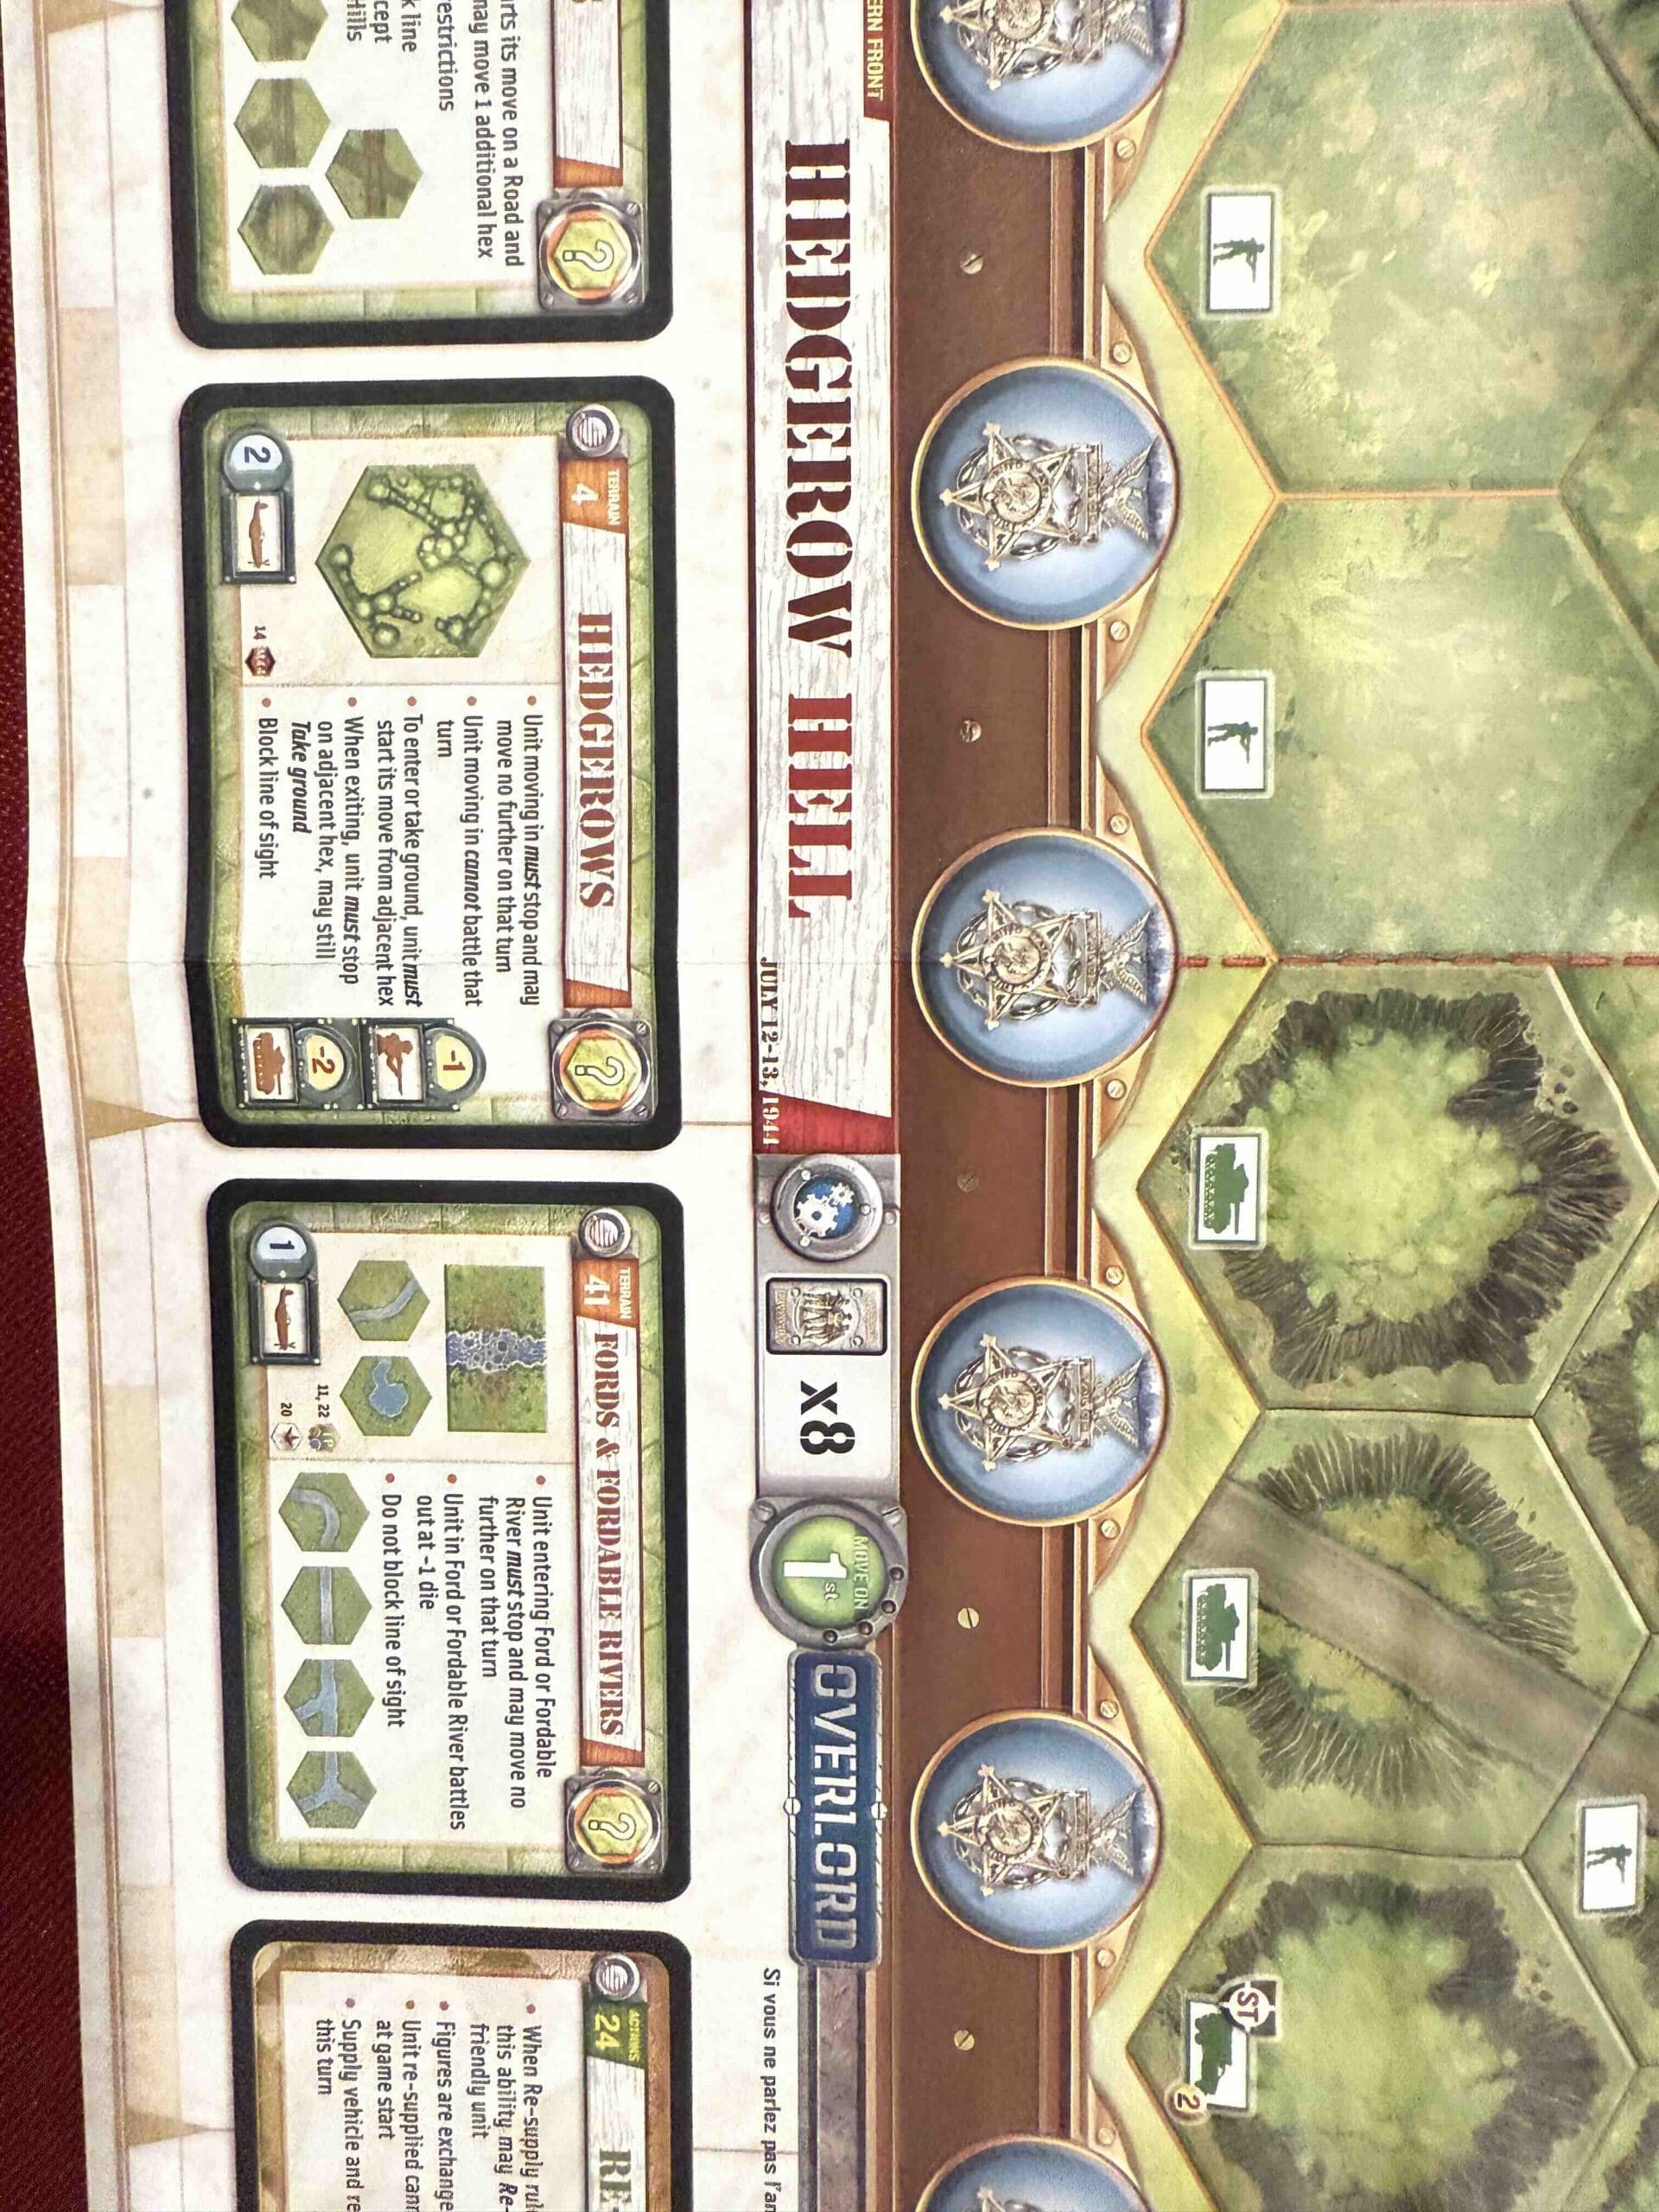
13 VP’s, plus Territorial Objective Medals for each side, and Exit hexes for the Allies.

Battlefield:

Countryside with rivers, roads, hills, and many hedgerows.

Troops:

Allies – 21 Infantry, 8 Armor and some Trucks, 3 Artillery

Axis – 14 Infantry, 5 Armor, 4 Artillery


medal allies

Allied Strategy:

1.

medal axis

Axis Strategy

1. 

Battle Reports

Author:

Days of Wonder

Place Battle Reports on a scenario page, or specify its scenario name in the shortcode.

Secret Link