General Howitzer’s Field Guide to Memoir 44

A Memoir 44 Strategy & Tactics Community

GENERAL HOWITZER

Scenarios

Explore Memoir ’44 battlefields, maps, and player statistics.

GENERAL HOWITZER

Campaigns

Relive historic campaigns through linked Memoir ’44 battles.

GENERAL HOWITZER

Strategy Tips

Sharpen your tactics and take command of the battlefield.

GENERAL HOWITZER

Field Manuals

Explore field guides and manuals for your next battle.

GENERAL HOWITZER

Tournaments

Find Memoir ’44 tournaments, events, and fellow commanders.

GENERAL HOWITZER

My War Room

Track your battles, campaigns, achievements, and next mission.

Sword Beach (Breakthrough)

Sword Beach (Breakthrough)

Sword Beach [Breakthrough]

Sword Beach

The Battle of Sword Beach took place on June 6, 1944 (D-Day) — the easternmost of the five Allied landing beaches during the Normandy invasion. It was assigned primarily to British forces, with support from Free French commandos, as part of Operation Overlord.

By nightfall on June 6, the Allies had:

  • Landed over 28,000 troops

  • Secured a beachhead about 5 miles deep

  • Linked up with Canadian forces from Juno Beach

  • Held their positions despite German counterattacks

Listen up, men — Sword Beach wasn’t just another patch of sand; it was the gateway to Caen and the key to cracking open Hitler’s Atlantic Wall on the eastern flank. At dawn on June 6th, the British 3rd Infantry hit that beach under a storm of lead and steel. Mines, wire, and concrete — it didn’t matter. They went straight through it, methodical as a tank rolling downhill.

While naval guns thundered from offshore, the Royal Engineers cleared obstacles like veterans of a hundred storms. And those Free French commandos — they fought like lions, linking up with the boys from Pegasus Bridge to lock down the flank before Jerry could regroup.

The Germans tried to hit back with their 21st Panzer Division, and for a moment, they even reached the coast — but our airmen and artillery smashed them flat. By nightfall, the British held Sword, linked up with the Canadians at Juno, and built a bridgehead five miles deep.

Caen didn’t fall that day — but Sword showed the world how an army fights when it’s trained, disciplined, and led with purpose. That’s how you take a beach — with steel in your hands and fire in your gut.

~~ General Howitzer

VP’s

12

card

Card Balance:

Allies – 6

Axis – 4

Complexity:

4

Conditions:

Beach

Context:

Historical

Location:

Normandy

Year:

1944

Codename:

Operation Overlord

Summary:

12 Victory Points:

12 Medals, including Permanent Medal Objectives for Allied control of Casino Riva Bella, Strong-point Cod, and Strong-point Trout.   Also a 2-Medal Temporary Objective for which ever side controls the Orne River and Canal.  Finally,  massive 3-Medal Temporary Objective for whomever controls the two Hexes representing Caen. Initially the Axis player gets these three medals at game start. 

Terrain:

Countryside and Beach

Troops:

Allies – 8 Infantry including 3 Elites, 5 Armor, 2 Artillery

Axis – 10 Infantry, 3 Armor, 2 Artillery

medal allies

Allies:

Big Picture Strategy:  Like all beach scenarios, the number one primary goal for your forces is to Get Off the Beach!.  Do not pause to capture the three frontline enemy medals.  You can encircle them and then attack from all sides.

1.  Once you have gotten your forces out of the water, then you can encircle the enemy at the three Permanent Medal Objectives at Casino Riva Bella, Strong-point Trout and the Chateau.  Those medals are almost a given, so do not lose an excessive number of forces attacking them before you are out of the water. 

3.  Get your Artillery out of the water as soon as possible. They will be vital to breaking through the strongholds of the enemy on the beach. It will be especially important to take out the Artillery in the bunker as soon as possible, or it will destroy your forces.

medal axis

Axis:

Big Picture Strategy: Get your forces forward. Bring the battle to them.

1. You have Armor stuck in your lower left flank which you need to get forward to the beach as quickly as possible. Practice some delaying techniques for a couple of turns to allow your Armor forward. You will be in a much better position to repel the enemy forces.

2.  Two approaches to deal with the enemy forces in your lower right flank:

Option A: Eliminate the enemy forces on your lower right flank along the Canel de Orne as quickly as possible so that you will not have to worry about a rear-action attack. Then you can move your forces forward towards the beach.

Option B:  Surround them and slowly pick them off throughout the game, saving the coup-de-grace for the end, when you can kill off the final Infantry for one Medal, and then move onto the bridge for two Medals.  This will earn you three! medals in a single turn. Save it for last to win the round.

Author: Days of Wonder

URL

Place Battle Reports on a scenario page, or specify its scenario name in the shortcode.

The Tatsinskaya Raid

The Tatsinskaya Raid

The Tatsinskaya Raid

scenario_ColdStream_start

By late December ’42, Paulus’ 6th Army was choking inside the Stalingrad pocket, and the Soviets slammed the door tighter with Operation Little Saturn. They tore through the Italian 8th Army like paper, and Badanov’s 24th Tank Corps drove a steel fist 150 miles deep into German lines. His T-34s rolled right onto Tatsinskaya airfield, smashing up Junkers 52s that were the lifeline to Stalingrad.

The Germans scrambled the 11th Panzer and 306th Infantry to hit back, and they hit hard. Badanov’s tanks took a pounding, but he held that airfield for four bloody days before clawing his way back to his own lines. The cost was high, but the result was clear: the German relief effort was crippled, Stalingrad was left to rot, and the mighty Wehrmacht had been dealt another hammer blow on the Eastern Front.

~~ General Howitzer

VP’s

10 including the Airport Permanent Objective Medal

card

Card Balance:

Allies – 4

Axis – 5

Complexity:

4

Conditions:

Winter

winter

Context:

Historical

Location:

Russia

Year:

1942

Codename:

Operation Little Saturn

Summary:

Victory Points:

10 Medals, including the airport Permanent Medal Objective

Terrain:

Winter terrain

Troops:

Allies – Infantry, Armor, Artillery

Axis – Infantry, Armor, Artillery

medal allies

Allies:

1. Your forces have a massive armor advantage over the Axis in this raid scenario.  You need to coordinate your efforts and arrive at the frontlines of battle together.

2.  Your very first challenge is to deal with the Artillery and Infantry hidden in the forest right in the front center of the battle field. Until you deal with them, they will hamper all of your attack efforts.

3. If you can deal with the Artillery quickly, before the Axis bring down their other units, you can gain a couple of medals very quickly, as that Artillery is the key defensive point on this end of the battlefield. But if you do not have the cards and forces to take it out quickly, you will destroy several units during the attack.  [Athafil, Italy]

4.  The airport is a Permanent Medal Objective. You don’t need to stay on the hex, so you can just grab it and then leave to a more defensive position.

medal axis

Axis:

1.  This is primarily a defensive scenario for the Axis. You need to engage the enemy, but if you attempt to battle the massive armor forces out in the open, your forces will get decimated.

2.  Your forces are stuck behind the forests. You need to get them, especially the armor, forward as quickly as possible to support your advance forces which are defending the airport.

3.  The airport is a Permanent Medal Objective for the enemy.  Hold it as long as you can. Make them pay for it with a lot of units.

4.  Your Artillery in the center frontline is your strongest asset. Use it at every opportunity.  

5.  You have many assets stuck in the forests and marches in the back. Get them out as quickly as possible and forward to provide additional attack strength and support with your forward Artillery.

6.  Note that most of your troops in the woods begin the battle in Camouflage mode, where they can only be attacked in Close Assault. However, if they move or attack, you lose your Camouflage.

Author: Jdrommel

URL

Place Battle Reports on a scenario page, or specify its scenario name in the shortcode.

Coldstream Hill

Coldstream Hill

Coldstream Hill

scenario_ColdStream_start

Hill 309 in Normandy wasn’t just another patch of dirt—it became Coldstream Hill because the 4th Battalion, Coldstream Guards, stormed it on July 30, 1944, and planted their flag in blood and steel. This was part of Operation Bluecoat—launched while the Germans were shuffling their tanks west to plug the hole blasted open by the Americans in Operation Cobra.

Make no mistake—this wasn’t some grand “battle” on its own, but a vicious, close-quarters fight inside the bigger Normandy campaign. Grabbing that hill gave the British a grip on key ground in the bocage, helped stabilize the line, and reminded the Germans that every inch of France would be paid for with their retreat. Coldstream Hill stood as proof that the Guards didn’t just hold tradition—they made history under fire.

~~ General Howitzer

VP’s

12

card

Card Balance:

Allies – 6

Axis – 5

Complexity:

3

Conditions:

Countryside

countryside

Context:

Historical

Location:

France

Year:

1944

Codename:

Operation Bluecoat

Summary:

Victory Points:

12 Medals, including Hills 226 & 309 as Temporary Medal Objectives.

Terrain:

Open terrain with a few hills and towns

Troops:

Allies – 10 Infantry, 8 Armor, 2 Artillery including 1 Mobile

Axis – 10 Infantry, 3 Armor, 2 Artillery including 1 Mobile

Special Rules: 

1. Allies have 2 Engineer units and 1 Mobile Artillery.

2.  Allies have 1 Crocodile flamethrower tank, which rolls one extra dice in close assault.

3. Air rules are optional.

4.  Axis lays out the mines.

medal allies

Allies:

1.  Big picture strategy: You need to get your troops untangle, uncluttered, and mobilized before the Axis show up.  They have a few advance troops you will have to deal with as you mobilize your troops.

2.  Get your engineers into action so that they can clear those mines which are blocking your troops from getting out. 

3.  You have a Mobile Artillery on your right section.  Get the mines removed and start moving it forward to advance the attack.

4.  You also have a standard Artillery at D2.  You will need to get the mines on the third row cleared out so that you can also move it forward.

medal axis

Axis:

1.  Big picture strategy:  You need to do two things at once; get your forces down the battlefield as quickly as you can, and also use your advance forces to attack, harass, and slow down the enemy’s advancement.

2.  Your Artillery are absolutely decisive in this scenario. It is a large battlefield, so get them well-placed and then blow the enemy to smithereens!

3.  Attack vector – Get your Armor, which is way at the back of your right flank, as quickly as possible to the front, while the enemy Allied forces are still bunched up against the back border.

Author: Ddrommel

URL

Place Battle Reports on a scenario page, or specify its scenario name in the shortcode.

Battle of Abbeville

Battle of Abbeville

Battle of Abbeville

Battle of Abbeville

The Battle of Abbeville was a hard-hitting brawl that showed just how unprepared we were for the kind of fast, mechanized war the Germans were waging. After their lightning dash to the Channel, the Germans dug in around Abbeville, threatening to cut off our northern forces. The French, led in part by de Gaulle and his 4e Division Cuirassée, threw in the big boys—those heavy Char B1 bis tanks and Hotchkiss H35s and H39s. The Brits rolled up with Matilda I and II tanks, tough as hell but slower than molasses in January.

We launched a series of assaults to punch the Germans off those Somme bridgeheads, but coordination was lousy, the terrain was brutal, and too many tanks broke down before they even fired a shot. The enemy wasn’t sitting on their hands either—they had Panzer IIIs and IVs guarding the line, with light Panzers filling in the gaps and 88mm Flak guns ripping through anything we sent their way.

Despite brave pushes and a few local breakthroughs, we couldn’t dislodge them. The Germans held the high ground, held the bridges, and held the initiative. That failure didn’t just cost us a patch of land—it helped seal France’s fate. The Germans kept their corridor, tightened the noose, and by the end of June, France was on her knees.

Abbeville wasn’t the biggest battle, but it damn sure mattered. It reminded us that guts alone wouldn’t win this war—we needed better gear, tighter coordination, and leaders ready to move fast and hit hard.

~~ General Howitzer

10 VP’s

Card Balance:

Allies – 6

Axis – 6

Complexity:

4

Conditions:

Countryside

Context:

Historical

Location:

France

Year:

1940

Theater:

Western

Campaign:

Codename:

Summary:

Objectives:

10 VP’s, including two Temporary Objective Medals for the Allies at E13, and E17.

Battlefield:

A countryside with a stretch of river across one end.

Troops:

Allies – 10 Infantry, 3 Artillery

Axis – 10 Infantry, 6 Armor, 2 Artillery


Special Rules:

1.  Blitz Rules are in effect.

2.  The Somme River is impassable except via bridges.

3.  The Axis Artillery at E17 is a Flak88.  It moves 0-1, or battles at 2,2,2,2; hits Armor on Stars; must have line of sight.

4.  The French have two Elite Infantry, which can move 2, and still battle.

medal allies

🔥 Winning as Allies

1.  Big Picture Strategy: You have 5 Armor to the enemy’s none, but they have three well-entrenched Artillery, which give them a strong defensive advantage.  You will have to bring your two Artillery forward to provide some balance; at the same time, using your Armor to attack their many Infantry and keep them back as you move your Artillery into range.

2.  Concentrate your forces and just pick off each forward enemy infantry unit, section by section, as you move your forces forward together.

medal axis

🔥 Winning as Axis

1.  Big Picture Strategy: Consolidate your forces and remain in a defensive stance.  You have an Artillery advantage. Use it.

2.  Your forces are spread out and unable to defend each other. If you have the opportunity, you may want to pull back your forward units, and attempt to form some sort of a defensive line.

3.  To win this scenario, your Axis forces will need to perform delaying actions, and a strategic retreat.  Fight with your forward forces as long as you can, but when it becomes a potential loss, then pull back, and move them into defensive positions.  

4.  Your Artillery are essential to win this battle. Move your unit on row 16 forward to the central hills. You may want to pull back your unit on row 10 back to one of the defensive positions in row 13, so that it cannot be surrounded and eliminated by the enemy. 

5.  You will lose a lot of forces as you perform your strategic retreat, but as the enemy gets closer to your hills and artillery, they will begin to pay dearly for each unit advanced against your forces.  

Author:

Jdrommel

Place Battle Reports on a scenario page, or specify its scenario name in the shortcode.

Operation Crusader

Operation Crusader

Operation Crusader

“Listen up, men! In November ‘41, the British Eighth Army—under the command of General Auchinleck—thundered across the sands of the Marmaric Desert like a damn hurricane, aimed straight at those Italian-German armored divisions. Cunningham’s boys rolled out with 700 tanks, ready to grind the Germans and their Italian buddies into the dirt and lift the siege at Tobruk.

For three weeks, it was a seesaw slugfest around Sidi Rezegh, with that garrison at Tobruk busting out to join the main show. The German Panzergruppe fought like devils, but they were no match for the sheer weight of British armor and artillery.

Rommel might have been a cagey fox, but even he had to admit defeat when he saw the Eight Army rolling over his battered panzers. He ordered the survivors to pull back to Gazala, leaving Tobruk free and the British in charge of the field. That’s what happens when you bring overwhelming firepower to a knife fight, boys—you don’t just win, you drive the enemy clean out of the desert!”

~~ General Howitzer

12 VP’s

Card Balance:

Allies – 6

Axis – 6

Complexity:

4

Conditions:

Desert

Context:

Historical

Location:

Libya

Year:

1941

Theater:

Mediterranean

Campaign:

Tobruk Breakout

Codename:

Operation Crusader

Summary:

Objectives:

12 VP’s, plus a Territorial Objective Medal for the Axis.

Battlefield:

Desert with a ridge of hills in the center of the battlefield.

Troops:

Allies  – 10 Infantry, 8 Armor, 3 Artillery (Big Guns and Mobile)

Axis  – 10 Infantry, 5 Armor, 3 Artillery (including a Flak88 and a Big Gun)

Special Rules:

1.  The German Medal in the Campaign Headquarters on the Allied baseline [F1] is a Permanent Medal Objective for the Axis player.

2.  Oasis Recovery rules are in effect at Bir el Chleta, Bir el Gobi and Gabr Saleh, and each sides HQ tent.

3.  The Allied player lays out the minefields around Tobruk and the Axis player everywhere else.

4.  The Axis Artillery at L3 is a Flak 88, and hits at 2,2,2,2.  It must have line of site, and can ignore terrain protections. 

medal allies

🔥 Winning as Allies

1.  Make use of your Tobruk forces and especially the Artillery as much as possible.

2.  You have a massive force gathered together in the center section.  You will need to peel off a few to deal with the isolated Axis forces at hex 6 and 7 on your right section, and the rest towards the Axis forces on the other side.

Overall Strategy

1.  Both sides have to make immediate decisions on overall strategy. Do the Allies move straight for Tobrouk, or the Axis main force, or do they clean up the battlefield from A to M as they go?  [~Admiral Frigate] 

2.  There are four Oasis hexes; two primarily in Allied territory and two mainly in the Axis territory.  This is a long scenario, so take the opportunity to restore your units back to strength. 

3.  ADVICE FROM JDROMMEL, THE CREATOR OF THIS SCENARIO:

  • About Crusader, the best way, if possible, is an attack in force and continue for the British side on any section (Bir el Gobi, or Halfaya or in the center).
  • For the Axis side, the best is to resist first and then counter-attack with Afrika-Korps units.

medal axis

🔥 Winning as Axis

1.  If you can surround and wipe out the forces at Tobrouk quickly, then your forces can swing around and assist your brothers at arms further north.

2.  Your Big Gun at I15 is in range to attack the units in Tobruk.  Once you get one hit, your permanent targeting reticule will give you one extra dice roll for that hex.  Through the course of a long game, you can earn one or two medals this way if you faithfully fire it at every opportunity given.

3.  You have a Mobile Artillery, keep moving it forward at every opportunity. You can make for the hills to your right. It will serve you well against the mass of Allied forces headed your way.

Author: Jdrommel

Link:

Place Battle Reports on a scenario page, or specify its scenario name in the shortcode.

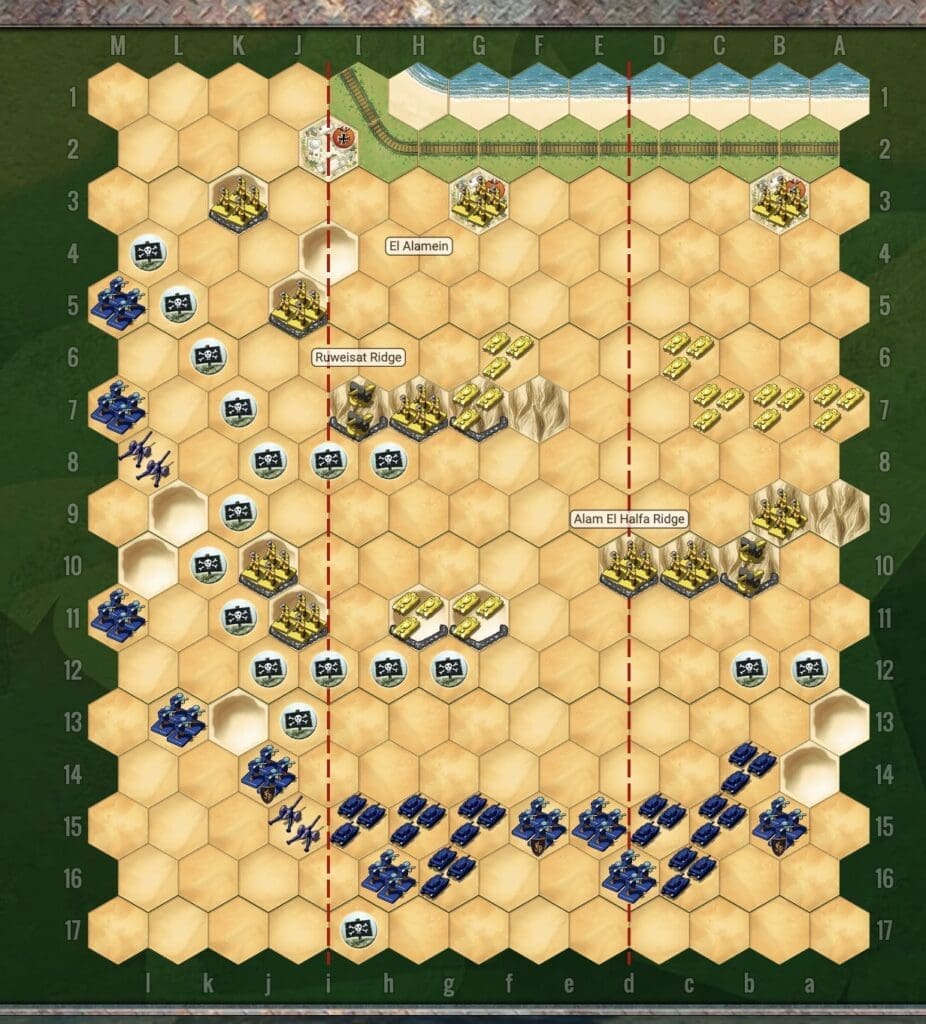
Battle of Alam el Halfa

Battle of Alam el Halfa

Battle of Alam el Halfa

Memoir 44

Aug 29 – Sep 6, 1942

Alam el Halfa was Rommel’s last real chance to win the desert war and grab Egypt, and he knew it. His numbers were thinning, his supplies were running dry, and time was about to turn against him. So he did what gamblers always do when the clock is running out—he rolled the dice one more time and tried the same wide flanking punch he’d used at Gazala.

But this time, the British weren’t blind. ULTRA told them exactly what was coming, and Montgomery finally did something smart: he stopped chasing glory and prepared to fight on ground of his choosing. He planted his forces on the Alam el Halfa and Ruweisat ridges, dug tanks into the sand like steel bunkers, and told Rommel, “Come get it.”

This wasn’t a battle of fancy maneuvers—it was a battle of discipline. Rommel charged in from the south and smashed straight into prepared defenses, air power, and fuel shortages he couldn’t overcome. His attack burned itself out, and with it went his last hope of victory in North Africa.

The lines are drawn, the enemy is committed, and now it’s your fight. Hold the ground, let the enemy break himself, and remember this: when the enemy makes his last move, you make sure it’s his last mistake.

~~ General Howitzer

VP’s

8

card

Card Balance:

Allies – 6

Axis – 6

Complexity:

3

Conditions:

Desert

Context:

Historical

Location:

North Africa

Year:

1942

Summary:

8 Victory Points:

8 Medals, including three Permanent Medal Objectives for Axis control of three town hexes.

Terrain:

Desert with some ridges and a railroad track.

Troops:

Allies – 7 Infantry, 8 Armor, 2 Artillery

Axis – 10 Infantry, 8 Armor, 2 Artillery

Special Rules:
1.  North African Desert Rules – for tank movement

2.  British Commonwealth Rules  – Stiff Upper Lip for fighting back

3.  No Airpower

4.  Allied player lays out the Mines

medal allies

Allies:

1.  Watch your right flank!  Historically, this is where Rommel attacked. The Axis have you out-numbered in this flank.  This is their path to get to the Permanent Medals you are defending besides the railroad tracks.

2.  You have 8 Armor to match the Axis’ 8 Armor.  Yours are in a bit of disarray.  Bring the Armor back in your left flank forward as quickly as you can and establish a line along row 10 to supplement your Infantry and Armor up on the dunes.  That will be a powerful block to any enemy advances. 

medal axis

Axis:

1. Big Picture Plan – In two of the three flanks, the British either evenly match you, or outnumber you.  And they are solidly in place up on Alam El Halfa Ridge, with Artillery on top and many armor units behind. 

So you need to engage the enemy carefully – to keep them busy, while you push your forces up the left flank, and attempt to gain the Permanent Medals along the railroad tracks.  

Author: Days of Wonder

URL

Place Battle Reports on a scenario page, or specify its scenario name in the shortcode.

Secret Link