Gates of Moscow (Typhoon)

Gates of Moscow (Typhoon)

scenario_GatesMoscow_start

Operation Typhoon was the German military campaign to capture Moscow during World War II, launched in early October 1941 as part of their broader invasion of the Soviet Union (Operation Barbarossa). The offensive aimed to deliver a decisive blow by taking the Soviet capital before winter set in.

German forces, under Field Marshal Fedor von Bock, advanced with two large army groups and made initial gains, encircling and destroying significant Soviet forces. However, stiff Soviet resistance, logistical challenges, and worsening weather slowed the German advance. Muddy conditions in October, followed by the onset of harsh winter, further hampered their progress.

By December ’41, the Germans thought they had Moscow in their grip—but Zhukov and his Siberian wolves had other plans. Hardened for winter, those Red Army troops stormed forward in a counteroffensive that drove the Wehrmacht off the city’s doorstep. It was the first time Hitler’s war machine got its teeth kicked in, proof that Blitzkrieg had limits when it slammed into a determined foe with steel in its spine and snow in its veins.

~~ General Howitzer

7 VP’s

Card Balance:

Allies – 5

Axis – 5

Complexity: 

4

Conditions:

Urban

Location:

Russia

Year:

1941

Theater:

Eastern Front

Campaign:

Barbarossa

Codename:

Operation Typoon

Summary:

The Gates of Moscow is a complex scenario which results in a brutal battle with many digital ‘casualties’ on both sides.

Objectives:

7 VP’s, including two Objective Medals for Axis
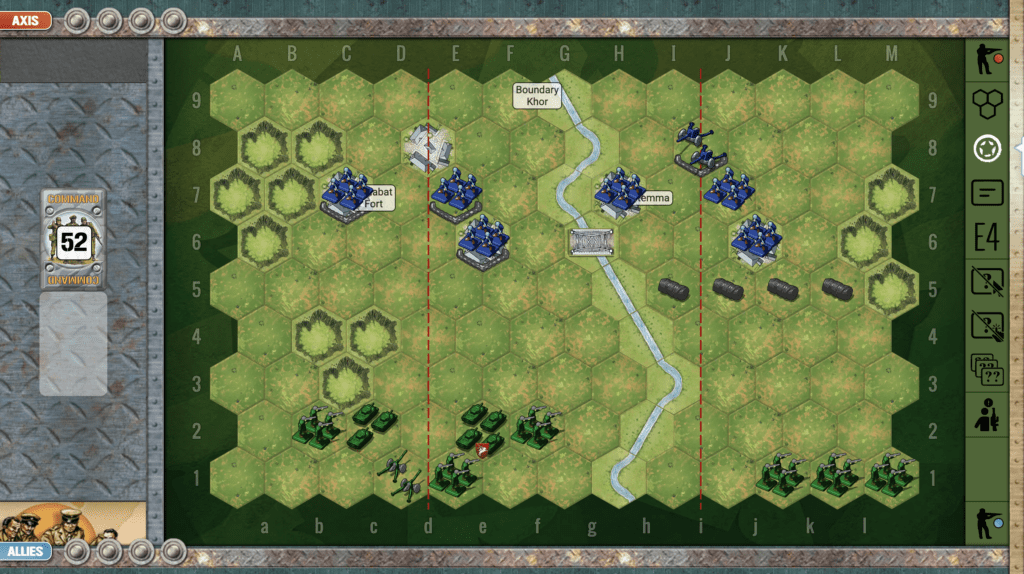
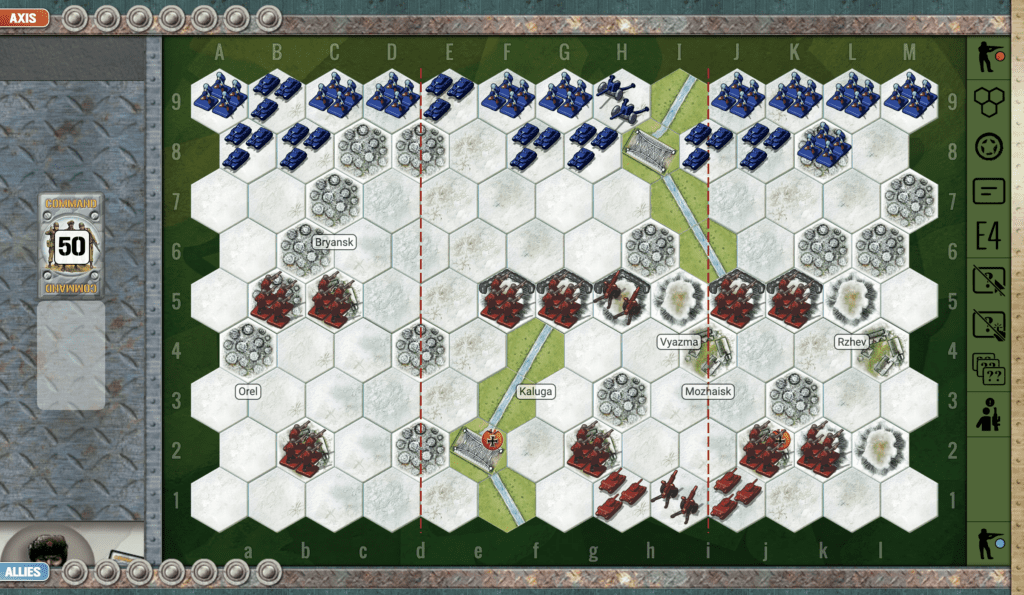
Terrain:

Frozen field with Kaluga river cutting vertically and a ridge of hills cutting across horizontally.

Troops:

Allies – 10 Infantry, 2 Armo, 2 Artillery

Axis – 10 Infantry, 8 Armor, 1 Artillery

🔥 Winning as Allies

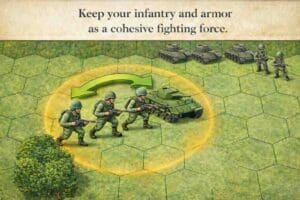
1. Big picture strategy for the Allies. This is a defensive scenario, so stay behind your sandbags and defend the two medal objectives.  Move your Artillery and Armor forward into the battle.

2.  Although there is a large Axis force massed against the Allies, the Axis side starts back against the game border. Allies can use this to their advantage, by turning retreat flags into deadly kills. Target the Axis forces which have no retreat available to them. This will increase your odds of a kill by another 17%. This increases the likelihood of an armor hit from 33% to 50%, and an infantry hit from 50% to 67%.

3.  Attack Vector Left Flank:  The enemy forces are congested. If you have a good set of cards, you can move in, and clear out many of the forces, including the armor.

🔥 Winning as Axis

1.  Big picture strategy for Axis is to disperse your bunched-up troops and concentrate your forces on the front-line enemy to eliminate them as quickly as possible before they score too many hits against your forces.

2.  Keep pushing forward as you attack with the goal to eventually be to capture the bridge hex medal (often as a final decisive move to end the game).

3.  This is a long scenario of 7 medals, so you will have to take out the centrally located enemy Artillery. It is sand-bagged on a hill, but it needs to be attacked quickly.

4.  Beware of your armor trapped behind the row of trees on your right flank.  Do not try to take out the enemy infantry in the woods, because they will inflict heavy penalties on such an attempt.  Best option is to get them into the tree line and then out into the open for more fruitful attacks.


Battle Reports (percentage of Allied victories):

34%

(These are historical records. The poll on the right is new results.)

29
BR - Gates

Author:

Days of Wonder

Link:


Gallabat & Metemma

Gallabat & Metemma

The Battle of Gallabat and Metema was a significant engagement in the East African Campaign of World War II, taking place in February 1940. The battle occurred between Allied forces, primarily made up of British and Indian troops, and Italian forces in Ethiopia, near the borders of Sudan and Ethiopia.

General Howitzer summarizes:
We hit Gallabat hard in ’40, punched through and took the damn fort—looked like the start of a fine push into Italian turf. But they had the skies, and their bombers kept pounding us. With no cover from the air and stiff resistance on the ground, we had to pull back. Hell of a fight, but not every swing lands the knockout.

4 VP’s

Card Balance:

4 – 4

Complexity:

3

Conditions:

Countryside

Location:

East Africa

Year:

1940

Theater:

Mediterranean Theater

Campaign:

East Africa Campaign

Codename

Summary:

Objectives:

A short 4-medal game; no territorial medals.

Battlefield:

The Gallabat scenario has a river going down the center which seriously blocks troop movement between both sides. Therefore it is almost like two separate battles so plan your movements carefully.

Troops:

Allies 6 Infantry, 2 Armor, 1 Artillery

Axis – 6 Infantry, 1 Artillery

🔥 Winning as Allies

1. For Allies, the troops on the right section should be moved into play only when you have enough movement cards to quickly get you next to the town for attack. The wire surrounding the town will decrease your attack power, so you will need a full set of cards to continue the attack.

2. You only need 4 medals to win. There are three heavily defended Axis units on the left side. With your armor and artillery, you should be able to weaken or destroy them, leaving just one unit medal to win on your right flank.

🔥 Winning as Axis

1.  Your units are heavily defended with sandbags and town and wire protections. This should give you the time you need to assemble a collection of attack cards.

2. Your artillery is centrally-placed. If you can move it forward a bit, do it. Then use it well to take out any forces that attempt to approach your forces.

3.  Possible attack vector:  Your right flank is very weak as three Infantry units are no match for two enemy Armor, one Artillery, and three enemy Infantry. But your left flank has possibilities.  Although outnumbered three Infantry to two, if you can move your Artillery forward, and then get some good cards like Airpower or Barrage, you can weaken the three enemy Infantry.  Then you can move in and take some out.

DoW Battle Reports (percentage of Allied victories):

59%

25
BR - Gallabat

Author:

Days of Wonder

Link:


Flanking Maneuver at Bir Hakeim

Flanking Maneuver at Bir Hakeim

scenario_FlankingManeuver_start

“Now let me tell you about that flanking maneuver at Bir Hakeim—a real brawl in the North African sands back in May and June of ‘42. Rommel was out there with his Panzers, trying to outfox and outflank the whole Allied line, and he found that weak spot right at Bir Hakeim.

But the Free French, under General Leclerc, they weren’t about to roll over and die. Hell no! Those boys dug in, held their ground, and fought like hell. Rommel’s men swung around the flanks with tanks and firepower, but the French held on—courage, grit, and a lot of lead flying every which way.

When the walls closed in, those Free French didn’t surrender. They broke out—fighting their way out of that trap like men possessed, slipping through the enemy’s fingers and living to fight another day.

So here’s the lesson, boys—a good flank can break an army, but a fighting spirit can break the odds. Those Free French showed the world what it means to hold your ground and punch your way out when you’re surrounded. That’s how you do it!”

~~ General Howitzer

5 VP’s

Card Balance:

Allies – 5

Axis – 6

Complexity:

3

Conditions:

Desert

Location:

North Africa

Year:

1942

Theater:

Mediterranean Theater

Campaign

Codename

Summary:

The Axis have a superior force against the British in this scenario. But the British are defended by a series of sandbagged infantry, and another set hidden behind mines and wire rolls. The Bir Hakeim Oasis provides medical relieft and restoration to Allied troops, just like a Medics and Mechanics card. So this adds an interesting element to the game.

Objectives:
Five hexes, plus the Axis have two hexes with Medal Objectives plus a set of Exit Hexes to go for.

Battlefield:
Open desert with one three hex berm cutting an an agnel in the center section. There is also a large minefiled on the Allies right blank, laid by the Allies.

Troops:
British – 7 Infantry, 2 Armor, and 1 Artillery. British troops are guarded by sandbags and mines.
Axis – 7 Infantry, 6 Armor, and 1 Artillery

🔥 Winning as Allies

1. First moves: Your infantry behind the minefield will quickly be under attack from the enemey armor. Be prepared with a response. Also your armor is kind of out of the action at the start of the scenario, so get them up onto some berms to be prepared to attack the enemy. Recognize that you will get attacked by enemy armor, but it will be from a position of strength.

2.  Keep your infantry behind the sandbags as long as you can. They are preventing the enemy from getting access to the Exit hexes.

🔥 Winning as Axis

1. As the Axis commander it is your job to locate where you will gain the five VP’s for this scenario. Many of the Allied infantry are sandbagged up on dunes, and it will be a slow slog to pick them off with your armor. But the infantry behind the minefield is more availble. There is one in a bunker and then two unprotected. But watch out as one of those infantry units is actually an Anti-tank Gun which can hit Armor with grenades, armor, and stars on the dice roll. So you may be able to get two possibly three units from your left flank. The other two VP’s will have to come from enemy armor, two units, or one armor and one infantry perhaps.

2. If the cards warrant it, try to concentrate your forces in the center section so that you can quickly respond to needs in either flank.

3. You have an artillery; use it. If you move it foward one row, the sand-bagged infantry will be within your two-dice bombardments.

4.  There are three Exit Markers available to you.  Occasionally, with the right set of cards, a commander may be able to force one or two units out the door. But this can come at a cost as you must pass heavily entrenched enemy forces to do so.

Classic Battle Reports:

(percentage of Allied victories)

31%

31
BR - Flanking

Author:

Days of Wonder

URL

First Assault Wave (Omaha Beach)

First Assault Wave (Omaha Beach)

scenario_FirstAssaultWave_start_Axis

The invasion of Omaha Beach on June 6, 1944, was a pivotal part of the D-Day landings during World War II’s Operation Overlord. Omaha Beach, one of five landing sites in Normandy, was assaulted by U.S. forces, primarily the 1st and 29th Infantry Divisions, supported by specialized units.

Heavily fortified by German defenders from the 352nd Infantry Division, the beach presented challenging terrain with high bluffs, barbed wire, and entrenched gun emplacements. American troops faced intense machine-gun fire, artillery, and obstacles as they landed, resulting in high casualties, particularly in the initial waves.

Despite the heavy losses, small groups of soldiers managed to breach the German defenses, scaling the bluffs and neutralizing key positions. By the end of the day, the U.S. forces had secured a tenuous foothold, paving the way for the larger Allied advance into occupied France. The success at Omaha Beach, though costly, was crucial to the ultimate liberation of Europe from Nazi control.

General Howitzer’s perspective:

“Let me tell you something—Omaha Beach was no picnic. The enemy had the high ground, the machine guns, and every advantage. But our boys? They didn’t stop. Through smoke, blood, and hell itself, small squads clawed their way up those bluffs, took out key positions, and broke through the defenses.

By day’s end, we had ourselves a fragile foothold—but it was ours. And that patch of bloody sand became the launch point for the drive to liberate France and crush the enemy war machine.

So don’t ever forget—victory doesn’t come easy. It comes from courage, sacrifice, and the will to fight forward when every instinct says to drop. That’s what won Omaha. That’s what wins wars.

6 VP’s

Card Balance:

Allies – 4

Axis – 5

Complexity:

2

Conditions:

Beach

Context:

Historical

Location:

France

Year:
1944

Theater:

Western Front

Campaign:

D-Day

Codename

Summary:

True to history, this is a tough battle for the Allies to win.

Objectives:

5 VP’s including Medal Objectives

Battlefield:

Omaha Beach is well-guarded with hedgehogs, barbwire, and numerous hills to slow down the Allied advance. If they successfully make it off the beach, there are three towns at the edge of the battlefield with victory points for them.

Troops:

Allies – 10 Infantry, 3 Armor

Axis – 7 Infantry, 2 Artillery

🔥 Winning as Allies

1.  Get off the beach as quickly as possible!

2.  Keep your armor and infantry attack cohesive. They are both needed to successfuly breach the bunkers. The armor fires from a safe distance, and then when ready, the infantry moves in for the kill and take over.

memoir 44 cohesive fighting forces

3.  One of your Infantry on the right flank is a special forces which can move two hexes and still attack.  Get it up to the enemy as quickly as possible.

🔥 Winning as Axis

1.  The Axis have artillery on each flank, which gives you control over nearly every hex on the beach. Use them to good effect.

2.  There are five! town medal objectives which need to be defended for this scenario. If you can slow down the advance of the Allies, it will give time for your artillery to hit them.


Battle Reports (percentage of Allied victories):

19%

27
BR - First Assault Wave

Author:

Days of Wonder

Link:


Escape via the Coastal Road

Escape via the Coastal Road

In May of ’40, the Germans came roaring into France, and the Allies—Brits, French, and Commonwealth alike—were staring down the barrel of encirclement. So they fell back, fighting tooth and nail toward Dunkirk. One lifeline was that damned coastal road, hugging the Channel, choked with men, guns, and danger at every turn. It was no pleasure cruise—enemy fire, chaos, and desperation were the order of the day. But by God, they held on long enough for Operation Dynamo to haul over 330,000 soldiers out of the trap and back to Britain, ready to fight another day.
~~ General Howitzer

6 VP’s

Card Balance:

5 – 5

Complexity:

2

Conditions:

Desert

Location:

North Africa

Year:

1942

Theater:

Mediterranean Theater

Campaign:

Dunkirk Evacuation

Codename:

Operation Dynamo

Summary:
The Escape scenario is a race to the edge, to either escape or prevent escape. If the Allies can prevent the Axis from getting through the gaps in the escarpment, they can win easily. But if the Axis can move fast enough, and get in front of the Allied troops, they will have the time they need to bring in the rest of the armor and pound the enemy into the dust before they can escape via the Coastal Road.

Objectives:
Six VP’s, combined with the escape hexes on the edge for the Axis.

Battlefield:
Desert, divided in half by an escarpment with three gaps in it.

Troops:
Allies – 10 Infantry, 1 Armor, 1 Artillery
Axis – 6 infantry, 5 Amor

🔥 Winning as Allies

1. For Allies, it is all about providing a protected retreat. Take advantage of the easy VP’s gained by escaping out of the exit markers. The unprotected left exit will be the easiest course of action. Use your tanks to protect your escape, by holding off the Axis long enough to go. Fortunately, the Axis armor has to make it way through the escarpments. This slows down their advance and their ability to mass against the Allies. If you can block entrance through an escarpment with a combination of infantry and armor, it may provide enough tie for the rest of the troops to escape to the left.

2.  The right exit is heavily defended by sandbagged infantry, so don’t attack that unless you have overwhelming force.

🔥 Winning as Axis

1. The goal is to get through the escarpments with your armor as quickly as possible and begin attacking the escaping troops.

2. If you can get an armor unit to sit on the unguarded exit marker to block the exit to your right, you will be in a position to pound the Allied infantry into dust with the rest of your armor.

Classic Battle Reports:

(percentage of Allied victories)

52%

21
BR - Coastal

Author: 

Days of Wonder

Link: