Breakout at Klin

Breakout at Klin

  • When & Where:
    December 1941, near the town of Klin, northwest of Moscow, during the Soviet counteroffensive in the Battle of Moscow.

  • Context:
    After months of German advances toward Moscow, Soviet forces launched a major counterattack. German troops, particularly from Army Group Center, found themselves overextended and at risk of encirclement near Klin.

  • The Battle:
    Soviet forces attacked from multiple directions, threatening to trap German units in the Klin salient. The Germans, under pressure and facing severe winter conditions, conducted a fighting withdrawal, breaking out of the encirclement and retreating westward.

  • Outcome:
    The Soviet Red Army recaptured Klin, dealing a blow to German morale and momentum. The breakout marked a turning point in the Moscow campaign, with German forces now on the defensive for the first time in the war.

Lessons from General Howitzer:

“The Breakout at Klin wasn’t just a German retreat—it was the moment the Red Army showed the world it could counterpunch. And it was the first time the German war machine started to cough and stall. Learn from it, gentlemen: never overreach, never underprepare, and never, ever give your enemy a second chance to swing.

6 VP’s

Card Balance:

Allies – 3

Axis – 6

Complexity:

3

Conditions:

Winter

Location:

Russia

Year:

1941

Theater:

Eastern Front

Campaign:

Battle of Moscow

Codename

Summary:
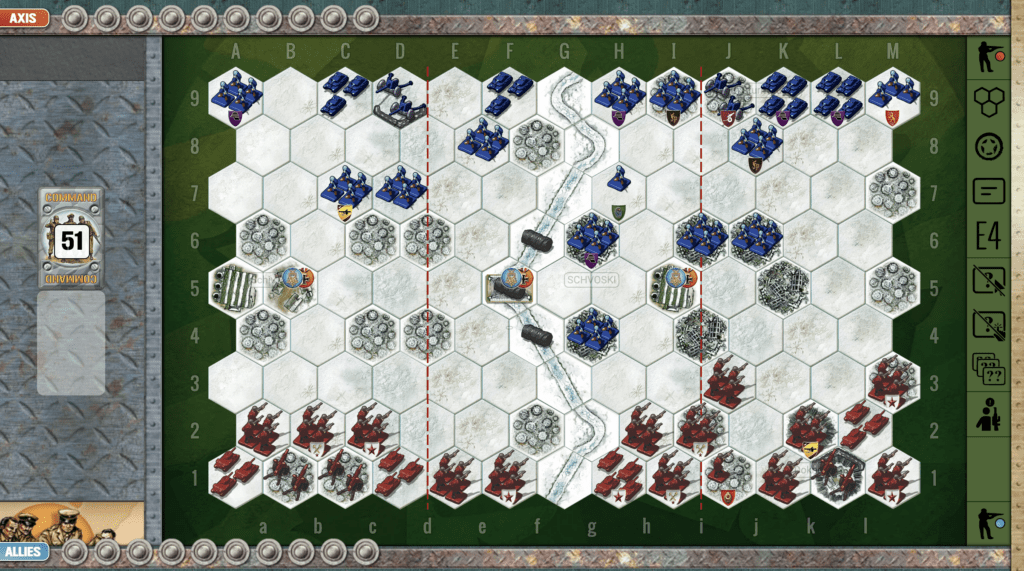
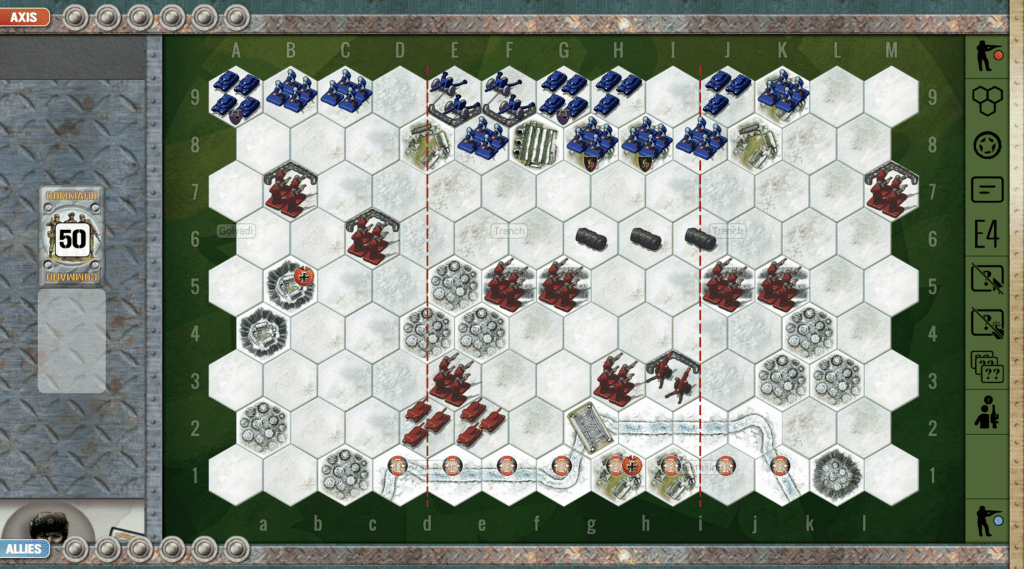
At the start, the Axis are line up mostly against the lower border, while the Russians have control of much of the board. The objective for the Axis is to either destroy the forces, or as the name implies breakout past them to the exit hexes at the top of the battlefield. If the Axis can effect rapid movement (and Blitz rules are in effect to help with this ) they can make it past the Russian troops blocking their path in excellent defensive positions, and achieve victory.

Objectives:
It is a long 6 VP game, fought at, often, close quarters, while they Axis seek two objectives, to destroy the enemy and to escape the enemy.

Battlefield:
This is a winter war with a mix of urban and countryside, making for an intersting battlefield deployment and field of play.

Troops:
The Axis –  7 infantry, 4 armor, 2 artillery.
The Russians –  9 infantry, 2 armor, 1 artillery.

Allies:

 1.  You are positioned very closely to the enemy  on your left flank, and in the center at the trenches.  Attack as much as you can before the enemy breaks out from their center section congestion.

2. You also have a well-placed center section artillery which you can use to decimate the enemy forces. Use it!

3. Your best opportunity for some significant kills is on your left flank.  You will need to get your armor up there to assist your forward infantry. But you need to do it quickly before they are wiped out by the nearby enemy.  And because of winter conditions, you can only move your armor two hex per turn, so don’t waste any time and get them moving!

Axis:

1. Axis, note that on your right flank the Russians are nearly on top of you, with a sandbagged infantry only two hexes away from your backwall, and another one three hexes away. Since you have two infantry hexes pressed against your back border, with no retreats, an early attack against you is going to result in several hits. If you can move on your right flank right away with a decisive attack, you can begin the breakout successfully.

2. The next immediate objective for the Axis forces is to get some mobility for your armored forces. Get them out from behind the town and factory hexes with which they begin the battle.

3. Note that you have two artillery units at your disposal in the center section. At the start of the battle, there are four enemy hexes within your full power two-hex attack. Use those artillery at every chance.

Class Battle Reports:

(percentage of Allied victories)

19%

20
BR - Klin

Author

URL

Braskir Offensive

Braskir Offensive

scenario_BraskirOffensive_start

Here is General Howitzer’s summary of this fictious battle:

The Braskir Offensive was a brutal winter clash between Axis and Allied forces fought amid snow-covered city ruins. The battlefield centered on three key objective territories, each representing vital control points.

The Allies began congested, bottled up in the eastern ruins, struggling to break out under heavy Axis fire. The Axis initially dominated the field, and using fortified positions to hammer any Allied advance.

Through grinding urban combat, flanking maneuvers, and coordinated assaults, the Allies sought to push past the chokepoints, seize the objectives, and turn the tide. The frozen, rubble-strewn city made every advance costly, turning the Braskir Offensive into a battle of attrition where each medal marked blood, grit, and survival.

~~ General Howitzer

VP’s

10

card

Card Balance:

Allies – 5

Axis – 4

Complexity:

4

Conditions:

Winter

winter

Context:

Fictional

Location:

The Baltics

Year:

1944

Summary:

Victory Points:

10, including some objective medals for the church, the Schiv, and the bridge.

Terrain:

There is a lot of complexity to this scenario, with city ruins, factory complexes, a navigable river, and forests. With 10 VP’s needed to win, each side must plan out a long, strategic campaign to degrade enemy forces until victory is achieved.

Troops:

Allies – 14 Infantry including 1 Sniper, 4 Armor, 3 Artillery

Axis – 13 Infantry including 1 Sniper, 4 Armor, 2 Artillery

medal allies

Allies:

1.  Your forces begin in a very congested configuration in the left and right corners. You need to get them mobile ASAP, to be prepared for the coming enemy attack.

 2.  The key to winning this battle is to soften the targets near the medal objectives, and then to position your infantry to take control of the targets in a final push. This will require you to save one card in reserve which allows for multi-sectional attacks, such as a Recon in Force, or Move Out!, or Direct from HQ.

medal axis

Axis:

1. The three Objective hexes in the center, can be quickly gained with some rapid infantry movements. Once gained the Allies will have to fight hard to take them from Axis control, resulting in many losses for them. This can start the Axis at as much as a 3 VP advantage from the first turn.

2. But do not take them too early. If you do not have the support forces around you, any advance forces that grab Objective hexes will get pummeled. This scenario is really about bringing all of your forces to bear upon your attack objectives.

16
BR - Braskir

Author.

URL

Bastogne Corridor West

Bastogne Corridor West

scenario_BastogneCorridorWest

Let me tell you something: Bastogne Corridor West was a knockout punch thrown in a snowstorm, and our boys delivered it with grit frozen to their faces.

In late December ’44, the Germans came crashing in from the west, hell-bent on slicing through the lifeline that kept Bastogne alive. They thought they could slam the door shut before the Third Army reached the paratroopers. Well, they were wrong.

Patton’s tankers, infantry, gunners, and flyboys stood their ground in the worst winter Europe had seen in years. The enemy hit hard—armor, guns, the works—but our men hit harder. Through drifts, smoke, and steel, they held that corridor like it was the spine of the whole damn war—because it was.

By beating back that counterattack, we kept Bastogne supplied, kept the line unbroken, and broke the enemy’s last real chance to split our forces. It was a turning point in the Bulge, and it proved once again: when the Allies are cornered, they don’t fold—they fight their way out.

~~ General Howitzer

6 VP’s 

including some territorial objective medals.

card

Card Balance:

5 – 5

Complexity:

3

Conditions:

Winter

winter

Location:

Belgium

Year:

1944

Theater: 

Western Front

Campaign:

Ardennes

Codename:

it was part of the larger Battle of the Bulge (German codename: Unternehmen Wacht am Rhein, or Operation Watch on the Rhine)

Summary:

This is a reverse of the Corridor East scenario. But in this scenario both forces are pressed up against their respective borders. The scattered forests in the center of the battlefield are up for grabs to whomever can get to them first.

Objectives:

6 medals including territorial medals for each side by controlling their town objectives.

Terrain:

Winter, wooded, with open plains for fun tank battles

Troops:

Allies – 8 Infantry, 7 Armor, 2 Artillery

Axis – 6 Infantry, 6 Armor, 1 Artillery

Allies:

1.  Big picture strategy for Allies is to quickly mobilize your forces before the enemy armor moves in for attack.  Get your Infantry into defensive positions in the towns of Moricy, Remagne, Lavaselle, and Sibret if you can.  This will slow the Axis attack while you mobilize your own Armor.

2. You have two Artillery.  If the enemy moves forward quickly, you can begin using them immediately. If they delay advancement, you can move your own Artillery forward one or two hexes. Air Power cards are played as Artillery Bombardment, so it will be good to have your Artillery in a forward position, should that card become available.

 3.  The Axis have the advantage of being closer to the forests. So they will be able to place their Armor in there, and blast you if you try to make a frontal assault out in the open middle section. Your best attack vector is your left flank, where your forces can move forward under the protection of the towns and forest’s on that side. 

4.  Wait them out in the center section until either they come out from the forests, or you have the cards for a massive assault.  Of course, if you can capture the forests first, that is the way to go.


Axis:

1.  Big picture strategy is to move your Infantry into the forests, and mobilize your Armor rapidly for some early hits against the enemy before they have had a chance to mobilize.

2. Because there are a lot of open spaces, and a lot of Armor, this can become very much a tank battle. So choose your section and focus of attack carefully. The center section gives your forces the most mobility.

 3.  Capture the center forest hexes. Then begin moving your artillery and your right flank forces forward to put pressure on the enemy.

4.  Keep the pressure on your left flank. If you get close enough to the town of Sibret, in the corner, near the end of the game you can grab that as your last Medal.


18
BR - Bastogne West

Author:

Days of Wonder

URL

Bastogne Corridor East

Bastogne Corridor East

scenario_BastogneCorridorEast

The Battle of Bastogne Corridor East was a crucial engagement during the Battle of the Bulge in World War II. It occurred in late December 1944 and early January 1945, focusing on the eastern approach to the besieged town of Bastogne, Belgium.

German Objective: The German army aimed to break through U.S. defenses east of Bastogne to secure critical roads and regain momentum after their advance stalled.

Allied Response: U.S. forces, including the 101st Airborne and supporting armored divisions, mounted a fierce defense despite being surrounded and outnumbered. The weather improved, allowing Allied air support to deliver supplies and conduct airstrikes.

Outcome: The Allies successfully held the eastern corridor, repelling repeated German attacks. This defense helped maintain the Allied hold on Bastogne and contributed to the eventual German retreat, marking a turning point in the Ardennes Offensive.

General Howizer has some observations on this battle:

The Germans threw everything they had at us—tanks, infantry, the works—but our boys, including the damn fine 101st Airborne and our armor, stood their ground like a stone wall. Surrounded? Outnumbered? Hell, that just meant we could shoot in every direction. Then the skies cleared, and our flyboys swooped in with supplies and bombs, giving the Germans a taste of hell from above.

We held that eastern corridor like bulldogs on a bone, smashed every attack they sent, and kept Bastogne in Allied hands. That stand didn’t just hold the line—it broke the enemy’s back and turned the tide in the Ardennes.

Memoir 44 Details

6 VP’s

Card Balance:

5 – 5

Complexity:

3

Conditions:

Winter

winter

Location:

Belgium

Year:

1944

Theater:

Western Front

Campaign:

Ardennes (Battle of the Bulge)

Context:

Historical

Strategy Summary


Objectives:

6 VP’s, including Exit Medals for the Axis forces

Terrain:

In this scenario, the Allies control two-thirds of the battlefield at the start. Because there are scattered forests across the field of play, it makes it difficult for the Axis to push them out. But they begin the round with superior forces, while the Allies are crammed into the back of one flank.

Troops:

Allies – 7 Infantry, 4 Armor, 2 Artillery

Axis – 8 Infantry, 5 Armor, 1 Infantry

Allied Strategy:

1. Big Picture Strategy:

Focus on defending villages and chokepoints, leveraging defensive terrain and slowing down Axis tanks. Keep units close to key areas like the exit markers to prevent breakthroughs.

2.  You have four armored units jammed together in the lower left flank. At least half of those will need to shift right to engage the enemy in the center section, to prevent Axis forces from escaping across the exit row.

Axis Strategy:

1. Big Picture Strategy:
Use tanks’ mobility to avoid prolonged battles in forests and villages. Concentrate forces for a decisive breakthrough toward the exit markers or to capture critical objectives like villages.

2.  Given the preponderence of the Allied armor on your right flank, this would be your weak flank. So be careful of launching an attack on that side unless you have a tremendous set of cards for it.

3. Also note that the Allied infantry at c6 is within a two dice attack of your no-retreat armor unit. So you will need to move that away quickly.

4. You have a lot of forces on your left flank. Spend a card to get them into the action in the center section when you can.

19
BR - Bastogne East

Author:

Days of Wonder

URL: