Into the Cauldron

Into the Cauldron

Scenario_IntoTheCauldron_start

Rommel’s Panzers had bloodied the British 7th Armoured, but they’d shot their bolt. The Afrikakorps was jammed into what we’d call a pressure cooker—“the Cauldron.” To the south, Bir Hakeim held firm. To thea north, Tobruk was still in enemy hands. East and north, the tattered remains of British armor blocked the way. And to the west, minefields stretched like a wall of steel.

The Brits, blind to how short the Germans were on fuel and shells, failed to strike while the iron was hot. That hesitation let Rommel dig in around the ridges of Sidi Muftah, while his Italian allies clawed through minefields under heavy fire to drag supplies forward. When the British finally counterattacked on June 5th, it was sloppy and ill-timed—broken against the German anti-tank guns. A golden chance to smash the Desert Fox had slipped right through their fingers.

~~ General Howitzer

6 VP’s

Card Balance:

Allies – 4

Axis – 5

Complexity:

3

Conditions:

Desert

Context:

Historical

Location:

North Africa

Year:

1942

Theater:

Mediterranean Theater

Campaign:

Battle of El Almein

Summary:

Objectives:

6 VP’s, plus Exit Hex Medals
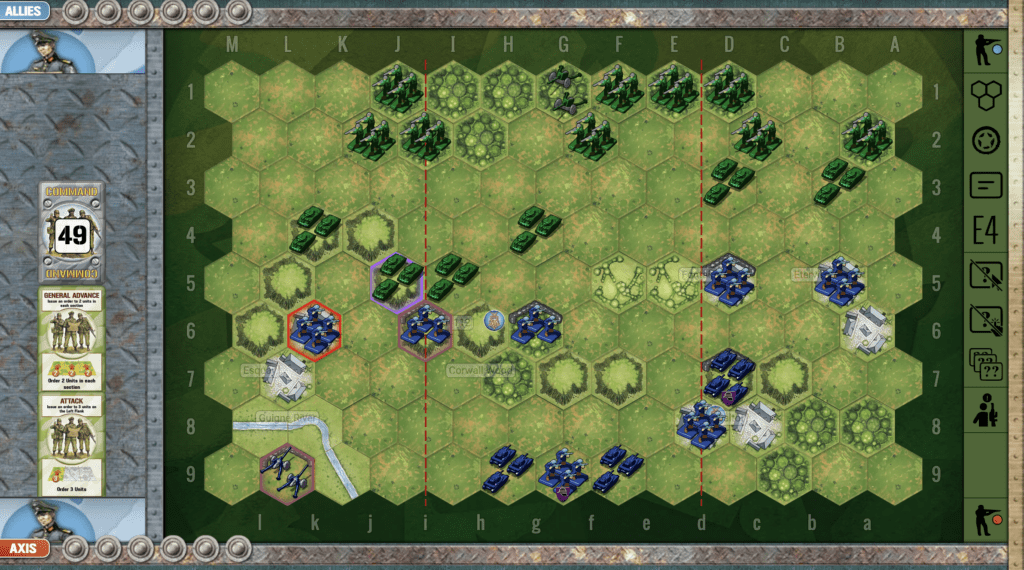
Battlefield:

This desert scenario has a series of sand dunes across the center of all three sections on which are perched sandbagged Axis troops ready for battle. The challenge for the Allies is with their greater armored forces are to force their way through to victory.

Troops:

Allies –  7 Infantry, 7 Armor

Axis – 8 Infantry, 5 Armor

Winning as Allies:

1.  The Allies have numerical superiority on the left flank, which can be exploited. Also note that the Allies have a 7 -5 advantage with armor. It is important to quickly take advantage of this superiority, as desert warfare can very quickly turn around with a few well-rolled armor attack dice.

2. Use any attack cards you get, to pull your armor forward one hex, and aim their turrets at the enemy three hexes away on the dunes. In this way, you can start to degrade the enemy attack from the dunes. With some well-rolled dice, you can attack the sandbagged infantry from a distance, and possibly score a quick VP. But be wary of the sandbagged armor units on each flank, which are well protected, and can very quickly knock out your armor units with a few attacks. Also the sandbagged anti-tank units can score against your armor with stars, thus raising the likelihood of a successful armor hit from 33% to 50% per dice roll.

3. You have two units of hexes in bunkers deep in the enemy territory, next to the exit hexes. Be very careful about moving them from the bunkers. Once you do so, all their protection is gone, and since they are surrounded by enemy troops, will be destroyed quickly. But if you keep them in the bunkers and use them as harassment, they can distract the Axis troops from applying all of their fire-power at the unprotected Allied troops trying to make an attack uphill against the sandbagged Axis defenders.

Winning as Axis:

1. One special Victory Point which the Axis can take advantage of is the escape hex through the minefield. Don’t waste a lot of your forces trying to find it, but one unit assigned to opening the escape path while the rest battle the British could be a path to an ‘easy’ VP.

2.  The Allies have a numerical superiority of armor.  Don’t launch an armor attack prematurely.  Use your sandbagged infantry and armor units to slowly degrade the enemy. Be prepared should they try to launch an assault. Keep your responsiveness ready so you are prepared for whichever direction they come.

3.  Watch out for the two enemy infantry units lodged in the bunkers along the backrow. Have an armor unit ready to respond with devastating force should they venture out of the bunkers.

Battle Reports

(percentage of Allied victories):

48%

15
BR - Cauldron

Author:

Days of Wonder

Link:

Hill 112

Hill 112

In early July 1944, during the Normandy campaign, British forces launched Operation Jupiter to seize Hill 112, a dominant height southwest of Caen. Control of this hill was crucial: whoever held it could observe and direct fire across much of the surrounding countryside, making it a strategically vital position.

On 10 July 1944, the British 43rd (Wessex) Infantry Division, supported by armored units including Churchills of the 31st Tank Brigade, attacked German defenses held mostly by elements of the Waffen-SS, including the 9th SS Panzer Division “Hohenstaufen” and 10th SS Panzer Division “Frundsberg.” The fighting was brutal, confused, and close-quarters, with British infantry repeatedly advancing into heavy machine-gun, mortar, and tank fire.

General Howitzer:
Hill 112 wasn’t conquered—but it served its purpose.
It tied down Germany’s best, burned away their strength, and cracked open the German shield around Caen. A brutal ridge that changed the course of the Normandy campaign by simply refusing to be ignored.

6 VP’s

Card Balance:

5 – 5

Complexity:

3

Conditions:

Countryside

Location:

France

Year:

1944

Theater:

Western Front

Campaign

Codename:

Operation Jupiter

Summary:

Objectives

This is a six VP game, so it calls for good positioning, strategic planning, and consistent attack with a goal towards long-term degradation of the enemy.

Battlefield:

The battlefield has a ridge of hills on one flank, moving into the center.  There is also a set of hedgerows and a town hex right in the middle of the field. The Axis controls much of the board at the beginning of the round, while the Allies are pressed up against the back wall.

Troops:

Allied Strategy:

1. The Allies havae a significant armor advantage with six armor units vs. three for the Axis. Since you do have an armor advantage, make use of it, by getting your units out into the open field for battle where the long distance firepower of your tanks may prevail.

2. Watch out for the Axis artillery in the upper right flank. Although it is locked behind the Guigne River, its range controls much of the flank and part of the center flank.

3. Note that Hill 112 is an Allied medal objective. It is within range of a one-hex artillery attack. So if you grab the objective too early, the enemy will have time to chase you away. But if you time it right, it can be a late-game objective, to perhaps clinch the win.

Axis Strategy:

1. The Axis begin with control of much of the battlefield. If you can get your armor out into the middle of the field, you may perhaps be able to attack some of the Allied units while they are still up against the wall, and thus take advantage of their no-retreat situation.

2. You have an artillery unit trapped in the lower left flank behind the Guigne River. Use it whenever the enemy gets near the medal objective at h6.

11
BR - Hill 112

Author:

Days of Wonder

URL

Hellfire Pass

Hellfire Pass

Hellfire Pass was the kind of battleground that earns its name the hard way. In June 1941, on that blasted strip of desert between Egypt and Libya, British and Commonwealth troops dug in on the heights while Rommel’s Afrika Korps came at them like wolves scenting blood. That pass wasn’t just a notch in the ridgeline — it was the key to the whole frontier, a gate that controlled who moved and who stalled in the desert war.

The Germans hit fast, hit hard, and kept hitting, using tanks, guns, and every trick they had to crack the British line. And the men holding that ridge fought with grit, firing until their barrels burned and their positions were blown apart around them. They didn’t stop the Axis forever, but they made the enemy pay for every yard and bought precious time for the larger fight ahead.

Hellfire Pass proved a simple truth: when you stand your ground on the high ground, and you fight like you mean it, even the best the enemy has can’t roll over you without bleeding for it.

~~ General Howitzer

6 VP’s

Card Balance:

Allies – 4

Axis – 6

Complexity:

3

Conditions:

Desert

Context:

Historical

Location:

Egyptian – Libyan border

Year:

1941

Theater:

North Africa

Campaign

Codename:

Operation Battleaxe

Summary:

Hellfire Pass begins with the Axis dominating over two-thirds of the battlefield. The challenge for the Allies is to break through to the exit hexes, if they can make it through Hellfire Pass.

Objectives:
Six VP’s, plus the Allies have exit hexes for additional Objective Medals

Battlefield:
Desert with the Halfaya Pass through which the battle takes place. Much of the battlefield is lined with Axis mines, which will slow the advance of the Allies.

Troops:
Allies have 9 Infantry, and 5 Armor.

Axis have 8 Infantry (including two Anti-tank units), 2 Armor, 2 Artillery

Allied Strategy:

1.  Allies have a numerical advantage in the center, of 3 Infantry, and 5 Armor. However, the Axis have a row of mines, and two artillery defending the section.  So Allies will need a good set of cards which provide for rapid advance, and a Barrage or Airpower card to attack the artillery would definitely help.

2. Because this scenario has an escape option for the British, speed is paramount. So remember that units which begin on the road are able to travel one extra hex.

3.  The Allies have a significant armor advantage of 5 – 2.  Use their attack and mobility to your advantage.  Some of them begin the scenario trapped behind infantry, so you need to get them out and into the game.

Axis Strategy:

1.  Initial plan for the Axis is defensive. Stay behind the sandbags and mines which you have set up.

2.  There are two Infantry units on your left flank which have no retreat.  Some lucky one-shot dice hits can quickly cut their firepower in half.

3. Your Armor has mobility, and are at the ready to defend against a flank attack on either side, or do a quick run up the road to defend the center section.

4. Your Artillery is well-positioned, but the enemy starts at the one-dice hit range.  It may be wise to wait a turn or two until they advance forward one row and then come within range of two-dice hits.

Battle Reports

(percentage of Allied victories):

48%

15
BR - Hellfire

Author:

Link:

Guam Landings

Guam Landings

“Alright, listen up, boys! The Guam Landings in the summer of ‘44 were a hell of an operation—an amphibious smash right into the gut of the Japanese defenses in the Marianas. The island was crawling with enemy troops, but that didn’t stop our boys from hitting the beaches on July 21st and driving straight inland.

They fought through thick jungles, coral ridges, and all the damn bunkers the enemy could build, pushing those defenders back inch by inch until Guam was ours by August 10th. We didn’t just take an island—we seized a launchpad for bigger things, setting the stage for bombing Japan into rubble.

That’s how you take the fight to the enemy, boys—you land, you fight, and you don’t stop until the flag is flying over every square inch!

~~ General Howitzer

6 VP’s

Card Balance:

Allies – 6

Axis – 5

Complexity:

4

Conditions:

Historical

Location:

Guam

Year:

1944

Theater:

Pacific Theater

Campaign:

Pacific Campaign

Codename

Summary:

There is a massive invasion force of Marines coming on shore with infantry, armor and artillery.

Objectives:

6 VP’s and one Objective Medal for the Marines.

Battlefield:

The battlefield is marked by a v-shaped river flanked on one side by a series of hills, and on the other by rice paddies. 

Troops:

Allies – 10 Infantry, 8 Armor, 3 Artillery

Axis – 11 Infantry

Allied Strategy:

1.  You have an overwhelming force to assist you. You have a lot of armor. Start with that and attack the sandbagged enemy from a distance. You will be able to wipe out several front-line units very quickly using your armor.

2.  There is a Medal Objective on your right flank. You can target it, but will need to deal with the enemy infantry unit close to the beach at hex M3.

3.  Deal with the two enemy infantry units right on the beach first, or they will be able to score a hit on every retreat flag they throw against your forces.

Axis Strategy:

 1. The Japanese are well-protected behind sandbags, and would need a pretty good reason to break cover, while they wait for the Marines to attack.

2.  You have a forward unit in the village of Asan, which you can use to take out some figures, maybe a full unit before you are destroyed.

3. And you have a forward unit in the jungle and sandbagged at M3, which you can also use for some quick hits against the enemy.

Battle Reports (percentage of Allied victories):

67%

20
BR - Guam Landings

Author:
Days of Wonder

URL:

Gold Beach

Gold Beach

The Invasion of Gold Beach was one of the five beachheads landed by Allied forces during the D-Day invasion of Normandy, France, on June 6, 1944, during World War II. The invasion was part of Operation Overlord, the Allied effort to liberate Nazi-occupied Western Europe and begin the push toward Germany. Gold Beach was the landing zone assigned to British forces, primarily the 50th (Northumbrian) Infantry Division and supporting units from the Royal Marines and Canadian forces.

General Howitzer summarizes its impact:
Gold Beach—June 6, 1944—wasn’t just sand and sea, it was a damned doorway to Germany. The British 50th Northumbrian boys, backed by Royal Marines and tough Canadian allies, slammed ashore under fire as part of the grandest show on earth—Operation Overlord. Their job? Bust through Nazi defenses, plant the Union Jack on French soil, and start the long march east to drive a knife straight into Hitler’s gut.

6 VP’s

Card Balance:

Allies – 6

Axis – 4

Complexity:

2

Conditions:

Beach

Location:

France

Year:

1944

Theater:

Western Front

Campaign:

D-Day

Codename:

Operation Overlord

Summary:

Unlike many other beach scenarios, Gold Beach does not have a hill or ridge slowing down the Allied advance. Therefore the Allies are able to very rapidly move up the beach. But Axis forces are protected in bunkers and cities, allowing them more time to attack the unprotected Allies.

Objectives:

This is a six VP scenario, so rather long, with one Objective Medal for the Allies in the town of LeBuhot.

Battlefield:

Beach scenarious are all about getting the Allies off the beach as fast as possible, while the Axis try to push them back and slow them down to allow more time for attack.

Troops:

Allies – 10 Infantry, 3 Armor

Axis –  7 Infantry, 2 Artillery       

Allied Strategy:

1. You must eliminate the Axis artillery as rapidly as possible, or it will decimate your forces.

2.  Because there is no enemy artillery on the left flank, it generally poses the best chance of advancement, should the cards allow it.  Once you get off the beach on the left side, you can proceed with your forces toward the right until you capture all the VP’s you need.

3. You have three Armor. Get them out of the water and into the action quickly. But they must coordinate their attack with the infantry. It is very difficult to win this scenario, unless you quickly get your artillery off the beach and into the back ranks where you can attack the enemy from behind. 

Axis Strategy:

1. Axis has two artillery, which compensate for the overwhelming Allied forces coming at them. The one in the center section near the beach is a powerful force. Every single beach hex in the central section is within the range of full two-dice artillery attacks. This is a very powerful weapon in the Axis arsenal. Use it at every opportunity you have.

2.  If you can move the artillery on your left flank forward to a more central position, it will improve your ability to attack the enemy coming up the center section. Of course, you will lose your sandbags when you move, so this move forward is safest if you have a Dig In card at the ready.

16
BR - Gold Beach

Author:

Days of Wonder

Link:

Gates of Moscow (Typhoon)

Gates of Moscow (Typhoon)

scenario_GatesMoscow_start

Operation Typhoon was the German military campaign to capture Moscow during World War II, launched in early October 1941 as part of their broader invasion of the Soviet Union (Operation Barbarossa). The offensive aimed to deliver a decisive blow by taking the Soviet capital before winter set in.

German forces, under Field Marshal Fedor von Bock, advanced with two large army groups and made initial gains, encircling and destroying significant Soviet forces. However, stiff Soviet resistance, logistical challenges, and worsening weather slowed the German advance. Muddy conditions in October, followed by the onset of harsh winter, further hampered their progress.

By December ’41, the Germans thought they had Moscow in their grip—but Zhukov and his Siberian wolves had other plans. Hardened for winter, those Red Army troops stormed forward in a counteroffensive that drove the Wehrmacht off the city’s doorstep. It was the first time Hitler’s war machine got its teeth kicked in, proof that Blitzkrieg had limits when it slammed into a determined foe with steel in its spine and snow in its veins.

~~ General Howitzer

7 VP’s

Card Balance:

Allies – 5

Axis – 5

Complexity: 

4

Conditions:

Urban

Location:

Russia

Year:

1941

Theater:

Eastern Front

Campaign:

Barbarossa

Codename:

Operation Typoon

Summary:

The Gates of Moscow is a complex scenario which results in a brutal battle with many digital ‘casualties’ on both sides.

Objectives:

7 VP’s, including two Objective Medals for Axis

Terrain:

Frozen field with Kaluga river cutting vertically and a ridge of hills cutting across horizontally.

Troops:

Allies – 10 Infantry, 2 Armo, 2 Artillery

Axis – 10 Infantry, 8 Armor, 1 Artillery

Allied Strategy:

1. Big picture strategy for the Allies. This is a defensive scenario, so stay behind your sandbags and defend the two medal objectives.  Move your Artillery and Armor forward into the battle.

2.  Although there is a large Axis force massed against the Allies, the Axis side starts back against the game border. Allies can use this to their advantage, by turning retreat flags into deadly kills. Target the Axis forces which have no retreat available to them. This will increase your odds of a kill by another 17%. This increases the likelihood of an armor hit from 33% to 50%, and an infantry hit from 50% to 67%.

3.  Attack Vector Left Flank:  The enemy forces are congested. If you have a good set of cards, you can move in, and clear out many of the forces, including the armor.

Axis Strategy:

1.  Big picture strategy for Axis is to disperse your bunched-up troops and concentrate your forces on the front-line enemy to eliminate them as quickly as possible before they score too many hits against your forces.

2.  Keep pushing forward as you attack with the goal to eventually be to capture the bridge hex medal (often as a final decisive move to end the game).

3.  This is a long scenario of 7 medals, so you will have to take out the centrally located enemy Artillery. It is sand-bagged on a hill, but it needs to be attacked quickly.

4.  Beware of your armor trapped behind the row of trees on your right flank.  Do not try to take out the enemy infantry in the woods, because they will inflict heavy penalties on such an attempt.  Best option is to get them into the tree line and then out into the open for more fruitful attacks.


Battle Reports (percentage of Allied victories):

34%

(These are historical records. The poll on the right is new results.)

23
BR - Gates

Author:

Days of Wonder

Link: