General Howitzer’s Field Guide to Memoir 44

A Memoir 44 Strategy & Tactics Community

GENERAL HOWITZER

Scenarios

Explore Memoir ’44 battlefields, maps, and player statistics.

GENERAL HOWITZER

Campaigns

Relive historic campaigns through linked Memoir ’44 battles.

GENERAL HOWITZER

Strategy Tips

Sharpen your tactics and take command of the battlefield.

GENERAL HOWITZER

Field Manuals

Explore field guides and manuals for your next battle.

GENERAL HOWITZER

Tournaments

Find Memoir ’44 tournaments, events, and fellow commanders.

GENERAL HOWITZER

My War Room

Track your battles, campaigns, achievements, and next mission.

Battle of Westerplatte

Battle of Westerplatte

Battle of Westerplatte

Battle of the Westerplatte_small

September 1st, 1939—0448 hours. That was the shot that lit the damn fuse on World War II.

The Germans kicked things off by bringing in the battleship Schleswig-Holstein, sitting nice and cozy in Danzig harbor, and then—boom—she opened up with a full broadside on the Polish outpost at Westerplatte. They thought they’d scare the Poles into folding before breakfast.

Then came the assault: crack German marines, three platoons strong, storming across the land bridge, expecting a little parade through the depot. They even blew open the rail gate like it was just another drill. They thought they were walking into a skirmish.

Wrong.

They walked straight into a kill zone. The Poles were locked, loaded, and waiting—concealed firing positions, crossfire, barbed wire, the whole damn package. And those German troops? They didn’t find a pushover—they found hell on Earth.

The plan was for the Poles to hold for twelve hours. Instead, they held that godforsaken strip of land for seven damn days—against artillery, naval fire, and relentless infantry assaults. They bled, they fought, and they showed the world what grit looks like under fire.

Westerplatte didn’t stop the war. But it told the Nazis one thing loud and clear: this wasn’t going to be easy. It became a symbol—of resistance, of courage, and of never giving an inch when everything’s on the line.

The lines were drawn, the fuse was lit, and history roared to life in a blaze of fire and steel.

Now the only question left is—when it’s your turn to hold the line… will you stand, or will you fold?

~~ General Howitzer

6 VP’s

Card Balance:

Allies – 5

Axis – 6

Complexity:

4

Conditions:

Countryside

Context:

Historical

Location:

Poland

Year:

September 1, 1939

Theater:

Western

Campaign:

The Invasion of Poland

Codename:

Fall Weiss / Case White

Summary:

Objectives:

6 VP’s, plus one Permanent Medal Objective for each side (The Destroyer and the Supply Shed.)

Battlefield:

Contains countryside with a road, a railway, and a river.

Troops:

Allies – 10 Infantry (3 figures each), 2 Artillery 

Axis – 10 Infantry, 1 Artillery, 1 Destroyer!


Allied Strategy:

1.  Because of the surprise nature of the attack, all of the Polish Allied Infantry only have three figures each.  They are therefore very quickly overrun by the German forces.  Gain the hits you can, and protect the Supply Shed!

Axis Strategy

1.  You have a Destroyer at your disposal, with massive range. Use it every chance you get. 

Battle Reports

Author:

Originally developed for the Belgium Open, 2017; Also used by The Finest Hour Open, Chicago, 2025.

Link:

View

Place Battle Reports on a scenario page, or specify its scenario name in the shortcode.

Battle of Alam el Halfa

Battle of Alam el Halfa

Battle of Alam el Halfa

Memoir 44

Aug 29 – Sep 6, 1942

Alam el Halfa was Rommel’s last real chance to win the desert war and grab Egypt, and he knew it. His numbers were thinning, his supplies were running dry, and time was about to turn against him. So he did what gamblers always do when the clock is running out—he rolled the dice one more time and tried the same wide flanking punch he’d used at Gazala.

But this time, the British weren’t blind. ULTRA told them exactly what was coming, and Montgomery finally did something smart: he stopped chasing glory and prepared to fight on ground of his choosing. He planted his forces on the Alam el Halfa and Ruweisat ridges, dug tanks into the sand like steel bunkers, and told Rommel, “Come get it.”

This wasn’t a battle of fancy maneuvers—it was a battle of discipline. Rommel charged in from the south and smashed straight into prepared defenses, air power, and fuel shortages he couldn’t overcome. His attack burned itself out, and with it went his last hope of victory in North Africa.

The lines are drawn, the enemy is committed, and now it’s your fight. Hold the ground, let the enemy break himself, and remember this: when the enemy makes his last move, you make sure it’s his last mistake.

~~ General Howitzer

VP’s

8

card

Card Balance:

Allies – 6

Axis – 6

Complexity:

3

Conditions:

Desert

Context:

Historical

Location:

North Africa

Year:

1942

Summary:

8 Victory Points:

8 Medals, including three Permanent Medal Objectives for Axis control of three town hexes.

Terrain:

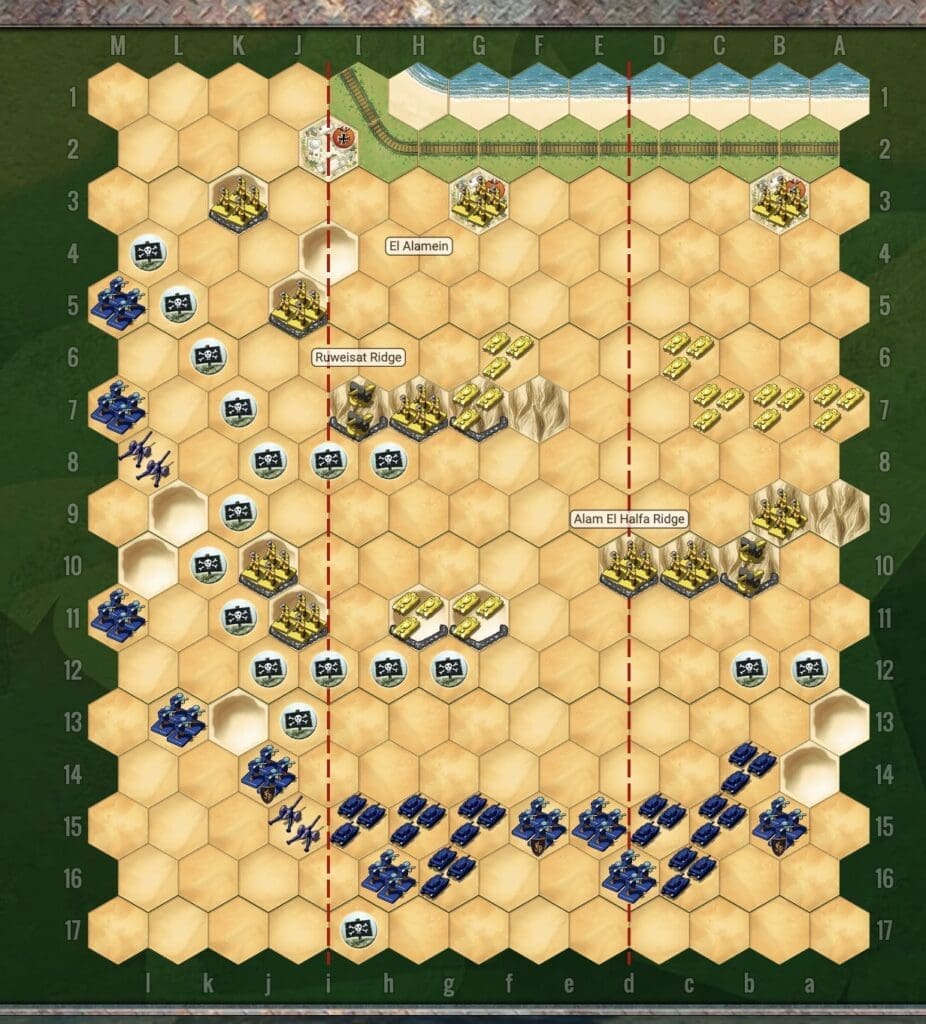
Desert with some ridges and a railroad track.

Troops:

Allies – 7 Infantry, 8 Armor, 2 Artillery

Axis – 10 Infantry, 8 Armor, 2 Artillery

Special Rules:
1.  North African Desert Rules – for tank movement

2.  British Commonwealth Rules  – Stiff Upper Lip for fighting back

3.  No Airpower

4.  Allied player lays out the Mines

medal allies

Allies:

1.  Watch your right flank!  Historically, this is where Rommel attacked. The Axis have you out-numbered in this flank.  This is their path to get to the Permanent Medals you are defending besides the railroad tracks.

2.  You have 8 Armor to match the Axis’ 8 Armor.  Yours are in a bit of disarray.  Bring the Armor back in your left flank forward as quickly as you can and establish a line along row 10 to supplement your Infantry and Armor up on the dunes.  That will be a powerful block to any enemy advances. 

medal axis

Axis:

1. Big Picture Plan – In two of the three flanks, the British either evenly match you, or outnumber you.  And they are solidly in place up on Alam El Halfa Ridge, with Artillery on top and many armor units behind. 

So you need to engage the enemy carefully – to keep them busy, while you push your forces up the left flank, and attempt to gain the Permanent Medals along the railroad tracks.  

Author: Days of Wonder

URL

Place Battle Reports on a scenario page, or specify its scenario name in the shortcode.
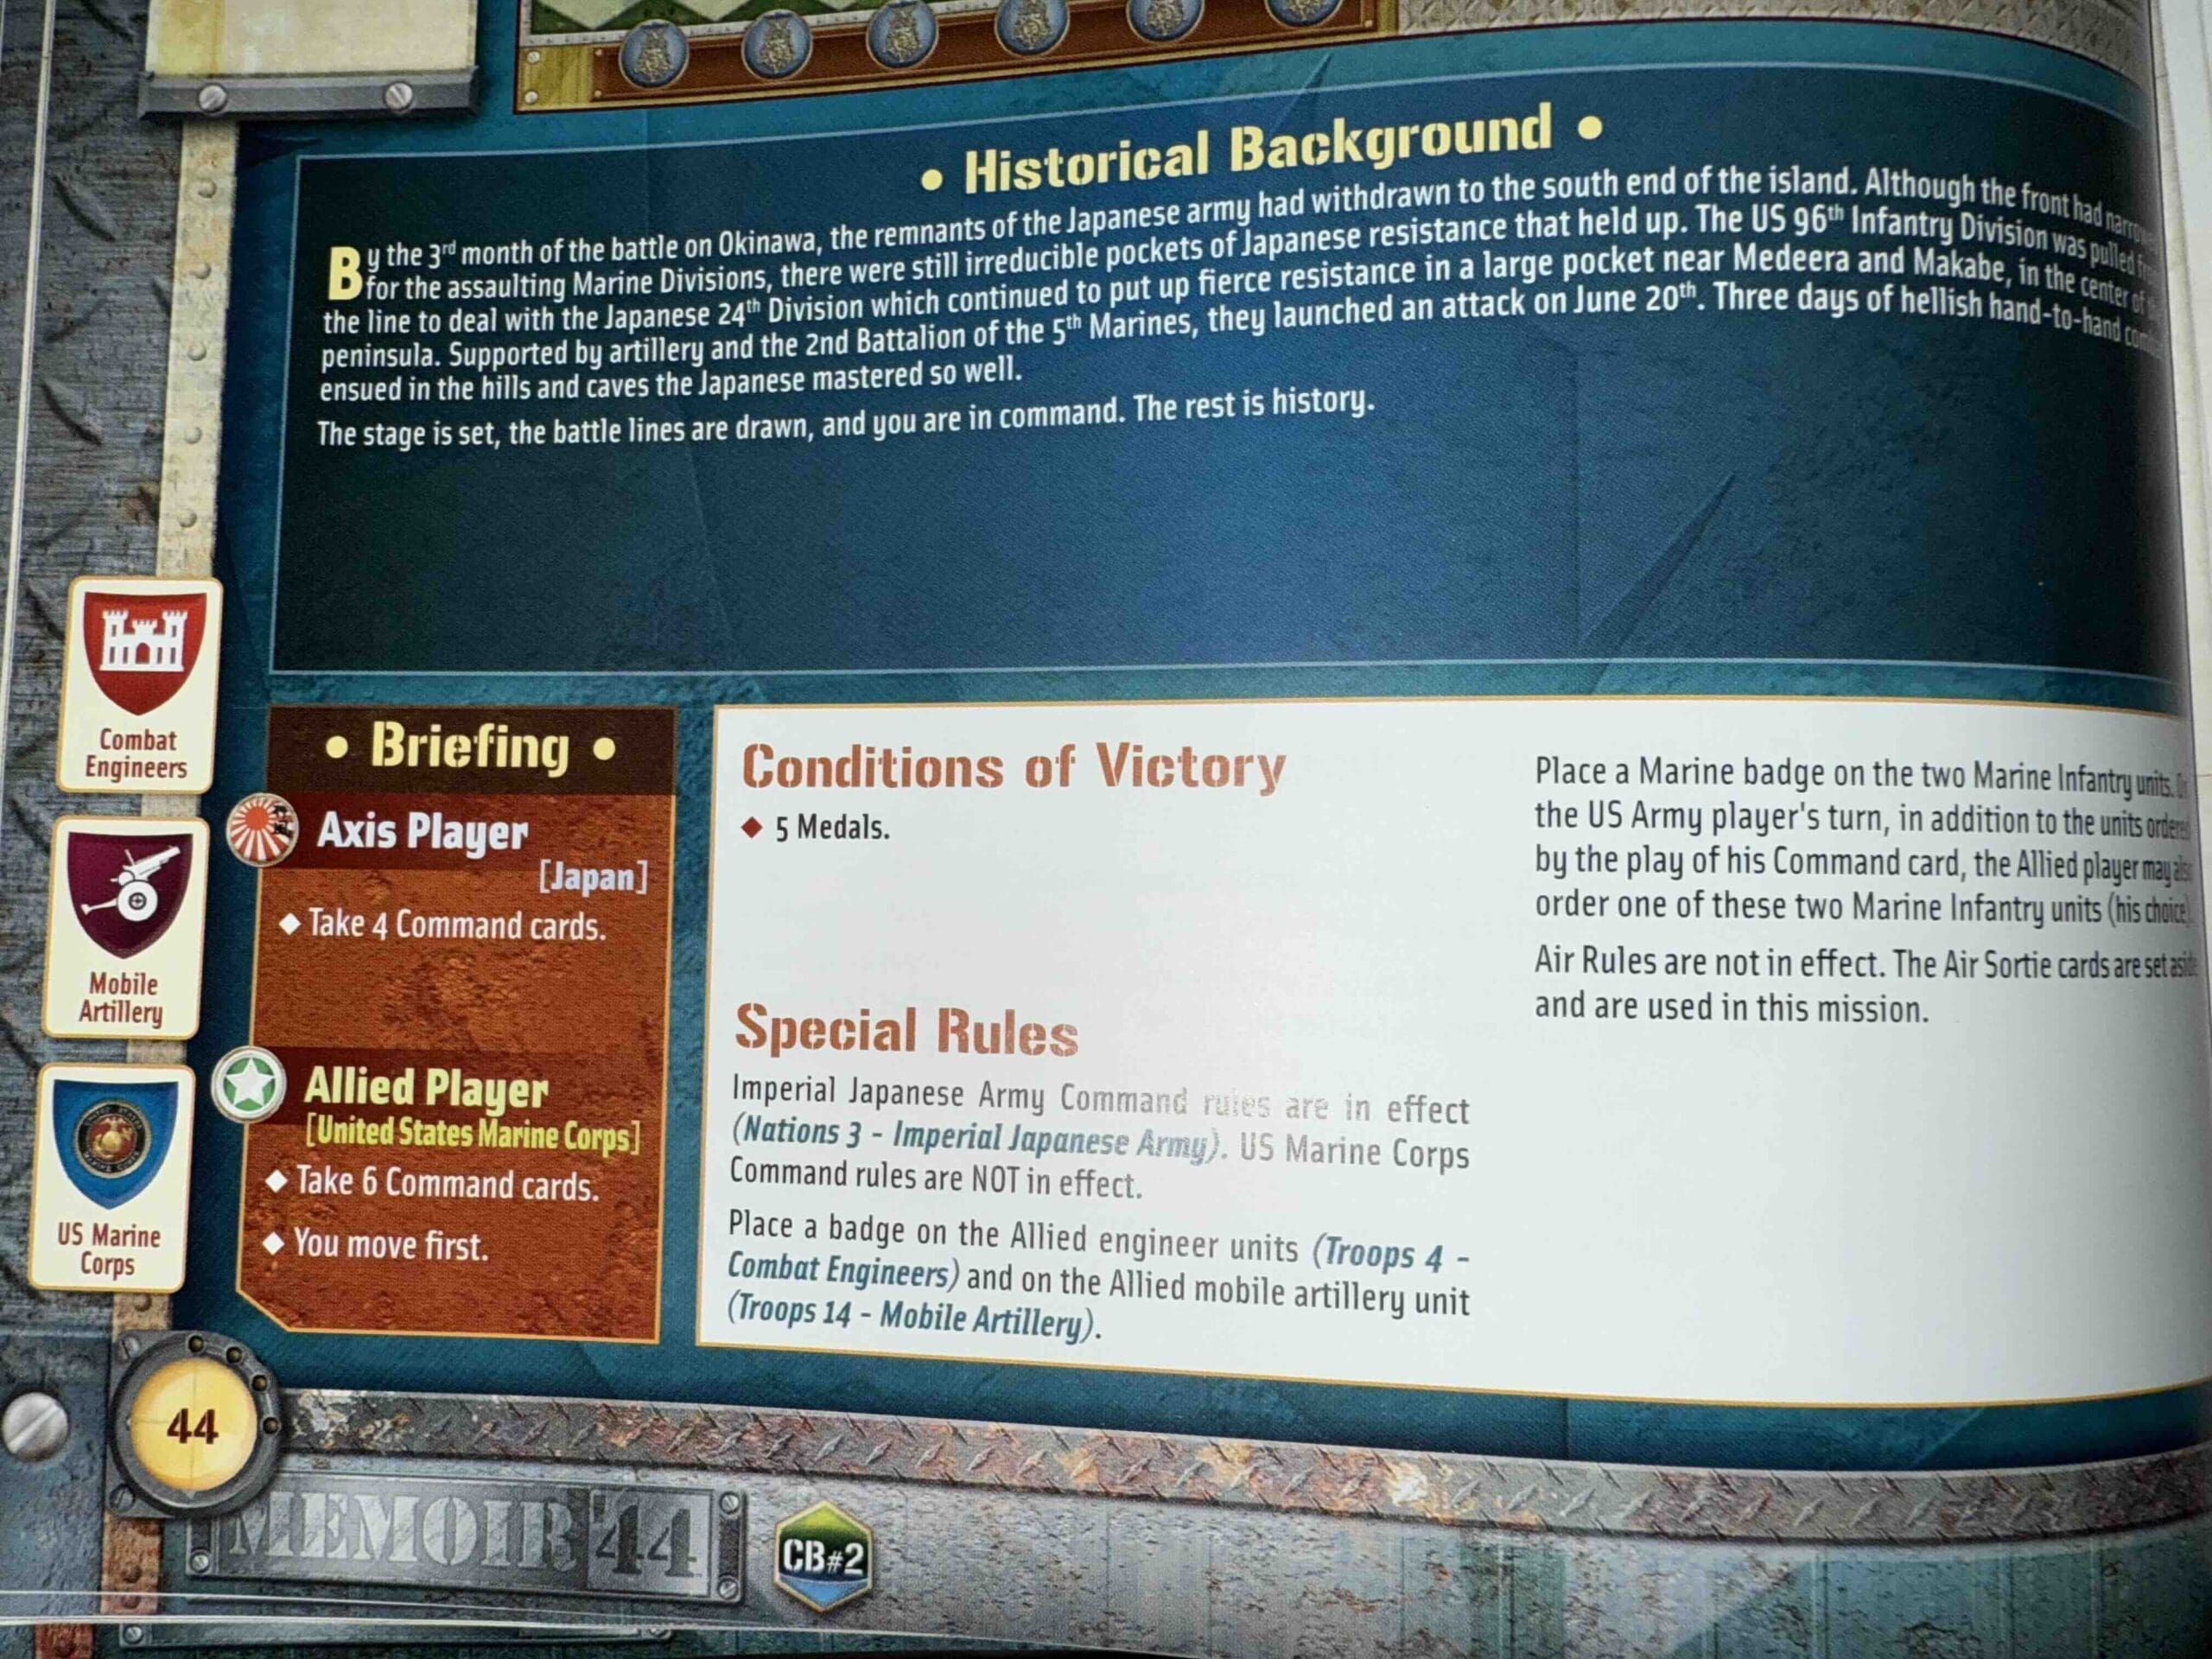
Medeera Pocket

Medeera Pocket

Medeera Pocket

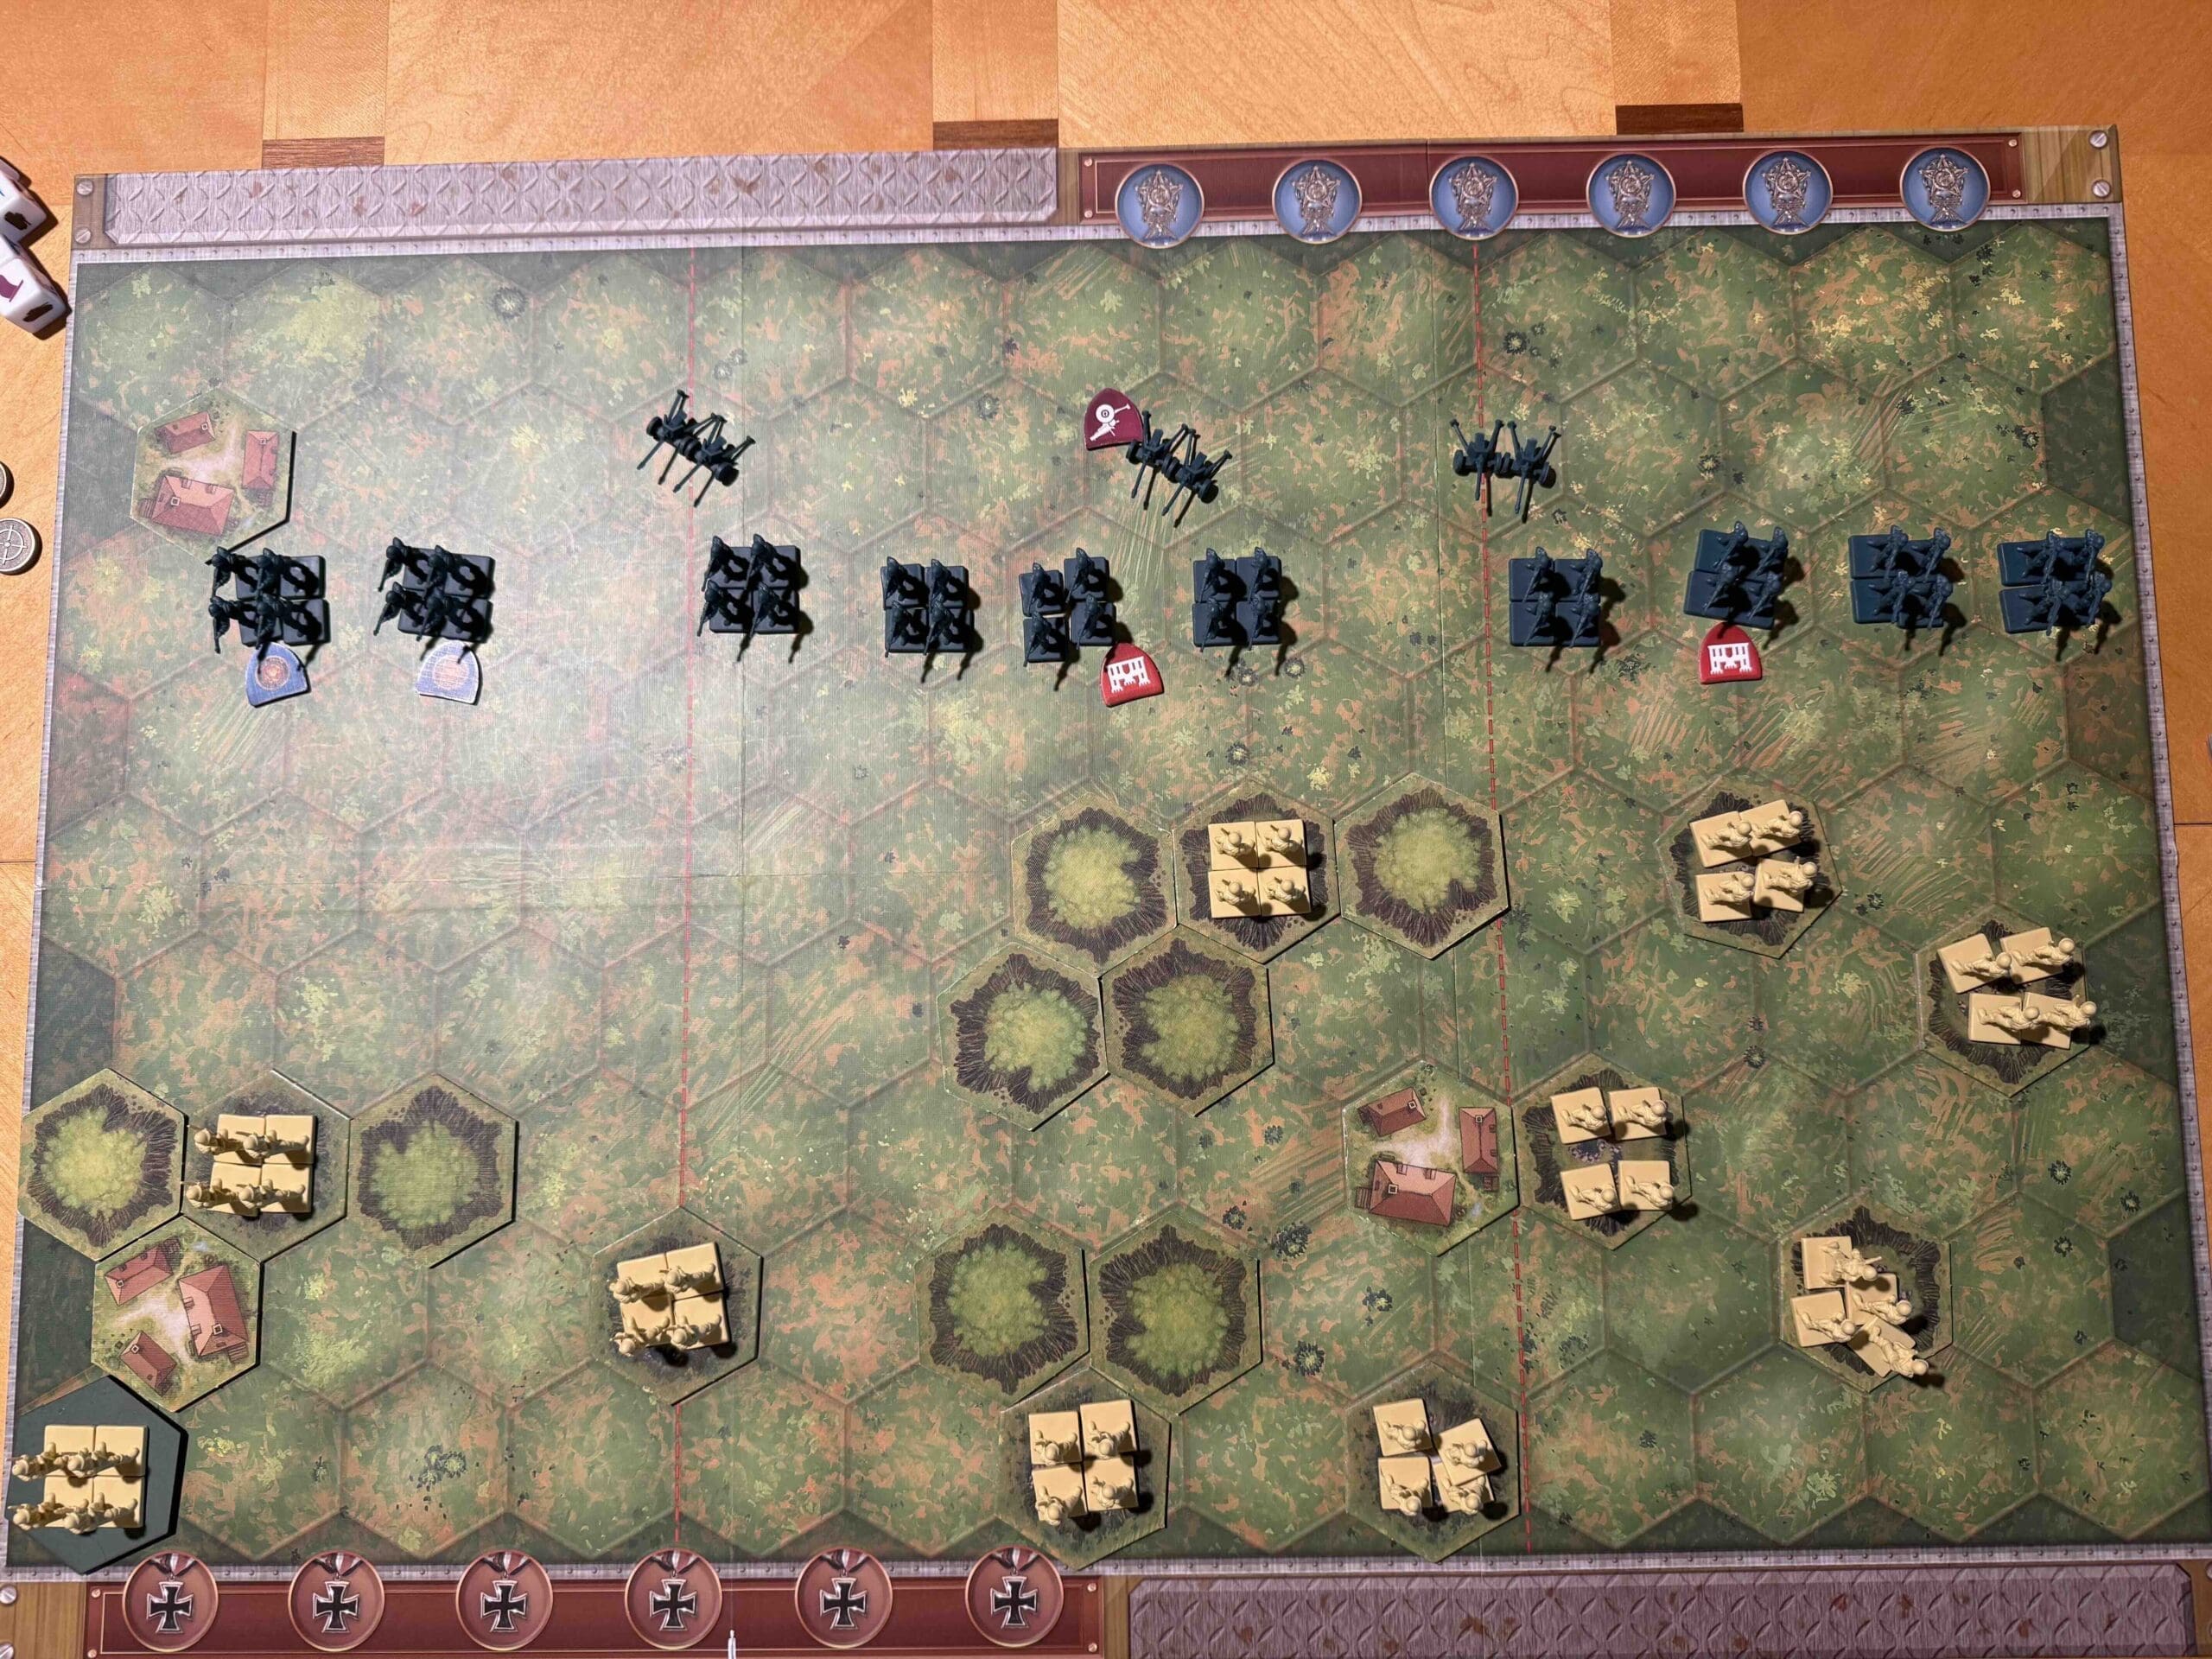
The Battle of the Medeera Pocket in June 1945 was a late-stage engagement during the Marianas and Palau Islands campaign of World War II.

Located on northern Peleliu, the Medeera Pocket was one of the last strongholds of Japanese resistance. U.S. Marines and Army forces faced fierce, dug-in Japanese defenders who refused to surrender, fighting from caves and fortified positions. The battle involved intense close-quarters combat, flamethrowers, explosives, and coordinated assaults to clear the terrain.

Despite being outnumbered and cut off, Japanese troops fought to the death, inflicting significant U.S. casualties before being wiped out.

The elimination of the Medeera Pocket marked the final clearing of organized resistance on Peleliu, securing the island for Allied operations and reinforcing the brutal nature of Pacific island warfare.

General Howitzer summarizes:

The Medeera Pocket was one hell of a last stand—the Japanese  were holed up in caves, dug in deep, and determined to die where they stood.  They fought like fanatics, even when they were cut off and outgunned, but our Army and Marines finished the job. Clearing that pocket sealed Peleliu for good and reminded everyone that in the Pacific, every inch costs blood.

5 VP’s

card

Card Balance:

Allies – 6

Axis – 4

Complexity:

3

Conditions:

Jungle

Context:

Historical

Location:

Palau Islands

Year:

1945

Theater:

Pacific

Campaign:

Codename:

Operation Iceberg

Summary:

Objectives:

5 VP’s 

Battlefield:

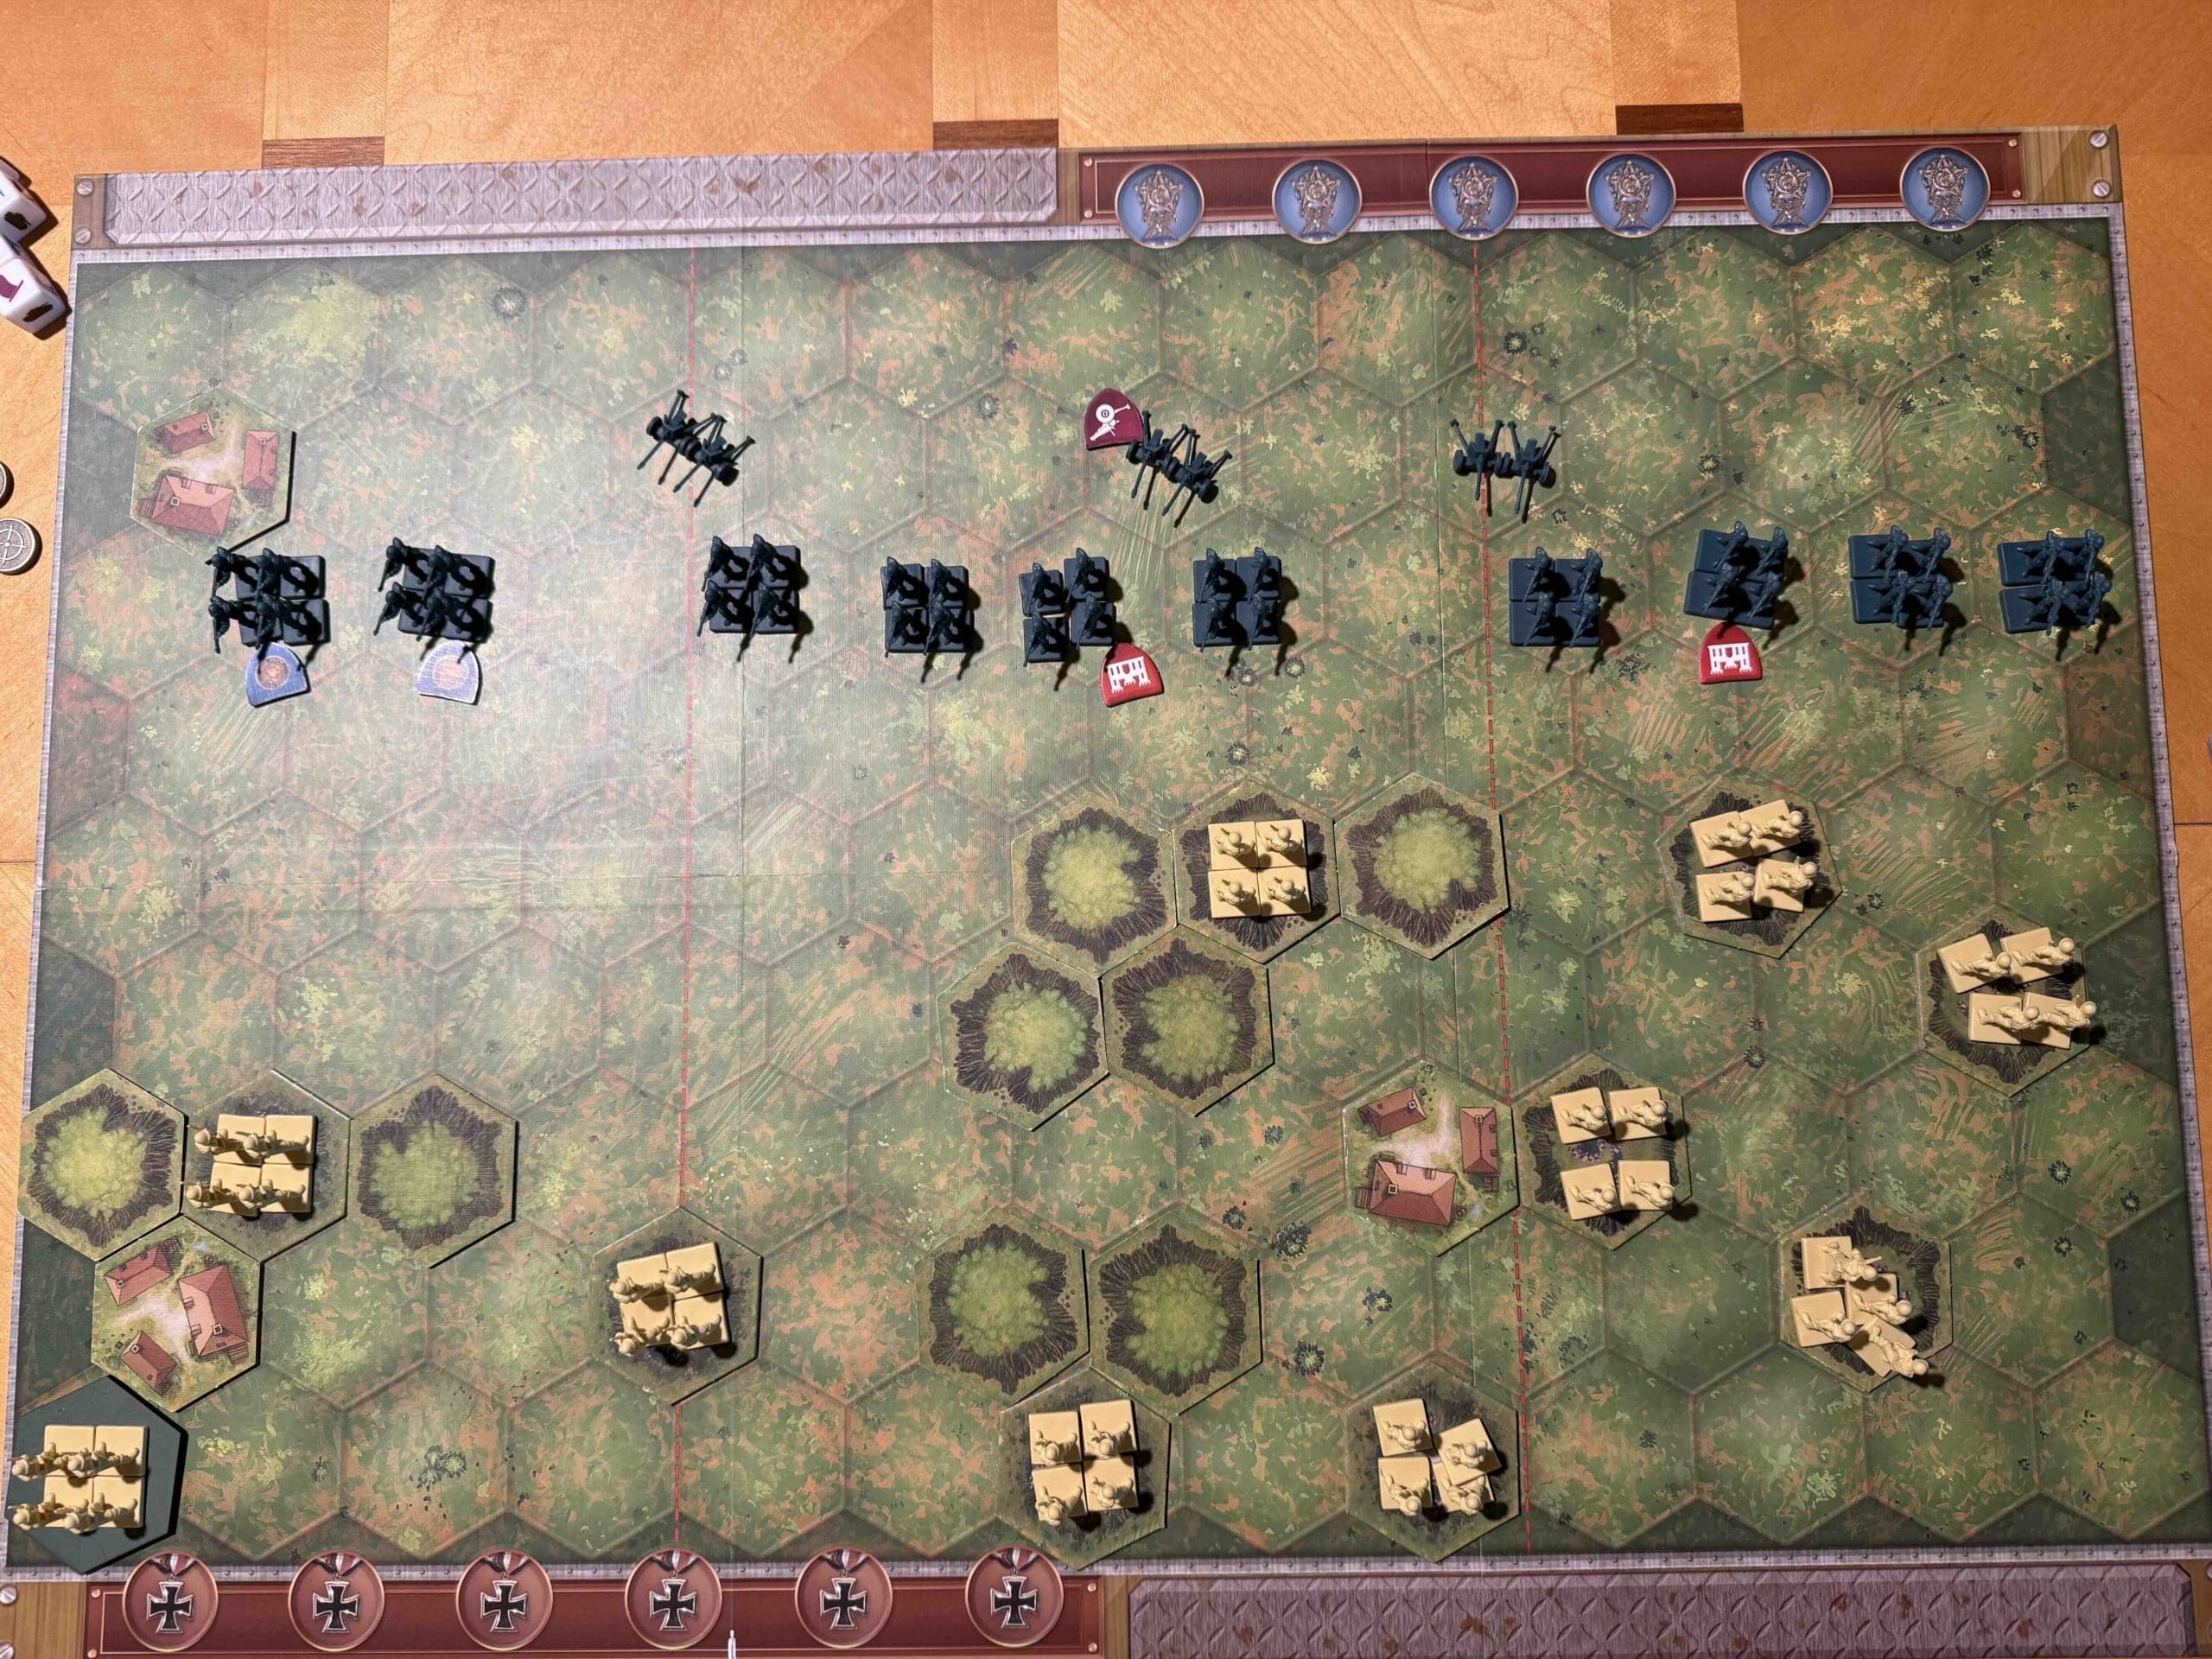
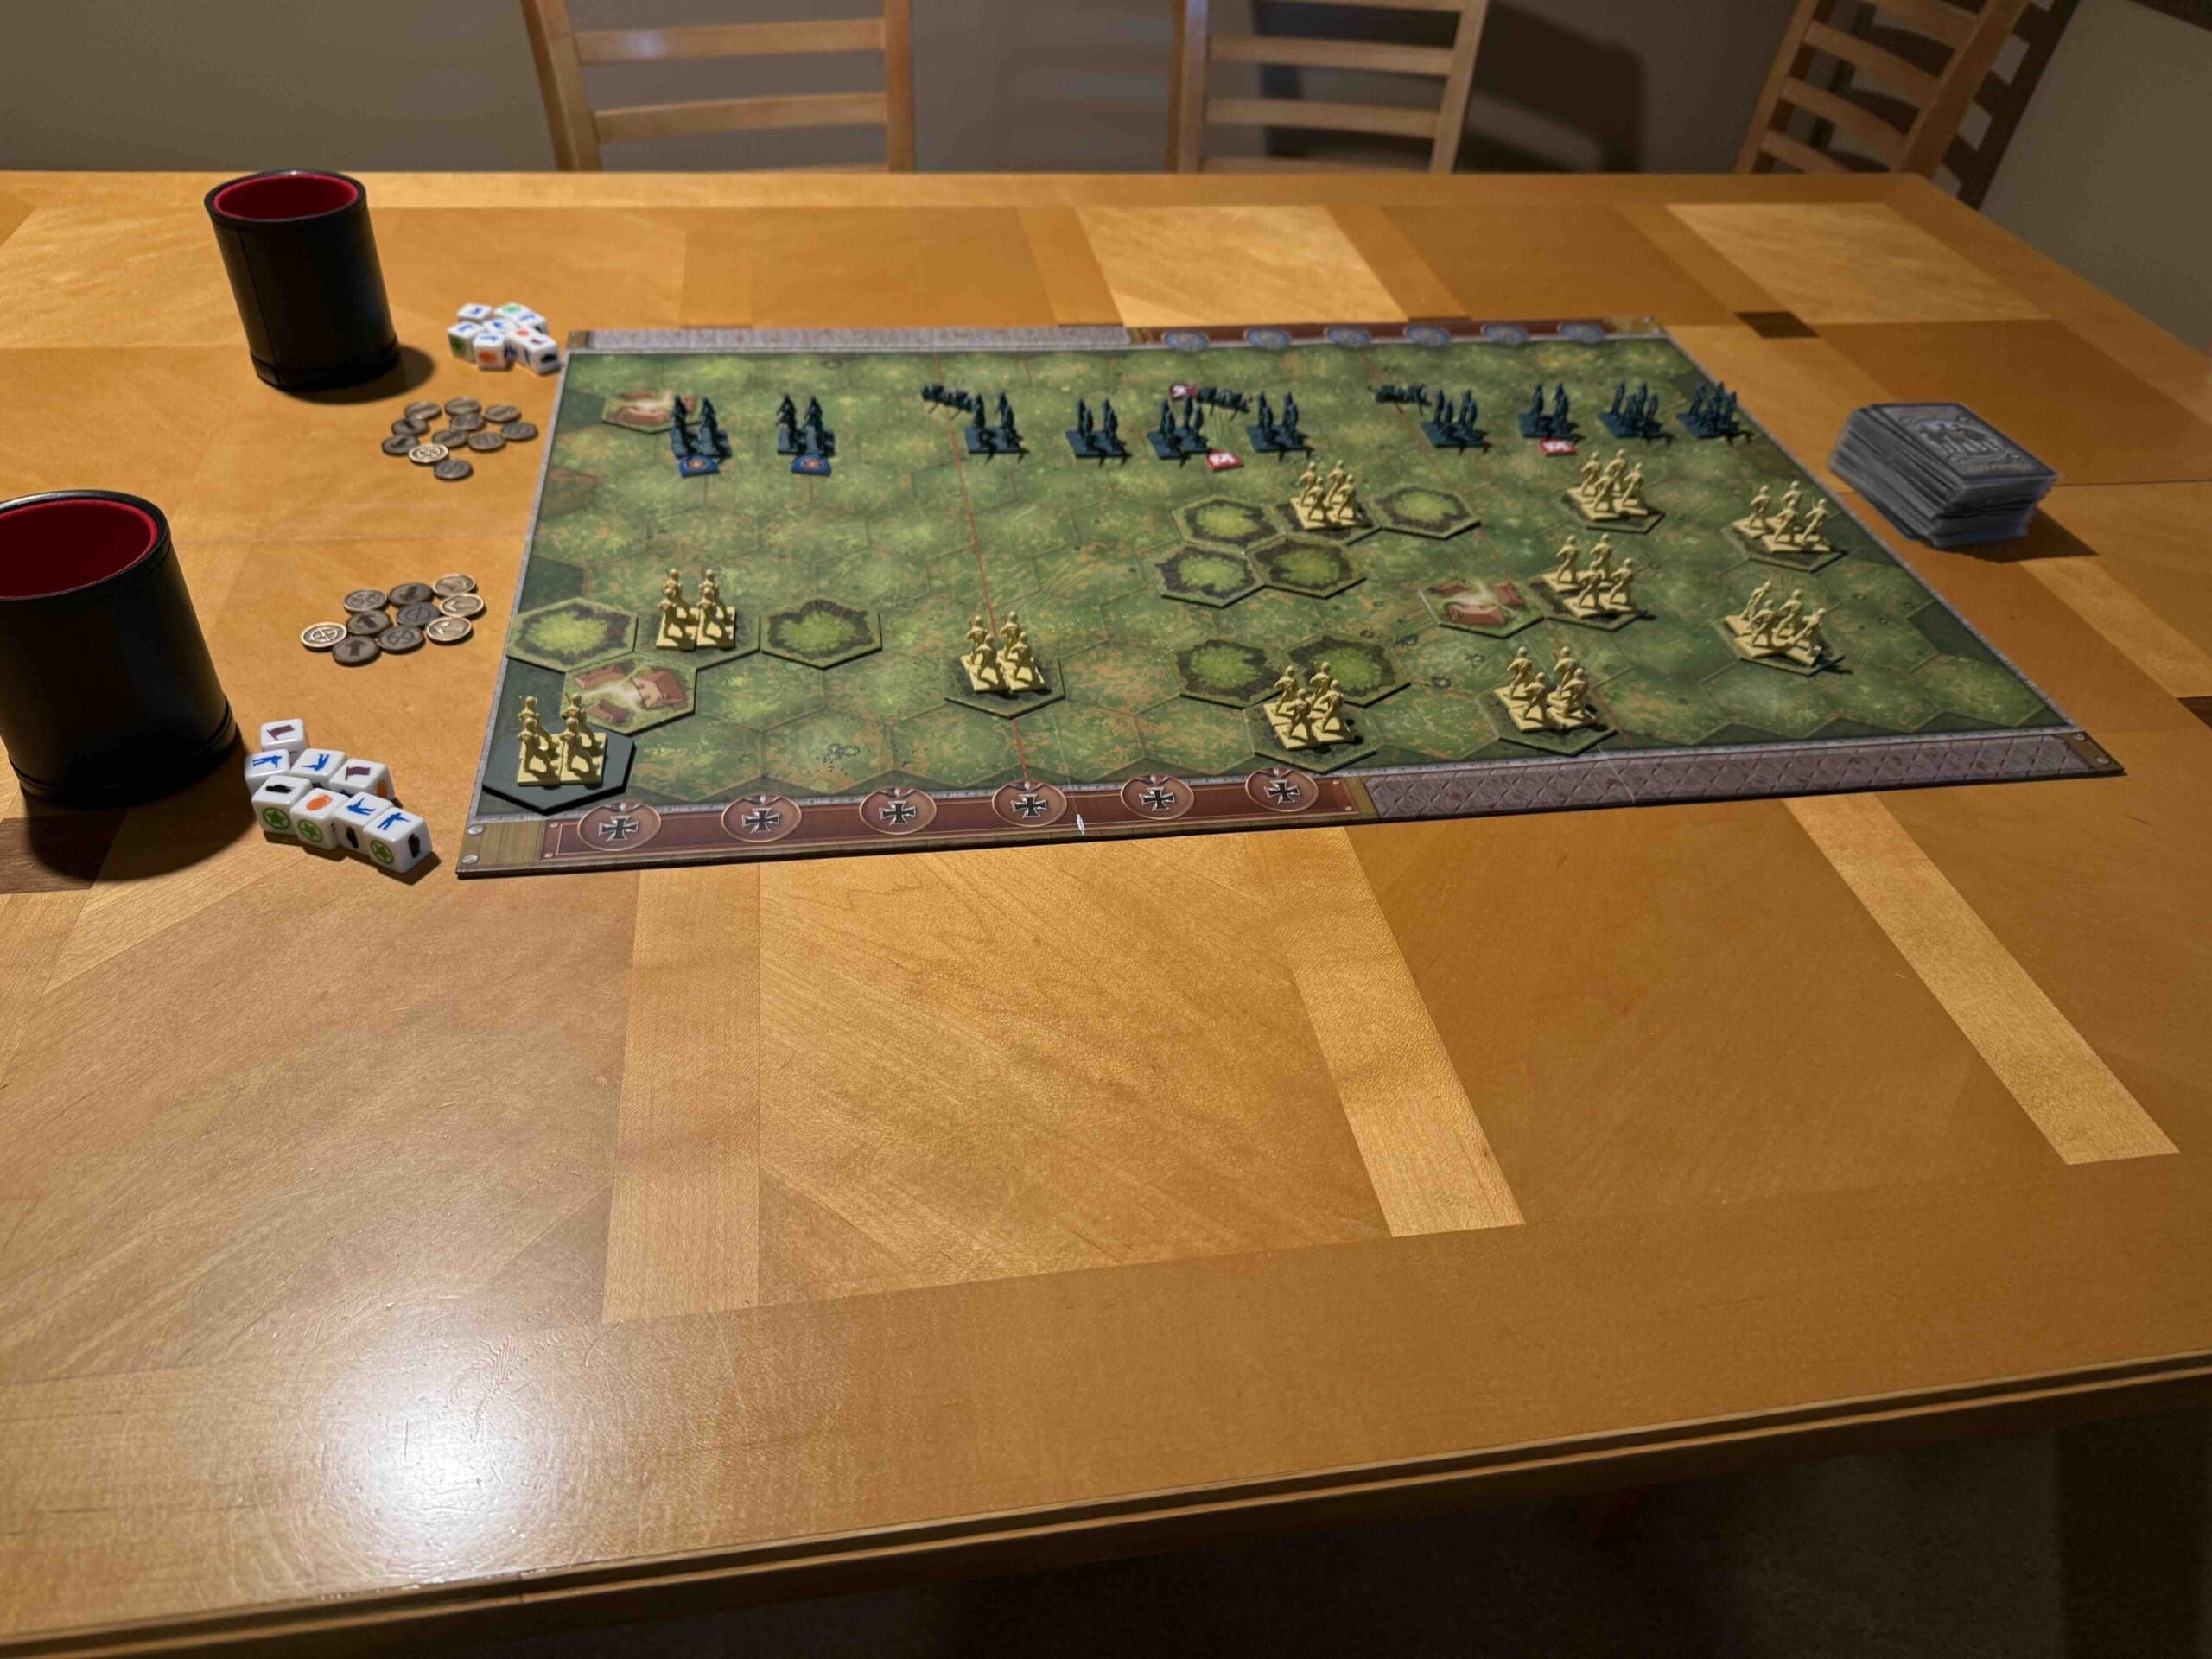
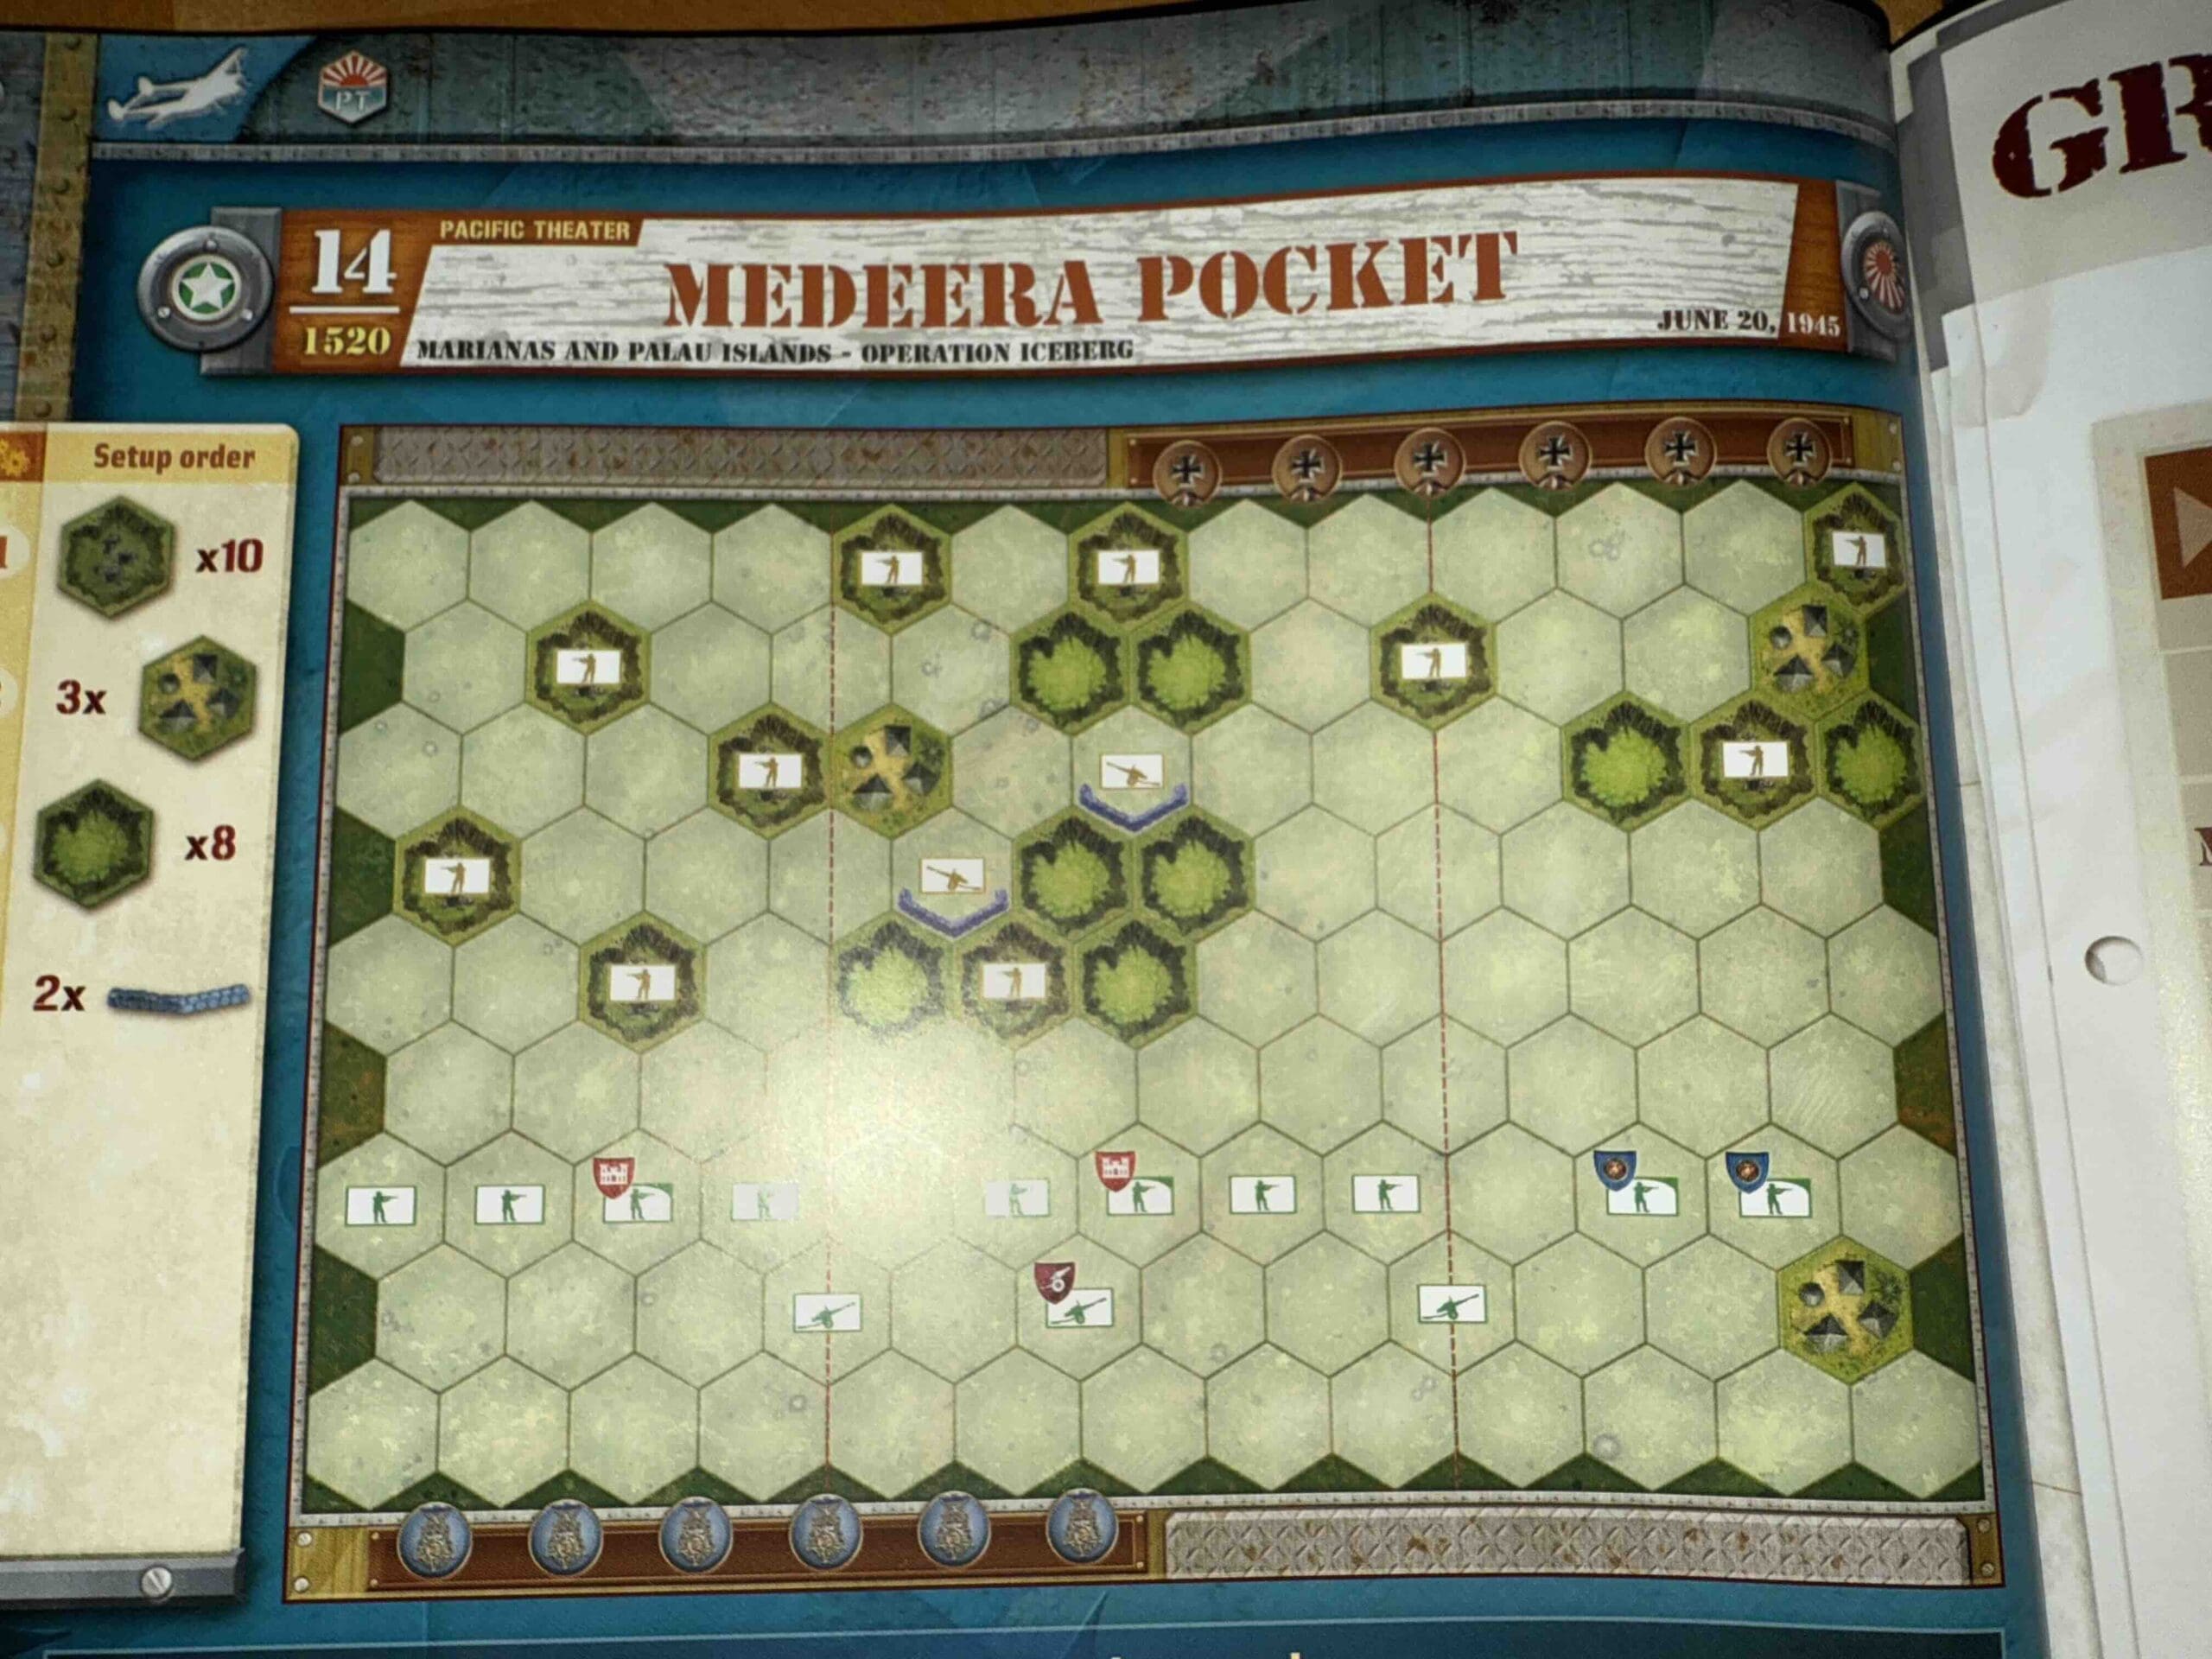
Jungle terrain , hills with caves and some small villages.

Troops:

Allies – 8 Army Infantry, 2 Marine Infantry, 3 Artillery including a Mobile Artillery

Axis – 10 Infantry


medal allies

Allied Strategy:

1.  The center section is the key to victory.  You have a Mobile Artillery, plus two other Artillery units which can all focus their firepower upon the center.  

2.  You have two Engineer units which can overcome the terrain disadvantages of caves on hills.  Use them to clear out the entrenched enemy.

3.  You have two Marine units which can be commanded every single turn, so they can conduct their own operation on your right flank, if they are supported by the Artillery unit on that side. 

medal axis

Axis Strategy

1.  Remember the three special abilities of your Japanese forces (Seishin Kyoiku Doctrine, Yamato Dashi Concept, and the Banzai War Cry).  You will need these to stand up against the enemy.

2.  There are many Caves on Hills which give you both a defensive and mobile advantage.  Infantry units can quickly move from one Cave on a Hill to another one, so that you can rapidly replenish your forces when they are destroyed.  

3.  You have two Artillery units well-protected in the center of the battlefield.  Use them at every opportunity to push back the attacking Infantry, and when it comes into range, to also destroy the Mobile Artillery.

Battle Reports

Author:

Days of Wonder

Resource:

Campaign Book, Volume 2

Place Battle Reports on a scenario page, or specify its scenario name in the shortcode.

Closing the Gap

Closing the Gap

Closing the Gap

Memoir 44 scenario Closing the Gap

The Battle of Closing the Gap near Falaise from August 19–22, 1944, marked the final phase of the Falaise Pocket, where British, Canadian, Polish, and American forces worked to encircle and destroy retreating German units in Normandy.

Fighting was intense as the Allies tightened the noose, with the Polish 1st Armored Division holding key high ground at Mont Ormel against desperate German breakout attempts. Despite some Germans escaping, the Allies captured or killed tens of thousands, crushing what remained of German Army Group B in the West.

Closing that pocket slammed the door on the German army in Normandy—choked ’em off, chewed ’em up, and cleared the road straight to Paris. From there, it was full speed ahead into the heart of France.

~~ General Howitzer

6 VP’s

card

Card Balance:

Allies – 5

Axis – 5

Complexity:

3

Conditions:

Countryside

countryside

Context:

Historical

Location:

France

Year:

1944

Theater:

Western

Campaign:

The Battle of Normandy

Codename:

Operation Tractable

Summary:

Objectives:

6 VP’s, plus Territorial Objective Medals for Allies, and Exit Objectives for Axis

Battlefield:

Countryside with a road and the Dives River cutting off the Axis forces from their objective.

Troops:

Allies – 8 Infantry, 3 Armor

Axis  – 10 Infantry, 2 Armor

 Special Rules:

Rescue attempt aspect: Each side may order up to 2 armor units into battle as Armor Breakthroughs. Axis armor units that are sent in to rescue cannot escape through any of the Exit hexes.

Overall Strategy

This game is interesting because each side is given the opportunity to bring in two Armor units into the battle, right into the heart of the enemy territory.  And so within the first couple of turns it is a crazy mixed-up battle with enemy forces attacking from multiple directions. You must learn to engage in a two-front war.

medal allies

Allied Strategy:

1.  The challenge for the Allies is to get your forces across the bridges. Otherwise, you will be blocked and congested in your attack efforts. Of course, you also have to deal with the enemy armor that will show up on your end of the battlefield.

2.  If any of the original Axis forces (not the ones which spawned on that side) make it across the river, you must prevent them from exiting. 

3.  You can hide out in the towns near the river for a while and attack the enemy forces in an attempt to degrade their fighting ability, but eventually you may have to cross over and attack if the enemy doesn’t come to you.

medal axis

Axis Strategy

1.  On your right flank, you are evenly matched with the Allied forces with four Infantry units each. Due to their congested starting postion, there is an opportunity to move in and claim control of the town of Moisy and prevent the Allies from getting objective medal without a bitter fight.  Then from there, it is a short 3 hex run to exit through the Exit hex and gain a medal.

2.  You have a lot of forces, but you will need to get them up to the river to attack the enemy. But keep some in reserve to deal with the enemy forces that will show up to rescue their troops.

Battle Reports

Author:

Days of Wonder

Place Battle Reports on a scenario page, or specify its scenario name in the shortcode.

Saint-Martin and Bull Bridge

Saint-Martin and Bull Bridge

Saint-Martin and Bull Bridge

Bull Bridge
  • After the Allied breakout from Normandy (Operation Cobra, late July 1944), U.S. forces rapidly advanced across northern France. As they pursued retreating German forces, small but fierce battles flared up at key defensive points.

  • Battle Overview:
    In early August 1944, elements of the U.S. Army (likely from Patton’s Third Army) encountered stiff German resistance at St. Martin and the nearby Bull Bridge, vital crossings over local waterways.
    The Germans, using hastily organized rear-guard units, attempted to delay the American advance by holding these positions. Fighting involved close-quarters combat, sniper fire, artillery strikes, and quick assaults to seize the bridge intact before the Germans could demolish it.

  • Outcome:
    U.S. forces ultimately captured St. Martin and secured Bull Bridge, helping to maintain the momentum of the Allied advance toward the Seine River.
    German forces were forced into further retreat, suffering losses in men and equipment.

  • Significance:
    Though a relatively small engagement compared to larger battles like Falaise, holding key river crossings like Bull Bridge was critical for sustaining the speed of the Allied liberation of France.

General Howitzer’s observation:
We took St. Martin and locked down Bull Bridge—small on the map, but damned vital. Every bridge we held kept our boys rolling toward the Seine and sent the Germans running with their tails between their legs, bleeding men and steel all the way.

5 VP’s

Card Balance:

Allies – 5

Axis – 5

Complexity:

3

Conditions:

Countryside

Context:

Historical

Location:

France

Year:

1944

Theater:

Western

Campaign:

Operation Cobra

Codename:

Summary:

Objectives:

5 VP’s, plus the temporary Allied Objectives of city of St. Martin and Bull Bridge

Battlefield:

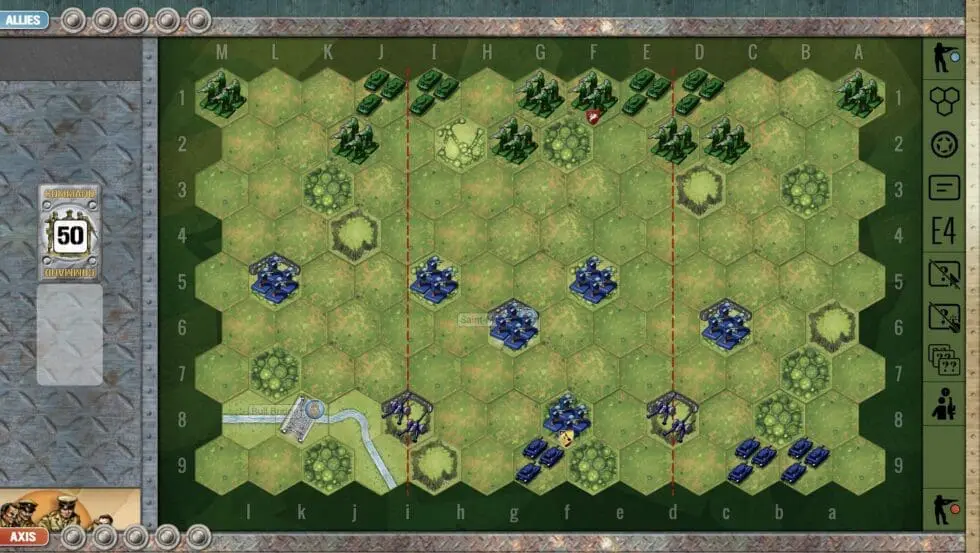
Countryside with forests and hedgerows, and a small river in the corner with Bull Bridge crossing it.

Troops:

Allies – 8 Infantry, 4 Armor

Axis – 6 Infantry, 3 Armor, 2 Artillery


medal allies

🔥 Winning as Allies

1.  Big picture strategy is that you can put the pressure on the enemy by both attacking units, and pushing towards the Bull Bridge medal objective.  This is only a 5 medal game, so there is not a lot of time for deep strategy.  You mainly just have to get into good attacking positions, and take out the enemy.

2.  The Axis have two Artillery units and a Mortar Infantry unit. This means they have a lot of range for their attacks. It may be best to hunker down in hedgerows and on hills and wait for the enemy to attack you. Use your Armor to attack the enemy Infantry while you wait.

medal axis

🔥 Winning as Axis

1.  Big picture strategy is that you need to defend the town of St. Martin and the Bull Bridge.  Historically, the bridge was completely undefended, so you need to get some forces near there to protect it from enemy capture.  

2.  You have an Infantry Mortar unit.  With it you can ignore terrain restrictions and attack anything that comes near you with a range of 3,2,1,1.  Use it to defend the town of St. Martin.

3.  Defensive Response: the enemy has more Armor and Infantry than you, so stay in your protective stance, in your hedgerows and the sandbagged town. Let them come to you, and then attack them from a safe position.  This should even things out a bit. Your Armor needs to spread itself out across all three sectors fo the battlefield to be prepared for wherever the enemy may try to attack.

Battle Reports

Author:

Link:

Place Battle Reports on a scenario page, or specify its scenario name in the shortcode.

Mount Pincon

Mount Pincon

Mount Pinçon

scenario_MtPincon

“Listen up! In July ‘44, our British allies climbed that Mount Pinçon, the highest ground in Normandy, and they weren’t going to let anything stop them.

That hill was a fortress—machine guns, mortars, and some of the toughest terrain you could imagine. The 43rd Wessex Infantry Division took it step by step, pushing through hedgerows and driving the enemy out of their defenses.

This wasn’t just about one hill—it was about the whole campaign. Taking Mount Pinçon meant commanding the area, opening the door to Falaise and Paris. That’s how you win a fight—you secure the high ground and keep the enemy on the move!”

~~ General Howitzer

6 VP’s

card

Card Balance:

Allies – 5

Axis – 5

Complexity:

4

Conditions:

Countryside

countryside

Context:

Historical

Location:

France

Year:

1944

Theater:

Mediterranean

Campaign:

Normandy

Codename:

Operation Bluecoat

Summary:

Objectives:

6 VP’s, plus the Mount Pincon

Battlefield:

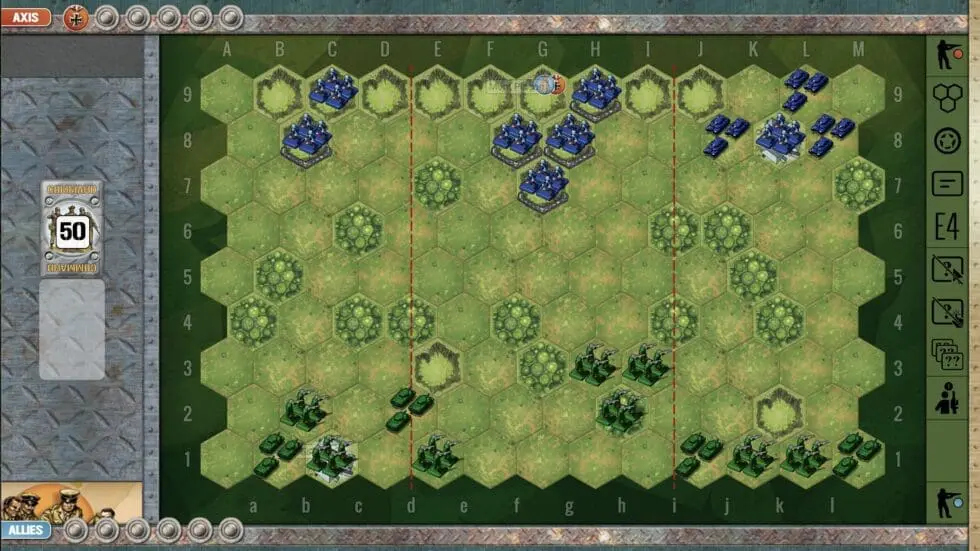
The terrain is covered with trees scattered across field, with the six hexes of Mount Pincon hugging one border.

Troops:

Allies – 8 Infantry, 4 Armor

Axis – 7 Infantry, 3 Armor


medal allies

🔥 Winning as Allies

1.  Historically, the Allies are on the advance and won this battle. So in this scenario, the Allies have one extra armor, and one more Infantry than the Axis. Use your additional strength to push against the enemy forces and put them under extreme pressure.

2.  Watch the corridor on your right flank. The enemy has three armor in that section, and you need to get into the forest next to it to defend.  If they make it past that corridor, they will decimate your infantry forces in the rear.

3.  Remember that if you get even one troop onto a Mount Pincon hex, you will win the Temporary Medal.  But the mountain requires two movement points.  So as you get close to achieving the victory points needed, maneuver close and be ready to move onto the mountain and gain the final medal.

medal axis

🔥 Winning as Axis

1. Historically, this is a defensive scenario for the Axis, which is why you begin with one territorial medal already secured, which you must defend.  But you can do great damage to the enemy on your left flank with your armor.

2.  Be wary of moving your defensive Infantry in the center section, unless you have a tremendous set of attack cards. You must keep at least two units on the hilltop. If the enemy gets a Behind Enemy Lines card, they could destroy an infantry unit, and then lodge on the hill to get an additional medal, so be careful!

Author:

Days of Wonder

Link:


Place Battle Reports on a scenario page, or specify its scenario name in the shortcode.

Secret Link