General Howitzer’s Field Guide to Memoir 44

A Memoir 44 Strategy & Tactics Community

GENERAL HOWITZER

Scenarios

Explore Memoir ’44 battlefields, maps, and player statistics.

GENERAL HOWITZER

Campaigns

Relive historic campaigns through linked Memoir ’44 battles.

GENERAL HOWITZER

Strategy Tips

Sharpen your tactics and take command of the battlefield.

GENERAL HOWITZER

Field Manuals

Explore field guides and manuals for your next battle.

GENERAL HOWITZER

Tournaments

Find Memoir ’44 tournaments, events, and fellow commanders.

GENERAL HOWITZER

My War Room

Track your battles, campaigns, achievements, and next mission.

Drop in the Night: 82nd

Drop in the Night: 82nd

Drop in the Night: 82nd

scenario_Drop-in-the-Night-82nd

In the dead of night before D-Day, the All Americans of the 82nd Airborne didn’t tiptoe into Normandy—they dropped in like thunder. C-47s hauled them over the Channel, and under flak, wind, and pure hell, they jumped straight into the enemy’s lap. The plan was simple: grab the crossroads, smash German lines of communication, and choke off any counterattack toward Utah Beach.

They got scattered to hell and gone, fighting in small bands with nothing but guts and rifles. But by God, they took Sainte-Mère-Église—the first French town freed—and held the line until the rest of the army came ashore. It was messy, it was costly, but it damned well crippled the Germans and locked down the flank for the greatest invasion in history.

~~ General Howitzer

VP’s

8

card

Card Balance:

Allies – 5

Axis – 5

Complexity:

4

Conditions:

Countryside

countryside

Context:

Historical

Location:

Normandy

Year:

1944

Summary:

Victory Points:

8 Medals, including some objectives for capturing towns, bridges, and permanent medals for blowing up bridges.

Terrain:

there is a lot of terrain here with the battlefield being a breakthrough that is 17 rows deep, composed of countryside, rivers and marshes.

Troops:

Allies – 10 elite Infantry units

Axis – 10 Infantry, 1 Armor

Special Rules:

1.  Allies do three Paradrops around the stars on the map.

2.  Nightime Rules: Then once daylight appears, you may be given a chance to do a fourth paradrop, using lost figures, up to three total over the town of Les Forges.

3.  Blowing up Bridges – once Allied forces are adjacent to a bridge, they may have an opportunity to blow it up, for a Permanent Victory Medal.

medal allies

Allies:

1. Big Picture Strategy:  This scenario is about consolidating and coordinating your forces.  Because of the paradrops, they end up scattered across the battlefield in a semi-random formation.  You need to pull them together and then make a plan to target sets of the enemy forces, sector by sector: isolated, attack, destroy, move to the next sector.

2.  Note that you have three Temporary Medal Objectives, made up of two bridges and one town.  You also have two Permanent Medal Objectives if you can blow up the designated bridges of Pont-l’Abbe, and Beuzeville.

3.  Concerning the paradrops at the start of the game.  The rules instruct you to center each drop around one of the three stars on the battlefield.  While you may be required to do this when playing IRL with friends, the BGA site will allow you to drop them anywhere you like, subject to the same random losses and displacement issues.

Some commanders have been quite successful in dropping all of their paratroops in the same sector, and then wiping out the enemy before moving on to the next sector.

4.  A second paradrop occurs at dawn.  Once you hit daylight, more reinforcements will be coming your way. So hang in there!

medal axis

Axis:

1.  Be aware the the two bridges across La Douve River are each permanent medal objectives for the Allies. If they succeed in destroying your bridges, they will gain one Medal for each one, plus any forces you have locked behind the river will be stranded as the river is impassable.

2.  The other two bridges with the marked Allied Medals are temporary objectives, in which the Allies must remain on the hex to keep the medal.

3.  Because this is an 8 medal battle, you will need to eliminate almost all of the Allied units to win. 

4.  Get your kills in before daylight. Once that happens, the enemy will do another paradrop of reinforcements.

Author: Ddrommel

URL

Place Battle Reports on a scenario page, or specify its scenario name in the shortcode.
Capture of Parry

Capture of Parry

Capture of Parry

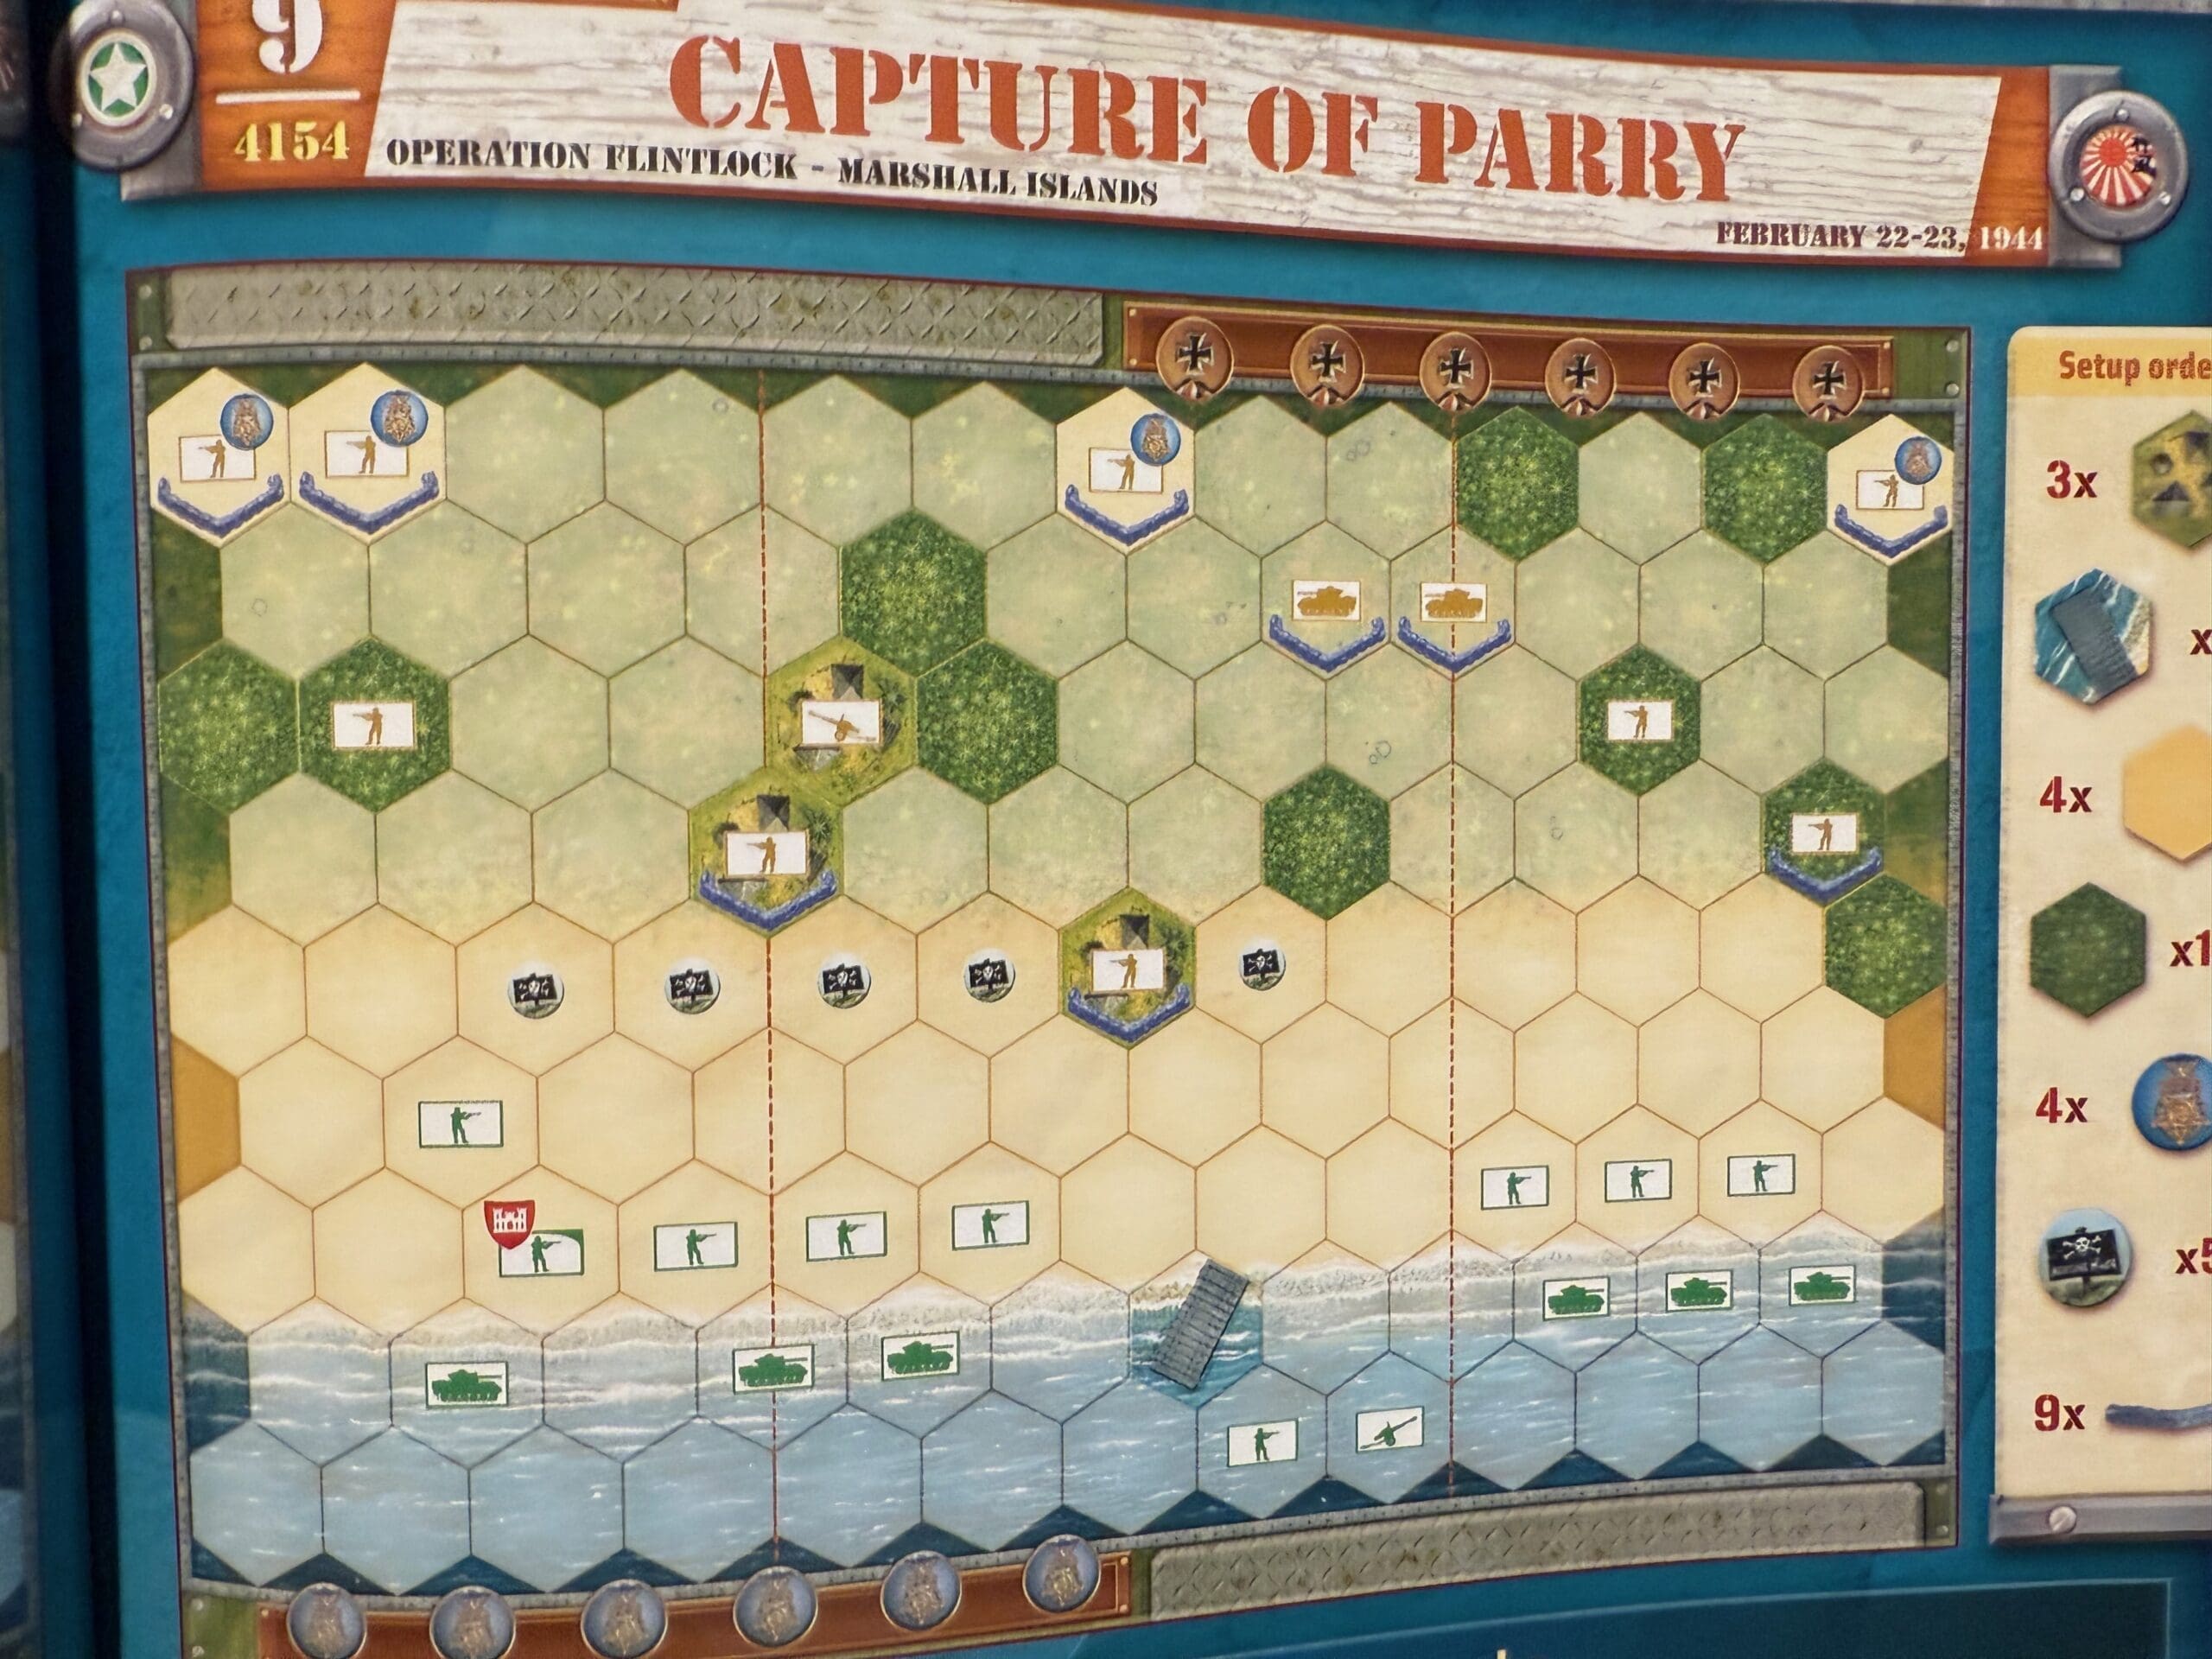
Parry Island was a textbook assault—our 4th Marines hit the beach with tanks rolling, guns blazing, and the Navy pounding from offshore. The enemy was dug in and ready to die, and they did—every last one of them. In just over a day, we turned their fortress into a smoking ruin. That win locked down Kwajalein and put us one step closer to Japan’s front porch. Fast, brutal, and effective—just the way war ought to be fought.

~~ General Howitzer

6 VP’s

card

Card Balance:

Allies – 6

Axis – 4

Complexity:

3

Conditions:

Beach &  Jungle

Context:

Location:

Marshall Islands

Year:

1944

Theater:

Western

Campaign:

Marshall Islands

Codename:

Operation Flintlock

Summary:

Objectives:

6 VP’s

Battlefield:

Beach.

Troops:

Allies – 9 Infantry, 6 Armor, 1 Artillery

Axis – 9 Infantry, 2 Armor, 1 Artillery


medal allies

Allied Strategy:

1.  

medal axis

Axis Strategy

1.

Battle Reports

Author:

Days of Wonder

Resource:

Campaign Book, Volume 2

Place Battle Reports on a scenario page, or specify its scenario name in the shortcode.

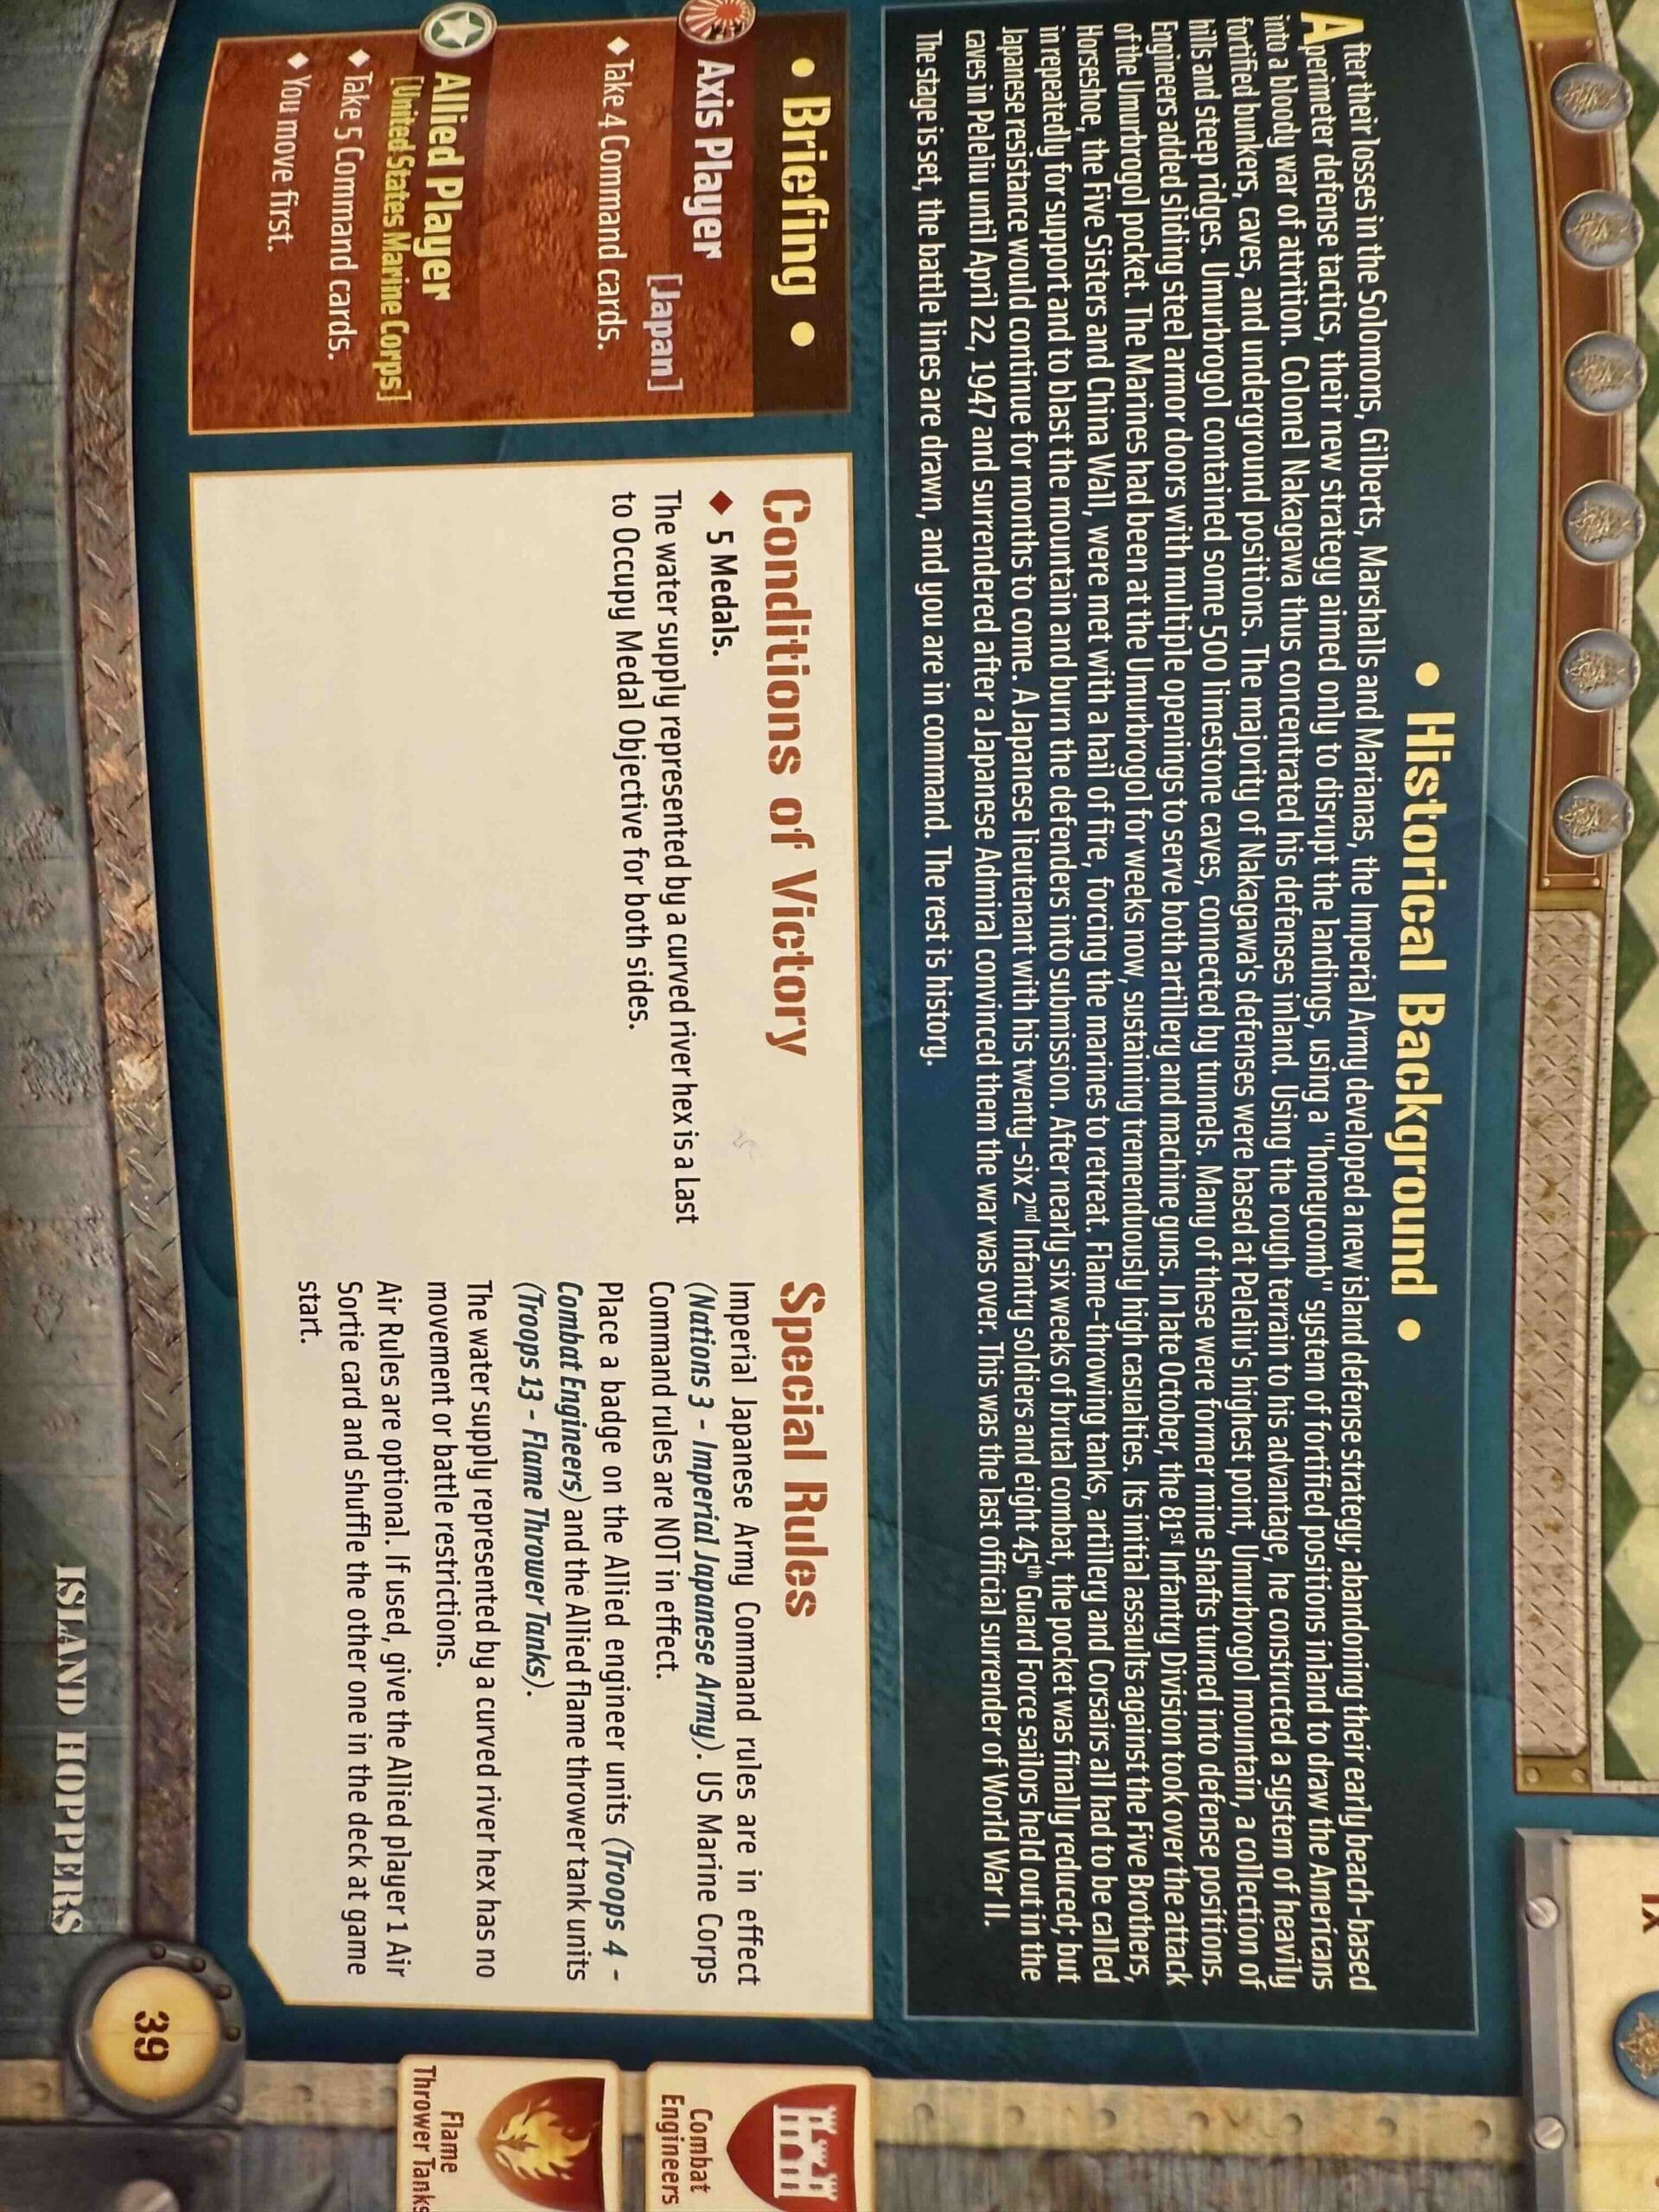
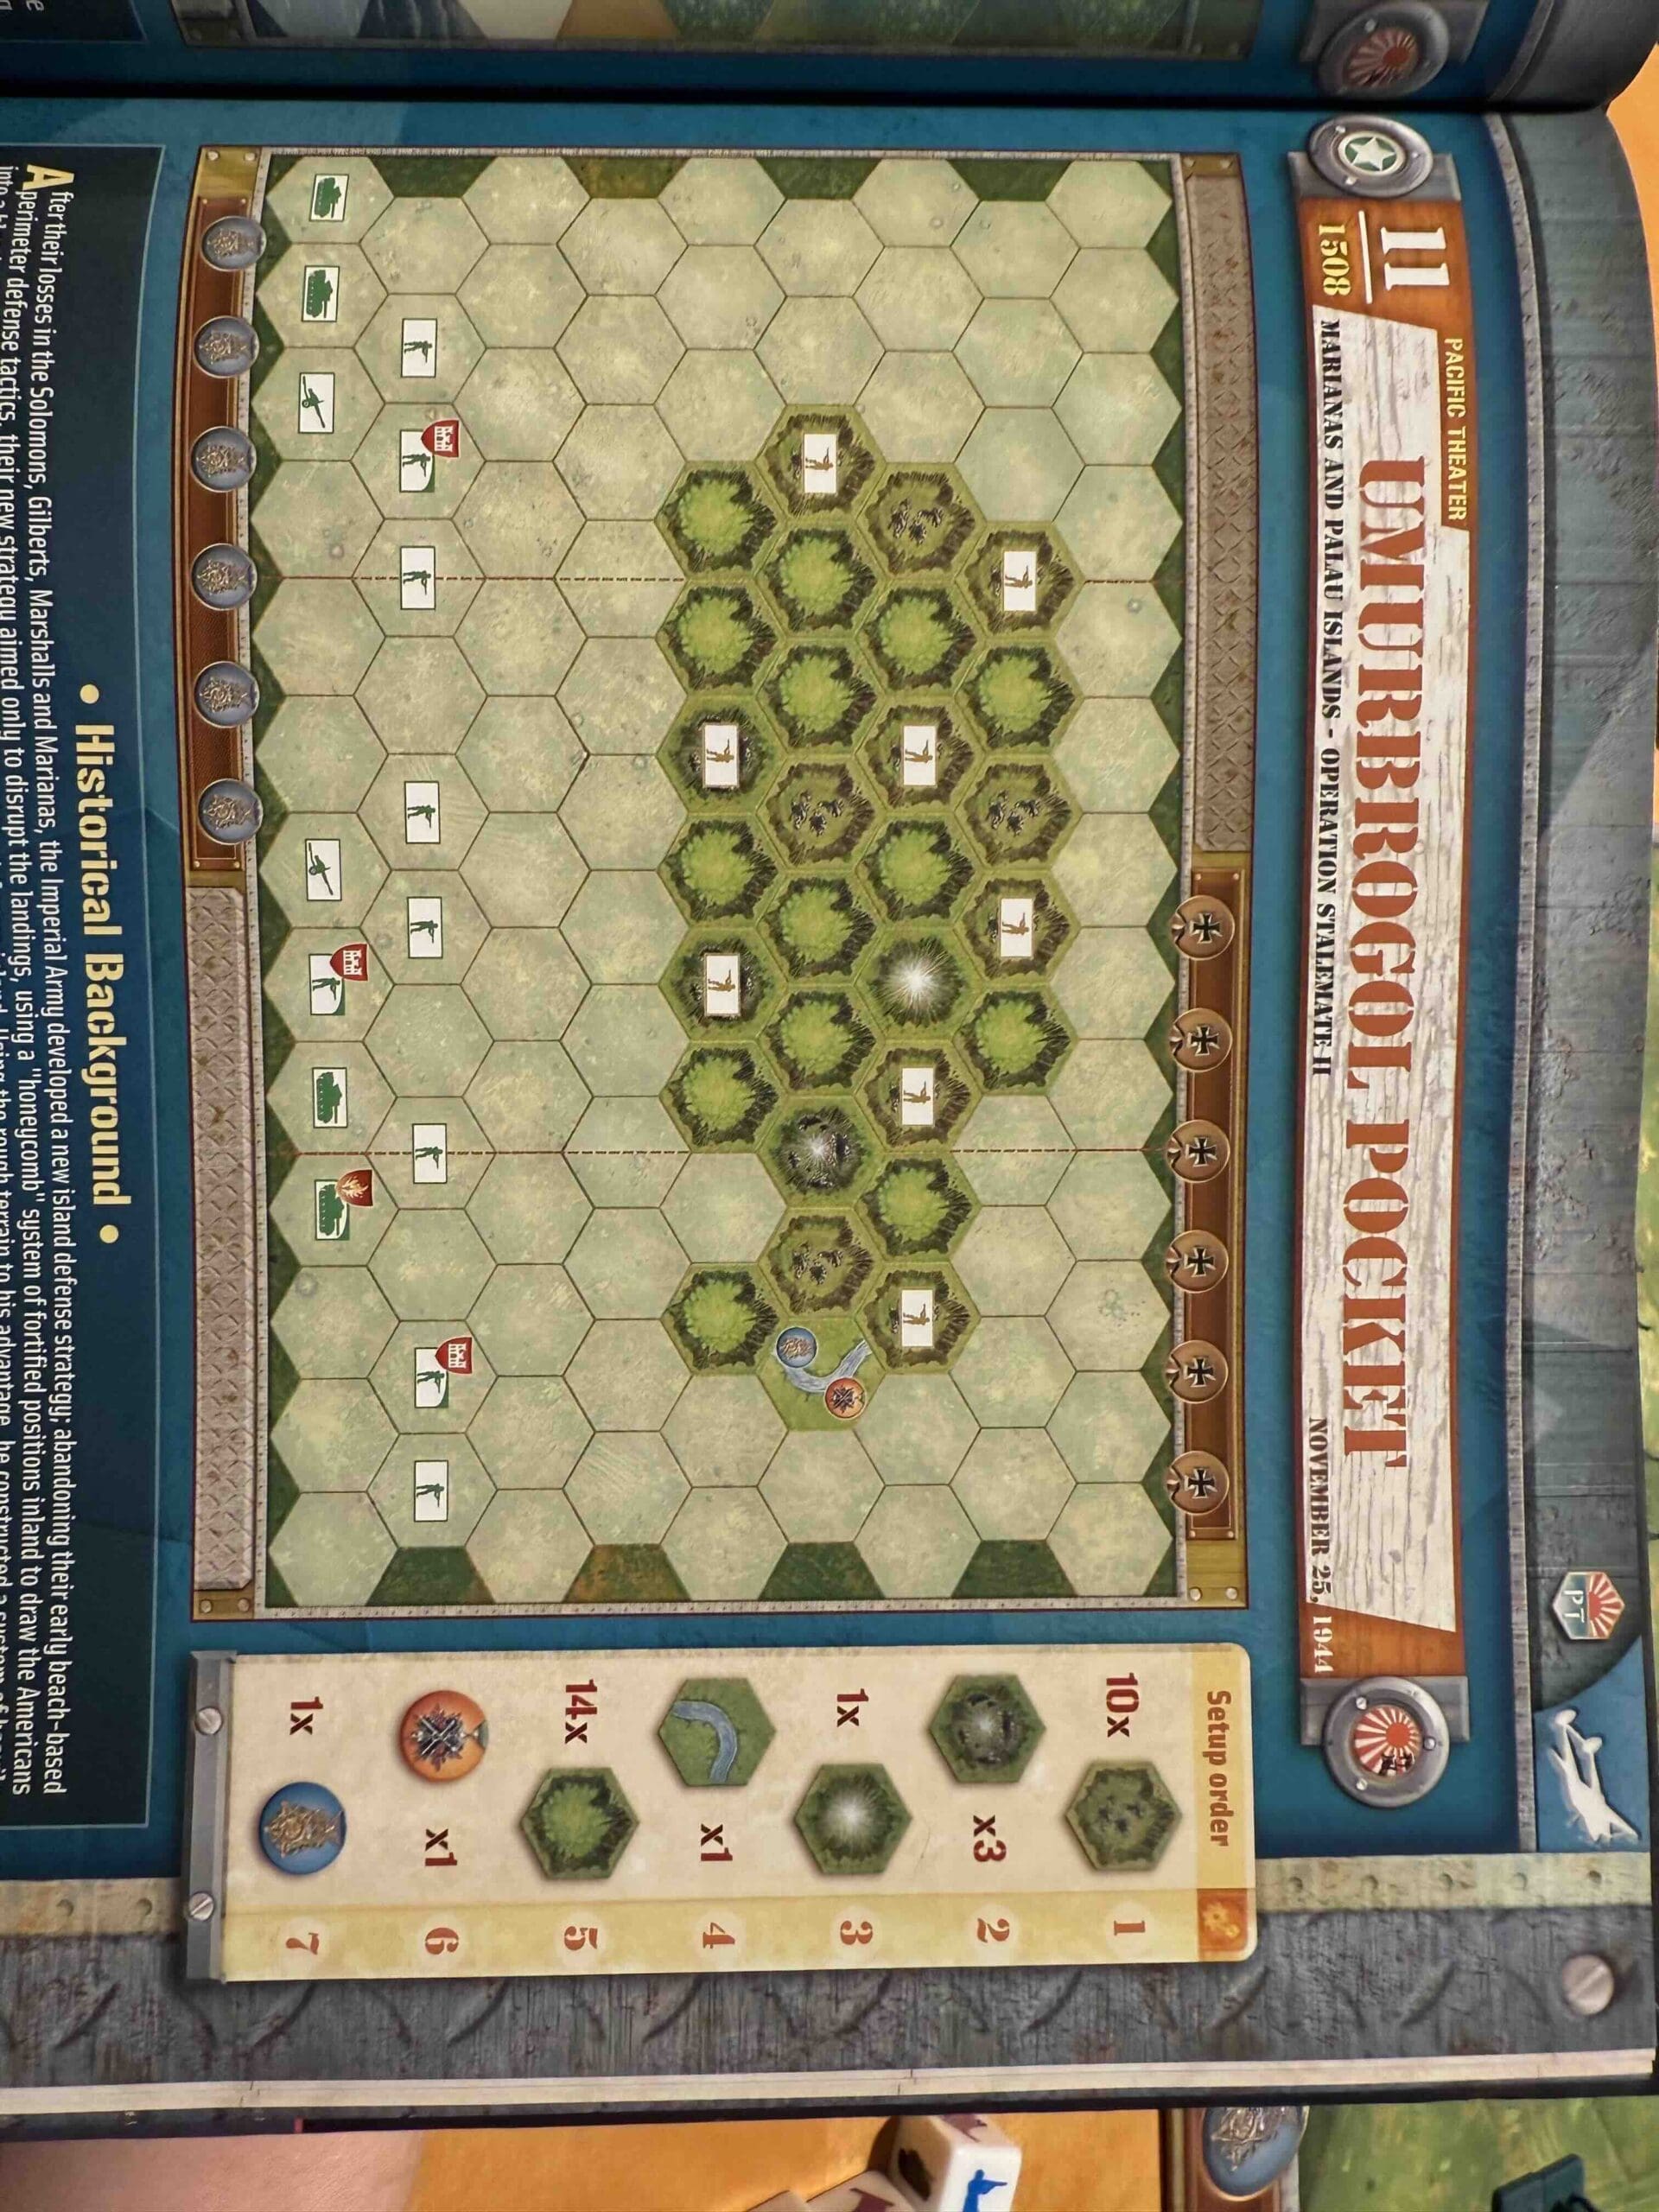
Umurbrogol Pocket

Umurbrogol Pocket

Umurbrogol Pocket

The Battle of the Umurbrogol Pocket in November 1944 was one of the fiercest and most grueling phases of the Battle of Peleliu during World War II. U.S. Marines faced deeply entrenched Japanese defenders in a mountainous, cave-ridden area known as “Bloody Nose Ridge.”

General Howitzer’s summary:

The Umurbrogol Pocket was a nightmare carved into rock—our Marines went up against die-hard defenders holed up in caves. The Japanese were dug in deep, fighting to the last man, and made us pay for every inch in blood. Flamethrowers, grenades, and guts—that’s what it took to root them out. It was slow, savage, and costly, but in the end, we crushed them. That ridge showed just how far the enemy would go—and how much farther we were willing to go to win.

5 VP’s

card

Card Balance:

Allies (US Marines) – 5

Axis – 4

Complexity:

3

Conditions:

Jungle Beach

Context:

Historical

Location:

Marianas & Palau Islands

Year:

1944

Theater:

Pacific

Campaign:

The Battle of Peleliu

Codename:

Operation Stalemate II

Summary:

Objectives:

5 VP’s plus a Last to Occupy Medal Objective

Battlefield:

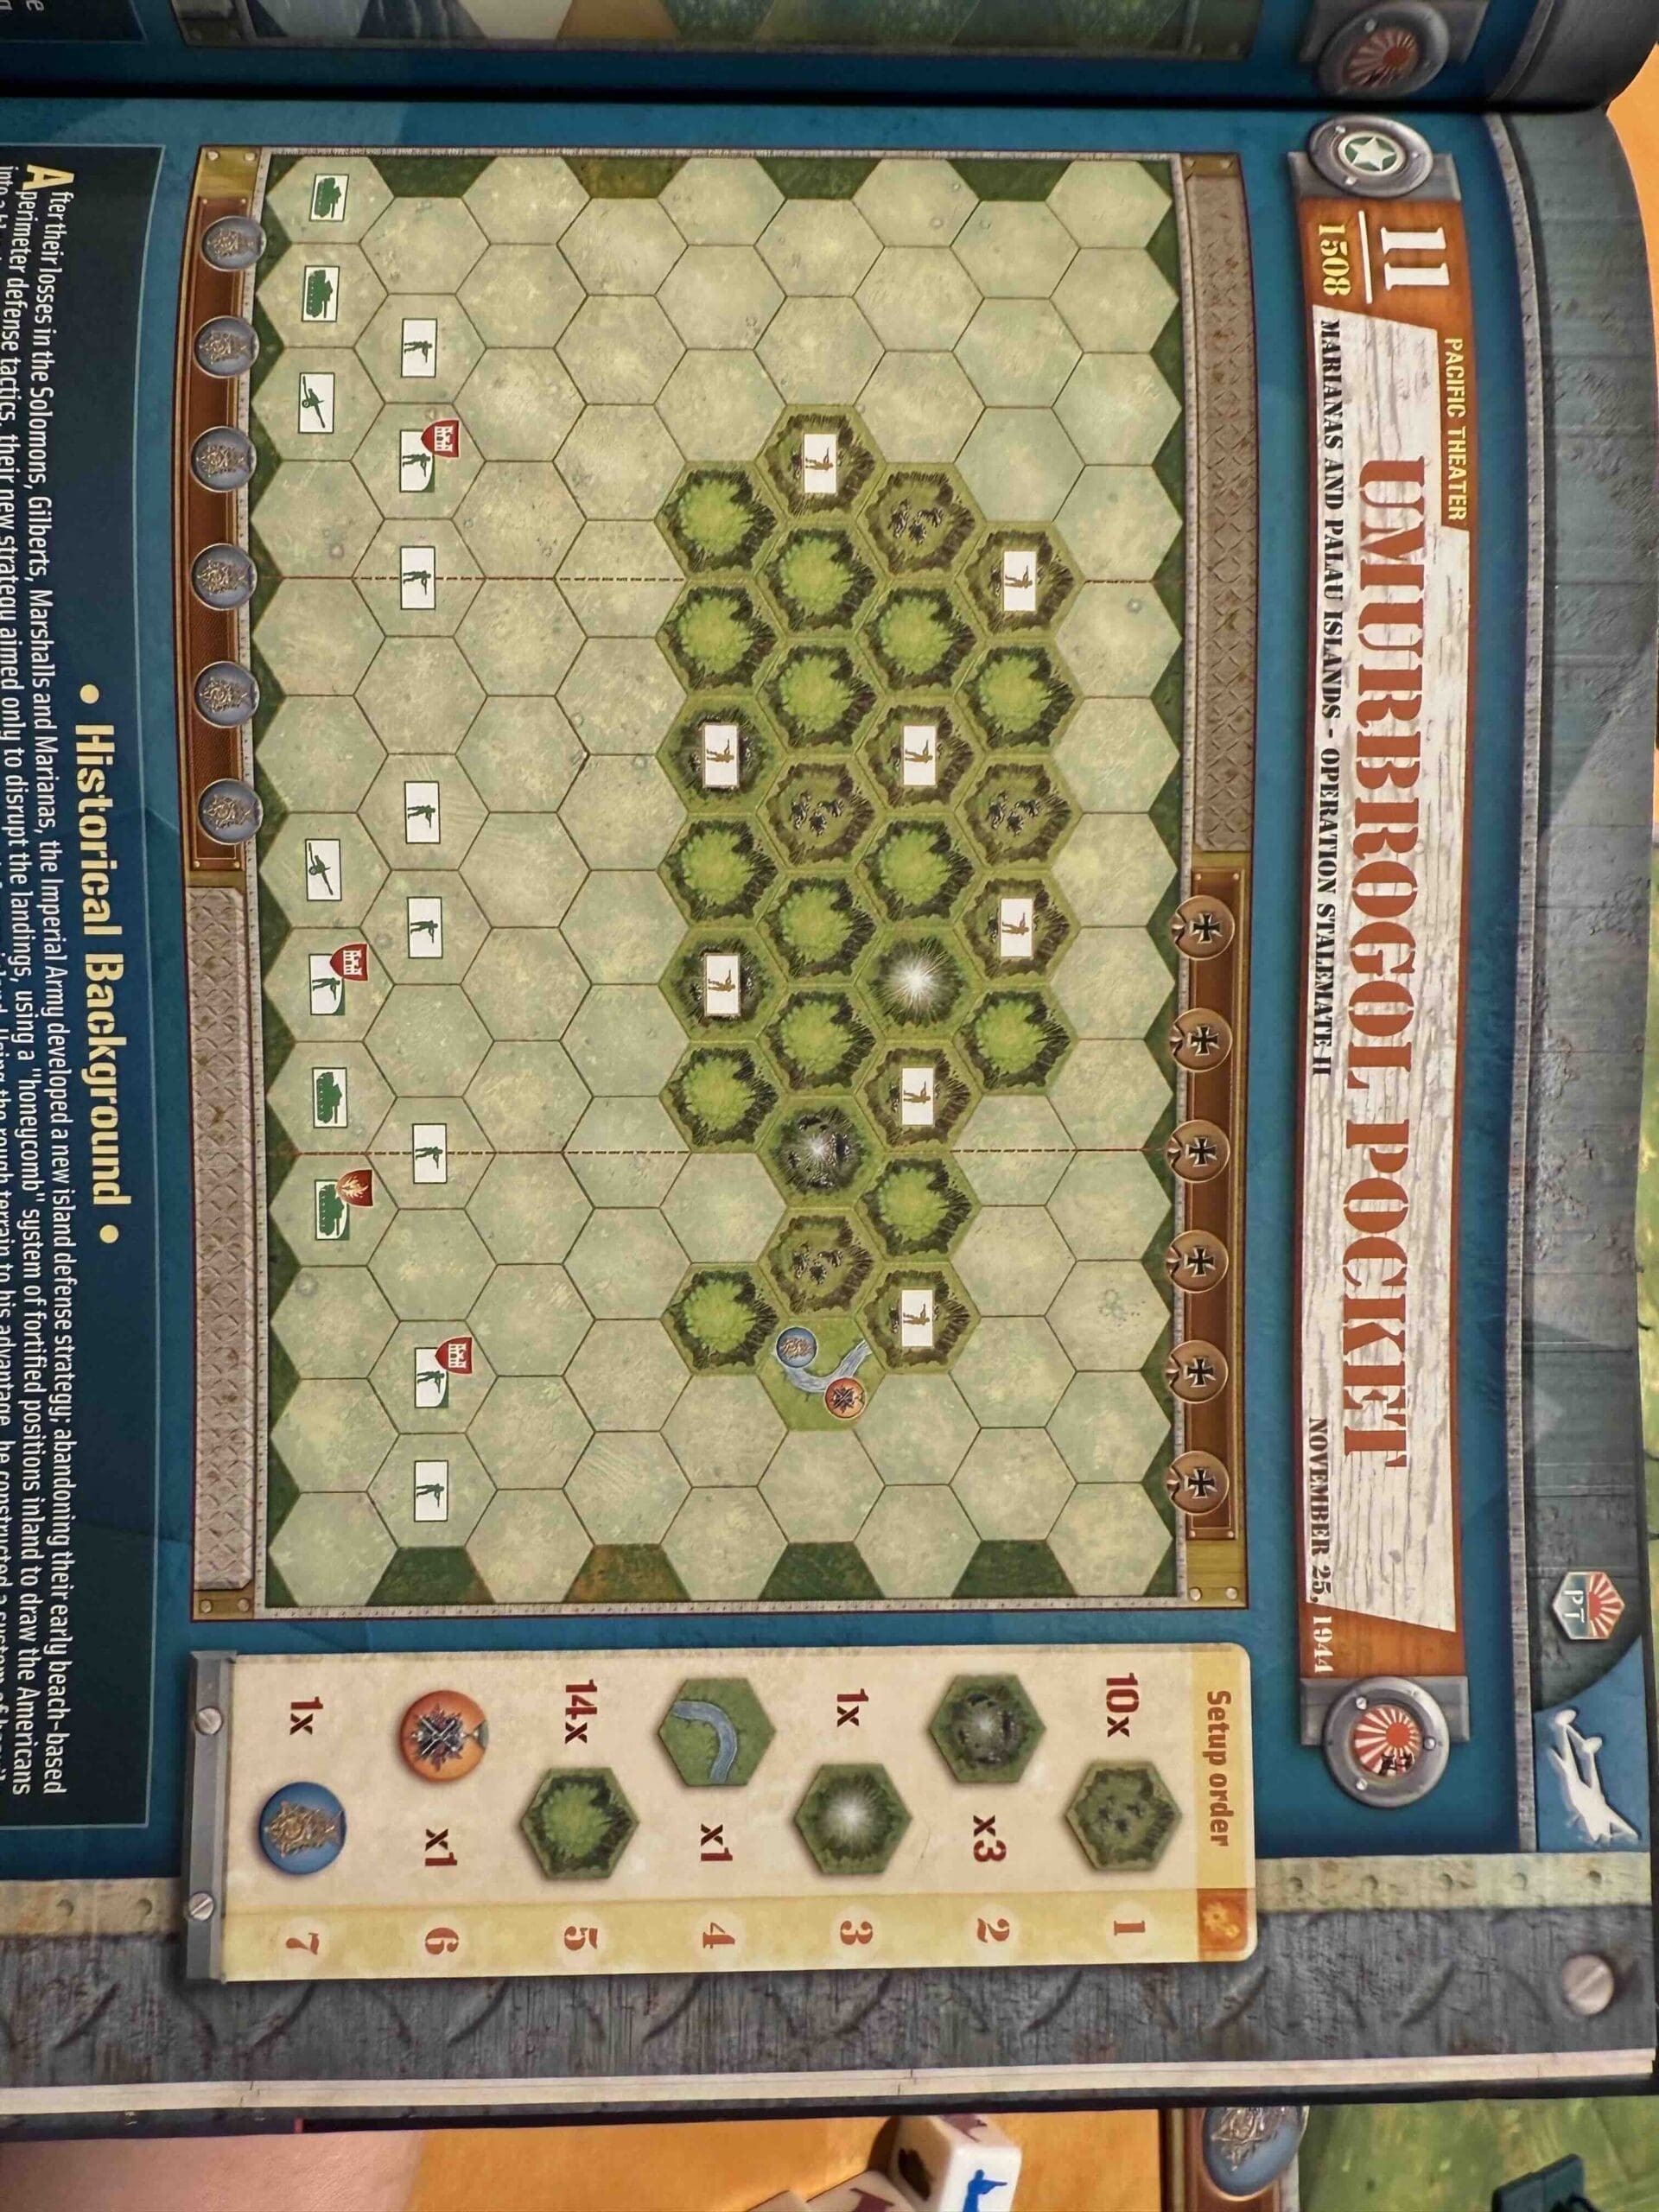
Combination of hills and hills with caves .

Troops:

Allies – 9 Infantry, 4 Armor, and 2 Artillery

Axis – 8 Infantry


medal allies

Allied Strategy:

1.  Use your Artillery and Armor as much as you can to attack the Japanese defenders at a distance.  When they are sufficiently weakened, you can move in your infantry, beginning with your Engineers to finish up the forward units.

2.  The fresh water river is a victory medal which goes to the  Last to Occupy.  Keep some forces on hand to grab it as a final victory point.

medal axis

Axis Strategy

1.  You have a very strong defensive position which allows you to quickly move between caves and hide your weak units when necessary.

2.  Take advantage of your Seishin Kyoiku powers and attack any enemy troops using the Banzai War Cry which come within two hexes of your Infantry.

3.  Guard the fresh water source, and keep the enemy away from it, as they will attempt to grab it on their final move. 

Battle Reports

Author:

Days of Wonder

Resource:

Campaign Book, Volume 2

Place Battle Reports on a scenario page, or specify its scenario name in the shortcode.

Singapore

Singapore

Singapore

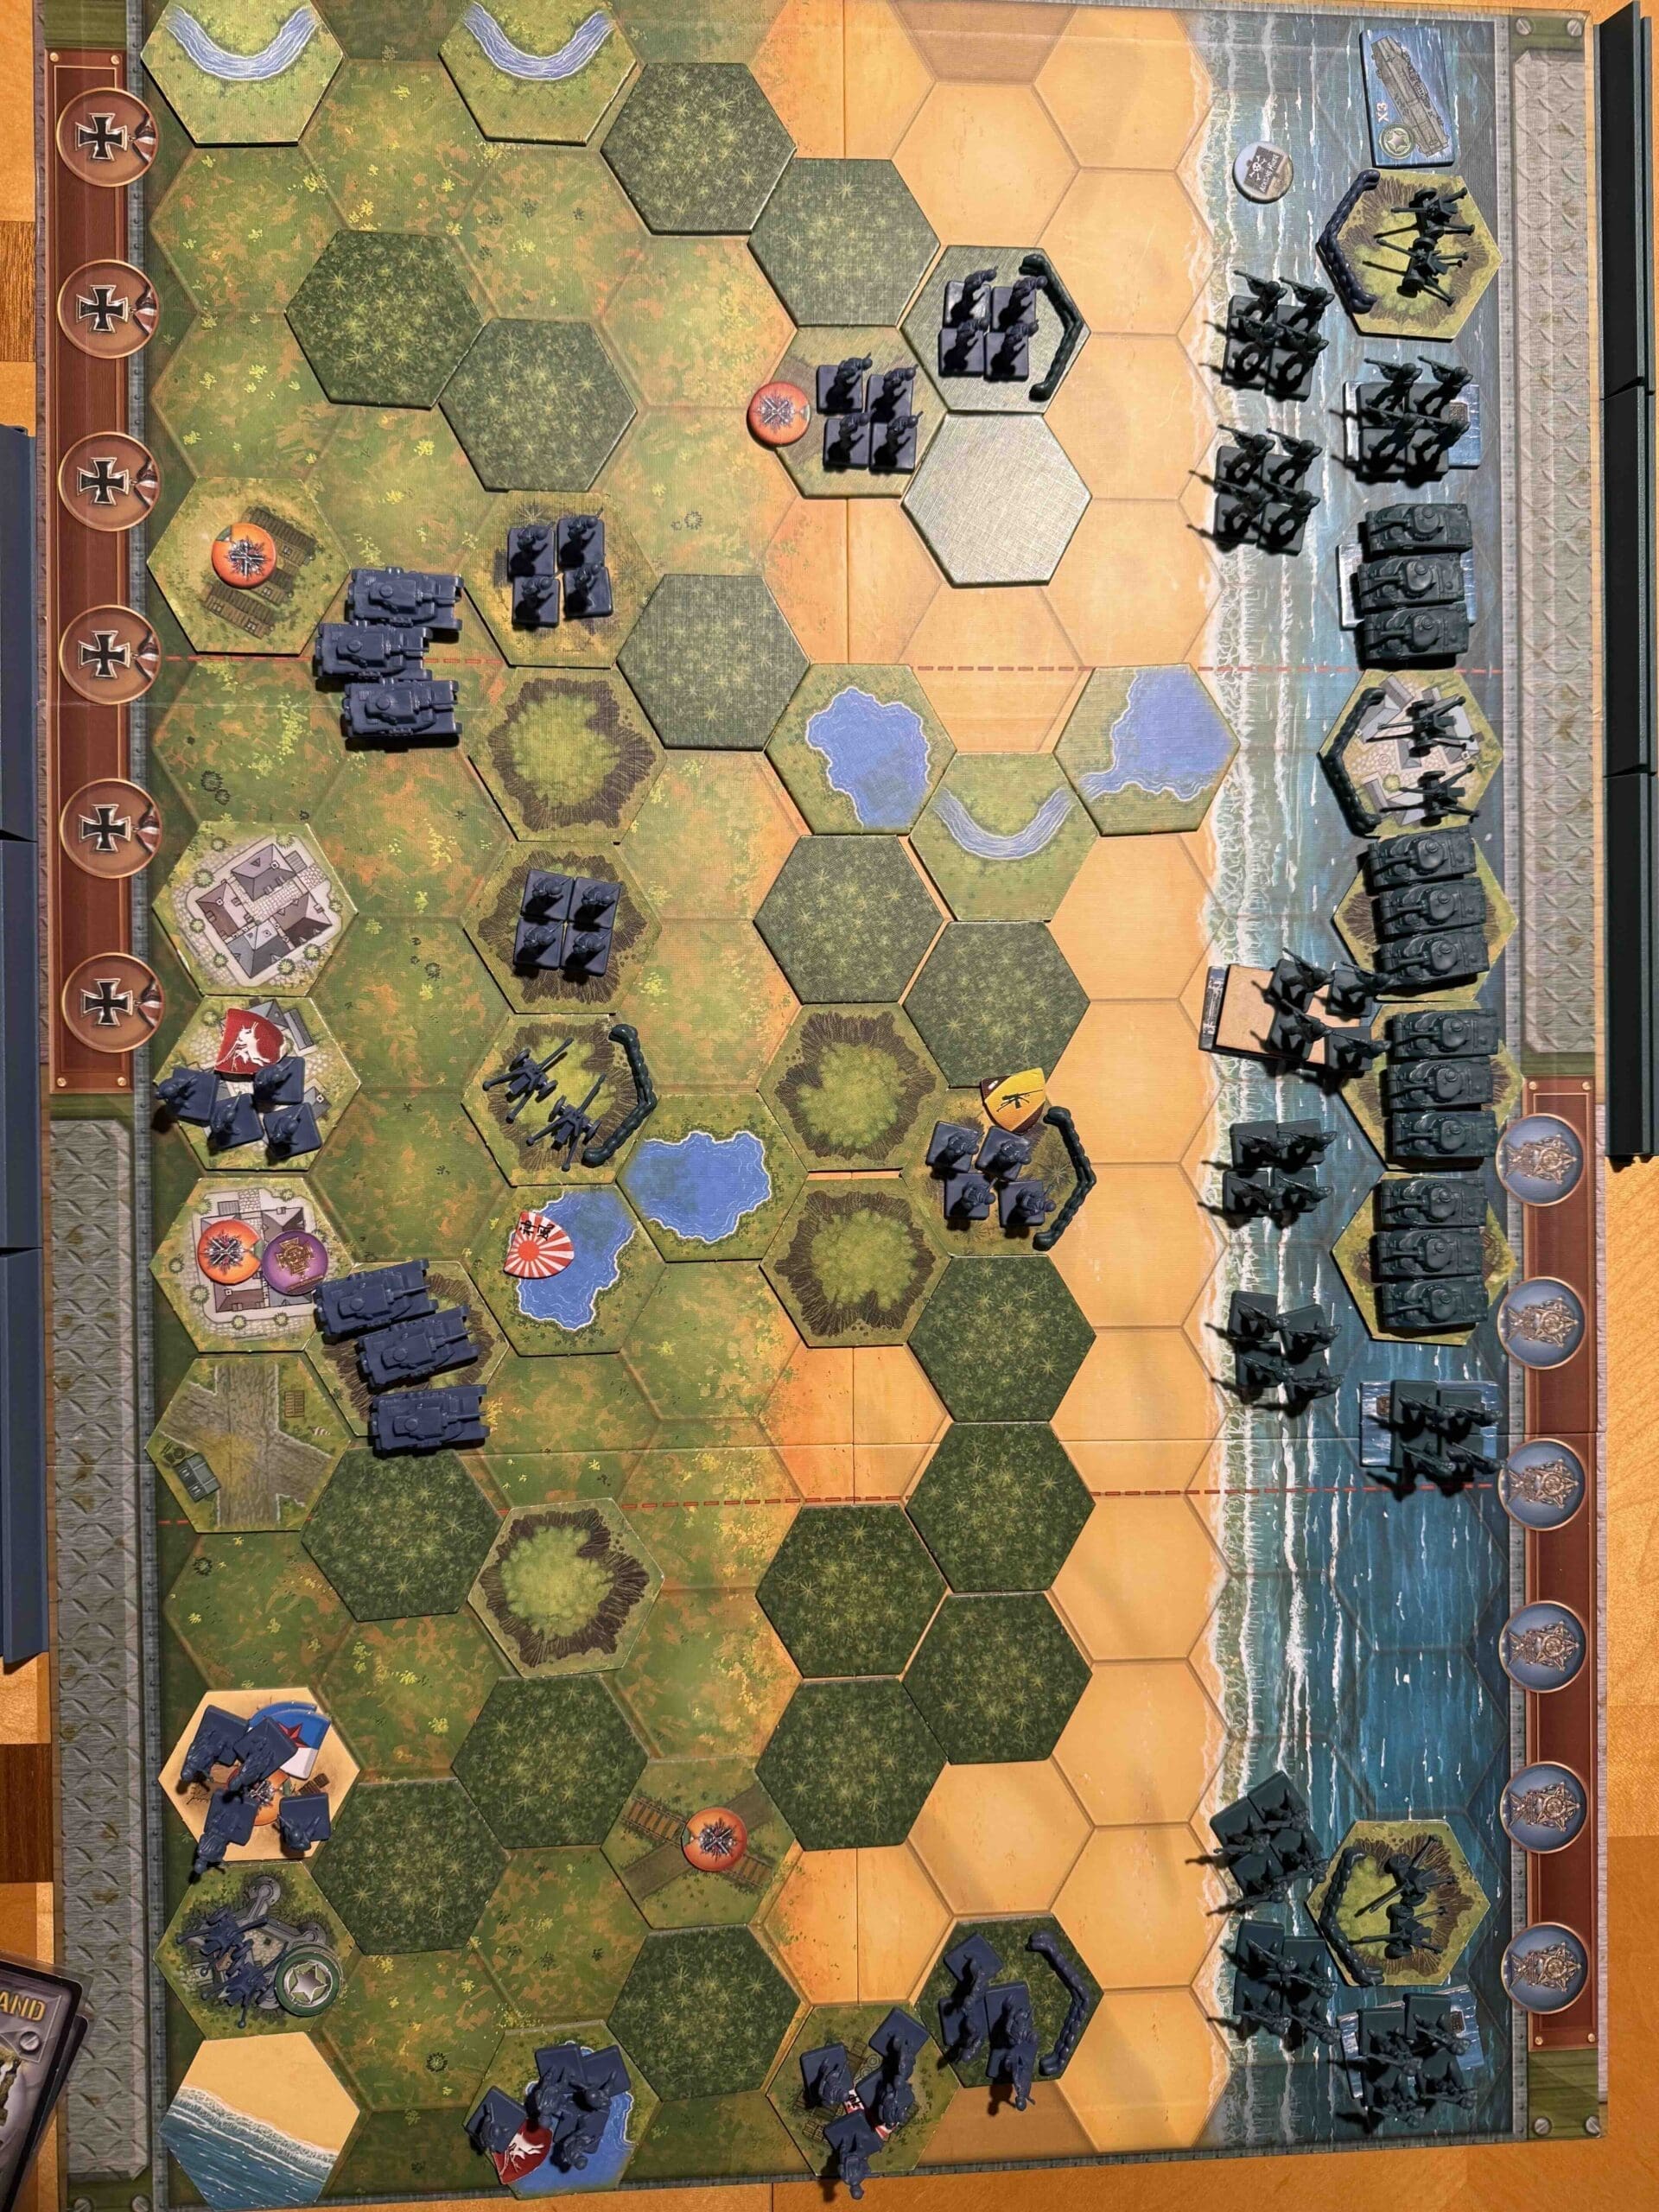
The Battle of Singapore in February 1942 was the climactic phase of Japan’s “Bicycle Blitzkrieg” during the Mare Shinko Sakusen (Greater East Asia Co-Prosperity Sphere offensive). Japanese forces, using speed, surprise, and bicycles to maneuver swiftly through Malaya, overwhelmed British Commonwealth defenses and pushed them back to Singapore.

Despite its strong coastal defenses, Singapore fell after a week of land-based attacks and psychological warfare. General Percival surrendered on February 15, 1942, in one of Britain’s worst military defeats, with over 80,000 Allied troops taken prisoner. The fall of Singapore stunned the Allies and gave Japan control over a key strategic stronghold in Southeast Asia.

General Howitzer sums it up in one sentence:
The Japanese rolled through Malaya on – can you believe it! – bicycles, outmaneuvered the Brits, and took Singapore without breaking stride—proof that arrogance and poor leadership lose wars faster than bullets.

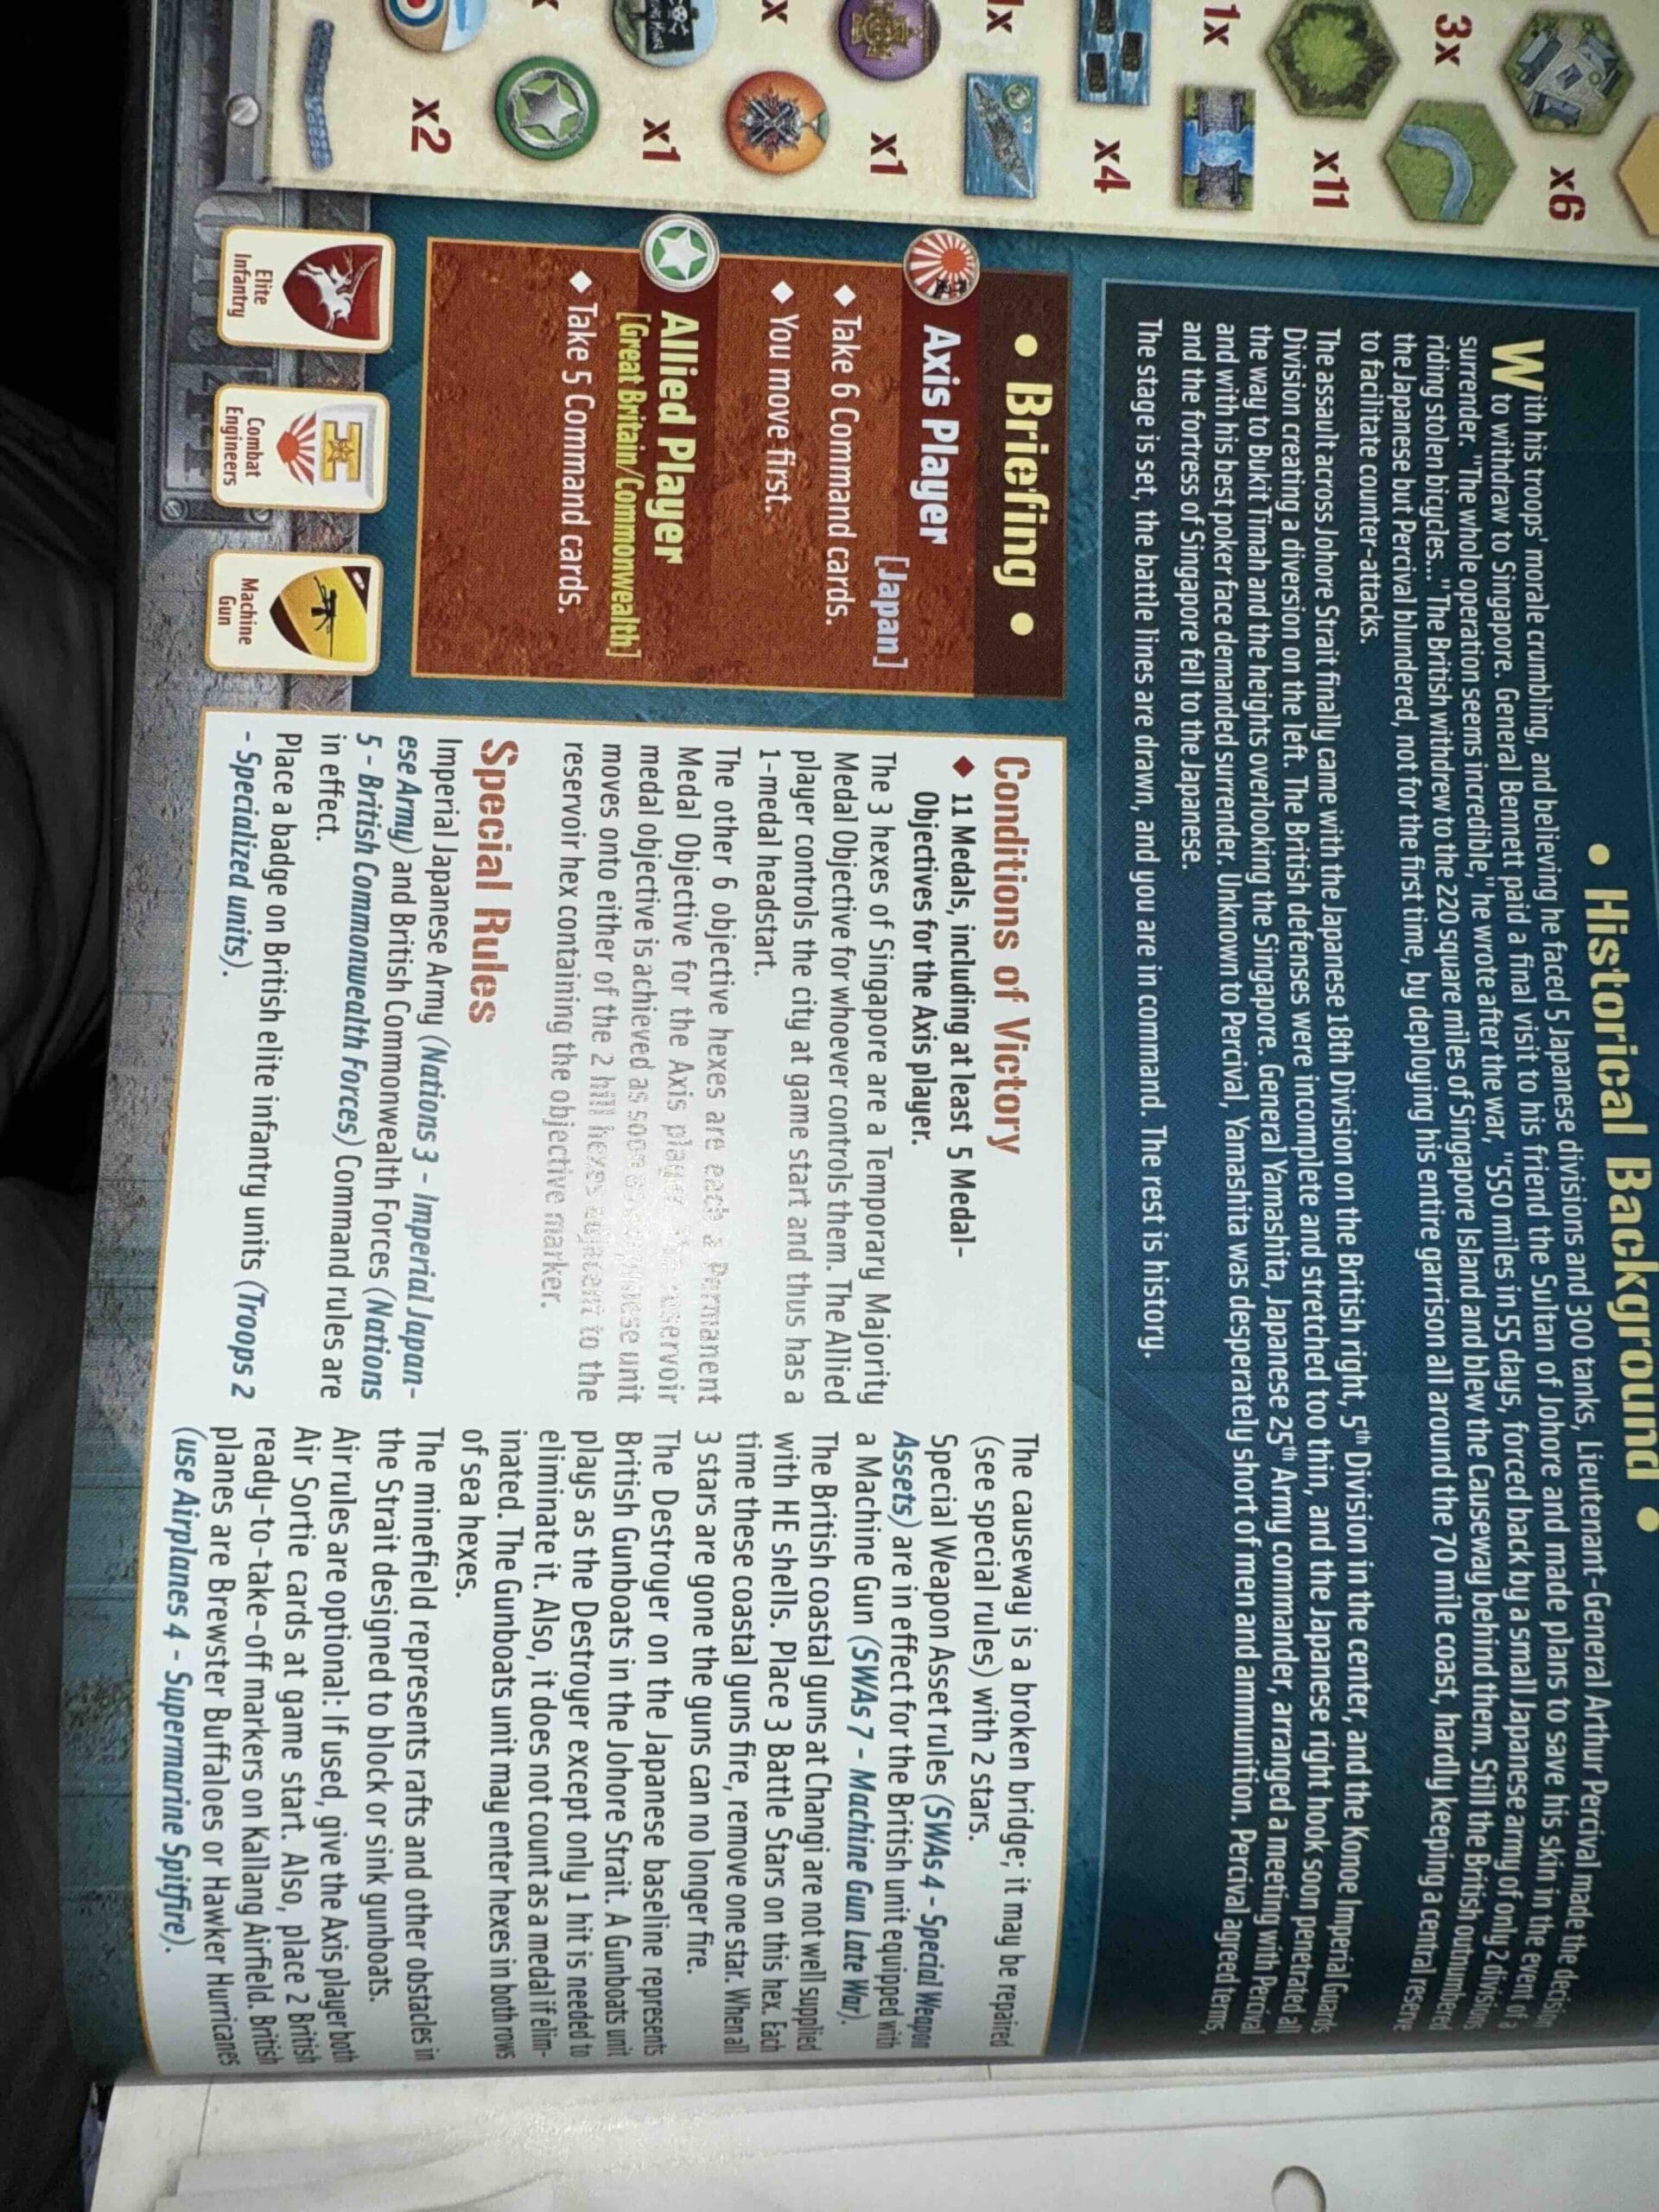
11 VP’s, including at least 5 Medal Objectives for the Axis player.

card

Card Balance:

Allies – 5

Axis – 6

Complexity:

4

Conditions:

Jungle Beach

Context:

Historical

Location:

Singapore

Year:

1942

Theater:

Pacific

Campaign:

Bicycle Blitzkreig

Codename:

Summary:

Objectives:

11 VP’s including Permanent Medal and Temporary Majority Medal Objectives

Battlefield:

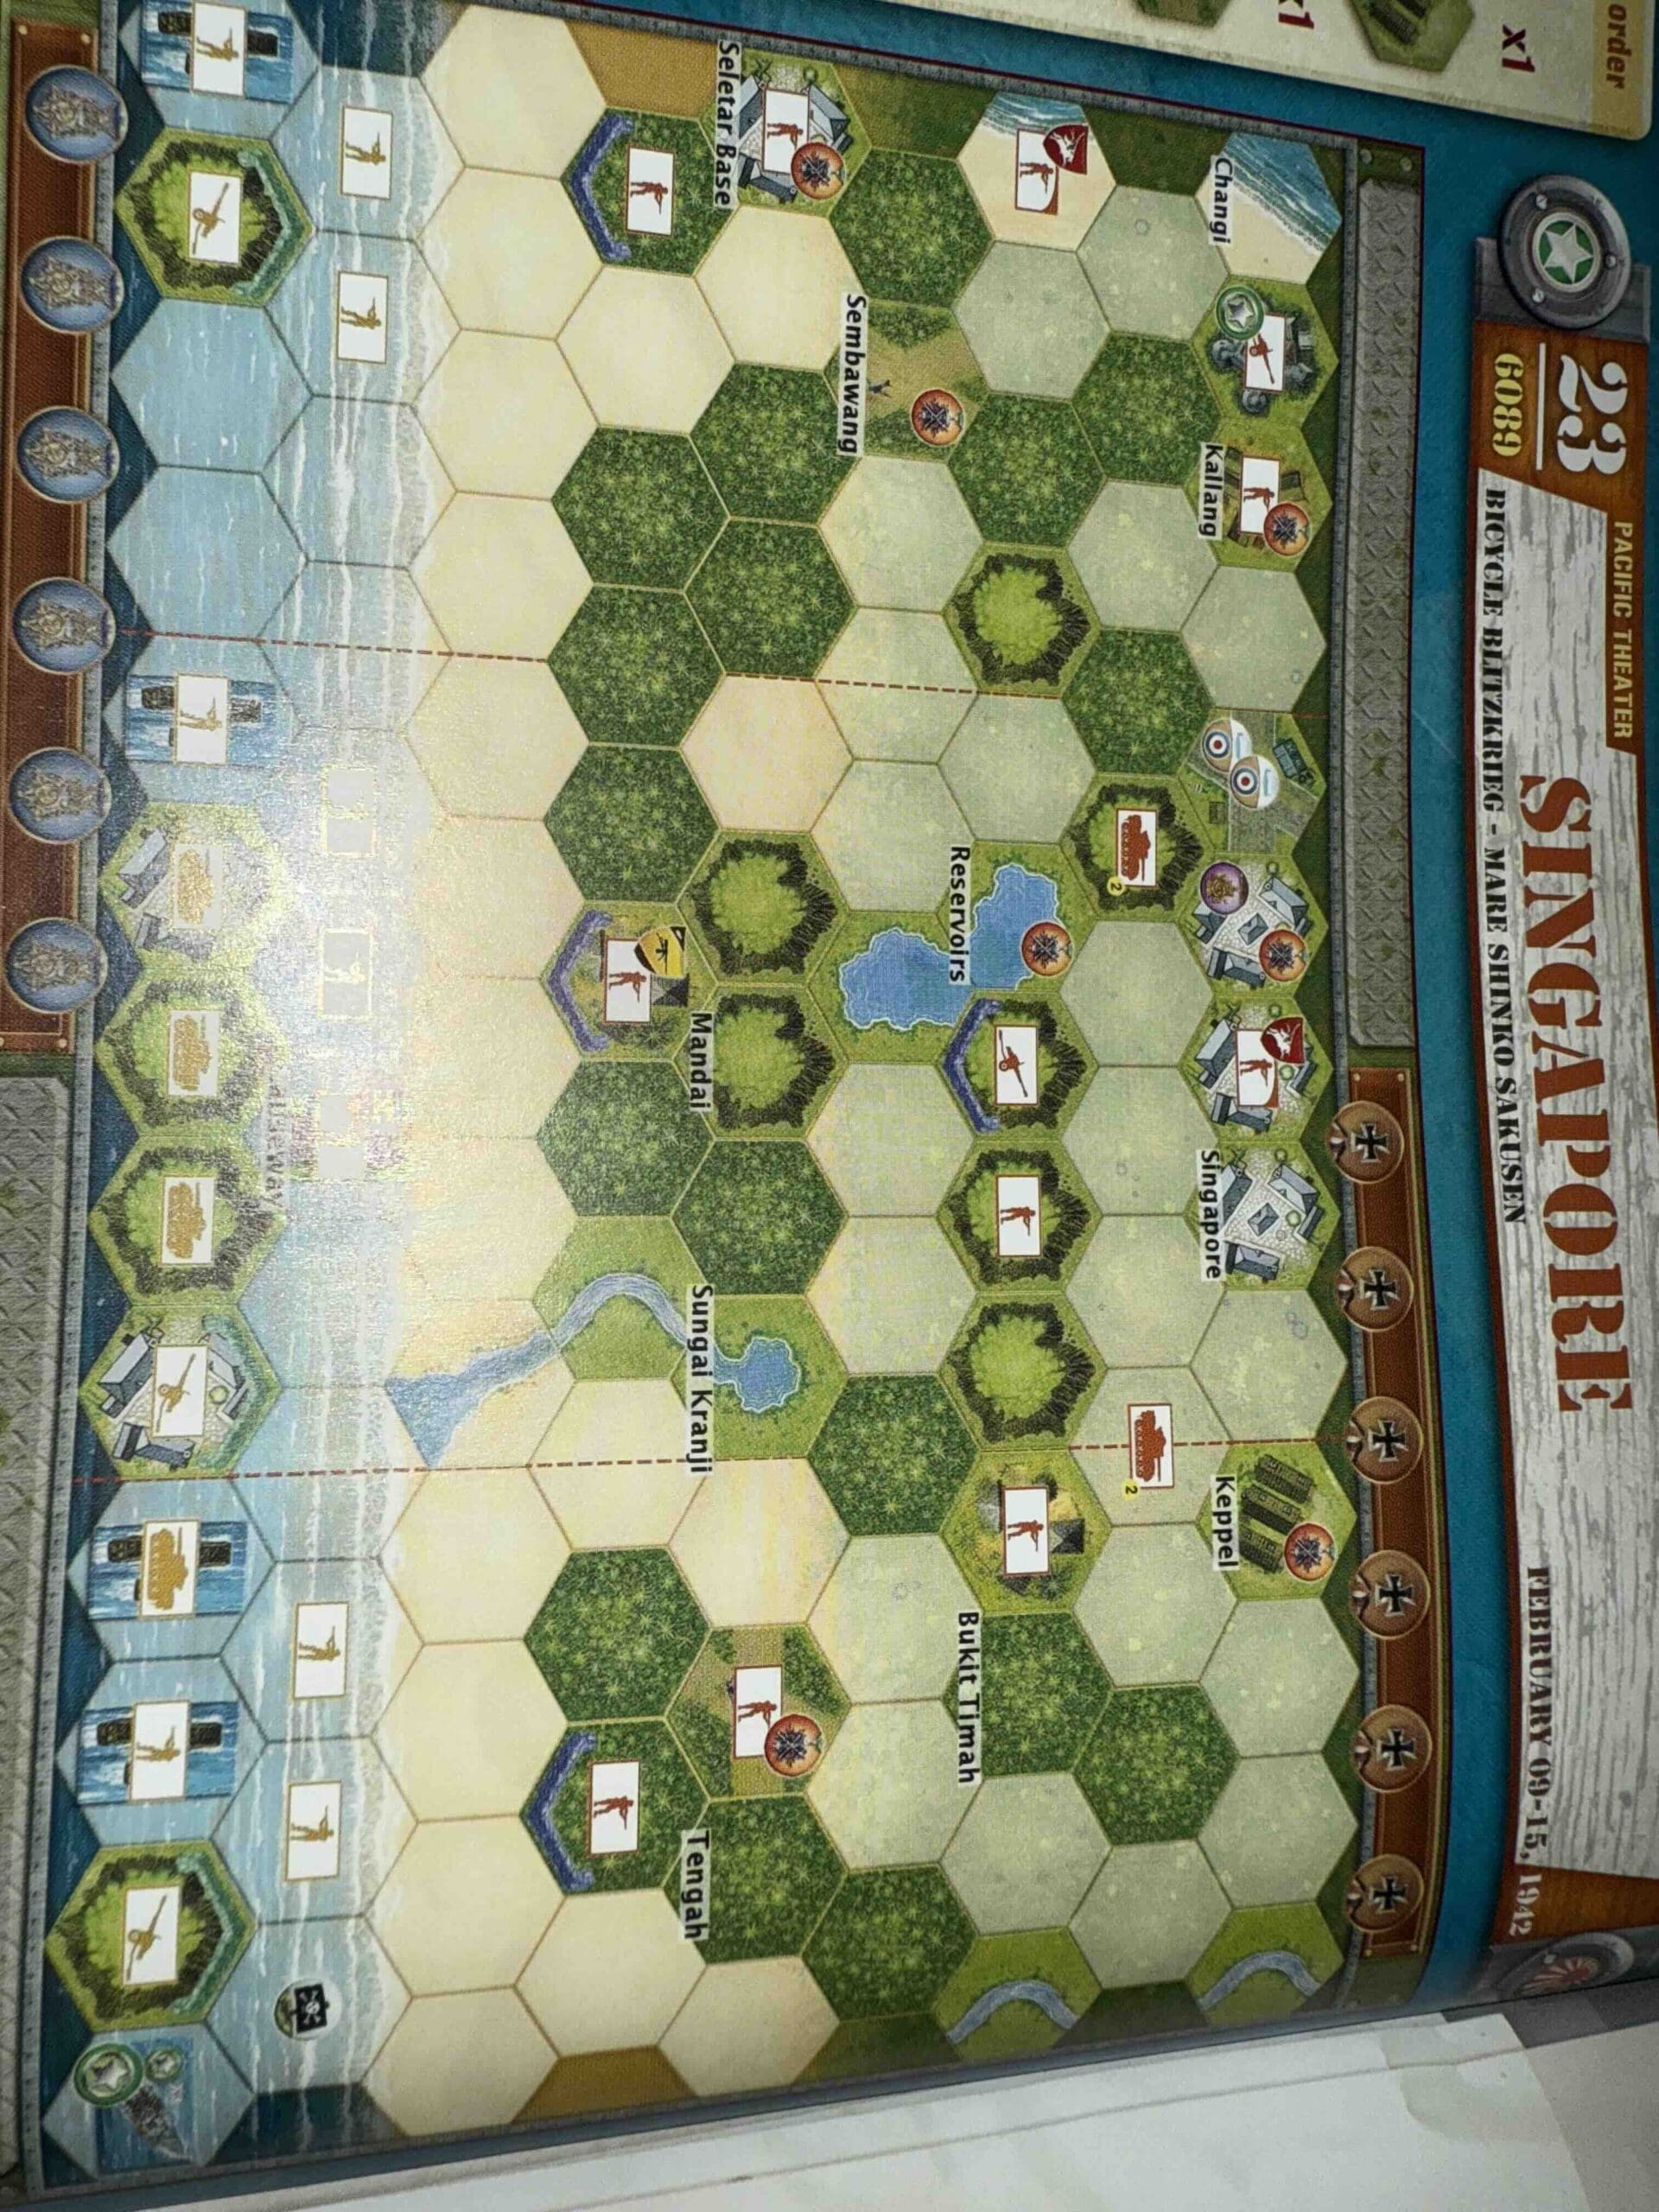
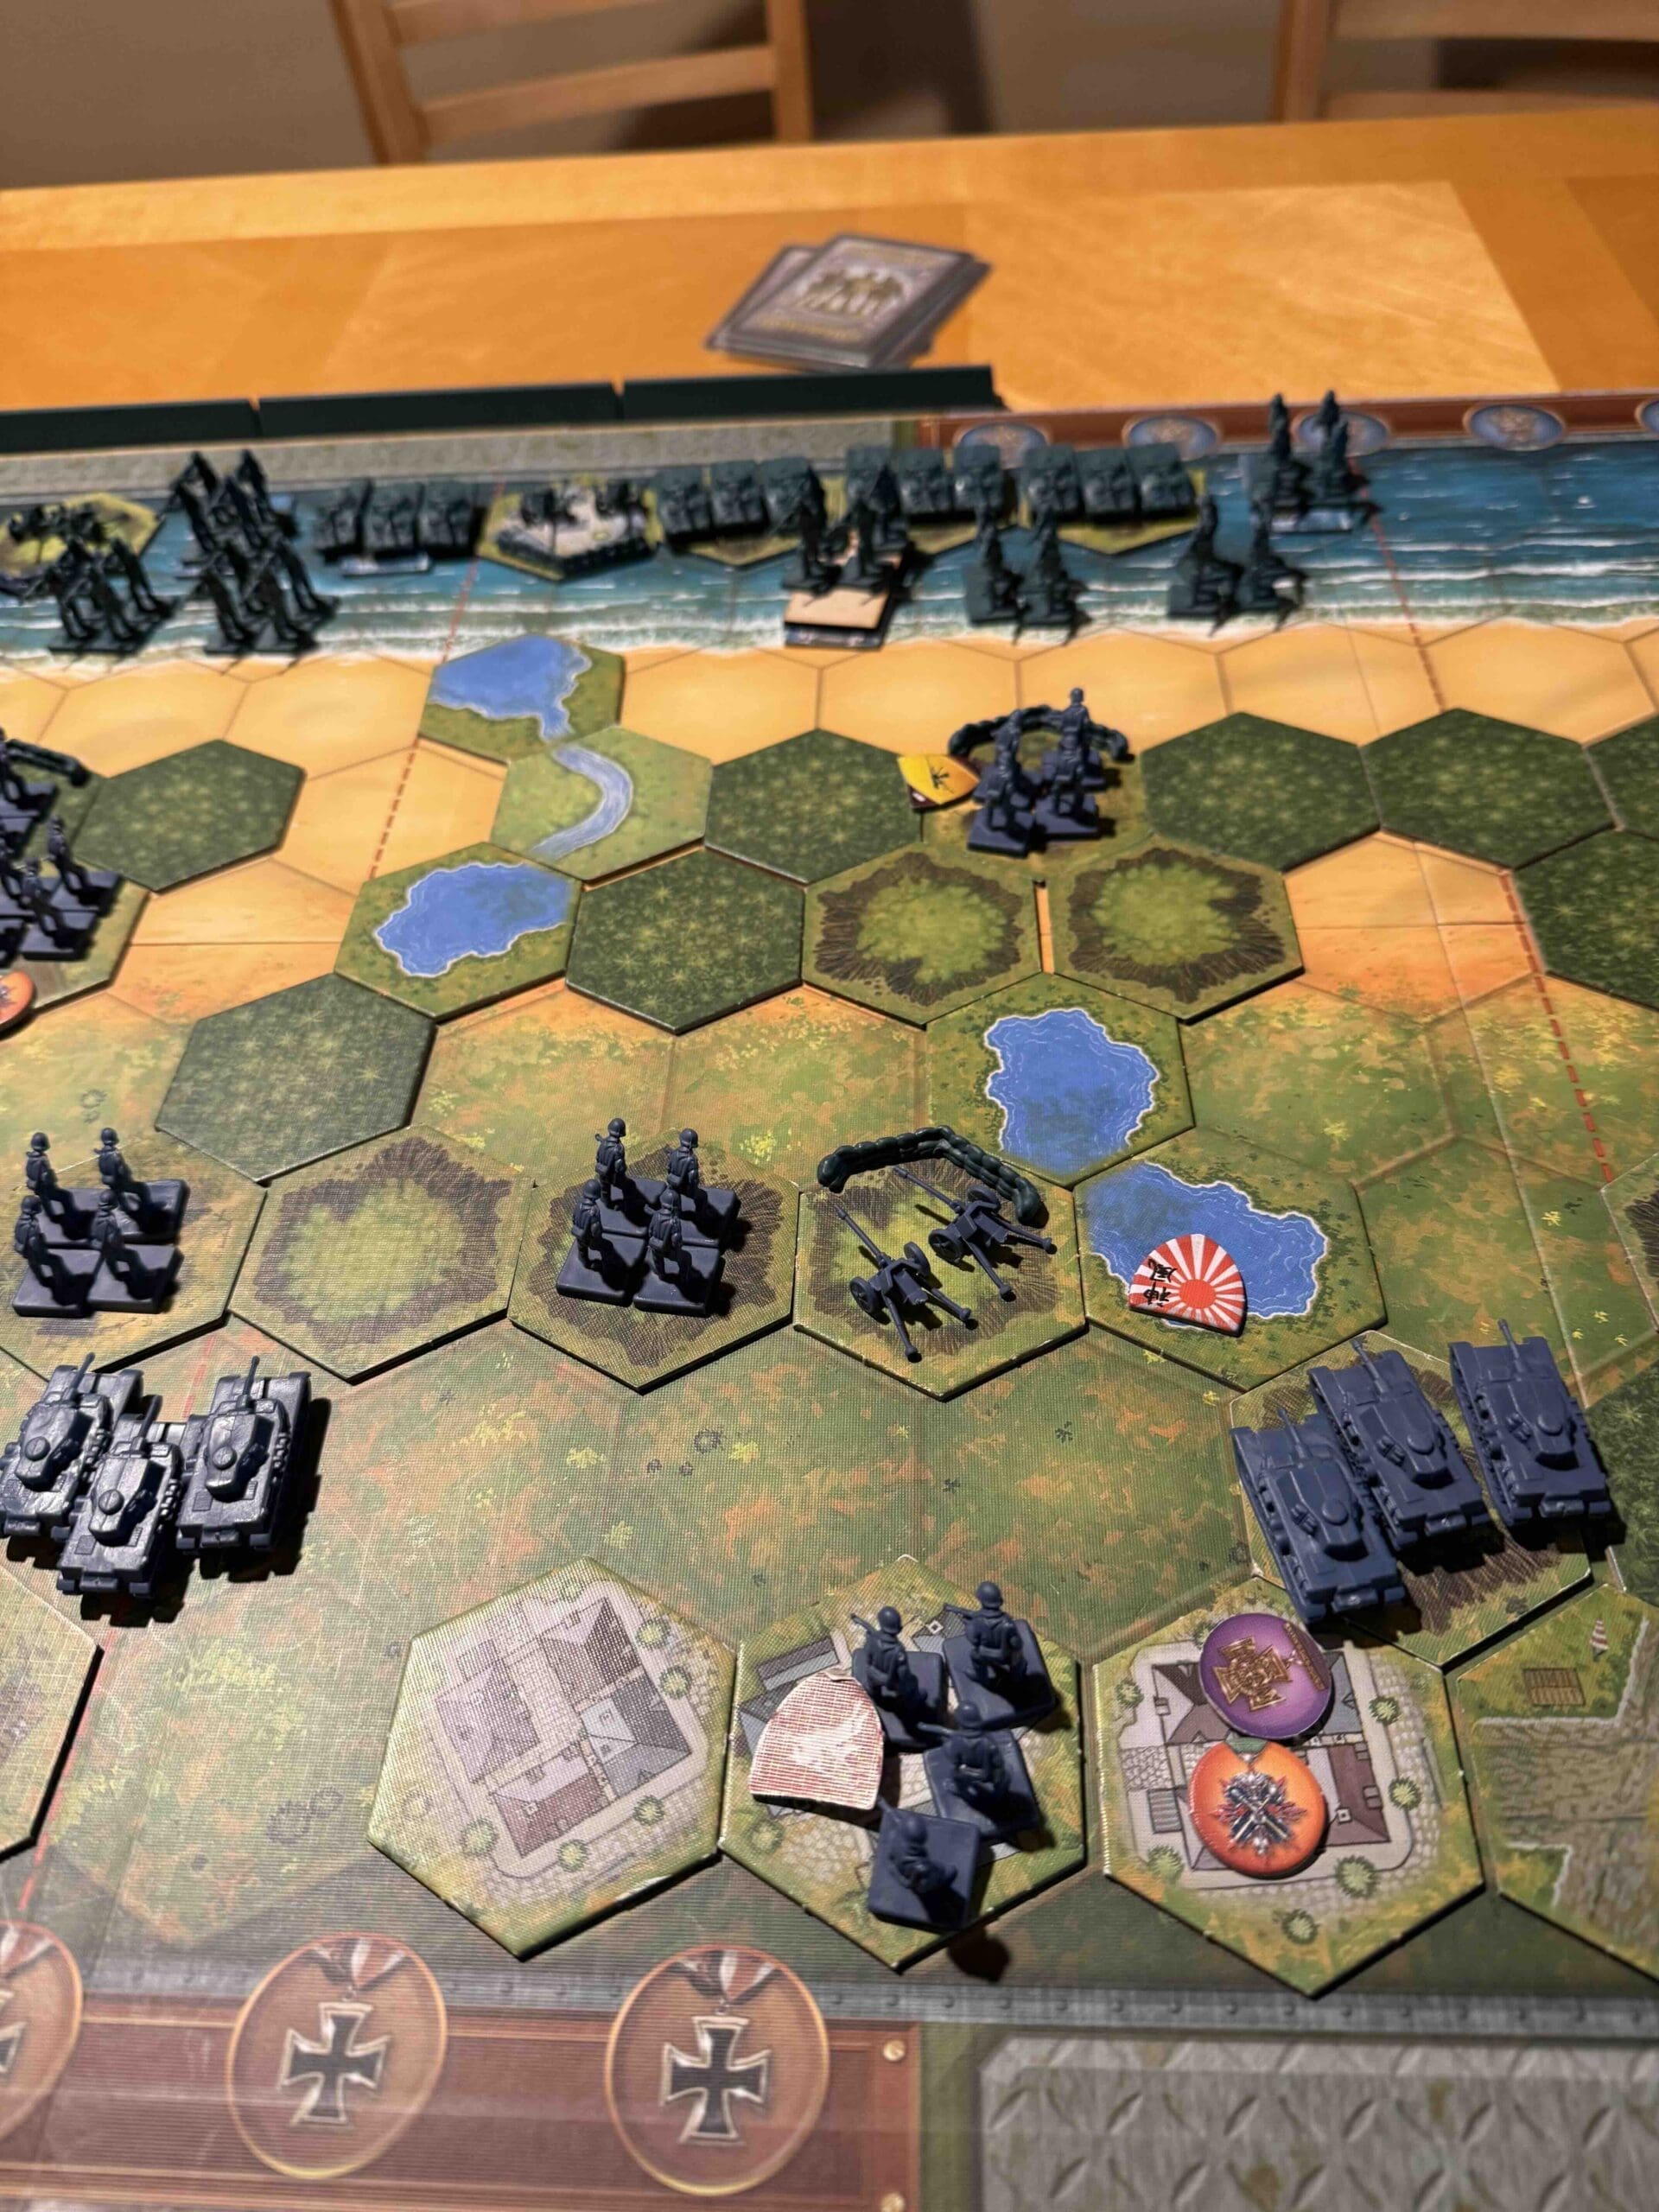
Combination of beach assault and jungle terrain and the city of Singapore.

Troops:

Allies – 10 Infantry including Machine Gun, 2 Artillery, a gun boat, and optional British Hawker Hurricanes

Axis – 10 Infantry, 4 Armor, 3 Artillery


medal allies

🔥 Winning as Allies

1.  You have a gun boat in the corner right next to the enemy. Use it as many times as you can before they take it out.

2.  You have a couple of Artillery. Use them well, but note that the unit at Changi only has enough ammo for three hits. 

3. You have many Permanent Medal Objectives to guard, so in most cases you will need to keep your forces in a defensive position.

4.  Air rules are optional. It is important for British defenses to make use of them as you have two Hawker Hurricanes at your disposal.

medal axis

🔥 Winning as Axis

1.  You have many forces which can be brought to bear but you will need to use your landing craft to get them ashore.

2.  You need to take out the enemy gun boat in the corner of your right flank ASAP. That will only take one Grenade.

3.  Once you have dealt with immediate threats near the beach, you can take some time to repair the causeway, which will take two Stars.  Then you can advance your three Armor units into battle.

4.  Your right flank is your strongest. Once you get your forces ashore with the landing craft, you can advance against Tengah and capture your first Medal Objective. Then you can continue deep into enemy territory.

Battle Reports

Author:

Days of Wonder

Resource:

Campaign Book, Volume 2


Place Battle Reports on a scenario page, or specify its scenario name in the shortcode.
Namur

Namur

Namur

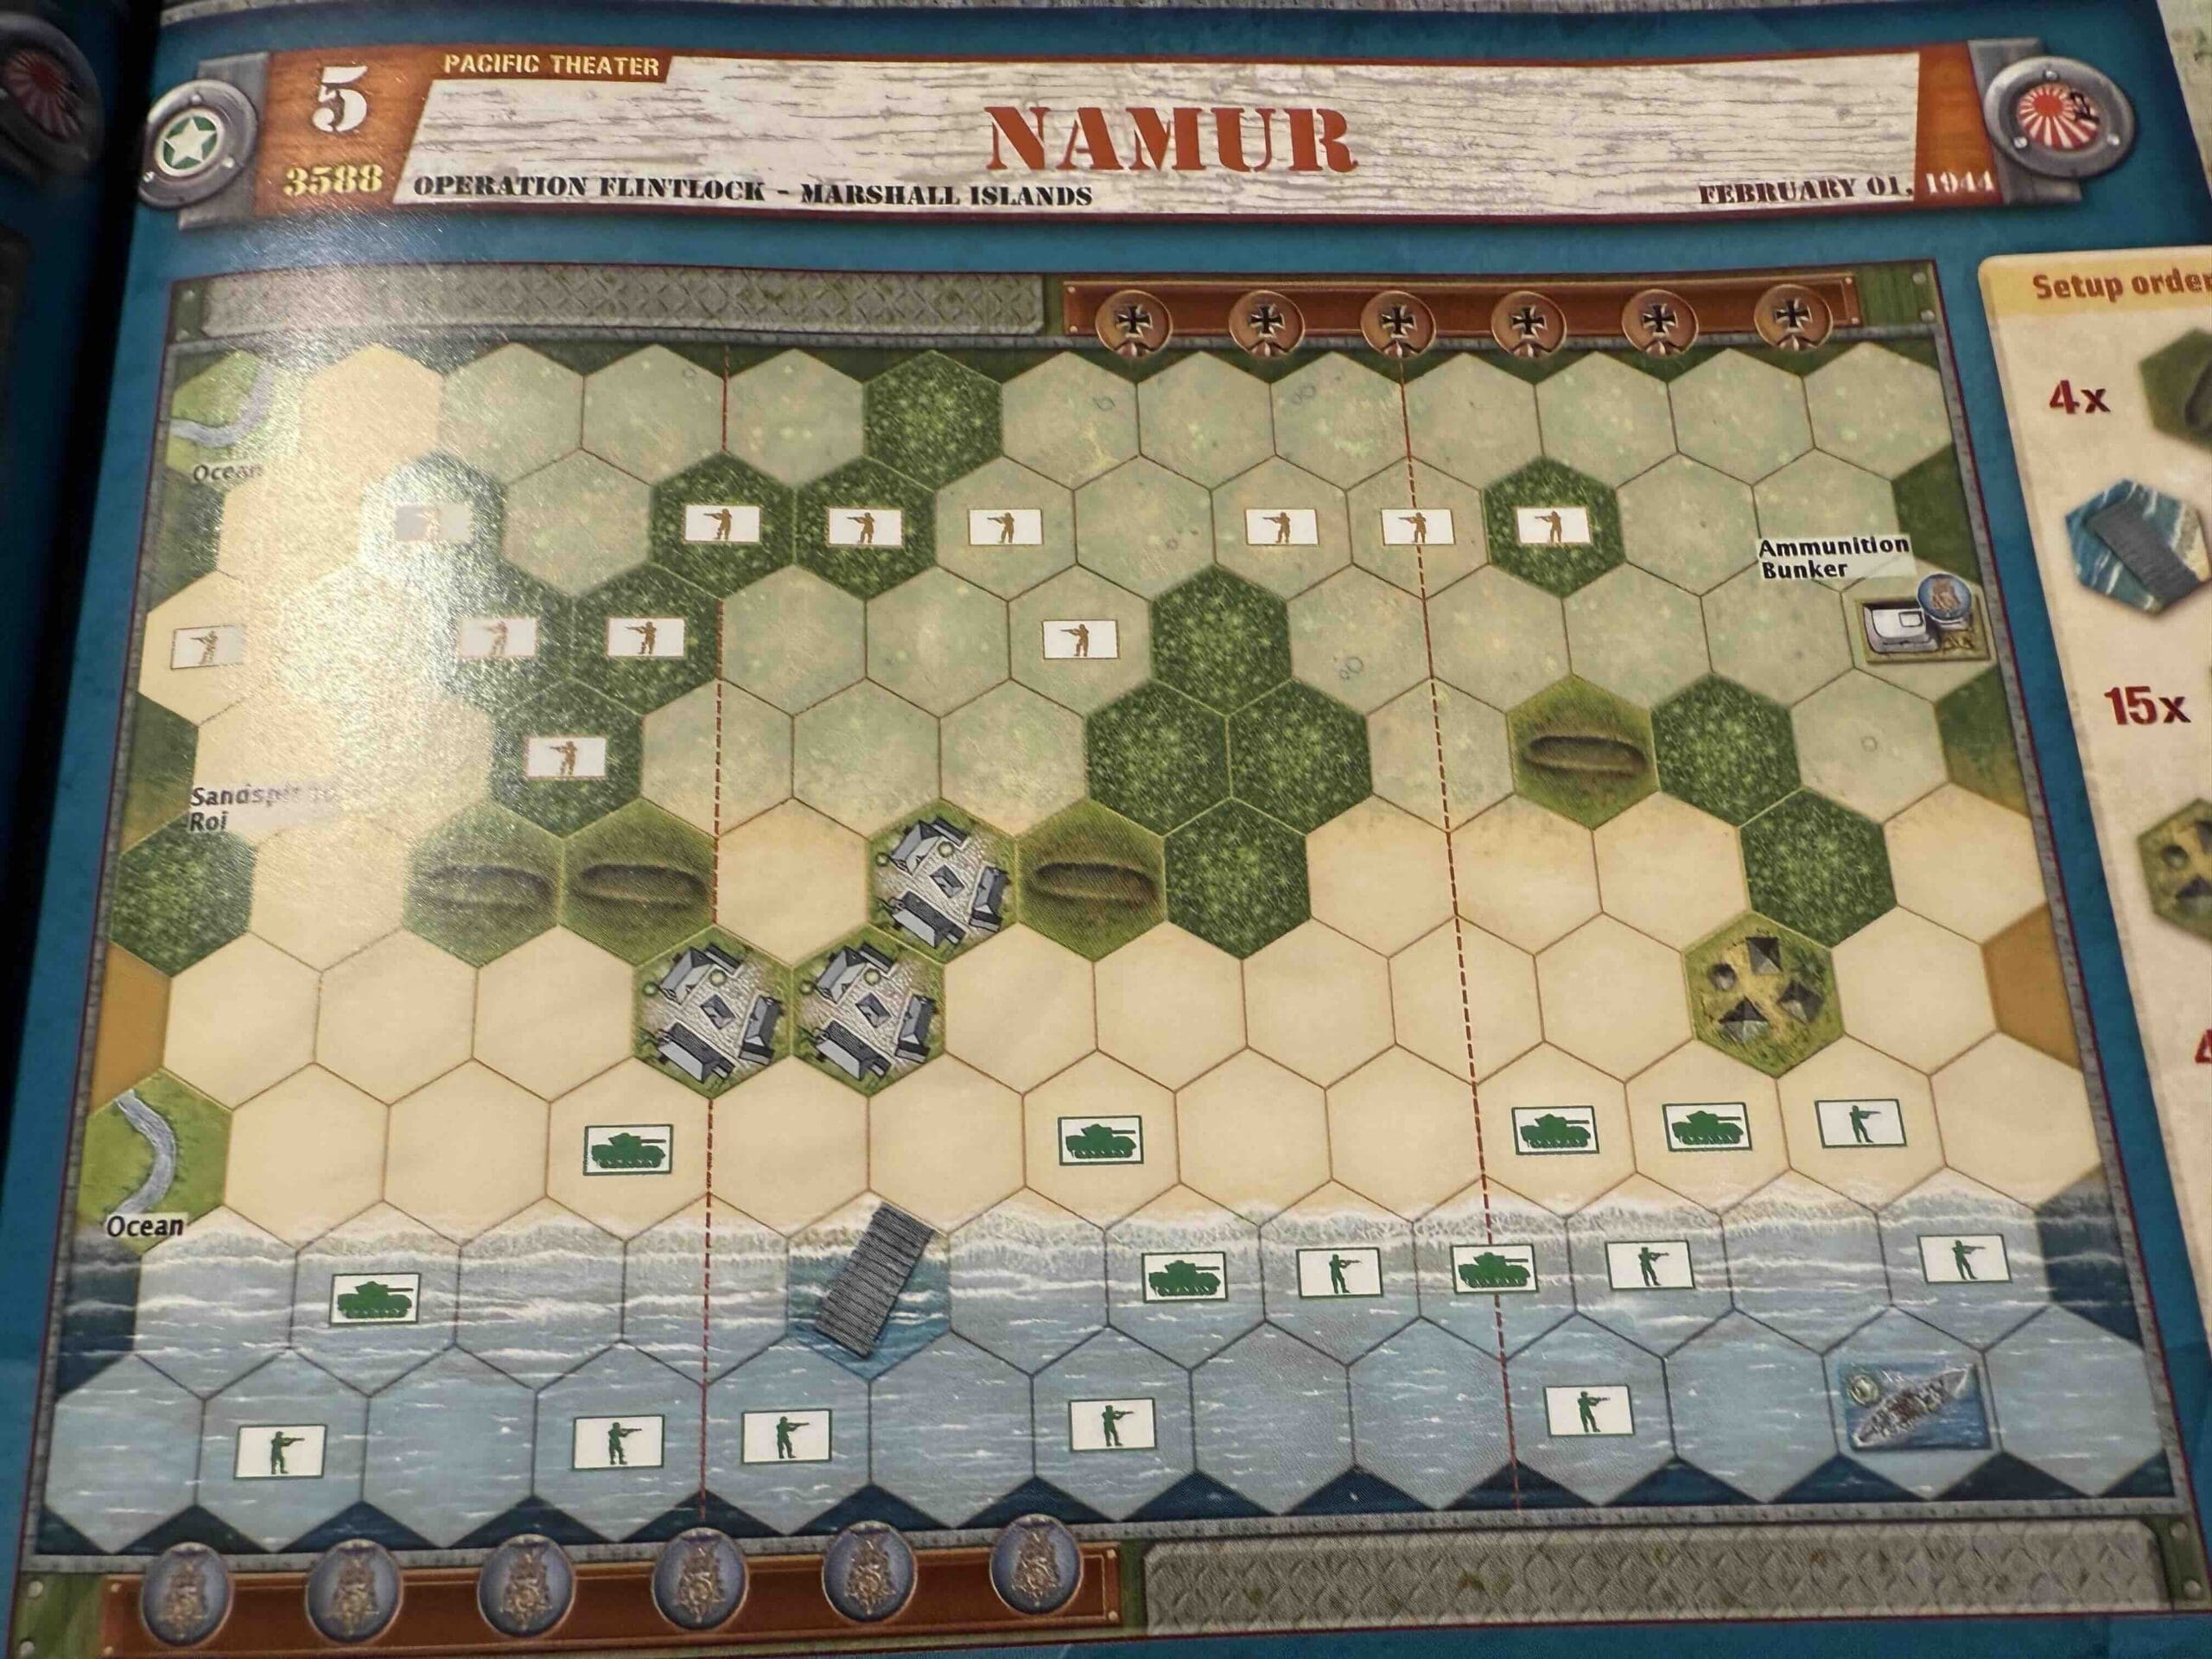
The Battle of Namur took place on February 1–2, 1944, as part of the U.S. assault on the Marshall Islands during World War II. U.S. 2nd Marine Division forces landed on Namur Island, part of the Kwajalein Atoll, facing fierce resistance from well-entrenched Japanese defenders. The battle saw intense close-quarters combat, complicated by Japanese bunkers, sniper fire, and booby traps. A massive explosion at a Japanese ammunition dump—triggered by American fire—caused heavy U.S. casualties but also disrupted enemy defenses. After two days of brutal fighting, the Marines secured the island. Namur’s capture was a key step in the U.S. island-hopping campaign, giving the Allies a critical foothold in the central Pacific and weakening Japan’s outer defensive ring.

General Howitzer’s summary:

Namur was a two-day slugfest—our 2nd Marines hit the beach and ran headfirst into bunkers, snipers, and traps laid by fanatical Japanese soldiers dug in like ticks. One hell of a blast tore through their ammo dump—and some of our boys with it—but it cracked their line wide open. When the smoke cleared, Namur was ours, and we had a solid damn grip in the Marshalls. Another island down, and one step closer to Tokyo.

5 VP’s

card

Card Balance:

Allies – 5

Axis – 5

Complexity:

3

Conditions:

Jungle Beach

Context:

Historical

Location:

Marshall Islands

Year:

1944

Theater:

Pacific

Campaign:

Codename:

Operation Flintlock

Summary:

Objectives:

5 VP’s plus the Ammunition Bunker Permanent Medal Objective

Battlefield:

Combination of beach assault and jungle terrain with some small villages.

Troops:

Allies – 9 Infantry, 7 Armor, and a Destroyer ship

Axis – 12 Infantry


medal allies

🔥 Winning as Allies

1.  Like all beach scenarios, the first objective is to get off of the beach as quickly as possible and assemble all of your forces into a cohesive fighting unit. 

2.  You have a Destroyer which has an attack range and power of 3,3,2,2,1,1,1,1; so 8 hexes deep!  Plus with a successful hit you gain a targetting reticule upon the hex, which increases the dice by one until the hex is destroyed or vacated.   Use it!

3.  Use your Armor to soften up the enemy at a distance, should any of them venture near the shore.  Remember that because of the Seishin Kyoiku principle, and full-force Japanese units attack with four dice at Close Range.  So hit each one at least once before venturing near them.

4.  The Ammunition Bunker is a Permanent Medal Objective(!) – if you can blow it up.  So occupy it and roll two dice, and hope for a star; but a grenade will kill one of your Marine figures, so be careful!

medal axis

🔥 Winning as Axis

1.  You have superior numbers on your right flank and central section.  So move your forces into the jungles and town hexes to hold off the enemy forces.

2.  Get close and then by combining the Banzai two-hex Close Assault attack with any full-force units, you can hit them with the Seishin Kyoiku princple and roll four-dice with each attack.

3.  Guard the ammunition bunker so that the enemy does not get an easy Permanent Medal Objective.

4.  With all of the enemy tanks in the area, do not get any of your forces caught in the open.

Battle Reports

Author:

Days of Wonder

Resource:

Campaign Book, Volume 2

Place Battle Reports on a scenario page, or specify its scenario name in the shortcode.
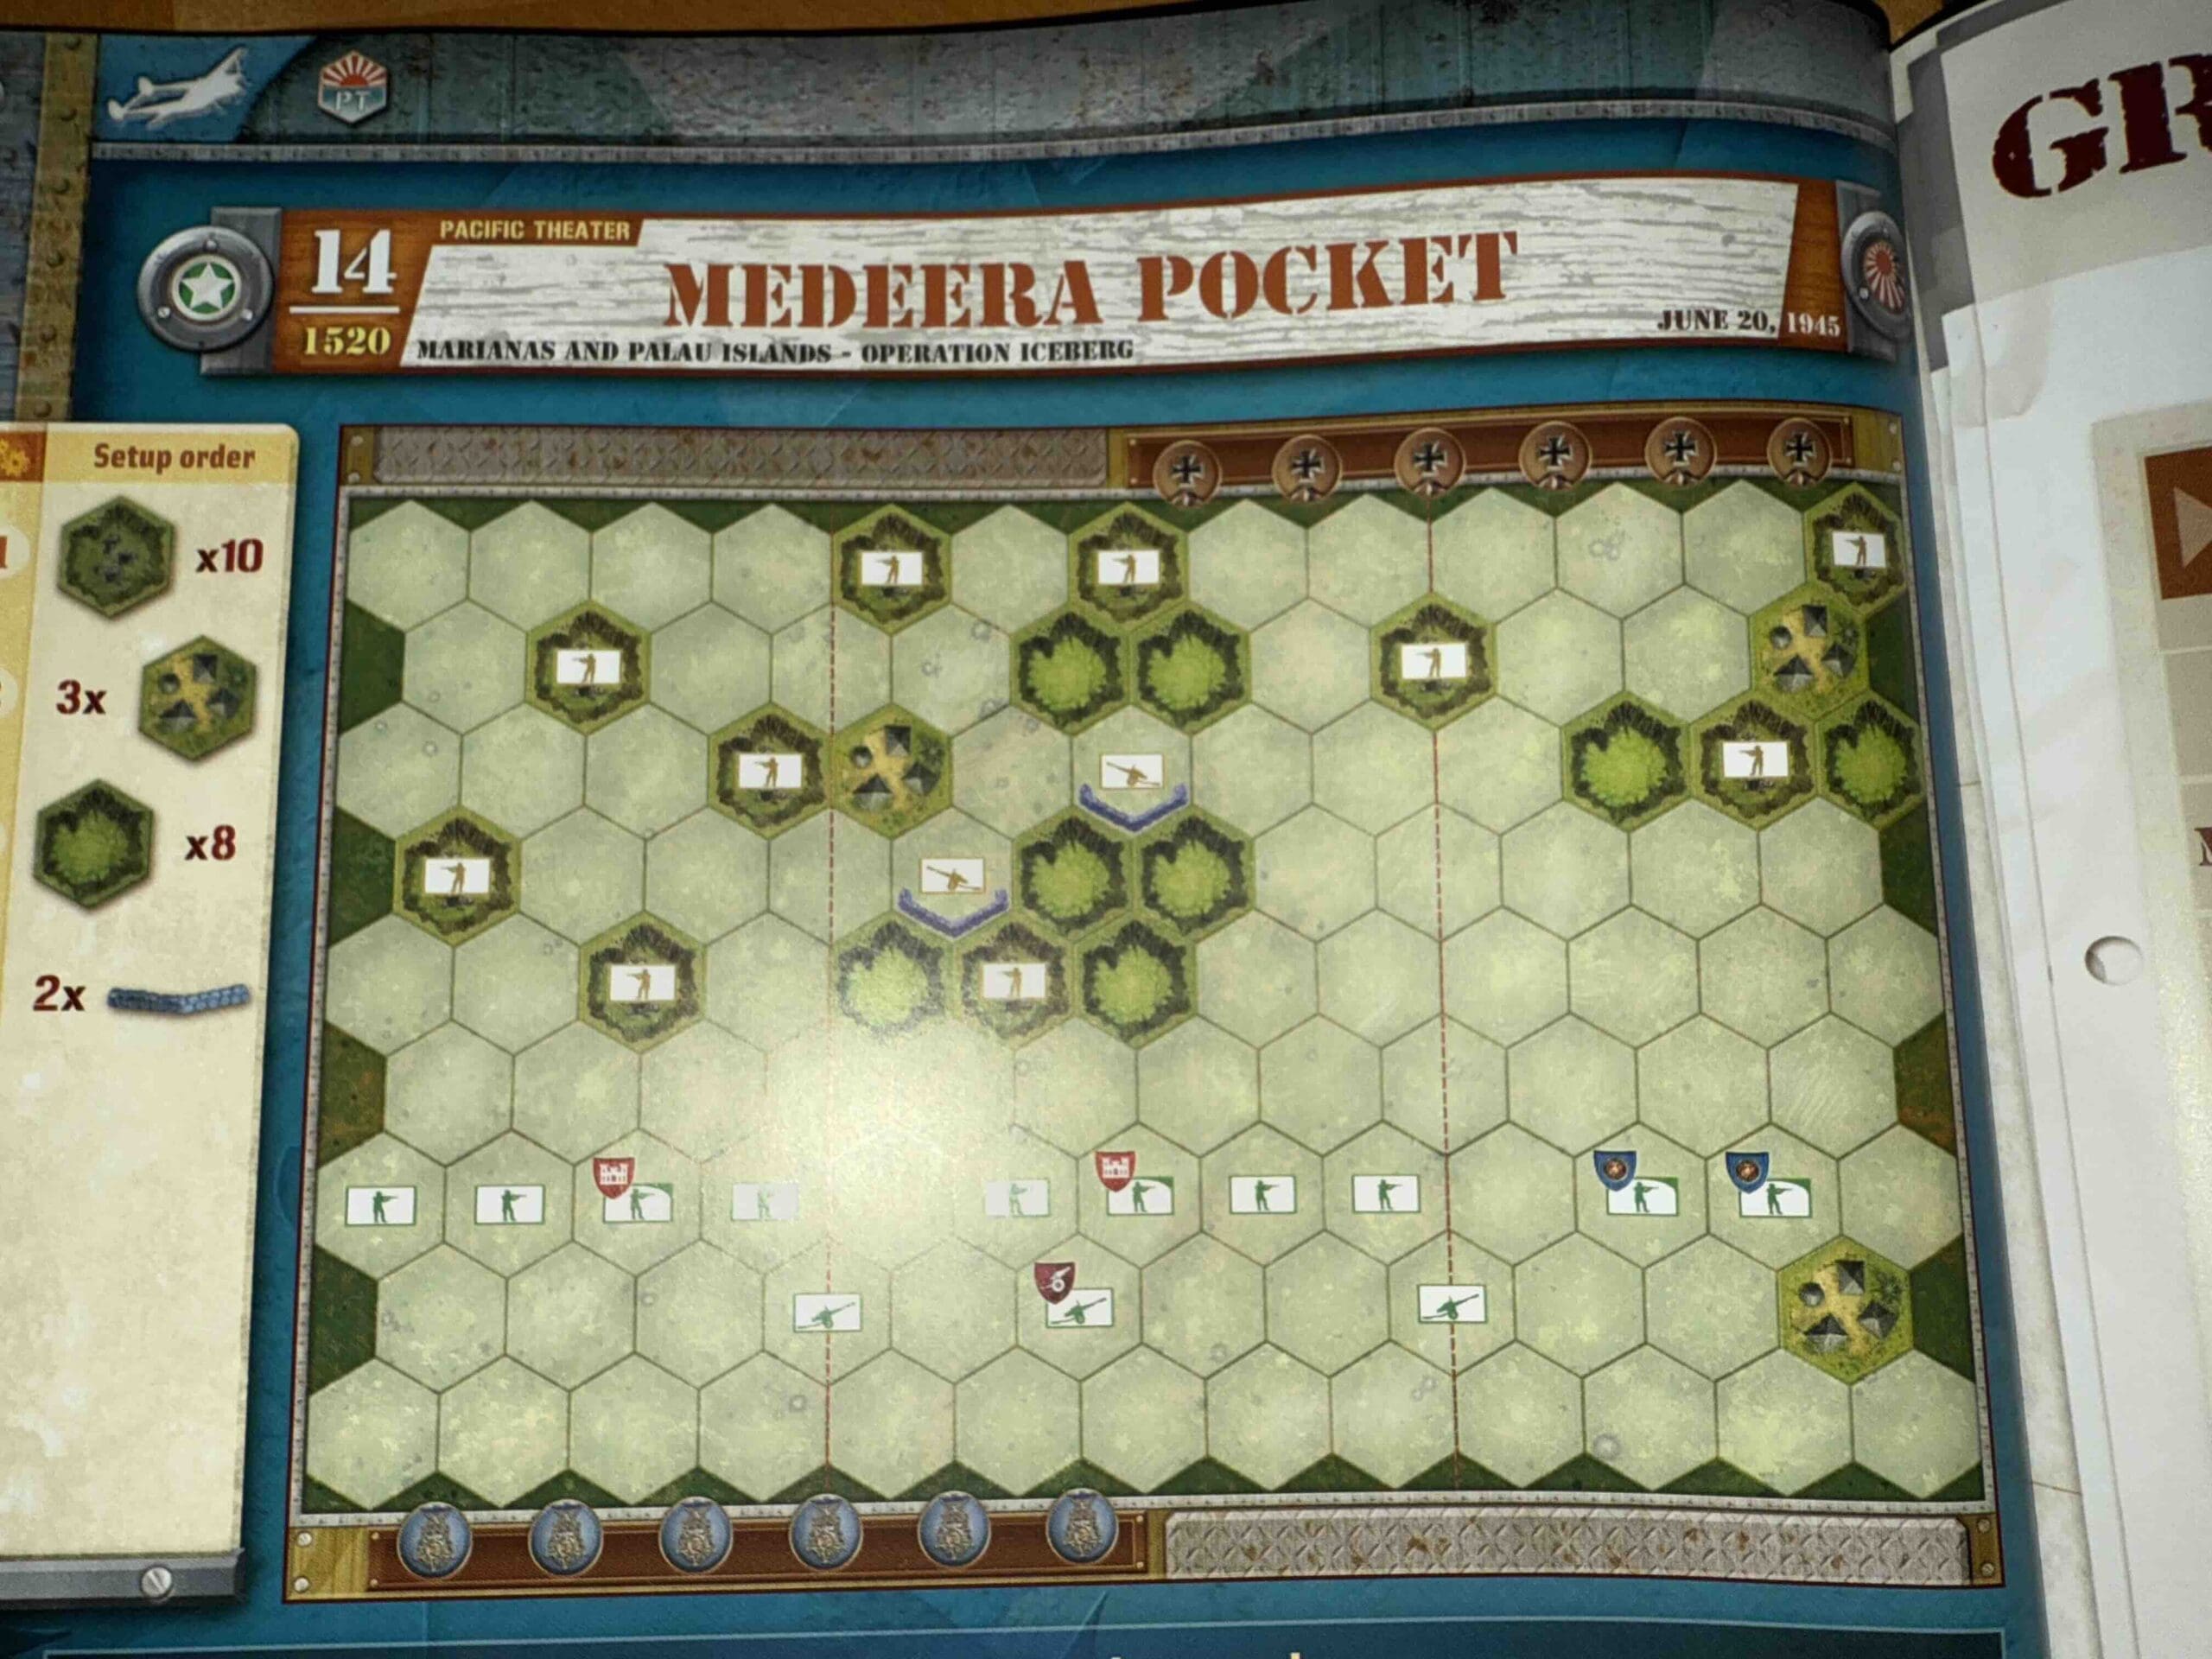
Medeera Pocket

Medeera Pocket

Medeera Pocket

The Battle of the Medeera Pocket in June 1945 was a late-stage engagement during the Marianas and Palau Islands campaign of World War II.

Located on northern Peleliu, the Medeera Pocket was one of the last strongholds of Japanese resistance. U.S. Marines and Army forces faced fierce, dug-in Japanese defenders who refused to surrender, fighting from caves and fortified positions. The battle involved intense close-quarters combat, flamethrowers, explosives, and coordinated assaults to clear the terrain.

Despite being outnumbered and cut off, Japanese troops fought to the death, inflicting significant U.S. casualties before being wiped out.

The elimination of the Medeera Pocket marked the final clearing of organized resistance on Peleliu, securing the island for Allied operations and reinforcing the brutal nature of Pacific island warfare.

General Howitzer summarizes:

The Medeera Pocket was one hell of a last stand—the Japanese  were holed up in caves, dug in deep, and determined to die where they stood.  They fought like fanatics, even when they were cut off and outgunned, but our Army and Marines finished the job. Clearing that pocket sealed Peleliu for good and reminded everyone that in the Pacific, every inch costs blood.

5 VP’s

card

Card Balance:

Allies – 6

Axis – 4

Complexity:

3

Conditions:

Jungle

Context:

Historical

Location:

Palau Islands

Year:

1945

Theater:

Pacific

Campaign:

Codename:

Operation Iceberg

Summary:

Objectives:

5 VP’s 

Battlefield:

Jungle terrain , hills with caves and some small villages.

Troops:

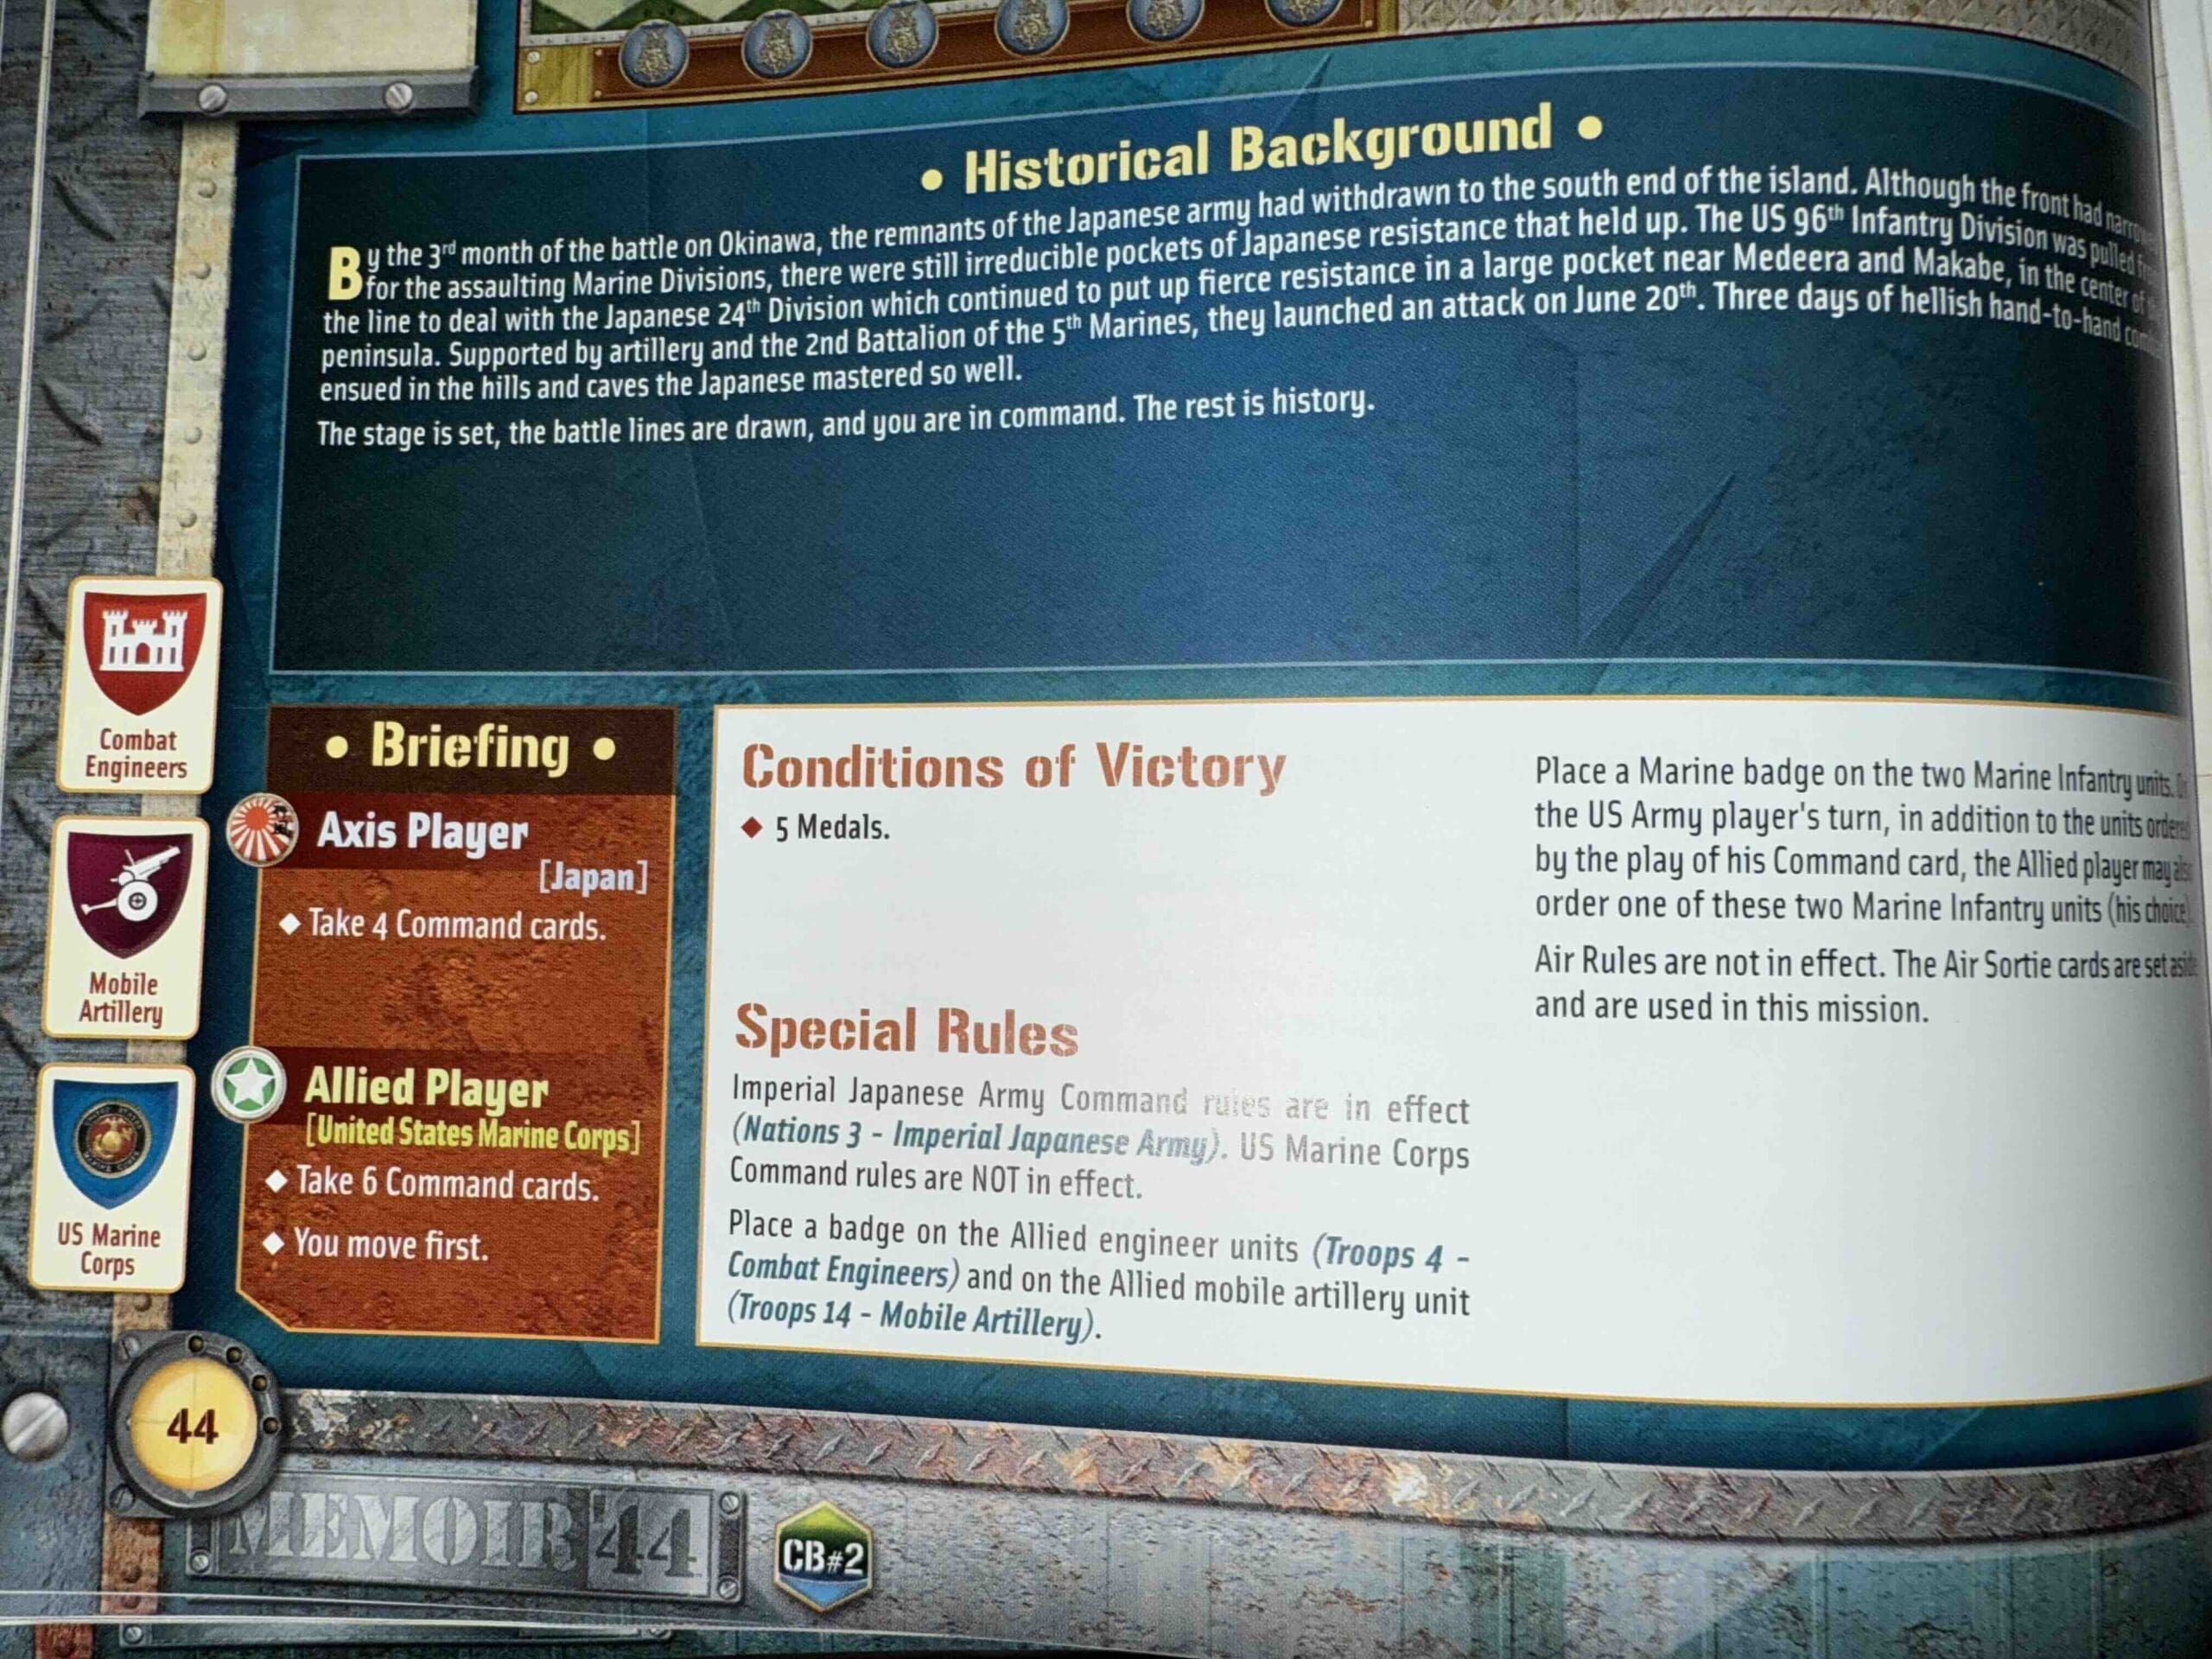
Allies – 8 Army Infantry, 2 Marine Infantry, 3 Artillery including a Mobile Artillery

Axis – 10 Infantry


medal allies

Allied Strategy:

1.  The center section is the key to victory.  You have a Mobile Artillery, plus two other Artillery units which can all focus their firepower upon the center.  

2.  You have two Engineer units which can overcome the terrain disadvantages of caves on hills.  Use them to clear out the entrenched enemy.

3.  You have two Marine units which can be commanded every single turn, so they can conduct their own operation on your right flank, if they are supported by the Artillery unit on that side. 

medal axis

Axis Strategy

1.  Remember the three special abilities of your Japanese forces (Seishin Kyoiku Doctrine, Yamato Dashi Concept, and the Banzai War Cry).  You will need these to stand up against the enemy.

2.  There are many Caves on Hills which give you both a defensive and mobile advantage.  Infantry units can quickly move from one Cave on a Hill to another one, so that you can rapidly replenish your forces when they are destroyed.  

3.  You have two Artillery units well-protected in the center of the battlefield.  Use them at every opportunity to push back the attacking Infantry, and when it comes into range, to also destroy the Mobile Artillery.

Battle Reports

Author:

Days of Wonder

Resource:

Campaign Book, Volume 2

Place Battle Reports on a scenario page, or specify its scenario name in the shortcode.
Secret Link