Knightsbridge, Battle of Gazala

Knightsbridge

scenario_Knightsbridge_start

“Listen up! In early June ‘42, out there in that hot Libyan desert at a place they called Knightsbridge, our British allies were in for the fight of their lives. The place was nothing but a road junction, but it was as valuable as gold when the shooting started.

Rommel came at ‘em with his Panzers and those nasty 88s, aiming to cut ‘em off, encircle ‘em, and finish the job. The British Eighth Army fought back with everything they had, but those German guns chewed up their tanks like a buzz saw through dry timber.

Even though the Brits took a beating and left a lot of metal in that desert, Rommel couldn’t crack the line. He overreached, and the whole thing bogged down into a stalemate.

Let that be a lesson, boys—in the desert, mobility is king. You gotta hit hard, move fast, and never let the enemy pin you down. Knightsbridge wasn’t the final blow, but it sure as hell was the warning shot that the real fight was just getting started!”

~~ General Howitzer

5 VP’s

Card Balance:

Allies – 4

Axis – 6

Complexity:

2

Conditions:

Desert

Location:

Libya

Year:

1942

Theater:

Mediterranean Theater

Campaign:

Western Desert Campaign

Context:

Historical

Summary:

Objectives:

5 Victor Points

Battlefields:

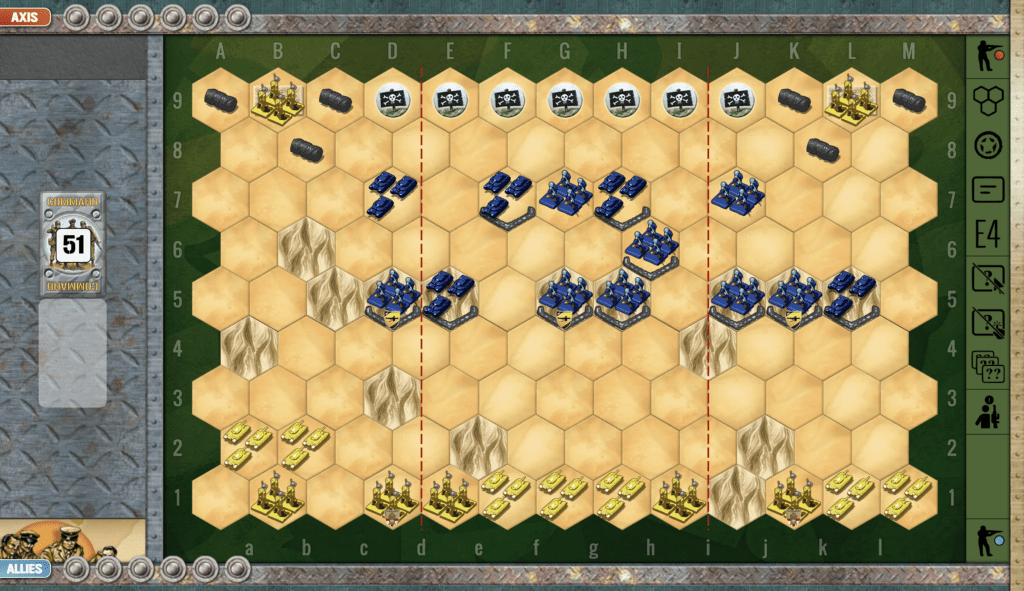
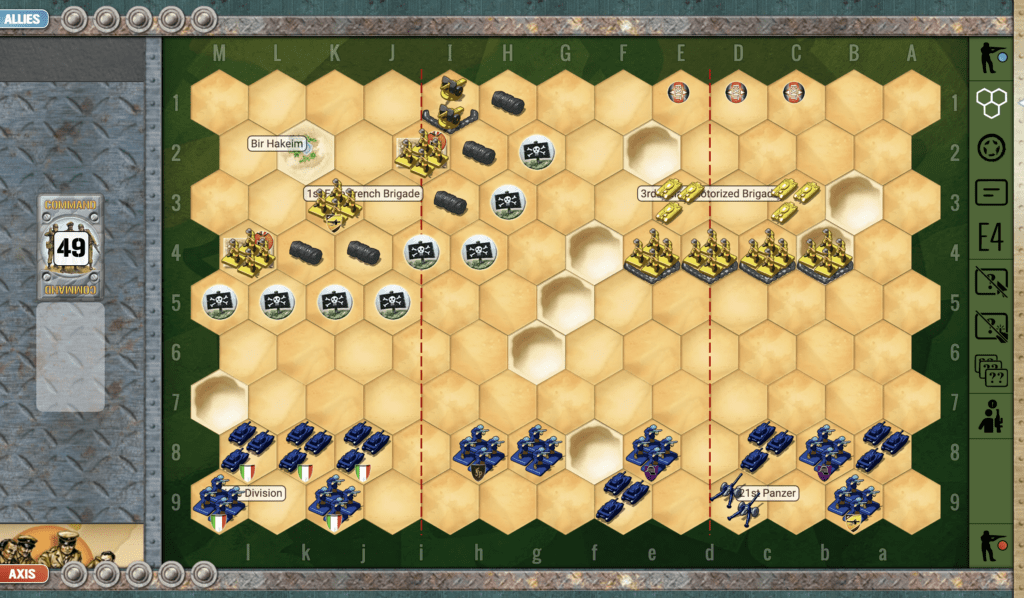
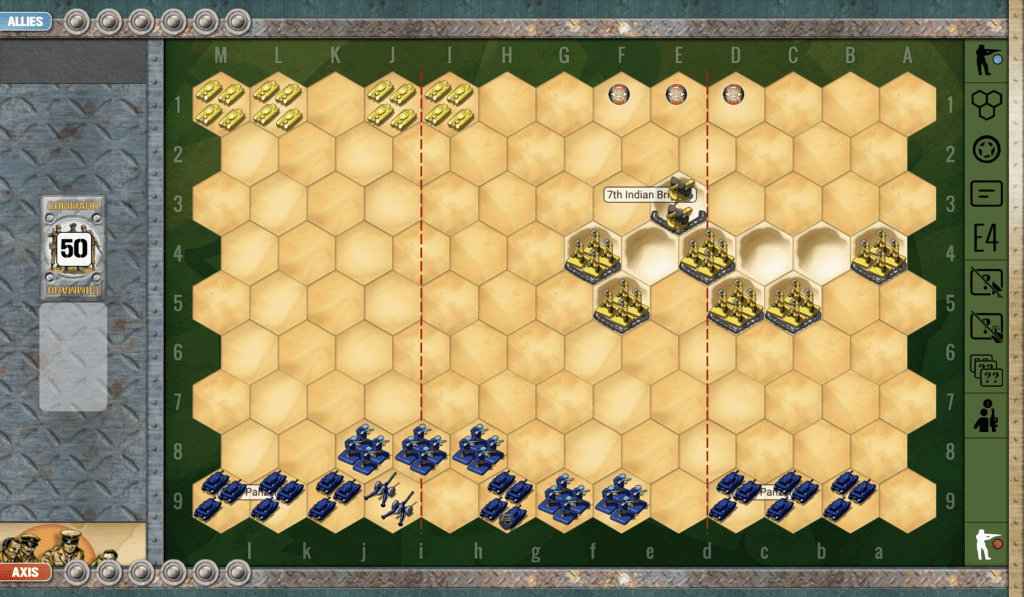
Knightsbridge is an almost open desert battlefield in which tanks engage in head-on warfare, interspersed with the occasional artillery fire and infantry assault.

Troops:

Allies – 8 Infantry, 1 Artillery

Axis – 6 Infantry, 3 Artillery

🔥 Winning as Allies

1.  Big picture goal for Knightsbridge, like many desert scenarios is to hit first and hit hard.

2. The Axis have three Artillery which will assist the Armor if you venture too close.  With your limited movement, it would be best to keep your forces together on your end of the battlefield.

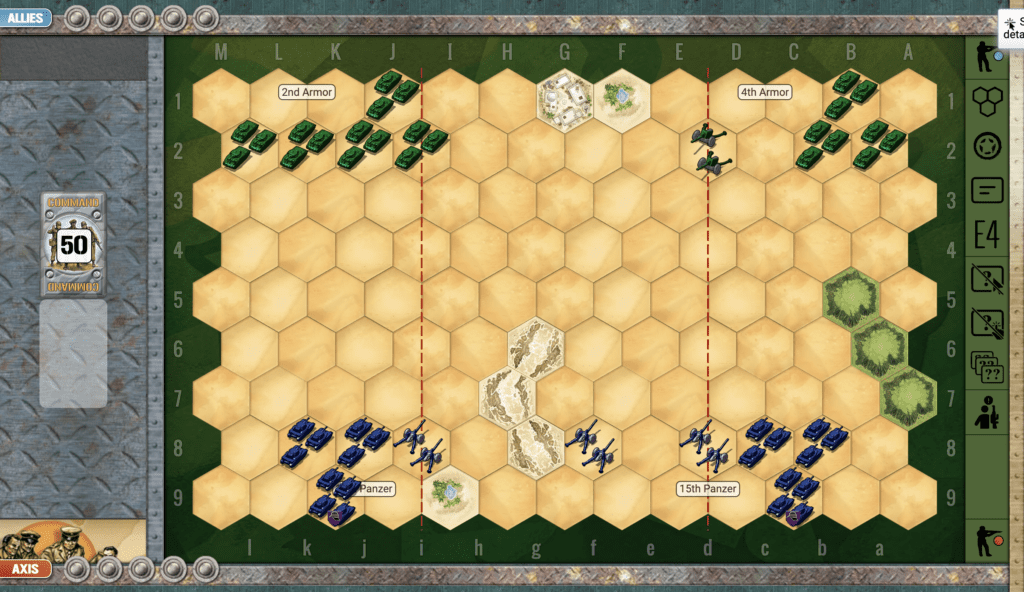
3.  Get to the ridge on your left section as quickly as possible. You cannot move as fast as the Axis, so you need to start right away.  Do not get caught back against the border, or the enemy will wipe you out with the additional flag hits.

4. You are strong on your right flank, so move your units forward together to defend against the on-coming Axis attack.


🔥 Winning as Axis

1.  Because of the wadi in the middle of your end of the battlefield, your forces are divided.  Your Armor on the left flank is outnumbered five to two, but you do have your artillery.  If you can entice the Allies to move forward, you can get some support from your Artillery fire.

2. Take advantage of the ridgeline on your right flank by parking your units there and wait for the Allies to attack. The height advantage may count in your favor in the ensuring battle.

3.  Grab the heights on the ridge as quickly as you can. Whoever gets on top of the hill first will gain a 17% hit advantage.


Battle Reports

24
BR - Knightsbridge

Author:

Days of Wonder

Link:


Into the Cauldron

Into the Cauldron

Scenario_IntoTheCauldron_start

Rommel’s Panzers had bloodied the British 7th Armoured, but they’d shot their bolt. The Afrikakorps was jammed into what we’d call a pressure cooker—“the Cauldron.” To the south, Bir Hakeim held firm. To thea north, Tobruk was still in enemy hands. East and north, the tattered remains of British armor blocked the way. And to the west, minefields stretched like a wall of steel.

The Brits, blind to how short the Germans were on fuel and shells, failed to strike while the iron was hot. That hesitation let Rommel dig in around the ridges of Sidi Muftah, while his Italian allies clawed through minefields under heavy fire to drag supplies forward. When the British finally counterattacked on June 5th, it was sloppy and ill-timed—broken against the German anti-tank guns. A golden chance to smash the Desert Fox had slipped right through their fingers.

~~ General Howitzer

6 VP’s

Card Balance:

Allies – 4

Axis – 5

Complexity:

3

Conditions:

Desert

Context:

Historical

Location:

North Africa

Year:

1942

Theater:

Mediterranean Theater

Campaign:

Battle of El Almein

Summary:

Objectives:

6 VP’s, plus Exit Hex Medals

Battlefield:

This desert scenario has a series of sand dunes across the center of all three sections on which are perched sandbagged Axis troops ready for battle. The challenge for the Allies is with their greater armored forces are to force their way through to victory.

Troops:

Allies –  7 Infantry, 7 Armor

Axis – 8 Infantry, 5 Armor

🔥 Winning as Allies:

1.  The Allies have numerical superiority on the left flank, which can be exploited. Also note that the Allies have a 7 -5 advantage with armor. It is important to quickly take advantage of this superiority, as desert warfare can very quickly turn around with a few well-rolled armor attack dice.

2. Use any attack cards you get, to pull your armor forward one hex, and aim their turrets at the enemy three hexes away on the dunes. In this way, you can start to degrade the enemy attack from the dunes. With some well-rolled dice, you can attack the sandbagged infantry from a distance, and possibly score a quick VP. But be wary of the sandbagged armor units on each flank, which are well protected, and can very quickly knock out your armor units with a few attacks. Also the sandbagged anti-tank units can score against your armor with stars, thus raising the likelihood of a successful armor hit from 33% to 50% per dice roll.

3. You have two units of hexes in bunkers deep in the enemy territory, next to the exit hexes. Be very careful about moving them from the bunkers. Once you do so, all their protection is gone, and since they are surrounded by enemy troops, will be destroyed quickly. But if you keep them in the bunkers and use them as harassment, they can distract the Axis troops from applying all of their fire-power at the unprotected Allied troops trying to make an attack uphill against the sandbagged Axis defenders.

🔥 Winning as Axis:

1. One special Victory Point which the Axis can take advantage of is the escape hex through the minefield. Don’t waste a lot of your forces trying to find it, but one unit assigned to opening the escape path while the rest battle the British could be a path to an ‘easy’ VP.

2.  The Allies have a numerical superiority of armor.  Don’t launch an armor attack prematurely.  Use your sandbagged infantry and armor units to slowly degrade the enemy. Be prepared should they try to launch an assault. Keep your responsiveness ready so you are prepared for whichever direction they come.

3.  Watch out for the two enemy infantry units lodged in the bunkers along the backrow. Have an armor unit ready to respond with devastating force should they venture out of the bunkers.

Battle Reports

(percentage of Allied victories):

48%

19
BR - Cauldron

Author:

Days of Wonder

Link:

Hellfire Pass

Hellfire Pass

Hellfire Pass was the kind of battleground that earns its name the hard way. In June 1941, on that blasted strip of desert between Egypt and Libya, British and Commonwealth troops dug in on the heights while Rommel’s Afrika Korps came at them like wolves scenting blood. That pass wasn’t just a notch in the ridgeline — it was the key to the whole frontier, a gate that controlled who moved and who stalled in the desert war.

The Germans hit fast, hit hard, and kept hitting, using tanks, guns, and every trick they had to crack the British line. And the men holding that ridge fought with grit, firing until their barrels burned and their positions were blown apart around them. They didn’t stop the Axis forever, but they made the enemy pay for every yard and bought precious time for the larger fight ahead.

Hellfire Pass proved a simple truth: when you stand your ground on the high ground, and you fight like you mean it, even the best the enemy has can’t roll over you without bleeding for it.

~~ General Howitzer

6 VP’s

Card Balance:

Allies – 4

Axis – 6

Complexity:

3

Conditions:

Desert

Context:

Historical

Location:

Egyptian – Libyan border

Year:

1941

Theater:

North Africa

Campaign

Codename:

Operation Battleaxe

Summary:

Hellfire Pass begins with the Axis dominating over two-thirds of the battlefield. The challenge for the Allies is to break through to the exit hexes, if they can make it through Hellfire Pass.

Objectives:
Six VP’s, plus the Allies have exit hexes for additional Objective Medals

Battlefield:
Desert with the Halfaya Pass through which the battle takes place. Much of the battlefield is lined with Axis mines, which will slow the advance of the Allies.

Troops:
Allies have 9 Infantry, and 5 Armor.

Axis have 8 Infantry (including two Anti-tank units), 2 Armor, 2 Artillery

🔥 Winning as Allies

1.  Allies have a numerical advantage in the center, of 3 Infantry, and 5 Armor. However, the Axis have a row of mines, and two artillery defending the section.  So Allies will need a good set of cards which provide for rapid advance, and a Barrage or Airpower card to attack the artillery would definitely help.

2. Because this scenario has an escape option for the British, speed is paramount. So remember that units which begin on the road are able to travel one extra hex.

3.  The Allies have a significant armor advantage of 5 – 2.  Use their attack and mobility to your advantage.  Some of them begin the scenario trapped behind infantry, so you need to get them out and into the game.

🔥 Winning as Axis

1.  Initial plan for the Axis is defensive. Stay behind the sandbags and mines which you have set up.

2.  There are two Infantry units on your left flank which have no retreat.  Some lucky one-shot dice hits can quickly cut their firepower in half.

3. Your Armor has mobility, and are at the ready to defend against a flank attack on either side, or do a quick run up the road to defend the center section.

4. Your Artillery is well-positioned, but the enemy starts at the one-dice hit range.  It may be wise to wait a turn or two until they advance forward one row and then come within range of two-dice hits.

Battle Reports

(percentage of Allied victories):

48%

18
BR - Hellfire

Author:

Link:

Flanking Maneuver at Bir Hakeim

Flanking Maneuver at Bir Hakeim

scenario_FlankingManeuver_start

“Now let me tell you about that flanking maneuver at Bir Hakeim—a real brawl in the North African sands back in May and June of ‘42. Rommel was out there with his Panzers, trying to outfox and outflank the whole Allied line, and he found that weak spot right at Bir Hakeim.

But the Free French, under General Leclerc, they weren’t about to roll over and die. Hell no! Those boys dug in, held their ground, and fought like hell. Rommel’s men swung around the flanks with tanks and firepower, but the French held on—courage, grit, and a lot of lead flying every which way.

When the walls closed in, those Free French didn’t surrender. They broke out—fighting their way out of that trap like men possessed, slipping through the enemy’s fingers and living to fight another day.

So here’s the lesson, boys—a good flank can break an army, but a fighting spirit can break the odds. Those Free French showed the world what it means to hold your ground and punch your way out when you’re surrounded. That’s how you do it!”

~~ General Howitzer

5 VP’s

Card Balance:

Allies – 5

Axis – 6

Complexity:

3

Conditions:

Desert

Location:

North Africa

Year:

1942

Theater:

Mediterranean Theater

Campaign

Codename

Summary:

The Axis have a superior force against the British in this scenario. But the British are defended by a series of sandbagged infantry, and another set hidden behind mines and wire rolls. The Bir Hakeim Oasis provides medical relieft and restoration to Allied troops, just like a Medics and Mechanics card. So this adds an interesting element to the game.

Objectives:
Five hexes, plus the Axis have two hexes with Medal Objectives plus a set of Exit Hexes to go for.

Battlefield:
Open desert with one three hex berm cutting an an agnel in the center section. There is also a large minefiled on the Allies right blank, laid by the Allies.

Troops:
British – 7 Infantry, 2 Armor, and 1 Artillery. British troops are guarded by sandbags and mines.
Axis – 7 Infantry, 6 Armor, and 1 Artillery

🔥 Winning as Allies

1. First moves: Your infantry behind the minefield will quickly be under attack from the enemey armor. Be prepared with a response. Also your armor is kind of out of the action at the start of the scenario, so get them up onto some berms to be prepared to attack the enemy. Recognize that you will get attacked by enemy armor, but it will be from a position of strength.

2.  Keep your infantry behind the sandbags as long as you can. They are preventing the enemy from getting access to the Exit hexes.

🔥 Winning as Axis

1. As the Axis commander it is your job to locate where you will gain the five VP’s for this scenario. Many of the Allied infantry are sandbagged up on dunes, and it will be a slow slog to pick them off with your armor. But the infantry behind the minefield is more availble. There is one in a bunker and then two unprotected. But watch out as one of those infantry units is actually an Anti-tank Gun which can hit Armor with grenades, armor, and stars on the dice roll. So you may be able to get two possibly three units from your left flank. The other two VP’s will have to come from enemy armor, two units, or one armor and one infantry perhaps.

2. If the cards warrant it, try to concentrate your forces in the center section so that you can quickly respond to needs in either flank.

3. You have an artillery; use it. If you move it foward one row, the sand-bagged infantry will be within your two-dice bombardments.

4.  There are three Exit Markers available to you.  Occasionally, with the right set of cards, a commander may be able to force one or two units out the door. But this can come at a cost as you must pass heavily entrenched enemy forces to do so.

Classic Battle Reports:

(percentage of Allied victories)

31%

Scales-Axis-Weighted
31
BR - Flanking

Author:

Days of Wonder

URL

Escape via the Coastal Road

Escape via the Coastal Road

In May of ’40, the Germans came roaring into France, and the Allies—Brits, French, and Commonwealth alike—were staring down the barrel of encirclement. So they fell back, fighting tooth and nail toward Dunkirk. One lifeline was that damned coastal road, hugging the Channel, choked with men, guns, and danger at every turn. It was no pleasure cruise—enemy fire, chaos, and desperation were the order of the day. But by God, they held on long enough for Operation Dynamo to haul over 330,000 soldiers out of the trap and back to Britain, ready to fight another day.
~~ General Howitzer

6 VP’s

Card Balance:

5 – 5

Complexity:

2

Conditions:

Desert

Location:

North Africa

Year:

1942

Theater:

Mediterranean Theater

Campaign:

Dunkirk Evacuation

Codename:

Operation Dynamo

Summary:
The Escape scenario is a race to the edge, to either escape or prevent escape. If the Allies can prevent the Axis from getting through the gaps in the escarpment, they can win easily. But if the Axis can move fast enough, and get in front of the Allied troops, they will have the time they need to bring in the rest of the armor and pound the enemy into the dust before they can escape via the Coastal Road.

Objectives:
Six VP’s, combined with the escape hexes on the edge for the Axis.

Battlefield:
Desert, divided in half by an escarpment with three gaps in it.

Troops:
Allies – 10 Infantry, 1 Armor, 1 Artillery
Axis – 6 infantry, 5 Amor

🔥 Winning as Allies

1. For Allies, it is all about providing a protected retreat. Take advantage of the easy VP’s gained by escaping out of the exit markers. The unprotected left exit will be the easiest course of action. Use your tanks to protect your escape, by holding off the Axis long enough to go. Fortunately, the Axis armor has to make it way through the escarpments. This slows down their advance and their ability to mass against the Allies. If you can block entrance through an escarpment with a combination of infantry and armor, it may provide enough tie for the rest of the troops to escape to the left.

2.  The right exit is heavily defended by sandbagged infantry, so don’t attack that unless you have overwhelming force.

🔥 Winning as Axis

1. The goal is to get through the escarpments with your armor as quickly as possible and begin attacking the escaping troops.

2. If you can get an armor unit to sit on the unguarded exit marker to block the exit to your right, you will be in a position to pound the Allied infantry into dust with the rest of your armor.

Classic Battle Reports:

(percentage of Allied victories)

52%

23
BR - Coastal

Author: 

Days of Wonder

Link:

Dug in at Sidi Omar

Dug in at Sidi Omar

scenario_DugInSidiOmar_start

The Battle of Sidi Omar (November 1941) occurred during the broader Operation Crusader in the North African Campaign of World War II. Sidi Omar, located on the Libyan-Egyptian border, was a heavily fortified Axis stronghold defended by Italian and German forces.

On November 25, 1941, British and Commonwealth forces, particularly the 4th Royal Tank Regiment and elements of the 2nd New Zealand Division, launched an assault to capture the position. The defenders, dug in with anti-tank guns and artillery, inflicted significant casualties on the attacking tanks.

At Sidi Omar the enemy fought hard, but it wasn’t enough. Our boys hammered their defenses, smashed the garrison, and bagged hundreds of Italians as prisoners. That victory didn’t just clear the ground—it locked down the left flank for the advance, gave us breathing room, and drove Operation Crusader forward. With Tobruk relieved and the Axis grip on North Africa broken a little more, Sidi Omar proved again: when the Allies hit with weight and will, the enemy breaks.

~~ General Howitzer

6 VP’s

Card Balance:

5 – 5

Complexity:

2

Conditions:

Desert

Context:

Historical

Location:

Libyan – Egyptian border

Year:

1941

Theater:

Mediterranean Theater

Campaign:

North African Campaign

Codename:

Operation Crusader

Summary:

Objectives:

6 VP’s and Exit hexes for the Axis

Battlefield:

The dominant elements of this scenarios are the hilly dunes controlled by the Allied infantry, and the wide open battlefield for the armor units of both sides to meet in the middle section and one flank.

Troops:

Allies – 6 Infantry, 4 Armor, 1 Artillery

Axis –  5 Infantry 7 Armor, 1 Artillery

🔥 Winning as Allies

1.  Your infantry on the dunes can hold off the enemy for a long time. This should give you enough time to get your armor, which is stuck in the corner on your right flank, into the field of play.

2.  Because your armor can only move two hexes at a time, it may take a couple of turns before you pose enough of a threat for them to stop attacking your infantry on the dunes.

3.  Quickly get to the center section with your forces, in order to prevent any of the enemy from thinking about escaping out of the Exit hexes.

4.  With your artillery in the center section on the dune, you are able to attack any enemy in the center section. Use it to good effect.

🔥 Winning as Axis

1. The principle advantage which the Axis have in this desert scenario, is that the Axis armor can move three hexes vs. the Allies who can only move two. This give you the opportunity to move in quickly on the Allies and take out some armor before they can respond.

2. The enemy have full control of the sand dunes in the middle of the center section and its adjoining flank. But you can keep your armor at a three-hex distance, and just keep attacking them until one or two hexes are eliminated.

3. Remember that there are some Exit hexes in the back of the battlefield for the Axis. If you are able to overwhelm the forces on the dunes, and close in on them, some of your troops may be able to make their way off the field (and make a few attacks on their way).

Battle Reports 
(percentage of Allied victories):

47%

27
BR - Dug-In

Author:

Days of Wonder

Link: