Moyland Wood (Operation Veritable)

Moyland Wood (Operation Veritable)

The Battle of Moyland Wood, part of Operation Veritable, took place in February 1945 near the village of Moyland in Germany. It was a significant engagement between British and Canadian forces of the Allied 21st Army Group and German forces as the Allies sought to clear the Reichswald Forest and advance into the Rhineland. The battle featured British and Canadian forces facing German defenders, including the 116th Panzer Division.  Fierce fighting in dense woods and muddy terrain saw the Allies overcoming stiff German resistance and counterattacks.  The Allies secured Moyland Wood, enabling their continued advance toward the Rhine.  The battle highlighted the challenges of wooded combat and the importance of infantry-armor-artillery coordination.

General Howitzer summarizes:
Moyland Wood was an awful grinder—thick trees, knee-deep mud, and a dug-in enemy hell-bent on stopping us. The Brits and Canadians went toe-to-toe with the 116th Panzer Division, hacking through the forest under fire. It was slow, brutal work, but they pushed the Germans back and took the wood. That fight proved one thing: in terrain like that, you’d better have your infantry, tanks, and artillery working like a single fist—or you’re dead in the mud. With Moyland secured, the road to the Rhine was wide open.

6 VP’s

Card Balance:

5 – 5

Complexity:

3

Conditions:

Countryside

Codename:

Operation Veritable

Context:

Historical

Location:

Germany

Year:

1945

Theater:

Western

Campaign

Codename:

Operation Veritable

Summary:

Objectives:

in this scenario is the town of Louisendorf and its victory points. The forms the crux of the battle strategy in many cases.
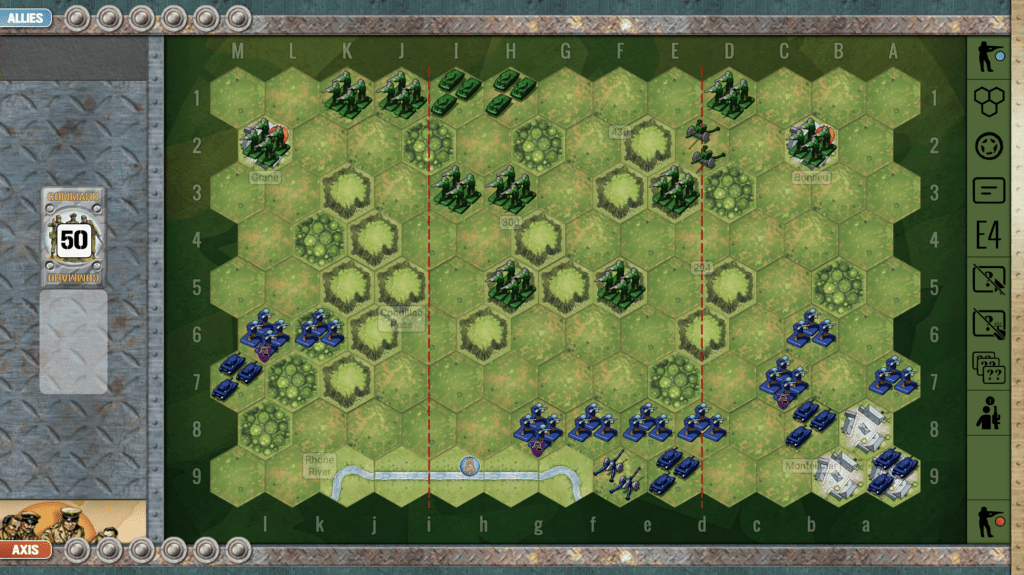
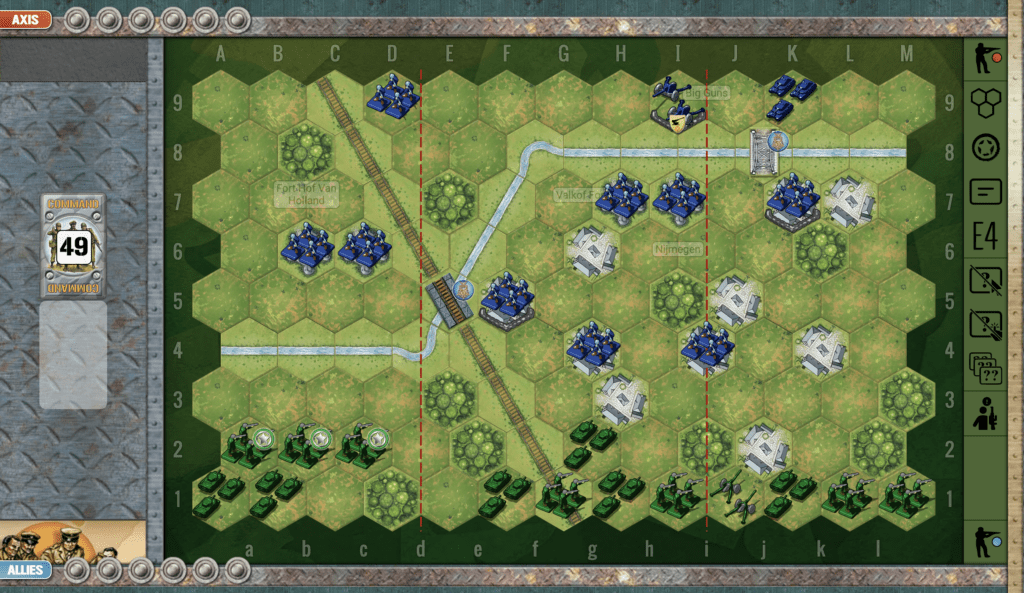
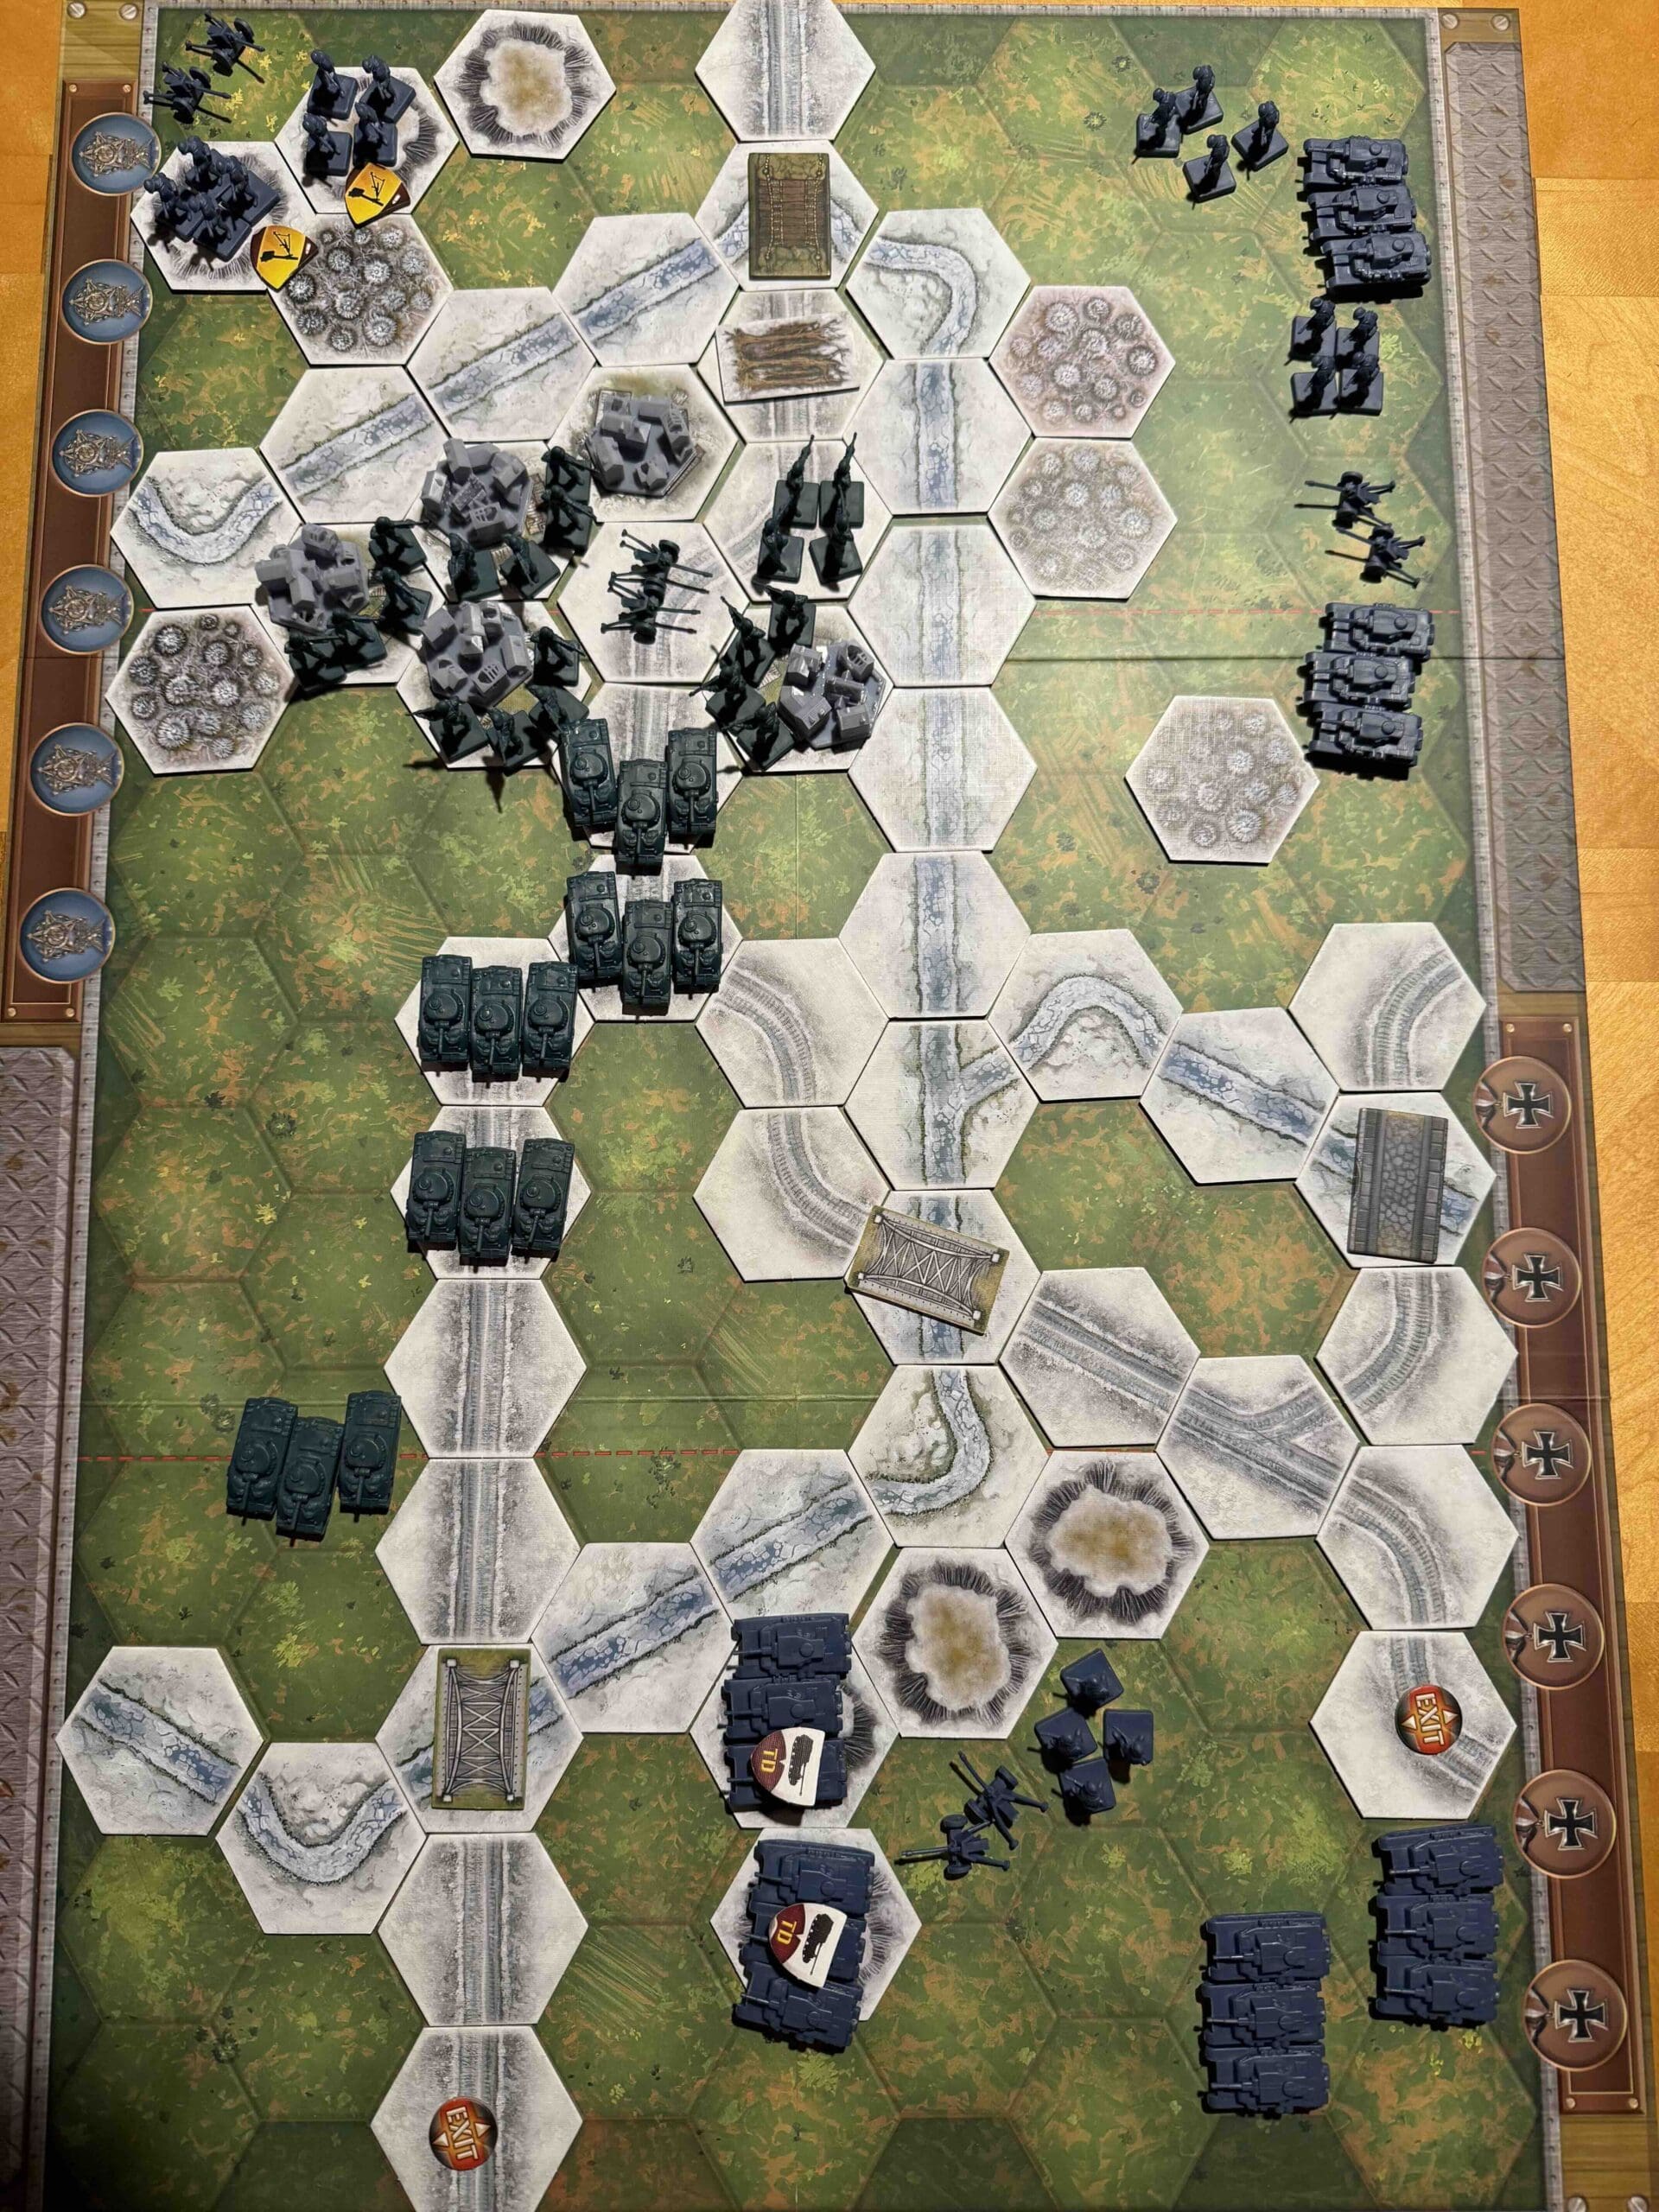
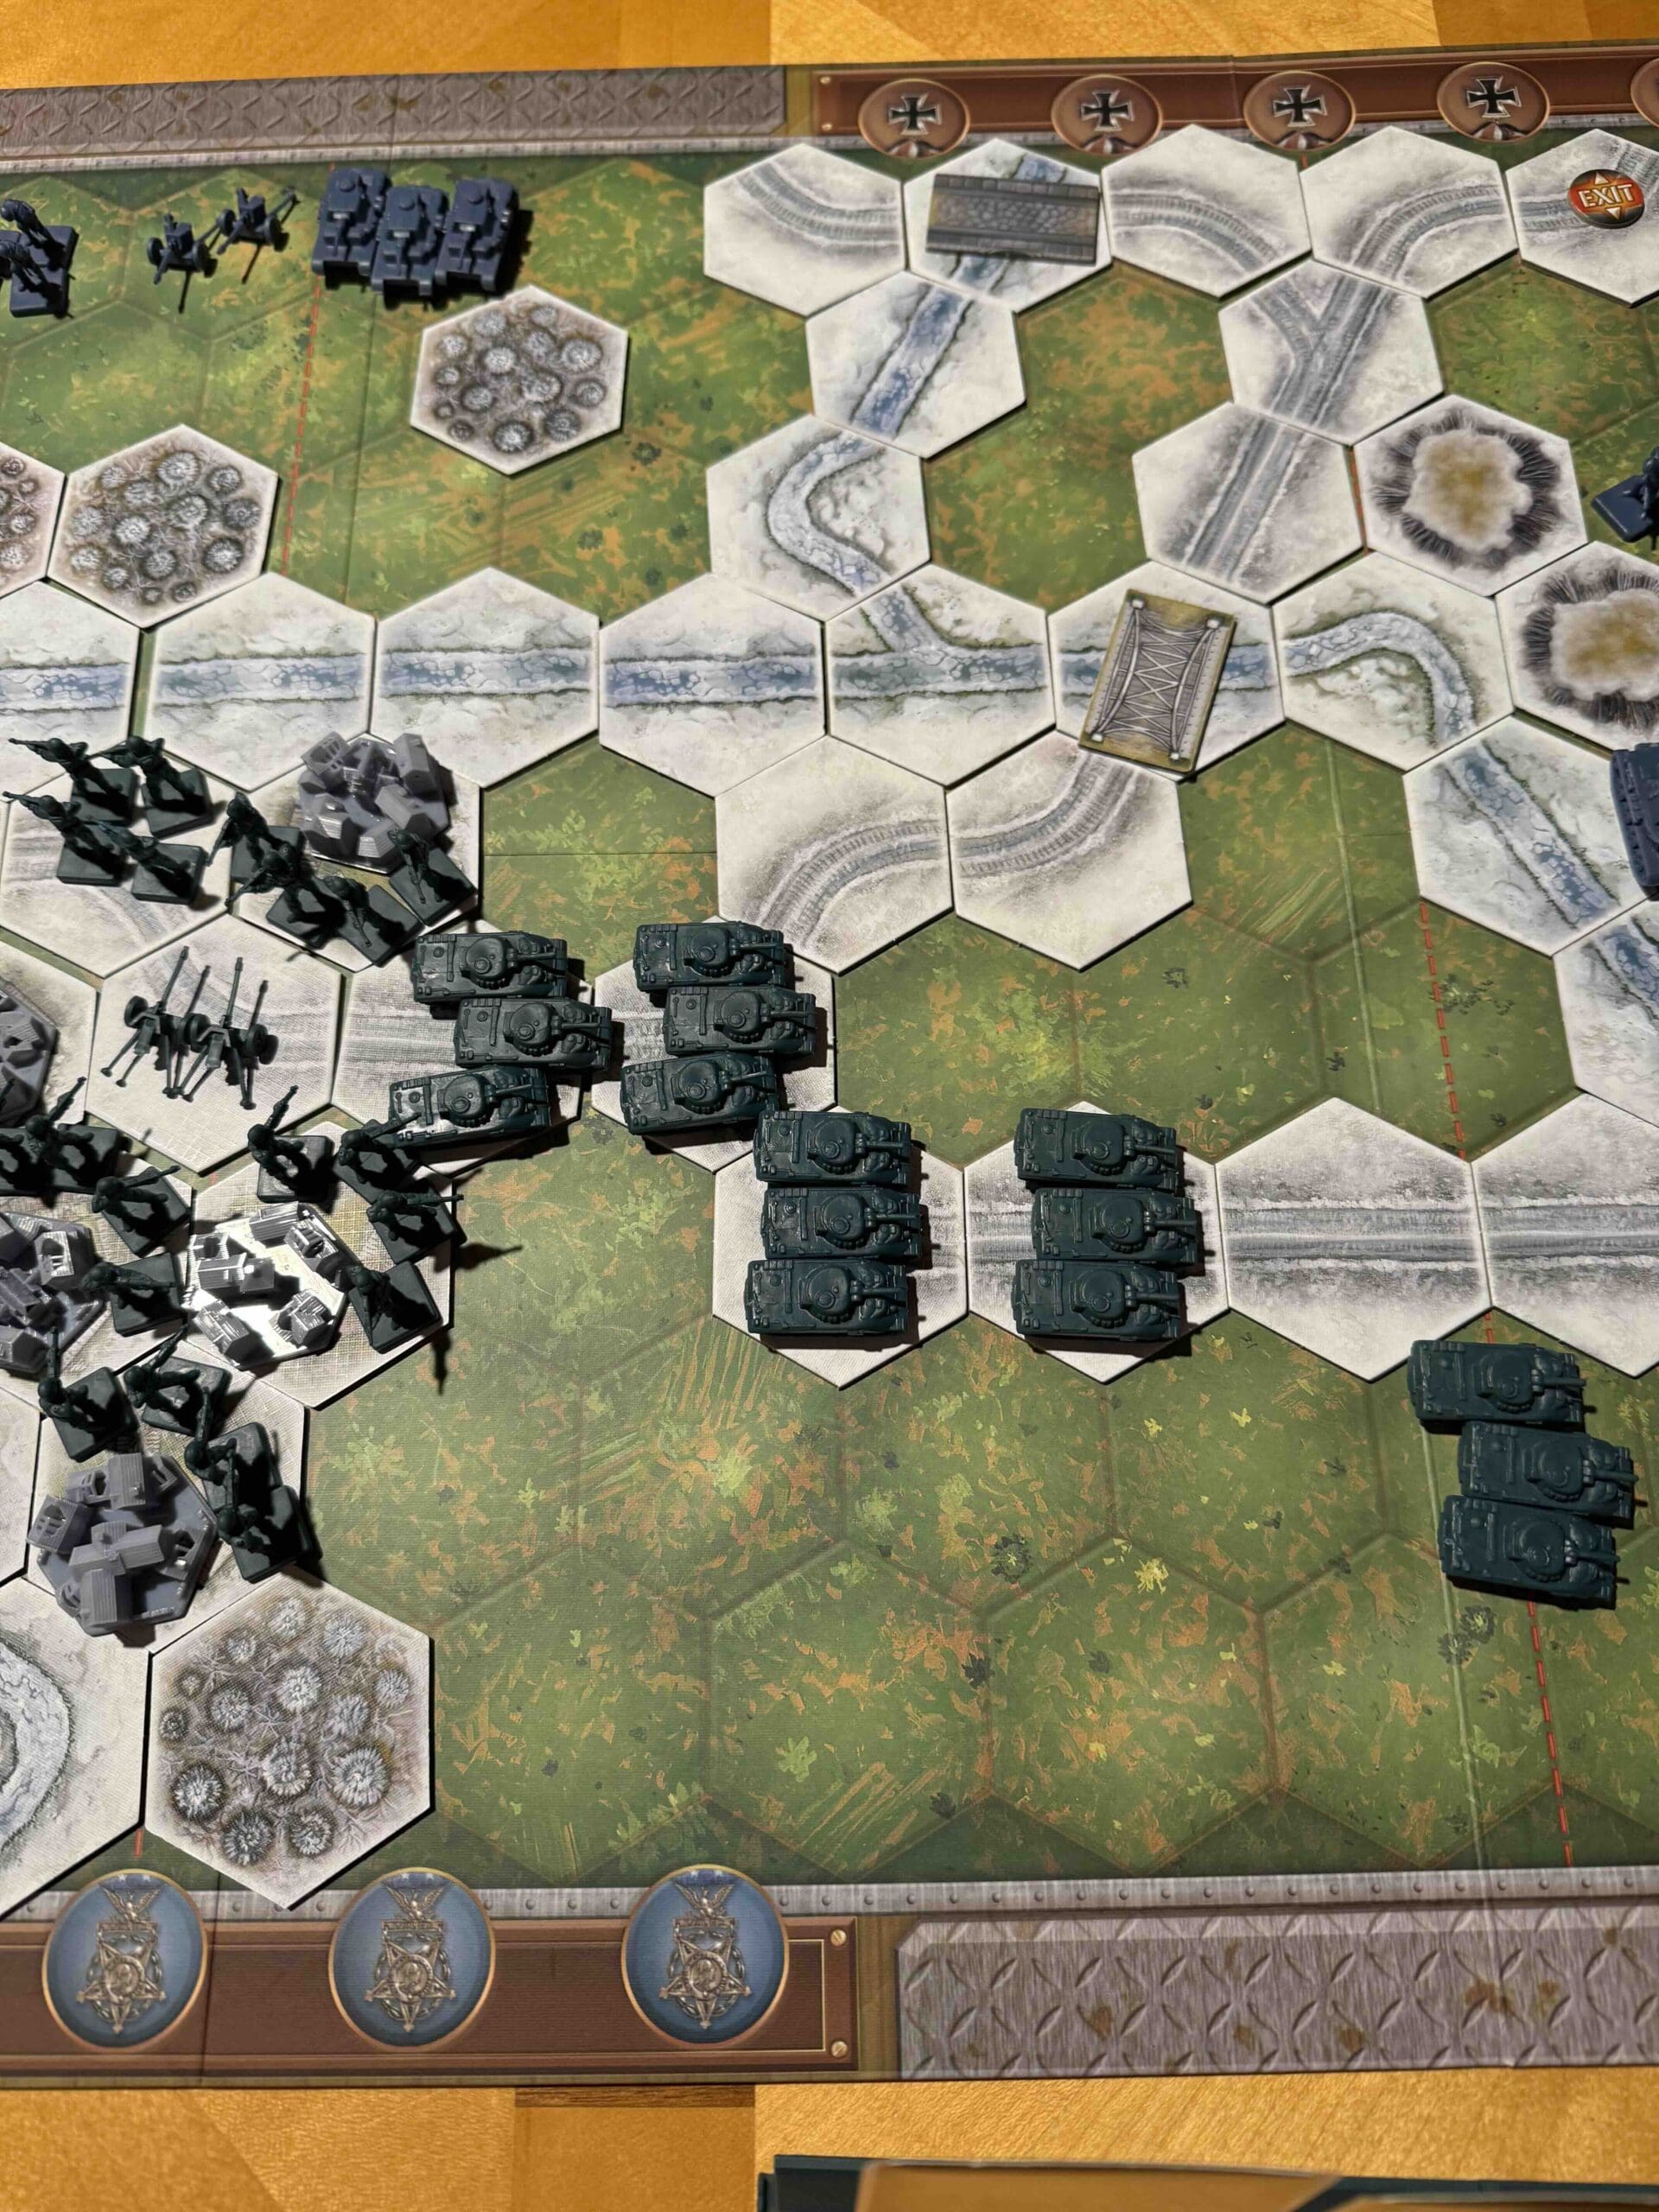
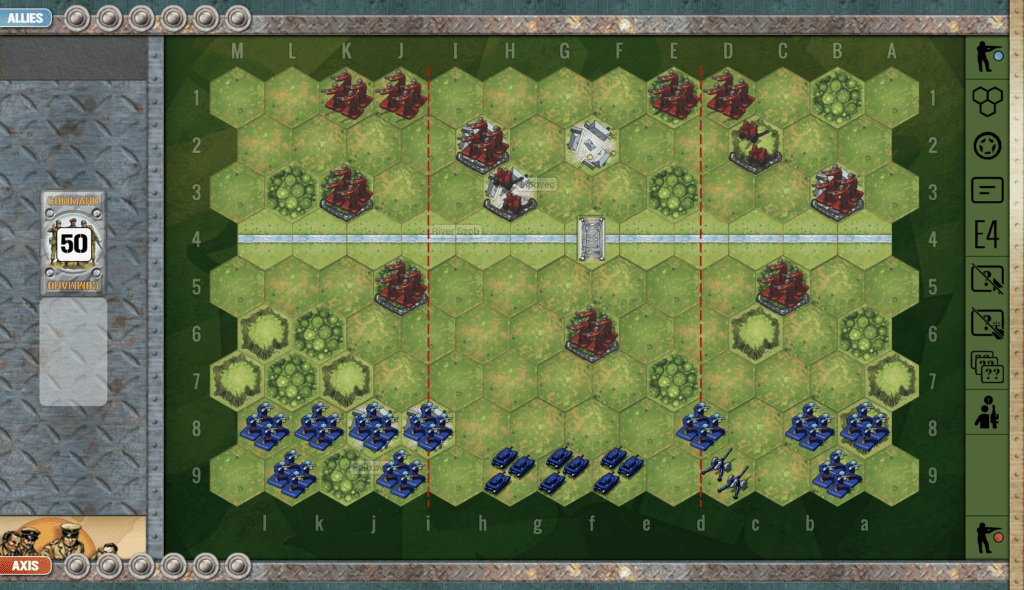
Battlefield:

Moyland Wood has a range of hilly hexes cutting across diagonally. There are two Axis VP’s right in the center town hexes. The Allied forces are scattered across the battlefield, in control of several hills, thus slowing down the forward advance of the Axis forces toward the VP town objectives.

Troops:

Allies – 10 Infantry, 5 Armor, 1 Artillery

Axis – 9 Infantry, 4 Armor, 2 Artillery

Allied Strategy:

1. The number one objective for Allies is to not easily surrender Louisendorf and its victory medals. As one is able, some of the center infantry should be placed into the town.

2. The round begins with the Allies scattered across the battlefield with no cohesive organizing principle. They will need to very quickly assemble and organize for an attack strategy before the Axis picks off the individual units. The Allied player needs to spend some time just arranging the troops into a battle plan.

3. At the start of the game, the advanced Allied infantry in the center section should really pull back into the town of Louisendorf for two reasons: first because the advanced unit is subject to multiple attacks from nearby Axis units with very little of its own supporting units to help support it, and second, in order to solidify a defense in the town.

4. Be wary of the well-placed artillery on your left flank, and the sandbagged infantry in the woods. It is really a losing battle to attack that flank unless you have an outstanding set of attack cards for that section.

5. Note that the ridge-line on your left flank is within the two-dice hex range of the artillery. So should you think about placing your armor on the point, which would make a great offensive and defensive position, if the enemy has the right combination of cards that flank, they will be able to attack and degrade the armor fairly quickly.

Axis Strategy:

1. Number one objective for Axis is to target the town of Louisendorf and its VP. The Axis begin the game with an outstanding offensive & defensive position on their right flank. Use it early on to hit the Allied units which are pressed up against the back boundary. Without a retreat option, the odds increase nicely for some successful kills.

2. Note that your forces on your left flank are fairly exposed, and backed up agains the boundary.  Should the Allies get some armor on the hill facing your forces, they will be able to deal some damage rather quickly.

3. As cards allow, gather your forces for an assault on the center, with the town hexes as your objective. And while the enemy is distracted defending for the impending attack, use your overwhelming firepower on your right flank to pick off units and gain one or two VP’s.

19
BR - Moyland Woods

Author:

JBorg

URL

Montelimar

Montelimar

scenario_Montelimar_start_Axis

The Battle of Montélimar (August 21–28, 1944) occurred as Allied forces, advancing quickly north from the Operation Dragoon landing beaches, sought to disrupt the German retreat along Route N-7, a critical supply and escape route near the Rhône River. The battlefield featured a mix of open farmland, rugged hills, and strategic chokepoints.

By August 22, skirmishes intensified as both sides probed each other’s strength. On August 24, German forces gained a critical edge after capturing detailed Allied operational plans. Despite this intelligence, their ambitious counterattacks on August 25 faltered. Efforts to cut off American forces and secure key terrain like Hill 300 and the Condillac Pass achieved mixed results. While some German gains were made, they were driven back by American artillery. Conversely, Allied attempts to sever N-7 were repelled by strong German counterattacks, leading to a tactical stalemate.

That fight was no game of chess—it was a brawl for the lifelines out of there. Both sides knew whoever held those escape routes held the keys to the whole sector. We clawed and fought for every inch, and in the end, that struggle fed right into the bigger job—kicking the enemy out and driving on to liberate southern France.

~~ General Howitzer

6 VP’s

card

Card Balance:

5 – 5

Complexity:

3

Conditions:

Countryside

countryside

Location:

Southern France

Year:

1944

Theater:

Western Front

Campaign:

Normandy Invasion

Codename:

Operation Dragoon

Summary:

Objectives:

Six VP’s, plus terriotorial objective medals for the Axis if they capture the towns, and for the Allies if they reach the river’s edge.

Terrain:

The Montelimar scenario has 5 hllly hexes dominating the center of the field of battle, plus several nearby hills. The side which controls this has some hope of reaching their objectives, whether it is the victory point towns, or the victory point riverway.

Troops:

Allies – 9 Infantry, 2 Armor, 1 Artillery

Axis – 9 Infantry, 4 Armor, 1 Artillery

thenmedal allies

Allied Strategy:

1.  The Allies begin the scenario in control of the central hilly hexes, which gives them an immediate edge. This is only blunted by the fact that the Axis are able to move first. If they get the right cards, such as an Assault in the Center or an Infantry Assault command card, they can make an immediate bid to challenge that central control.

2. Note that the hills on the right flank are impassable. This makes the right section almost its own battlefield. If the Axis get an attack advantage down that lane, they will be able to reach the Objective Medal in the town of Grane. 

3. If you hope to hold the right flank, you will need to get a unit into the forest at K4.  A Probe on the Right would allow you to swap places quickly by moving Infantry at L2 to K4, and Infantry K1 to L2

4.  The killer move is to station a unit on the hill (h6) next to, or on the hex (i6) in Condillac Pass.  Then when you are ready to finish off an enemy unit to gain your fifth medal, then also move your other unit from the sixth row hexes where they have been waiting, right up to the Rhone River to capture your sixth medal as a territorial objective! 


medal axis

Axis Strategy:

1.  Both of your flanks are strong compared to the Allies. So advance down those if you can, as they each also have an objective medal waiting for you at the end. However, your right flank is guarded by Allied artillery, so the left may be the place to make your biggest push.

2.  You need to take control of the hill in your central section. Your forces are pressed up against the Rhone River and subject to no-retreat hits.

3.  Attack Vector: left flank.  Because the hill hexes of the Condillac Pass are impassable, your entire left flank is its own battlefield.  Should you have the right combination of attack cards, you could pick up three medals by dominating that sector.


Battle Reports 
(percentage of Allied Victories):

54%

13
BR - Montelimar

Author:

Days of Wonder

Link:


Market Garden (Nijmegen Bridges)

Market Garden (Nijmegen Bridges)

scenario_NijmgenBridge_MarketGarden

The Battle of Nijmegen Bridge was a key engagement during Operation Market Garden in September 1944, a large Allied operation aimed at securing key bridges in the Netherlands to create a direct route into Germany.

General Howitzer’s comments:

“Listen up, men! In September of ‘44, at Nijmegen, those bridges over the Waal River were the keys to the kingdom—a direct shot into Germany itself. The plan was big—Operation Market Garden—take the bridges, link up the airborne and the armor, and ram straight for the Ruhr.

But those Germans weren’t just going to hand over those bridges. They had them locked down tight, and it took the 82nd Airborne, those American paratroopers, to cross that river in flimsy little boats under fire like hell itself. They paddled across, outflanked the Germans, and took those bridges with guts and bayonets.

We got the bridges, but we couldn’t hold Arnhem, and the whole damn operation fell short. But don’t let that fool you—the boys at Nijmegen showed what it means to fight with everything you’ve got. That’s how you break the enemy’s back—take the objective, hold it, and never let go until the job’s done!

6 VP’s

card

Card Balance:

Allies – 6

Axis – 5

Allies move first.

Complexity: 4

Conditions:

Countryside

countryside

Context:

Historical

Location:

Netherlands

Year:

1944

Theater:

Western Front

Codename:

Operation Market Garden

Summary:

Objectives:

6 Medals including bridge hex objectives.

Terrain:

Countryside with a river and train tracks cutting across the battlefield.

Troops:

Allies –  7 Infantry, 6 Armor, 1 Artillery

Axis – 9 Infantry, 1 Armor, 1 Artillery

medal allies

Allied Strategy:

1.  Use your armor to attack the many defensive positions of the enemy.  When the time is right, then capture your objective medals.

2.  Take the time to move your artillery into a more centralized position for attack.

3.  The Axis forces are so well-defended that you will need to attack them from a distance and significantly degrade them before direct assaults.  But you need to do this quickly as many of their forward forces are close to your and able to launch some subtantial attacks against you.

4.  The Axis Artillery is a Big Gun! That means that once they hone in on you with one hit, they are able to increase the dice attacks by one. So if they hit you once, and you have any figures remaining in the hex, you need to bug out, and move those figures to a new hex. 

medal axis

Axis Strategy:

1.  The Allies have an overwhelming armored force, so much of your work is defensive in nature, although you should pursue any soft targets you can locate. However, your two advanced infantry forces in the center have the ability to do significant damage to the enemy armor if you can quickly attack them while they are in no-retreat positions.  Be aggressive and you may be rewarded!

2.  There are two bridge objectives which you must protect. Stay close to each of them, and protect them well.

3.  Your Artillery is a Big Gun, so use it on semi-permanent targets so that you can take advantage of the additional die roll.

17
BR - Nijmegen

Author

Red Barricades Factory (Stalingrad)

Red Barricades Factory (Stalingrad)

By October ’42, the Germans were throwing more and more of their 6th Army into the meat grinder at Stalingrad. On the 22nd, the 79th Infantry, backed by engineers, tanks, and guns, went charging across the railroad embankment straight at the Red Barricades Factory.

It was hell—Russian snipers in every shadow, tanks dug in like fortresses, fire pouring in from every angle. The Germans clawed their way forward inch by inch, breaking the Soviet line by sheer weight. But after all that blood and fury, by nightfall they had only managed to seize a corner of the factory. A costly gain, proving again that in Stalingrad, every brick was paid for with lives.

~~ General Howitzer

10 VP’s

Card Balance:
Allies – 3
Axis – 5

Complexity:

5

Conditions:

Urban / Winter

Location:

Stalingrad

Year:

1942

Theater:

Eastern Front

Campaign:

Battle of Stalingrad

Summary:

The scenario is complex battle with a lot of different terrain, both urban and winter, that complicates troop movement. There are also snipers which add an extra element of suspense.

Objectives:

10 VP’s , including 3 Objective Medals for either side

Battlefield:

Battlefield is the Red Barricades Ordnance factory in the winter, surrounded by rubble.

Troops:

Allies – 9 Infantry, 2 Armor, 2 Artillery, and 2 Sniper

Axis – 9 Infantry, 4 Armor, 2 Artillery, and 1 Snipers

Allied Strategy:

1.  You can quickly grab the Medal Objectives which are very close to you in the city ruins and the factory, and then try to hold them for the game. This will give you an early advantage and force the enemy to come to you, and fight against you while you are in a well-protected positions.

2. You have two Snipers which can fire five! hexes away. You can use them to harass the enemy and force them to pay attention to the Sniper, even though it doesn’t count as a VP, thus diverting energy away from other units.

3.  Use your forward infantry to attack the enemy before they destroy you.  At two hexes away, you should be able to get some good hits in first.

4. The strategic reality is that your forward units will get destroyed rather quickly, so the real battle will take place along the second front in rows 3,4,5 where you have armor protected behind sandbags, and city ruins for your infantry.

5.  Give careful consideration before moving your armor away from their sandbags. The enemy outnumbers your armor two to one, and once they become mobile, will be coming for yours.

6.  This scenario makes it easy for Allies to quickly grab 4 medal objectives by entering the town and factory hexes, but the trick comes in trying to hold them. The enemy will push through your first line of defense pretty quickly, and then you will need to hold your second line on rows 3,4,5, in order to prevent the enemy from taking out your units on those town and factory hexes.

Axis Strategy:

1.  Mobility is the first order of business when you start. In fact, at the start of the game, the Axis have 16 units, and not  a single one can retreat. [ Admiral Frigate ] You have a lot of firepower stuck against your back wall, and hidden behind the hills.  You need to move it out and begin attacking the Allies immediately.

2.  You have three no-retreat Infantry units that are only two hexes away from the enemy.  You either need to bring your Armor up between the enemy and your infantry, or, better yet, move in and attack the enemy at close assault range.

3.  Once you get some mobility going to avoid the no-retreat attacks, you can use your Artillery to degrade the forward enemy units which are barricaded in the City Ruins.

4.  Use your Sniper to good effect. They can move two and battle against Infantry, hitting on grenade, infantry, or star dice faces, increasing your odds of a hit to 67%.

5. Most of the middle game of this battle will take place with your forces arrayed across the sixth row, while the Allies are defending from rows 4 and 5. So once you take out the advanced Allied forces, you can overtake those same city ruins and launch your attack from there against the Allies.  

Battle Reports
( percentage of Allied victories ):

57%

28
BR - Barricades

Author:

Days of Wonder

Link:

Longvilly Trap

Longvilly Trap

December 19th, 1944: They sprang the Longvilly Trap because we were stretched thin and caught standing still—never a good idea in a shooting war. Near Longvilly, ahead of Bastogne, the enemy pushed armor hard through the Ardennes and found American units sitting exposed on narrow, jammed roads with broken communications. The Germans hit fast and coordinated tanks with infantry, rolled right over isolated formations, and smashed them before they could maneuver. It was a bloody setback, no question—but it bought the enemy only time, not victory. Longvilly opened the road to Bastogne, yes, but it also set the stage for us to dig in, turn, and hit back harder—because wars aren’t won by trapping men, they’re won by destroying the enemy, and that bill was coming due.

~~ General Howitzer

VP’s: 6

Card Balance:

Allies – 4

Axis – 5

Complexity:

4

Conditions:

Winter

winter

Location:

Belgium

Year:

1944

Theater:

Western 

Campaign:

Battle of the Bulge

German Name:

Unternehmen Wacht Am Rhein

Summary:

This is a fun and exciting scenario as the Americans attempt to survive the seige of Bastogne and open up an escape route.  The Axis are able to pummel the Americans from all directions with Artillery, Mortars, and Tanks, while the Americans force their powerful Armor across the countryside and toward the Exit hexes.

Objectives:

The Americans need to break through the German roadblock and open the way to Bastogne.

Six Medals.  There are also two Exit Medal Objectives for the Americans to breakthrough.

Battlefield:

Winter conditions, with roads and rivers cutting through the battlefield.

Troops:

Allies – 5 Infantry, 6 Armor, 1 Artillery

Axis – 5 Infantry, including some SWA’s (Mortars), 6 Armor including two Tank Destroyers (2,2,2,2),  3 Artillery

Special Rules:

1.  Winter Combat rules – two hex armor movement

2.  Reduced Visibility rules – only hit with Grenades unless in Close Assault

2.  Special Weapon Asset rules for Mortars – 3,2,1,1

3.  The river is frozen, but impassable.

4.  Roadblock rule

5.  Also play with Winter Combat cards in addition to regular Combat cards

medal alliesAllied Strategy:

1.  Primary Objective is to break through and provide a passage to Bastogne so the troops can be rescued, as they were, historically.  You may want to keep the roadblock in place, so that your Armor can exit to the east without worry about rearguard action.  

2.  Your forces are congested in the town of Bastogne.  Retreat flags from the enemy will cause losses, so you will want to spread them out by moving your forces east along the road toward the Exit hex.  Remember that with winter conditions, you will only be able to move your Armor three hexes at a time on the road (instead of the usual four).

3.  If you have the cards for it, some gains can be had by removing the roadblock and heading west to attack the enemy directly. Otherwise, they will continue to pummel you from the woods in the north, and with their Artillery and Mortars to your southwest.  

medal axisAxis Strategy:

1.  You have the enemy completely surrounded, except for that pesky escape route along the road.  Move to block the Exit hexes ASAP.  It will only take two turns for the Allies to begin evacuating along the road.

2.  With three Artillery and two Mortar units, you can continuously attack the enemy and decimate their forces.  

3.  Remember that the Limited Visibility rules require that, unless you are in Close Combat, typically only Grenades will score a hit.  But Retreat Flags can be a very effective way to reduce the enemy in their congested situation in Bastogne. 

3.  Move the two Armor on your right and center section into the two forest hexes across the river from Bastogne.  From there you will be able to safely pick off the enemy bit by bit throughout the battle. 

4.  Take the time to move the Artillery on your right flank forward at least one row forward.  It will pay off every turn afterwards with increased firepower against the enemy hiding like cowards in Bastogne.

1
BR - Longvilly Trap

Author.

URL

Lipovec

Lipovec

scenario_Lipovec_start_Axis

July 22nd, 1941—Lypovec. Operation Barbarossa was tearing into the Soviet Union, and here came the Slovak Mobile Brigade—five thousand men, 43 tanks, and 123 artillery guns—charging into their first real scrap against the Red Army.

They smashed into General Tkachenko’s 44th Rifle Division—some fresh, some worn ragged—but the fight was no parade. The Slovaks had spirit, but their tanks ran thirsty, and fuel was scarce. They pushed into the town, only to be hammered by furious Soviet counterattacks.

What saved them? The guns. Artillery thundered, covering their retreat and keeping the whole affair from turning into a disaster. In the end, the Slovaks learned the hard truth—courage and machinery mean little without supply and strength in numbers. Against a seasoned, determined foe, they were blooded, beaten back, and reminded that war is unforgiving to the unprepared.

~~ General Howitzer

6 VP’s

Card Balance:

5 – 5

Complexity:

3

Conditions:

Countryside

Context:

Historical

Location:

Ukraine

Year:

1941

Theater:

Eastern Front

Campaign:

Operation Barbarossa

Codename

Summary:

The dominant factors in the Lipovec scenario is the river going across the battlefield, and the two artillery units safely ensconced in each of their own city hexes.

Objectives
Six VP’s. No medal objectives

Battlefield
The battlefield is split horizontally by the River Szob, which is a fordable river. There is also one bridge crossing.

Troops:
Allies – 10 Infantry, 2 Artillery
Axis – 10 Infantry, 3 Armor,  1 Artillery

Allied Strategy:

1. The Allies begin the round with three forest hexes deep into Axis territory, controlled by sandbagged infantry. This presents an early point of attack, and becomes the locus of the seesaw battle for control. Take advantage of those forward points and attack as quickly as possible at the Axis enemy pressed up against the battlefield barrier. For every flag thrown against a unit against “the wall” will be counted as a hit. This increases your chance of getting a hit by 17% for each unit.

2.  Allies have two artillery vs. the Axis’ one. So take advantage of the long-range hits available to you. The central artillery has reach of most of the battlefield. Use it.

3. As defenders in this game, unless the cards clearly dictate otherwise, you can wait across the river for the Allied attack, and then hit them when they are paused at the Szob River.

Axis Strategy:

1. The enemy begins with control of three hexes on the Axis side. So Axis will have to target the enemy incursion hex by hex to push him back. Unless Axis is given a great set of cards for a flanking attack, they will want to clear all enemy troops on their side of the river before trying to cross over.

2. You have six infantry units on your left flank. They can approach the enemy under the cover of the forest and hills, to get very close for the attack.

3.  Axis have an overwhelming advantage with armor.  Put them into action by dealing with the infantry hiding in the forest hex center seciton.

14
BR - Lipovec

Author:

Days of Wonder

URL