Flanking Maneuver at Bir Hakeim
Flanking Maneuver at Bir Hakeim
“Now let me tell you about that flanking maneuver at Bir Hakeim—a real brawl in the North African sands back in May and June of ‘42. Rommel was out there with his Panzers, trying to outfox and outflank the whole Allied line, and he found that weak spot right at Bir Hakeim.
But the Free French, under General Leclerc, they weren’t about to roll over and die. Hell no! Those boys dug in, held their ground, and fought like hell. Rommel’s men swung around the flanks with tanks and firepower, but the French held on—courage, grit, and a lot of lead flying every which way.
When the walls closed in, those Free French didn’t surrender. They broke out—fighting their way out of that trap like men possessed, slipping through the enemy’s fingers and living to fight another day.
So here’s the lesson, boys—a good flank can break an army, but a fighting spirit can break the odds. Those Free French showed the world what it means to hold your ground and punch your way out when you’re surrounded. That’s how you do it!”
~~ General Howitzer
5 VP’s
![]()
Card Balance:
Allies – 5
Axis – 6
Complexity:
3
Conditions:
Desert

Location:
North Africa
Year:
1942
Theater:
Mediterranean Theater
Campaign
Codename
Summary:
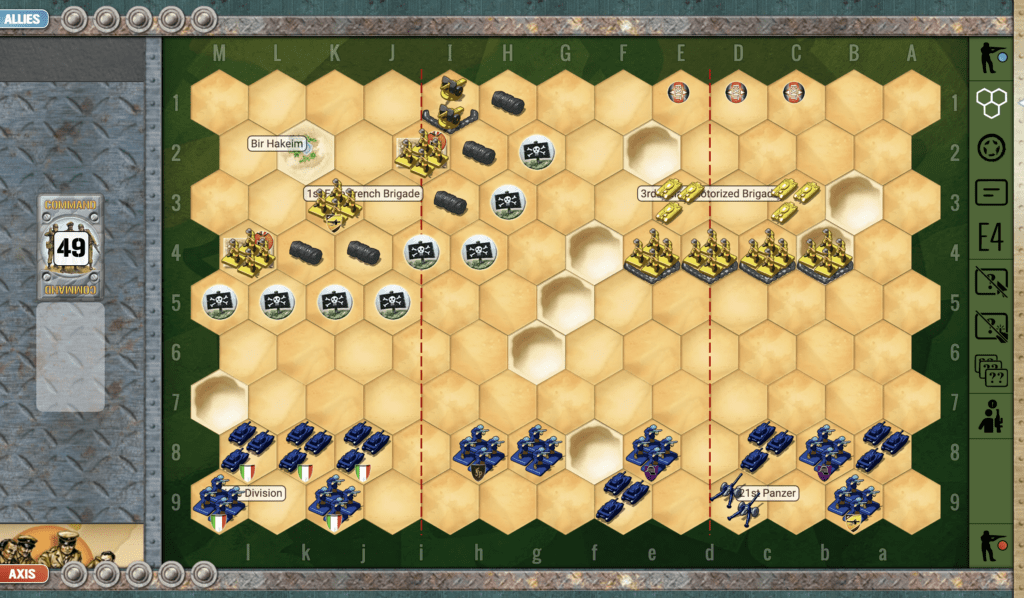
The Axis have a superior force against the British in this scenario. But the British are defended by a series of sandbagged infantry, and another set hidden behind mines and wire rolls. The Bir Hakeim Oasis provides medical relieft and restoration to Allied troops, just like a Medics and Mechanics card. So this adds an interesting element to the game.
Objectives:
Five hexes, plus the Axis have two hexes with Medal Objectives plus a set of Exit Hexes to go for.
Battlefield:
Open desert with one three hex berm cutting an an agnel in the center section. There is also a large minefiled on the Allies right blank, laid by the Allies.
Troops:
British – 7 Infantry, 2 Armor, and 1 Artillery. British troops are guarded by sandbags and mines.
Axis – 7 Infantry, 6 Armor, and 1 Artillery

🔥 Winning as Allies
1. First moves: Your infantry behind the minefield will quickly be under attack from the enemey armor. Be prepared with a response. Also your armor is kind of out of the action at the start of the scenario, so get them up onto some berms to be prepared to attack the enemy. Recognize that you will get attacked by enemy armor, but it will be from a position of strength.
2. Keep your infantry behind the sandbags as long as you can. They are preventing the enemy from getting access to the Exit hexes.

🔥 Winning as Axis
1. As the Axis commander it is your job to locate where you will gain the five VP’s for this scenario. Many of the Allied infantry are sandbagged up on dunes, and it will be a slow slog to pick them off with your armor. But the infantry behind the minefield is more availble. There is one in a bunker and then two unprotected. But watch out as one of those infantry units is actually an Anti-tank Gun which can hit Armor with grenades, armor, and stars on the dice roll. So you may be able to get two possibly three units from your left flank. The other two VP’s will have to come from enemy armor, two units, or one armor and one infantry perhaps.
2. If the cards warrant it, try to concentrate your forces in the center section so that you can quickly respond to needs in either flank.
3. You have an artillery; use it. If you move it foward one row, the sand-bagged infantry will be within your two-dice bombardments.
4. There are three Exit Markers available to you. Occasionally, with the right set of cards, a commander may be able to force one or two units out the door. But this can come at a cost as you must pass heavily entrenched enemy forces to do so.
Classic Battle Reports:
(percentage of Allied victories)
31%
Author:
Days of Wonder
URL