Tenaru
Tenaru

“Listen up! In August ‘42 on Guadalcanal, those Japanese under Colonel Ichiki thought they’d just waltz in and knock the Marines off their perch at Henderson Field. Hell, they didn’t know what they were walking into!
The Marines were dug in deep along the Ilu River, machine guns at the ready and artillery on call. When the Japanese hit the line, they slammed into a wall of hot lead and cold steel. All night those Marines fought like hell, and by dawn, the Japanese were stacked up like cordwood.
That wasn’t just another scrap, boys—that was a message. The Japanese learned the hard way that the U.S. Marines don’t back down, and we sure as hell don’t run. The Battle of Tenaru was the first big test on Guadalcanal, and the Marines passed it with flying colors.
That’s how you win a campaign, boys—you dig in, you hold the line, and you don’t let the enemy push you back an inch!”
~~ General Howitzer
6 VP’s
![]()
Card Balance:
5 – 5
Complexity:
3
Conditions:
Jungle

Location:
Guadalcanal
Year:
1942
Theater:
Pacific
Campaign:
Guadalcanal Campaign
Codename
Summary:
Objectives:
6 VP’s
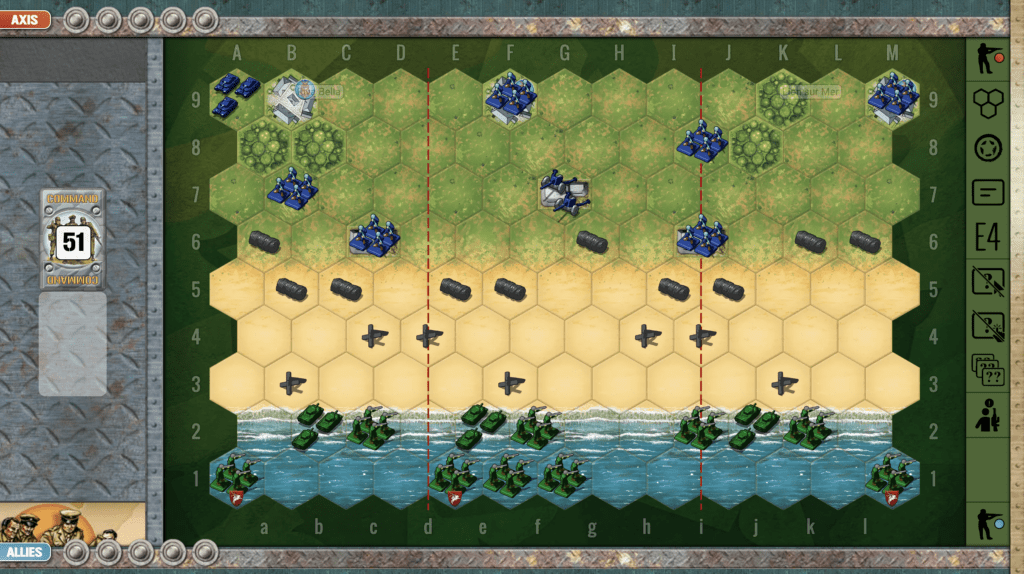
Battlefield:
The primary strategic elements to consider in the Tenaru scenario is the navigable river going across the battlefield, and the beach hexes along one flank which allows for rapid troop movement. But the most formidable element of this scenario are the two American artillery units on the beach section.
Troops:
Allies – 9 Infantry, 1 Armor, 2 Artillery
Axis – 12 Infantry

Allied Strategy:
1. Use your Artillery at every opportunity. The enemy will be able to make rapid progress along the beach, so you need to attack while you can.
2. You have one Armor, but it starts off in the back. You need to get it into play as soon as possible, so that you can attack the enemy forces from a distance and diminish their attack ability.
3. Do what you can to destroy at least one figure in every Japanese Infantry unit, in order to nullify the Seishin Kyoiku Principle advantage.

Axis Strategy:
1. Because this is a long scenario, you may need to consider destroying the American artillery near the beach. Fortunately, the beach allows for rapid progress of the Japanese infantry to its objectives.
2. However, it is possible for the Axis to win this scenario if they focus their energies to the left and center sections.
3. Take advantage of the Banzai War Cry, and the Seishin Kyoiku principle to rapidly attack and destroy the enemy.

Author:
Link: