Bastogne Corridor East

Bastogne Corridor East

scenario_BastogneCorridorEast

The Battle of Bastogne Corridor East was a crucial engagement during the Battle of the Bulge in World War II. It occurred in late December 1944 and early January 1945, focusing on the eastern approach to the besieged town of Bastogne, Belgium.

German Objective: The German army aimed to break through U.S. defenses east of Bastogne to secure critical roads and regain momentum after their advance stalled.

Allied Response: U.S. forces, including the 101st Airborne and supporting armored divisions, mounted a fierce defense despite being surrounded and outnumbered. The weather improved, allowing Allied air support to deliver supplies and conduct airstrikes.

Outcome: The Allies successfully held the eastern corridor, repelling repeated German attacks. This defense helped maintain the Allied hold on Bastogne and contributed to the eventual German retreat, marking a turning point in the Ardennes Offensive.

General Howizer has some observations on this battle:

The Germans threw everything they had at us—tanks, infantry, the works—but our boys, including the damn fine 101st Airborne and our armor, stood their ground like a stone wall. Surrounded? Outnumbered? Hell, that just meant we could shoot in every direction. Then the skies cleared, and our flyboys swooped in with supplies and bombs, giving the Germans a taste of hell from above.

We held that eastern corridor like bulldogs on a bone, smashed every attack they sent, and kept Bastogne in Allied hands. That stand didn’t just hold the line—it broke the enemy’s back and turned the tide in the Ardennes.

Memoir 44 Details

6 VP’s

Card Balance:

5 – 5

Complexity:

3

Conditions:

Winter

winter

Location:

Belgium

Year:

1944

Theater:

Western Front

Campaign:

Ardennes (Battle of the Bulge)

Context:

Historical

Strategy Summary


Objectives:

6 VP’s, including Exit Medals for the Axis forces

Terrain:

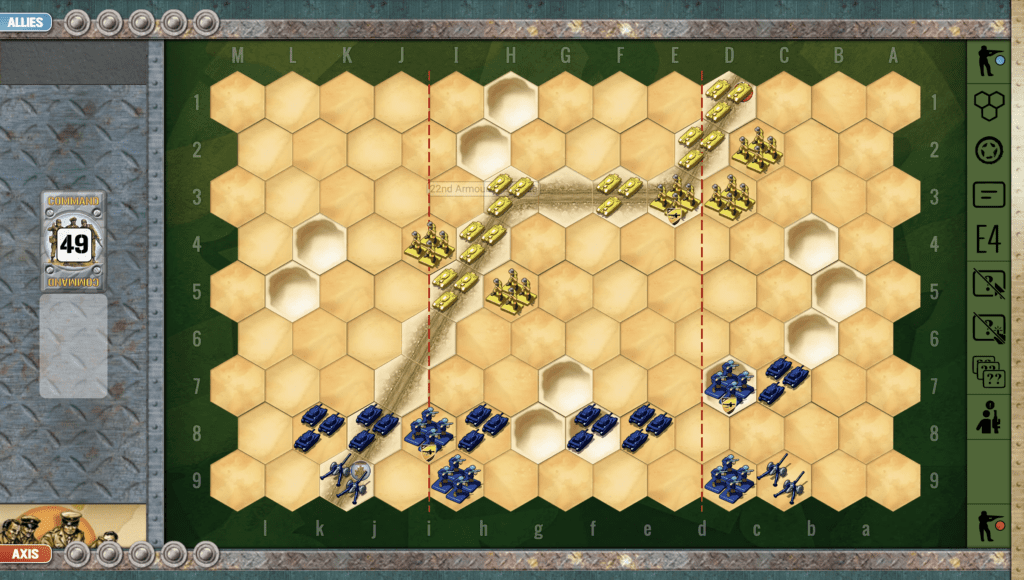
In this scenario, the Allies control two-thirds of the battlefield at the start. Because there are scattered forests across the field of play, it makes it difficult for the Axis to push them out. But they begin the round with superior forces, while the Allies are crammed into the back of one flank.

Troops:

Allies – 7 Infantry, 4 Armor, 2 Artillery

Axis – 8 Infantry, 5 Armor, 1 Infantry

Allied Strategy:

1. Big Picture Strategy:

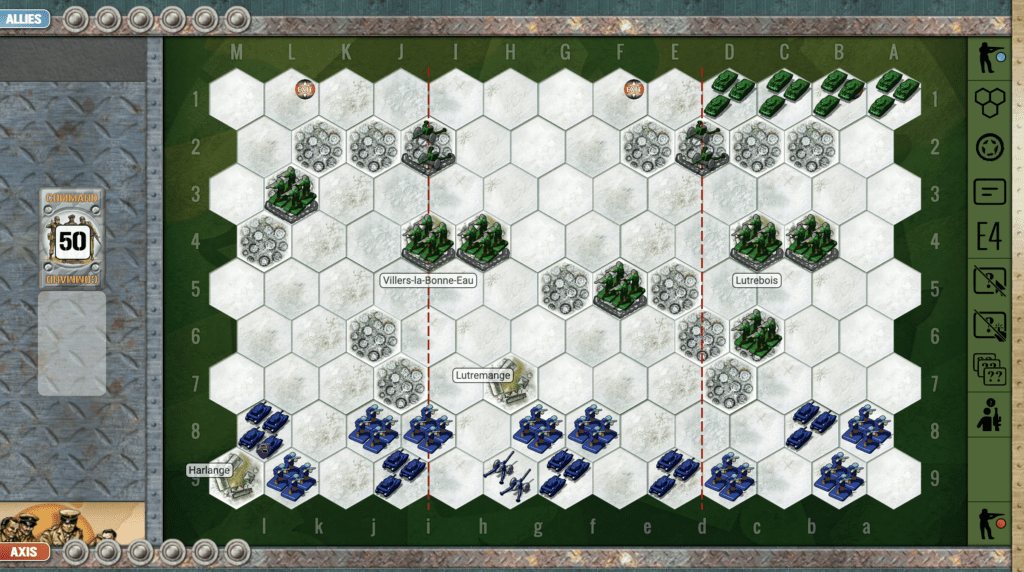
Focus on defending villages and chokepoints, leveraging defensive terrain and slowing down Axis tanks. Keep units close to key areas like the exit markers to prevent breakthroughs.

2.  You have four armored units jammed together in the lower left flank. At least half of those will need to shift right to engage the enemy in the center section, to prevent Axis forces from escaping across the exit row.

Axis Strategy:

1. Big Picture Strategy:
Use tanks’ mobility to avoid prolonged battles in forests and villages. Concentrate forces for a decisive breakthrough toward the exit markers or to capture critical objectives like villages.

2.  Given the preponderence of the Allied armor on your right flank, this would be your weak flank. So be careful of launching an attack on that side unless you have a tremendous set of cards for it.

3. Also note that the Allied infantry at c6 is within a two dice attack of your no-retreat armor unit. So you will need to move that away quickly.

4. You have a lot of forces on your left flank. Spend a card to get them into the action in the center section when you can.

19
BR - Bastogne East

Author:

Days of Wonder

URL:

Mignano Monte Lungo

Mignano Monte Lungo

Listen up, men—

The Battle of Mignano Monte Lungo was a damn fine example of grit and redemption. After switching sides, the Italian troops had something to prove—and by God, they did it. That mountain was no cakewalk. The Germans were dug in deep, with every ridge covered by fire, and the terrain was as unforgiving as a mule kick to the gut.

But those Italians, with the Yanks watching, clawed their way up that blasted rock from December 8 to the 16th, 1943. Took casualties. Took hell. But they took the mountain too. That wasn’t just a hill—it was a message: Italy was back in the fight, and they were fighting on the right side this time.

Monte Lungo wasn’t just a tactical win. It was a morale sledgehammer. And it cracked open the road to Cassino. That’s how you turn the tide—with steel in your spine and fire in your gut.

~~ General Howitzer

6 VP’s

Card Balance:

Allies – 6

Axis – 5

Complexity:

3

Conditions:

Countryside

Context:

Historical

Location:
Italy

Year:

1943

Theater:

Western

Campaign:

The Italian Campaign

Codename

Summary:

The Axis forces begin this scenario in control of the hexes across two-thirds of the battlefield, protecting two VP town hexes. The challenge for the Allies is to cross the open plain with out being decimated before they can control the hills and get to the VP’s.

Objectives:

6 VP’s, plus Monte Lungo and Monte Rotondo are temporary Medal Objectivese for the Allies.

Battlefield:

Troops:

Allies – 

Axis – 

Allied Strategy

1.  Big Picture Strategy:  the Axis forces have an Artillery guarding the left flank, and it’s objective medal. But there is an objective medal on the right flank.  Head all of your forces in that direction.

2.  If you can move your Artillery forward one row, you will be able to hit more of the enemy with 2D attacks.


Axis Strategy

1.  Big Picture Strategy: Guard the Objective Medal on your left flank.  If the enemy gets the right cards, they can very quickly come upon your forces and overwhelm them.

Battle Reports:

(percentage of Allied victories)

16
BR - Mignano

Author:

Days of Wonder

ID:

Link:

Across the River Roer

Across the River Roer

scenario_AcrossTheRiverRoer_start

Across the River Roer wasn’t just another bridgehead — it was the kind of operation that tests an army’s guts and grit. In February ’45, the Germans tried to drown the Allies out of the Rhineland by blowing their dams and turning the Roer into a boiling, flooded barrier. They figured the rising water would halt us cold. It didn’t. It just delayed the inevitable.

When the river finally dropped, our boys moved with discipline and fury. Under artillery, machine-gun fire, and every trick the enemy could throw, they forced that crossing, yard by yard, boat by boat. The Germans were dug in, determined, and desperate — but they couldn’t stop an army that had momentum, purpose, and the will to finish the job.

The Roer crossing cracked open Germany’s western shell and put us on the doorstep of the Rhine itself. And once you reach the Rhine, you’re cutting straight into the enemy’s heart. This operation proved again that no flood, no fortress, no line of resistance can hold back an Allied force that’s hell-bent on victory.

~~ General Howitzer

6 VP’s

Card Balance:

6 Allies
4 Axis

Complexity:

3

Conditions:

Countryside

countryside

Location:

Germany

Year:

1945

Theater:

Western Front

Campaign:

Rhineland

Codename:
Operation Grenade

Summary

Artillery plays a major role in this scenario, with three on one side and one on the other. 

Objectives:

Six VP’s including all three town objectives and an exit hex for the Allies, if they can get there.

Terrain:

The River Roer is a major strategic barrier which slows the advance into battle.

Troops:

Allies – 10 Infantry, 3 Artillery

Axis – 7 Infantry, 2 Armor, 1 Artillery

Allied Strategy:

1.  Attack Vector Options: Left Flank:
If you are going for a left flank assault, the enemy artillery will pick off your forces as you advance. So gather at the river first, since that barrier will stop your troops for one turn. Once everyone has breached it, then you will have to attack en masse and quickly attack before the artillery takes you out.

2.  Your artillery on the right can provide support fire for your troops if you pursue a central or right flank attack. But if you can move them forward at least one row before the battle begins, do that. The result will be that the sandbagged infantry in the center will be subject to 2D attacks from the artillery.

3.  Attack Vector Options:  Right Flank
An attack on the right flank is going to be a challenge as long as the enemy armor can move in and attack your infantry on the open plain before the town with the victory hex.  And then should you even reach it, you have to hold it until the end of the game to get the VP’s.

Axis Strategy:

1.  Historically, the Allies were able to move across the Roer and establish a 3-mile beachhead.  This means that the scenario is stacked against you, if you attempt to come out from your defensive positions and launch an assault. You may be able to do it, especially with your armor on your left flank, but be careful, as the Allied artillery is powerful. 

2.  Keep your armor mobile. You will most likely need them on your left flank to defend the town hex medal objective.

3.  Move your infantry in the back of the center section forward to replace the infantry you will lose in the center and right flanks.

21
BR - Roer

Author:

Days of Wonder

URL:

1st Armored to the Rescue

1st Armored to the Rescue

Back in May of ’42, out in that godforsaken sandbox they call North Africa, the British under General Ritchie were getting their clocks cleaned by that desert fox Rommel. That son of a gun was no slouch—he came flanking hard near the Gazala Line, punching through like a knife through warm butter.

So what do they do? They throw in the 1st Armoured Division to stop the bleeding. Good men, tough tanks—but they went up against a well-oiled machine. Rommel’s boys had coordination, momentum, and those damn Panzers that could turn faster than ours and hit harder too.

The Brits fought like hell, but their tanks were choking on dust, breaking down, and couldn’t take a hit like the German steel. The result? A tactical retreat that turned into a full-on fall of Tobruk—a damn tough loss for the Allies.

But here’s the lesson, and you’d better believe I paid attention: in desert warfare, you don’t win with brute strength alone. You win with mobility, logistics, and bringing everything—armor, air, and artillery—to bear in perfect harmony. That’s how you beat a fox like Rommel.

We may have taken a hit there—but it lit a fire under us. And that fire led us straight to victory later on.

~~ General Howitzer

5 VP’s

Card Balance:
Allies – 5
Axis – 6

Complexity

2

Conditions

Desert

Location:

North Africa

Year:

1942

Theater:

Mediterranean Theater

Campaign

Context:

Historical

Summary:

1st Armored is a wide open tank battle with a road running at an angle through the field. Any units of either side could escape of the field via the road. This adds a strategic movement element to the armored battle.

Objectives:

5 VP’s, plus each side has an escape hex at the end of the road.

Battlefield:

Desert battlefield with a road angling through from one corner to the other, surrounded by various sand dunes.

Troops:

Allies – 5 Infantry, 6 Armor

Axis – 4 Infantry, 6 Armor, 2 Artillery

Allied Strategy:

1.  Big picture is that historically the British lost this due to mobility and coordination factors with their forces (besides being outgunned by the Axis Artillery).  So with the Artillery on the flanks, you will need to focus your efforts in the central section, where at least the two guns have a bit less impact.

2. You have two units that begin the scenario in a no-retreat position. Get those dispersed as soon as you can.

Axis Strategy:

1.  The Axis have two artillery which you may not be able to use until the tank battles cool down a bit.

2.  With your armor mobility, you want to strike first and strike hard.

3.  The British have a few units with no retreat, such as the armor at I5, and the infantry at D3.  If you can attack those before the forces move, you can get some quick wins.

DoW Battle Reports: 28%
(Percentage of Allied Victories)

28
BR - 1st Armored

Author:
Days of Wonder

Link: