First Assault Wave (Omaha Beach)

First Assault Wave (Omaha Beach)

scenario_FirstAssaultWave_start_Axis

The invasion of Omaha Beach on June 6, 1944, was a pivotal part of the D-Day landings during World War II’s Operation Overlord. Omaha Beach, one of five landing sites in Normandy, was assaulted by U.S. forces, primarily the 1st and 29th Infantry Divisions, supported by specialized units.

Heavily fortified by German defenders from the 352nd Infantry Division, the beach presented challenging terrain with high bluffs, barbed wire, and entrenched gun emplacements. American troops faced intense machine-gun fire, artillery, and obstacles as they landed, resulting in high casualties, particularly in the initial waves.

Despite the heavy losses, small groups of soldiers managed to breach the German defenses, scaling the bluffs and neutralizing key positions. By the end of the day, the U.S. forces had secured a tenuous foothold, paving the way for the larger Allied advance into occupied France. The success at Omaha Beach, though costly, was crucial to the ultimate liberation of Europe from Nazi control.

General Howitzer’s perspective:

“Let me tell you something—Omaha Beach was no picnic. The enemy had the high ground, the machine guns, and every advantage. But our boys? They didn’t stop. Through smoke, blood, and hell itself, small squads clawed their way up those bluffs, took out key positions, and broke through the defenses.

By day’s end, we had ourselves a fragile foothold—but it was ours. And that patch of bloody sand became the launch point for the drive to liberate France and crush the enemy war machine.

So don’t ever forget—victory doesn’t come easy. It comes from courage, sacrifice, and the will to fight forward when every instinct says to drop. That’s what won Omaha. That’s what wins wars.

6 VP’s

Card Balance:

Allies – 4

Axis – 5

Complexity:

2

Conditions:

Beach

Context:

Historical

Location:

France

Year:
1944

Theater:

Western Front

Campaign:

D-Day

Codename

Summary:

True to history, this is a tough battle for the Allies to win.
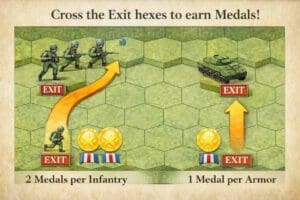
Objectives:

5 VP’s including Medal Objectives
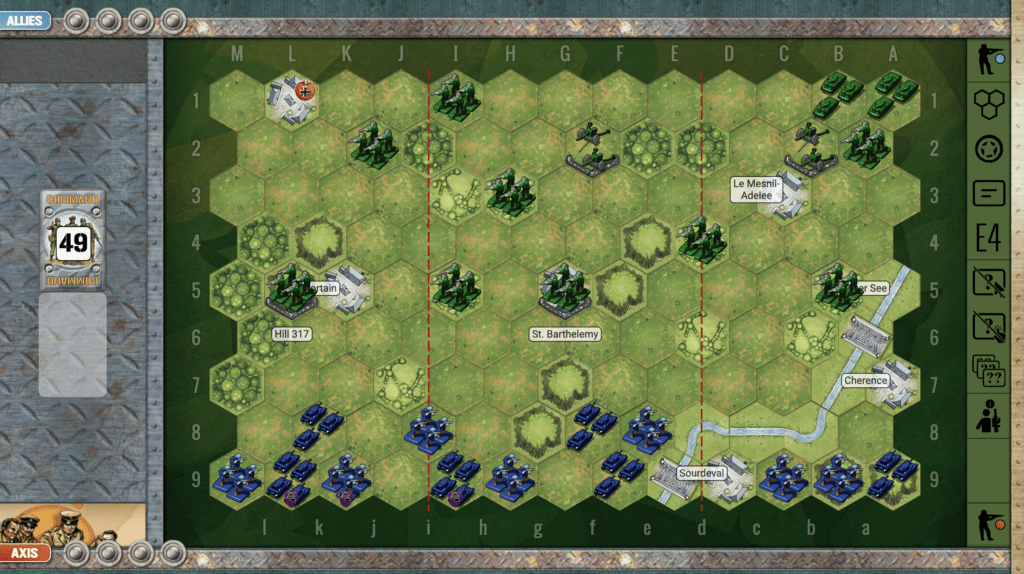
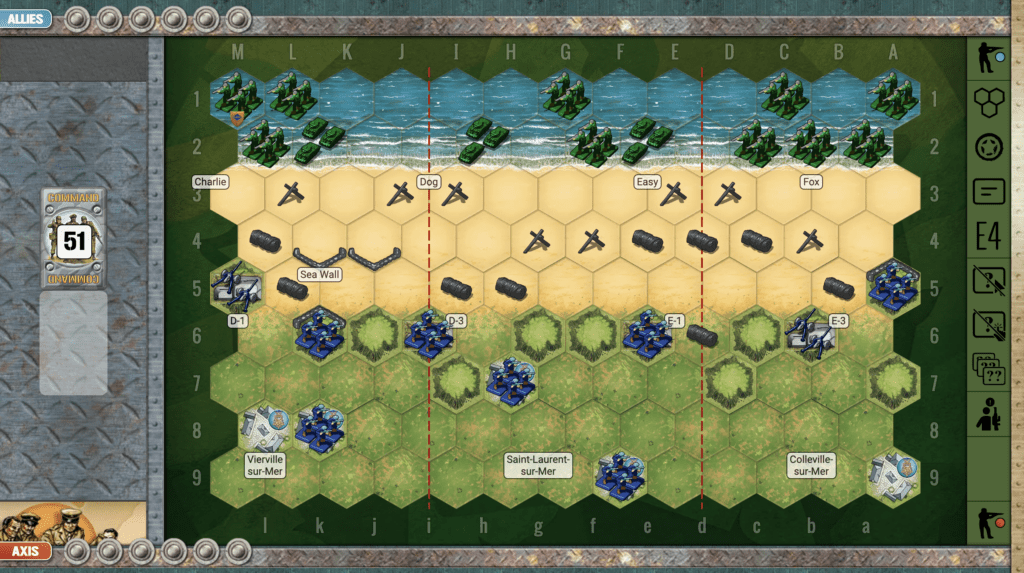
Battlefield:

Omaha Beach is well-guarded with hedgehogs, barbwire, and numerous hills to slow down the Allied advance. If they successfully make it off the beach, there are three towns at the edge of the battlefield with victory points for them.

Troops:

Allies – 10 Infantry, 3 Armor

Axis – 7 Infantry, 2 Artillery

🔥 Winning as Allies

1.  Get off the beach as quickly as possible!

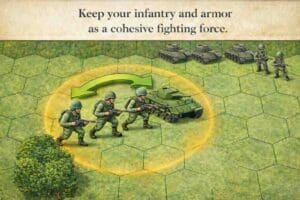
2.  Keep your armor and infantry attack cohesive. They are both needed to successfuly breach the bunkers. The armor fires from a safe distance, and then when ready, the infantry moves in for the kill and take over.

memoir 44 cohesive fighting forces

3.  One of your Infantry on the right flank is a special forces which can move two hexes and still attack.  Get it up to the enemy as quickly as possible.

🔥 Winning as Axis

1.  The Axis have artillery on each flank, which gives you control over nearly every hex on the beach. Use them to good effect.

2.  There are five! town medal objectives which need to be defended for this scenario. If you can slow down the advance of the Allies, it will give time for your artillery to hit them.


Battle Reports (percentage of Allied victories):

19%

32
BR - First Assault Wave

Author:

Days of Wonder

Link:


Counter-Attack on Mortain

Counter-attack on Mortain

“Alright, boys—here’s the lowdown on that Axis stunt they called Operation Lüttich. Early August ‘44, the Germans thought they’d knock us back on our heels by punching through at Mortain, aiming to cut us off at Avranches and stop our drive into Brittany. Hell of a plan—if we were asleep!

They hit us hard at first, but we didn’t blink. Our boys dug in, held those lines with guts and grit. And don’t forget—our flyboys were on ‘em like hounds on a fox, raining steel and fire from the skies until those Nazis were howling for mercy.

The result? Germany’s counterattack went up in smoke—smashed, scattered, and thrown back with a hell of a lot of their tanks and men left behind in the dust. That’s the way to fight, boys—no retreat, no surrender, and always give ‘em hell!

~~ General Howitzer

4 VP’s

Card Balance:

Allies – 6

Axis – 5

Complexity:

3

Conditions:

Countryside

Location:

France

Year:

1944

Theater:

Western Front

Campaign:

Codename:

Operation Luttich

Summary:

As it was historically, the Allies are very well protected, and controlling most of the field of play.

Objectives:

4 VP’s, and one Objective Medal for Axis

Battlefield:

This scenario has a nice combination of hills, forests, and hedgerows scattered across the battlefield. There is also a river in one corner making it difficult for extra infantry and armor to engage in the war.

Troops:

Allies – 9 Infantry, 2 Armor, 2 Artillery

Axis – 7 Infantry, 6 Amor

🔥 Winning as Allies

1. You have the advantage of terrain control, defensive positions in hedgrows, forests and towns. But you need to take advantage of it by quickly attacking where you can.

2. Your right flank is your weak one, being outnumbered by enemy forces, 5 to 2.  Use your infantry on Hill 317 to attack the no-retreat armor before it moves away.

3.  Note that as long as you have your forces on either of the two hexes of Hill 317, you can use any Recon (on the right) cards to call down Airpower attacks against the Axis. Use it, and bomb them back to Berlin!

4.  Then move your infantry in the back of the right flank forward into the town of Mortain to support your other infantry unit on the hill, and to box in the enemy even more than they are already.

5. If you have the movement points, you can place your infantry at I1 into the village to defend the Objective Medal.

6. Get your armor in your left corner into the action ASAP. If you can get over to the river before the enemy has moved into safety, you can score one or two VP’s by attacking them in their no-retreat positions.

🔥 Winning as Axis

1.  Your forces on the left flank are bunched up, and you have a no-retreat armor ready to get hit by the infantry hidden in the woods. You need to create some mobility on your left and some of your troops into the woods to attack the enemy.

2. Your right flank is equally problematic. You are a sitting duck back against the border. So you need to get those troops into safety into the nearby towns, at least. Even better if you have the cards to move them out into the action. Or else when the enemy armor in the upper right flank becomes mobile, they will make their way down and easily destroy one or two units.

3.  It is going to be difficult to get all four VP’s, so you should target the Objective Medal in the village on your left flank. If your armor can survive the infantry attacks as you make your way there, it will be an important VP for you.

4. You only need four Medals to win this scenario, and three of them are on your left flank, ready for the taking. Just take out the two Infantry units and roll into the town of St. Hilaire.

Classic Battle Reports

(percentage of Allied victories):

39%

35
BR - Mortain

Author:

Days of Wonder

Link:

Counter-Attack of the BEF

Counter-Attack of the BEF

Counter-Attack of the BEF

Memoir 44 scenario Counter-Attack of the BEF

France, May ’40—Guderian cuts to the Channel and splits the front. Gort answers with a punch at Arras: Franckforce—Matildas and Durhams—drives south of the city, hits Rommel by surprise, scatters his cyclists, and rolls over light guns like they’re tin. Then Rommel does what winners do—drags up heavy artillery and 88s, fires direct, and stops the thrust. Dusk brings the Luftwaffe; the counterattack bleeds out. By nightfall the BEF falls back, and the only road left is the sea—Dunkirk.

Lesson: shock opens the door, but you hold it with guns and air. Mass your armor, keep your flanks covered, bring the big artillery, own the sky—and don’t stop moving.

~~ General Howitzer

VP’s

12

card

Card Balance

Allies – 6

Axis – 5

Complexity:

4

Conditions:

Countryside

countryside

Location:

France

Year:

1940

Theater:

Western

Campaign

Codename

Summary:

This scenario accurately reflects the difficult job the British had in 1940 to try to stop the Axis onslaught with a courageous Counter-Attack by the British Expeditionary Force (BEF).

medal allies

🔥 Winning as Allies

1.  There are a couple of medal objectives available to you, just beyond the train tracks (row 8) at the towns of Agny and Wailly (row 11).  If you can position two of your forces within movement distance of both of them, you can set yourself up for a final medal capture and win.

2.  Attack Plan: do not cross the railroad tracks on row 8, until you have eliminated all enemy forces on row 7.  Just line up – with appropriate safety spacing – your Armor and Artillery and pick off the Infantry units on that row until they are gone. Deal with any enemy Armor that gets moved into the battle as well.

3.  It is going to be difficult to protect and hold control of the town of Arras at A9.  If you can get enough forces over there in time,  you may be able to put up a good fight.  But you will be in enemy territory the entire time, and it will be difficult to control.  You could consider either a strategic withdrawal, to preserve your Infantry unit, or stay and fight, attempting to take out as many enemy forces as possible before your demise.

4.  Your weak section is your right flank. With the enemy 88 Artillery in the woods, they present a formidable challenge to advance in that sector. You will need to deal with it first.  The way to do this is to get your Artillery unit in the region up to row 4 or 5. You will be out of reach of the 88, and will be able to pick it off.

5.  Your Artillery units are too far back. Take every opportunity to move them forward.

medal axis

🔥 Winning as Axis

1.  You can actually win this one without crossing the railroad tracks on row 8. But the BEF must cooperate by attempting to come in for the kill. You can finish them off, and then save your final coup-de-grace for the Medal in the town at A9.

2.  Possible Attack Vector:  Target the town of Arras at A9, which has an Axis Temporary Medal Objective.  Start moving forces up in that direction. It will have two benefits of concentrating your firepower into one sector, and then after a successful destruction of the enemy in that region, you can capture the town of Arras – and hold it – for an additional medal. This attack plan could potentially yield two to three medals, maybe more.

3.  Your Armor is misplaced at the start of the battle. Take every opportunity to move it forward, so it can begin to attack across the railroad tracks at the enemy.

Battle History Results

14
BR - CounterAttack of BEF

Author: Jdrommel

URL

Capturing the Crossing

Capturing the Crossing

scenario_CapturingTheCrossing_start

“Capturing the Crossing” refers to a World War II battle during the Normandy campaign, focused on securing a key bridge over the Odon River in late June to early July 1944.

Brief Summary:

  • Context:
    Part of Operation Epsom, launched by British forces to outflank Caen and push westward. The Odon River valley was a natural defensive barrier held by the Germans.

  • The Battle:
    British units, fought to capture and hold the bridge crossings over the Odon River.  German SS Panzer divisions mounted fierce counterattacks to repel the advance and regain control.

  • Tactics:
    The British used coordinated infantry, armor, and artillery to secure the crossings under heavy fire and poor weather conditions. Engineers rushed to reinforce and repair bridges under fire.

  • Outcome:
    British forces successfully captured and held key crossings, enabling a bridgehead south of the Odon. However, they faced continued German resistance and did not achieve a full breakthrough.

  • Significance:
    The battle was part of the slow Allied grind toward Caen, tying down German armor and paving the way for later operations like Goodwood and Cobra.

General Howitzer’s Summary:

“Boys, let me tell you about the push across the Odon in the summer of ‘44. It was part of Operation Epsom, the British aiming to outflank Caen and punch westward. The Odon River valley was no picnic—it was a natural fortress that the Germans, including those damn SS Panzer divisions, were ready to die defending.

The British didn’t flinch—they threw in everything they had: infantry, tanks, artillery, and those hard-as-nails engineers. They fought like devils in the mud and the rain, grabbing those bridge crossings under heavy fire and refusing to let go.

The Germans counterattacked like rabid dogs, but the British held firm. They didn’t smash through to Caen, but they sure as hell got a bridgehead south of the Odon, and that put Jerry on the back foot. That bridgehead was the key to bigger things—Goodwood and Cobra wouldn’t have happened without it.

So remember, men: sometimes it ain’t about the breakthrough—it’s about digging in, holding on, and bleeding the enemy dry!

6 VP’s

Card Balance:

Allies – 6 

Axis – 5

Complexity: 3

Conditions:

Countryside

Context:

Historical

Location:

France

Year:

1944

Theater:

Western Front

Campaign:

The Battle for Caen

Codename:

Operation Epsom

Summary:

Objectives:

6 VP’s, and a territorial objective medal for the Allies

Terrain:

Countryside with forests, hills, some villages and the Odon River.

Troops:

Allies – 9 Infantry, 5 Armor, 1 Artillery

Axis – 8 Infantry, 4 Armor, 1 Artillery

medal allies

🔥 Winning as Allies

1.  Your left flank is strong. Your right flank is weak. The center section is more balanced. You have a bit more firepower, but the enemy has well protected Infantry in hedgerows.  You will need to take up secure positions in the woods facing the enemy and begin to degrade their defensive positions before you launch a frontal attack.

2.  Your artillery in the left corner should be moved forward into the nearby town to increase its effectiveness.

3.  Be aware that an armor battle from your position at L3 to j6 is likely to be lost due to the fact that the enemy Armor is sandbagged. You will need to bring in your additional Armor at i2 into the fray to even out the battle.


medal axis

🔥 Winning as Axis

1.  The Odon River presents a mobility challenge for the armor units behind it, forcing them to angle to the left flank or cross the bridge before they can engage the enemy in the center or right flanks. You will need to get them mobile as soon as you can.

2.  The enemy has you at a disadvantage with slightly more Infantry and Armor, and one additional card, thus increasing their responsiveness.  You will need to compensate with strategic care and precision, and not waste resources on ill-conceived attacks.

3.  Your right flank is weak. Your left flank is strong. The center section is a little more balanced. Allies have a bit more firepower, but your sandbagged infantry will be hard to dislodge.

14
BR - Capturing the Crossing

Author.

URL

Bug River

Bug River

a memoir 44 game field

The Battle of the Bug River was the opening crack of thunder in the great storm called Operation Barbarossa, June 1941. When the Germans hurled their legions eastward, the Bug River stood before them—not just a line of water, but the first Soviet shield guarding their vast frontier. That river marked the edge of two empires, a tense, steel-cold border between Nazi-occupied Poland and the Red giant beyond.

But rivers don’t stop armies with purpose. At dawn, the German assault troops slammed across the Bug with the kind of ruthless precision that defines a well-oiled war machine. Pioneers threw down bridges under fire, infantry surged across in rubber boats, and armored columns rumbled forward the moment the crossings held. The Soviets, caught between disbelief and the sheer violence of the assault, fought hard in pockets, but they were hit before they could fully wake to the scale of the invasion.

What happened on the Bug wasn’t just a crossing—it was the first thrust of a colossal campaign, a declaration that the Germans intended to carve their way deep into the Soviet heartland. The river was supposed to be a barrier. Instead, it became the starting line for one of the most brutal struggles in human history.

~~ General Howitzer

5 VP’s

Card Balance:

Allies – 3
Axis – 6

Allies are seriously impaired on their card management options in this scenario.

Complexity:

4

Conditions:

Countryside


Location:

Russia

Year:

1941

Theater:

Eastern Front

Campaign:

Operation Barbarossa

Codename

Summary:

The Axis are making an attack against a fairly well-defended Russian army. It is a countrside terrain with forests and bunkers. There is also a supply train which can drop off additional defenders if it gets to its depot safely. This adds an interesting element to the battlefield game.

Objectives:
There are five VP’s in this scenario. There is also a bridge medal objective for the Axis to attain. Proper hits on the train will also gain VP’s for the Axis.

Battlefield:
The Russians begin with solid control of two sections. In fact their armor are poised in field bunkers only two hexes from Axis infantry which have no retreat available to them. The train tracks cut across the field also impairing movement. The Bug River weaves across the backline in Axis territory, hampering movement and preventing retreats.

Troops:
The Axis possess 6 infantry, 4 armor, and 2 artillery.
The Russians have 5 infantry, 3 armor, no artillery. Plus possibly two more infantry if the train reaches its destination.

🔥 Winning as Allies

1. As the Russian Allied commander, you need to seek your VP’s. You need 5 and there are six enemy Infantry, which you can target initially. Then as the battle develops, see if any armor or artillery become candidates for attack.

2.  Note that the artillery is pressed up against the backwall with no retreat, so you can seek the chance to hit it with a three-dice armor attack. Your odds will be 33% per dice roll, vs. 16%. Take the chance to hit no-retreat artillery whenever you can. A Barrage card early in the game comes in very handy.

3.  Recognize that your armor in the field bunkers are going to get quickly overwhelmed by the larger Axis forces coming your way. The question is how much you can make them pay for it, before they do so.

🔥 Winning as Axis

1.  You have four infantry hexes which have no retreat and are a mere two hexes away from enemy armor in bunkers. You should attack them immediately and quickly move in on them to maximize your attack. You may be able to neutralize one of the armor units before they do a lot of damage.  With a card like Move Out! you will be able to advance four infantry immediately and nearly surround both field bunkers for a series of two-dice attacks.  In just a couple of turns the enemy should be eliminated.

2.  Do not let the Allied Transport Train get to the train station. Because once they do, they will unload additional forces to fight.

3.  Use your two Artillery as much as possible to attack the enemy Armor in the field bunkers.

4.  First Objective: Eliminate the Armor on row 6.

5.  Second Objective: Move all troops towards the Train Station.  Angle your left and right flanks towards the center.  But as soon as your left flank breaches the woods facing the Transport Train, start pummeling it with Grenades before it gets to the station to deploy more troops.  

Scales-Axis-Weighted
24
BR - Bug

Author:

Days of Wonder

URL

Breakout to Lisyanka

Breakout to Lisyanka

The Breakout to Lisyanka was a key engagement during World War II, fought in early 1944 on the Eastern Front. The battle saw Soviet forces encircling a large German force. The Germans attempted to break out from the encirclement to link up with their reinforcements near Lisyanka, with fierce fighting as they sought to escape Soviet attacks.

While some German units managed to break through, the escape was costly, with heavy losses in men and equipment. The Soviet success significantly weakened German capabilities in Ukraine, contributing to the broader Soviet advance in the region. The battle is often highlighted as a key moment in the Soviet efforts to liberate occupied Ukraine.

General Howizer summarizes it this way:

The Breakout to Lisyanka was a blood-soaked slugfest where the Soviets slammed the trap shut, and while some of the doomed Germans clawed their way out, they left behind a graveyard of men and machines—crippling their grip on Ukraine and fueling the Red steamroller westward.

7 VP’s

Card Balance:

Allies – 4

Axis – 5

Complexity:

3

Conditions:

Winter

Location:

Ukraine

Year:

1944

Theater:

Eastern Front

Campaign

Codename

Summary:

The goal for the Axis is to breakthrough, as the name implies, over the hilly ridge and across the river exits. For Allies, the goal is to of course prevent this. The forces begin in a non-symmetrical dispersion, which makes for a fun scenario.

Objectives:

7 VP’s, plus the Axis have Exit Medals they can try for.

Battlefield:

There is a ridge of hills going across the center, plus some ravines to provide a bit of cover to infantry.

Troops:

Allies – 10 Infantry, 4 Armor, 2 Artillery

Axis – 9 Infantry, 3 Armor, 1 Artillery

🔥 Winning as Allies

1.  As the Allies you must defend against three objective medal locations, the two-hex towns of Golyadi, and Nekrasino, each worth one VP, there is also the frozen river exits along the bottom of the battlefield. Your objectives however, are simply to destroy six enemy units. There are seven enemy infantry units to target and some armor and artillery, if they give you the chance.

2. Be aware that the Axis have Combat Engineers who can attack your infantry in the trenches at close range – with no combat restrictions. So make it one of your early goals to finish them off.

3. Make good use of your artillery in the middle section to defend your troops in the trenches.

4.  It is very difficult to win this scenario, unless you get your troops on your left flank into action. You have a lot of forces amassed together behind the forest hexes.  Get them into play as quickly as possible in one of your early turns while you still can.  Once you have them in the fray, they will be able to get you one or two medals from that side of the battlefield.

🔥 Winning as Axis

1.  Attack with your frontline infantry right away, to create some movement space for your armor, and also to neutralize the nearby enemy who will quickly attack from close range.

2. Try to avoid your right flank which is packed with enemy forces ready to pounce with both armor, infantry, and artillery. You may have better luck on your left flank which has less enemy artillery power.

3. You can also quickly overwhelm the enemy infantry at i6, to provide a proving ground for your forces to prepare for the breakout.

4.  Remember that if you get any of your Infantry across the Exit hexes, you will earn two! Medals per Infantry (and one for Armor).  So if you get a Behind Enemy Lines, then get your Infantry into the forest on row 6; this will provide you with the distance to move in, attack the enemy, and then quickly escape out the back row for an easy two medals.

Classic Battle Reports:

(percentage of Allied victories)

52%

Battle Reports:
42
BR - Lisyanka

Author:

Link: