Tunisia

Tunisia

Memoir 44 Tunisia

The Battle for Tunisia (1942–1943) was a key campaign in the North African theater of World War II. Following the Allied invasion of North Africa (Operation Torch) in November 1942, German and Italian forces, under Field Marshal Erwin Rommel, sought to hold Tunisia as a defensive stronghold. The Axis aimed to counter the Allied advance from Algeria and Morocco while securing supply lines to Italy.  The Allies, under the command of General Dwight D. Eisenhower, faced challenges due to difficult terrain, logistical issues, and initial inexperience.

General Howitzer’s observation:
The Battle for Tunisia was one tough brawl—Rommel dug in with his Axis boys trying to make Tunisia a fortress, but we weren’t about to let that desert rat keep his grip. Ike had green troops, bad roads, and a chaotic supply headache, but we pushed through it all, hammering east from Torch and learning fast. Tunisia was the doorway to Italy, and by God, we were kicking it open.

6 VP’s

Card Balance:

Allies – 4

Axis – 6

Complexity:

3

Conditions:

Countryside

countryside

Location:
Tunisa, North Africa

Year:

1942

Theater:

Mediterranean

Codename
Operation Torch

Summary:

Objectives

6 medals, no territorial objectives

Terrain:

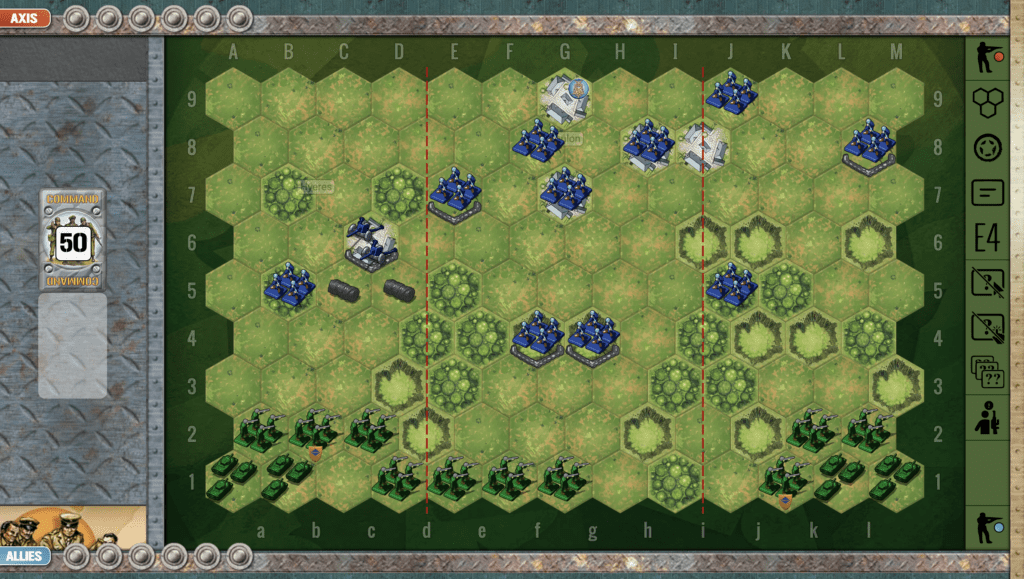
The many woods and hills in the center section present an excellent opportunity for whomever can gain control of them.

Troops:

Allies – 8 Infantry, 4 Armor, 2 Artillery

Axis – 7 Infantry, 5 Armor, 2 Artillery

medal allies

Allied Strategy:

1.  Big picture strategy for Allies is that when the battle starts you have partial control of the central hills.  If you can consolidate that control by moving in additional infantry and armor, plus move your center-section artillery forward, you can hold on and fight the battle from there.  However, if the enemy gets an immediate push forward with cards like Armor Assault or Infantry Assault, they will very quickly be on top of that hill. If you have not yet consolidated power, you may have to either fight to the death right there, or pull back to the nearby town and mini-hills and fight from there. 

medal axis

Axis Strategy:

1.  Big picture strategy for Axis is that they win this two-thirds of the time against the Allies, because you have a lot of firepower very close to the central hills where the primary battle is fought.  If you can mobilize all the forces stuck in the right-flank corner, you can bring a massive attack against the enemy.  With a few well placed cards, you can very quickly have your forces battling for control of the central hills.

Battle Reports

(percentage of Allied victories):

31%

18
BR - Tunisia

Author:

Link:

Toulon

Toulon

Scenario_Toulon_start_Allies

The Battle of Toulon (August 20–26, 1944) was a key engagement during the Allied invasion of southern France in World War II, as part of Operation Dragoon. The objective was to liberate the strategic port city of Toulon, essential for supplying the advancing Allied forces.

Now here’s a fight that showed the grit of France reborn. General de Lattre and his men from the French Army of Africa hit Toulon like a hammer on an anvil. The Germans had dug in—guns, bunkers, street traps—you name it. Every block was a battlefield. But the French didn’t flinch. They fought yard by yard, with their artillery pounding and the Navy blasting from offshore.

Six bloody days later, the tricolor flew over the port, and the German garrison laid down its arms. Toulon was free, Marseille followed, and the Allies had their supply lifeline to drive deeper into France. It wasn’t just a victory of arms—it was France standing up, shoulder to shoulder with her liberators, and proving she still had fire in her soul.

~~ General Howitzer

6 VP’s

Card Balance:

Allies – 6

Axis – 4

Complexity:

4

Conditions:

Countryside

Context:

Historical

Location:

France

Year:

1944

Theater:

Mediterranean

Campaign:

Codename:

Operation Dragoon

Summary:

Objectives:

6 VP’s, plus the City of Toulon

Battlefield:

Because of the two sets of thick hilly forests cutting across the left and right flanks at an angle, it limits movement of both forces from section to section. Thus proper placement of troops in the early moves of the game can have a dramatic effect on its final outcome.

Troops:

Allies – 10 Infantry, 4 Armor

Axis – 10 Infantry, 1 Artillery


medal allies

Allied Strategy:

1.  The key objective for the Allies is to capture the town of Toulon. If the Allies occupy three of the town hexes at the end of any turn, they win immediately. So, besides the need to simply destroy Axis units, the Allied player should keep up a relentless push toward the center section which contains Toulon. This will force the Axis player to not only defend individual hexes, but also to move troops toward defending the center, thus dislodging some from behind sandbags.

2. The most imminent need for the Allies is to get their infantry away from the back wall and into the fight against the two sandbagged hexes right in front of them. Any retreat flags thrown by the Axis powers will increase odds of a hit from 50% to 67% against the Allies.

medal axis

Axis Strategy:

1.  Because the Allies have four Armor units, the Axis are outnumbered. So the scenario is primarily defensive. Given the right cards, some offensive operations may be possible. But historically, the Germans had to eventually pull back, so be aware, and be careful.

2.  Your forward infantry in the center section may get overwhelmed by the Allies, so you will want to get in your hits while you can. If appropriate, you may consider a strategic retreat to let your infantry fight another day.

3. Because you are outnumbered in terms of forces, your best chance of scoring hits will be to remain in your defensive positions and hit the enemy as they approach.

4. Be sure to protect the four hexes of Toulon, for should the enemy gain control of three hexes, you will lose instantly.

Memoir 44
Classic Battle Reports

(percentage of Allied victories):

66%

27
BR - Toulon

Author:

Days of Wonder

Link:

Tenaru

Tenaru

“Listen up! In August ‘42 on Guadalcanal, those Japanese under Colonel Ichiki thought they’d just waltz in and knock the Marines off their perch at Henderson Field. Hell, they didn’t know what they were walking into!

The Marines were dug in deep along the Ilu River, machine guns at the ready and artillery on call. When the Japanese hit the line, they slammed into a wall of hot lead and cold steel. All night those Marines fought like hell, and by dawn, the Japanese were stacked up like cordwood.

That wasn’t just another scrap, boys—that was a message. The Japanese learned the hard way that the U.S. Marines don’t back down, and we sure as hell don’t run. The Battle of Tenaru was the first big test on Guadalcanal, and the Marines passed it with flying colors.

That’s how you win a campaign, boys—you dig in, you hold the line, and you don’t let the enemy push you back an inch!

~~ General Howitzer

6 VP’s

Card Balance:

5 – 5

Complexity:

3

Conditions:

Jungle


Location:

Guadalcanal

Year:

1942

Theater:

Pacific

Campaign:

Guadalcanal Campaign

Codename

Summary:

Objectives:

6 VP’s

Battlefield:

The primary strategic elements to consider in the Tenaru scenario is the navigable river going across the battlefield, and the beach hexes along one flank which allows for rapid troop movement. But the most formidable element of this scenario are the two American artillery units on the beach section.

Troops:

Allies – 9 Infantry, 1 Armor, 2 Artillery

Axis – 12 Infantry

Allied Strategy:

1. Use your Artillery at every opportunity. The enemy will be able to make rapid progress along the beach, so you need to attack while you can.

2.  You have one Armor, but it starts off in the back. You need to get it into play as soon as possible, so that you can attack the enemy forces from a distance and diminish their attack ability.

3.  Do what you can to destroy at least one figure in every Japanese Infantry unit, in order to nullify the Seishin Kyoiku Principle advantage. 

Axis Strategy:

1. Because this is a long scenario, you may need to consider destroying the American artillery near the beach. Fortunately, the beach allows for rapid progress of the Japanese infantry to its objectives.

2.  However, it is possible for the Axis to win this scenario if they focus their energies to the left and center sections.  

3.  Take advantage of the Banzai War Cry, and the Seishin Kyoiku principle to rapidly attack and destroy the enemy. 

20
BR - Tenaru

Author:

Link:

Sword Beach

Sword Beach

Scenario_SwordBeach_start_Allies

June 6th, 1944—Sword Beach. The British came in swinging on the eastern flank of Normandy, and they made it count.

Under General Miles Dempsey, the 3rd Infantry Division, backed by tanks, naval guns, and airborne troops, hit that beach like a battering ram. Their mission? Take the beach, punch inland, link up with the Canadians on the left and airborne boys on the right, and grab the city of Caen.

They ran headfirst into resistance from the German 716th Infantry, dug in and waiting. But it didn’t matter—Allied firepower and planning turned those bunkers into scrap. The Brits cleared the beach, pushed several miles inland, and set up a strong foothold by nightfall.

They didn’t take Caen on Day One—but they owned Sword Beach, and that was the damn prize. That success helped anchor the whole eastern flank of the invasion and gave us the momentum we needed to crack open Nazi-occupied France.

Sword Beach was no walk in the park—but it was a well-executed, hard-hitting assault that helped open the gate to Western Europe.

~~ General Howitzer

5 VP’s

Card Balance:

Allies – 5

Axis – 4

Complexity:

2

Conditions:

Beach

Location:

Normandy

Year:

June 5th, 1944

Theater:

Western Front

Campaign:

D-Day Invasion

Codename:

Overlord

Summary:

Like all Normandy beach invasions, this is a battle between well-defended but overwhelmed Axis forces who are trying to slow down the Allied onslaught.

Objectives:

This is a five VP game with three town hexes as Objective Medals. The goal for the Allies is to get to the town VP Objective hexes ASAP, and for the Axis it is all about slowing down the Allied advance enough to get a few knockout Tactic cards against them.

Battlefield:

Sword Beach has no hills or bluffs to slow the Allied advance off the beach

Troops:

Axis –
6 Infantry,
1 well-placed artillery in the center of the field,
1 badly positioned armor unit stuck in the corner behind a forest.

The Allies –  9 Infantry,  3 Armor

Allied Strategy:

1.  As with all beach scenarios, the challenge is for the Allies to get off the beach as quickly as possible.

2.  The three! objective medals in the towns against the back border represent a clear and compelling goal for the Allies. If the Allies can maximize their movement cards off the beach and blitz past the defenders for the town hexes, victory can be had rather quickly.

3.  The Axis artillery in the center of the battlefield is very dangerous and unless the Allies have an excellent set of cards, should not be attacked. The best strategy – as indicated by Alexis Beuve in the Memoir 44 Tactics & Strategy Guide is to attack on the flanks in order to avoid the devastating pounding from the centrally placed artillery.

4.  You have three Elite Infantry which are capable of moving two hexes and still attacking. This is imminently valuable for a beach assault. They all start way back in the ocean hexes, but if you take the time in the early gameplay to get them moved forward, they will help you to quickly approach and attack the enemy forces.

5.  Possible Attack Vector:  split your forces in a “V” formation, and send half to the left, and half to the right, so that you can avoid the enemy Artillery in the center sector.  It is set so far back from the beach that if you try to assault it with your Infantry, they will get decimated before they get close to it, so unless you have a Bombard or Airpower card, it is best to avoid it. 

Axis Strategy:

1. The Axis armor in the corner is hidden away and of no use. Therefore, as early as possible, the Axis needs to move the tank into the forest hex, where it will have to stop for one turn. But from there it can make its way out to the battlefield. The decision as to whether to place the armor in the center section or the right flank, will depend in part on where the Allies choose to deploy their forces. But once this armor gets out the Axis player should be able to score one or two VP’s, especially if he catches the Allied forces while they still have their back to the water, resulting in some no-retreat hits.

2. Use your artillery as much as possible, before the enemy takes it out with Barrage or Air Power, or an Infantry Assault. This will be one of the Allies’ early objectives. So use it well while you have it.

3. Should you pull your infantry from the back row where they are defending Objective Medals? Early on, if you have the opportunity, they could bolster your forces which are trying to prevent the Allies from coming off the beach. But once the full scale Allied invasion begins to form, they will be sitting ducks in the open terrain, and should be pulled back to guard a Medal Objective.

Battle Reports

(percentage of Allied victories):

46%

16
BR - Sword Beach

Author:

Days of Wonder

Link

Suomussalmi – Russo-Finnish War

Suomussalmi

scenario_Suomussalmi_start

Let me tell you about Suomussalmi, a frozen corner of Finland where, in the winter of ’39, a handful of tough, stubborn Finns showed the world how a smaller force—if it’s smart, fast, and mean enough—can tear a lumbering giant to pieces.

The Russians came in heavy, marching two full divisions down those narrow forest roads, thinking they could just roll over Finland and split the country in half. But those Finns didn’t fight the war the way the textbooks said. They didn’t stand still and get crushed. They moved. They lived on skis, slipping through the woods like ghosts, striking the Soviet columns where they were weakest—supply lines, roadblocks, isolated pockets of troops.

While the Russians froze in the open and bogged down in snowdrifts, the Finns carved them up piece by piece. They cut those long Soviet columns into little “motti” bundles—isolated groups with no food, no ammunition, no rescue. And then they finished them.

By early January, the Finns had smashed one Soviet division entirely and sent the other running back the way it came. What happened at Suomussalmi wasn’t luck; it was proof that speed, ingenuity, and the will to win can turn a frozen forest into a fortress and a small army into a battering ram.

The Finns didn’t just win a battle—they delivered a lesson every commander ought to remember:
Victory belongs to the side that fights smarter, moves faster, and never stops hitting.

~~ General Howitzer

6 VP’s

Card Balance:

Russian – 4

Finnish – 6

Complexity:

3

Conditions:

Winter

Location:

Finland

Year:

1939

Theater:

Eastern Front

Campaign:

Russo – Finnish War

Summary:
The Finns switched sides during WW2, all in the name of defending themselves.  

Objectives
Six VP’s, plus if the Finns occupy three of the four hexes of Suomussalmi, they win immediately, which I have done, and is a very satisfying win.

Battlefield
The battlefield for this scenario is marked by three frozen rivers cutting across the field of play and creating hazardous conditions for troop movements.

Troops:
Finns: 10 Infantry, 1 Artillery
Russians:  10 Infantry, 2 Armor, 1 Artillery

Allied Strategy:

Allies must defend the town of Suomussalmi, as it will be instant defeat if the Axis occupies 3 of the 4 town hexes. But the town is heavily defended with sandbagged troops, so do not try the attack unless you are able to assemble a strong force with powerful Combat cards.

Axis Strategy:

Axis (Finnish) ski troops have a major movement advantage. They can move 0-3, and fire at 3 or 2. Plus they can move onto any terrain and still fire. So your infantry movement cards will allow you to quickly mass your troops for an attack.

Battle Reports

(percentage of Allied victories):

54%

9
BR - Suomussalmi

Author:

Days of Wonder

Link:

Sugar Loaf and Half Moon

Sugar Loaf and Half Moon

The Battle of Sugar Loaf and Half Moon took place during the Battle of Okinawa in May 1945, one of the final and bloodiest battles of World War II. Sugar Loaf Hill and Half Moon Hill were heavily fortified Japanese positions that U.S. Marines needed to capture to advance on the island.

Listen up. Sugar Loaf and Half Moon weren’t just two lumps of dirt on Okinawa—they were the kind of fortified hellholes the enemy turns into a butcher shop. The Japanese were dug in deep, with bunkers you couldn’t see and tunnels you couldn’t count, and they poured out artillery, machine-gun fire, and counterattacks like they had an endless supply of men and steel.

Our Marines fought inch by inch, bleeding for every blasted ridge. They stormed those heights again and again, under fire hot enough to melt the paint off a helmet. Casualties were heavy, but the boys never broke. After days of slugging it out—crawling, climbing, charging—they took both hills and tore the heart out of the enemy’s northern line.

Seizing Sugar Loaf and Half Moon opened the door to Okinawa’s southern defenses, and it proved a cold, hard truth: fighting in the Pacific demanded guts, grit, and sacrifice on a scale few can imagine. And it was a grim preview of what it might have taken if we’d ever had to storm Japan itself.

~~ General Howitzer

6 VP’s

Card Balance:

USA – 6

Japanese – 4

Complexity:

2

Conditions:

Jungle


Location:

Pacific

Year:

1945

Theater:

Pacific

Campaign:

Battle of Okinawa

Codename:

Summary:

Objectives:

6 VP’s
(Special Rule: Note that if the Marines clear out an entire section of Japanese forces, it counts as a temporary VP.)

Battlefield:

This scenario begins with both forces arrayed across the battlefield and ready to engage in immediate warfare. It is a countryside with hills and caves spread across all three sections. The caves allow for rapid movement of Japanese troops.

Troops:

Allies – 10 Infantry, 2 Armor, 2 Artillery

(Infantry practices the Gung-Ho! rule.)

Axis – 10 Infantry, 2 Artillery

(Japanese Infantry practices the Seishin Kyoiku Doctrine (SKD), and the Yamato Damashi Concept, and the Banzai War Cry.)

Allied Strategy:

1. The enemy is weak on your right flank. They have no artillery protection on half the flank. With your artillery, you have a slight numeric advantage. If you can work up the cards, you could launch an attack on tht side, and gain half the VP’s you need. Once you overwhelm that section, your remaining forces can combine with your center section troops to finish off the job and gain your final three VP’s.

2.  Use your Artillery to hit every full force Infantry unit at least once in order to cancel out the SKD advantage they have.

3.  Note that one of your artillery is mobile, so you can move in and fire. But do not move in too close prematurely, or the Japanese forces will overwhelm you with their SKD power.

4.  Strategic consideration based on this special rule:
“When all the Japanese units in a section of the battlefield (right, center or left) are eliminated, the Marines gain one Victory Medal.”  This means that if you can concentrate all of your attacks in one section, you will gain not only the medals for eliminating units, but also one extra Victory Medal for clearing out the section. 

Axis Strategy:

1.  Use the Banzai War Cry combined with the Seishin Kyoiku Doctrine to quickly advance your full-power Infantry units to attack any enemy who are within striking range. With the additional dice roll that SKD provides, you can quickly weaken the enemy.

2. Remember to use the tunnel system to quickly move infantry from hill to hill to get your forces into the action.

3. Use your artillery at every opportunity on any enemy forces that approach.

Battle Reports

(classic percentage of Allied victories):

68%

17
BR - SugarLoaf

Author:

Days of Wonder

Link: