Sword Beach
Sword Beach
5 VP’s
![]()
Card Balance:
Allies – 5
Axis – 4
Complexity:
2
Conditions:
Beach

Location:
Normandy
Year:
June 5th, 1944
Theater:
Western Front
Campaign:
D-Day Invasion
Codename:
Overlord
Summary:
Like all Normandy beach invasions, this is a battle between well-defended but overwhelmed Axis forces who are trying to slow down the Allied onslaught.
Objectives:
This is a five VP game with three town hexes as Objective Medals. The goal for the Allies is to get to the town VP Objective hexes ASAP, and for the Axis it is all about slowing down the Allied advance enough to get a few knockout Tactic cards against them.
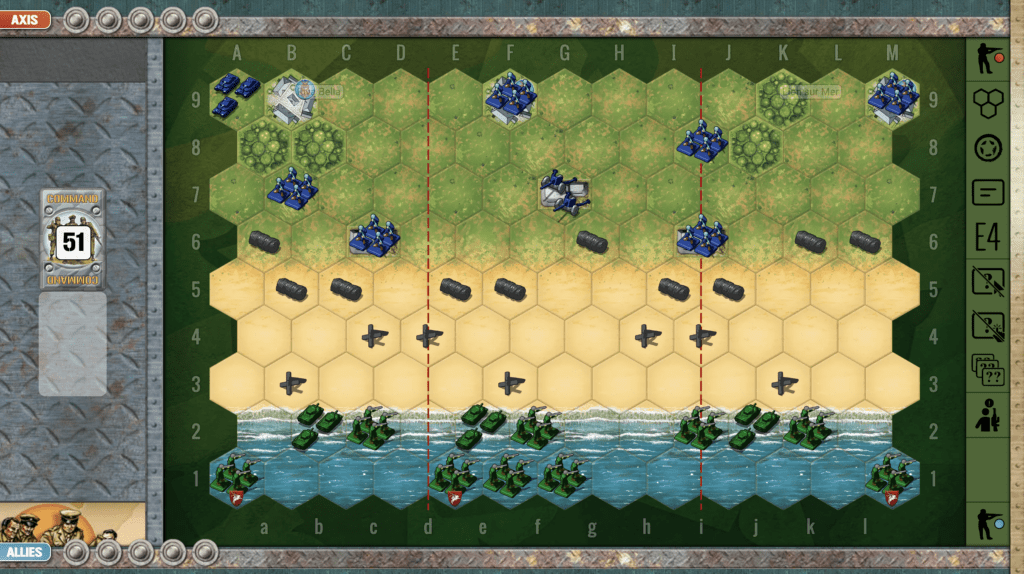
Battlefield:
Sword Beach has no hills or bluffs to slow the Allied advance off the beach
Troops:
Axis –
6 Infantry,
1 well-placed artillery in the center of the field,
1 badly positioned armor unit stuck in the corner behind a forest.
The Allies – 9 Infantry, 3 Armor

Allied Strategy:
1. As with all beach scenarios, the challenge is for the Allies to get off the beach as quickly as possible.
2. The three! objective medals in the towns against the back border represent a clear and compelling goal for the Allies. If the Allies can maximize their movement cards off the beach and blitz past the defenders for the town hexes, victory can be had rather quickly.
3. The Axis artillery in the center of the battlefield is very dangerous and unless the Allies have an excellent set of cards, should not be attacked. The best strategy – as indicated by Alexis Beuve in the Memoir 44 Tactics & Strategy Guide is to attack on the flanks in order to avoid the devastating pounding from the centrally placed artillery.
4. You have three Elite Infantry which are capable of moving two hexes and still attacking. This is imminently valuable for a beach assault. They all start way back in the ocean hexes, but if you take the time in the early gameplay to get them moved forward, they will help you to quickly approach and attack the enemy forces.
5. Possible Attack Vector: split your forces in a “V” formation, and send half to the left, and half to the right, so that you can avoid the enemy Artillery in the center sector. It is set so far back from the beach that if you try to assault it with your Infantry, they will get decimated before they get close to it, so unless you have a Bombard or Airpower card, it is best to avoid it.

Axis Strategy:
1. The Axis armor in the corner is hidden away and of no use. Therefore, as early as possible, the Axis needs to move the tank into the forest hex, where it will have to stop for one turn. But from there it can make its way out to the battlefield. The decision as to whether to place the armor in the center section or the right flank, will depend in part on where the Allies choose to deploy their forces. But once this armor gets out the Axis player should be able to score one or two VP’s, especially if he catches the Allied forces while they still have their back to the water, resulting in some no-retreat hits.
2. Use your artillery as much as possible, before the enemy takes it out with Barrage or Air Power, or an Infantry Assault. This will be one of the Allies’ early objectives. So use it well while you have it.
3. Should you pull your infantry from the back row where they are defending Objective Medals? Early on, if you have the opportunity, they could bolster your forces which are trying to prevent the Allies from coming off the beach. But once the full scale Allied invasion begins to form, they will be sitting ducks in the open terrain, and should be pulled back to guard a Medal Objective.
Battle Reports
(percentage of Allied victories):
46%
Author:
Days of Wonder
Link