Dug in at Sidi Omar

Dug in at Sidi Omar

scenario_DugInSidiOmar_start

The Battle of Sidi Omar (November 1941) occurred during the broader Operation Crusader in the North African Campaign of World War II. Sidi Omar, located on the Libyan-Egyptian border, was a heavily fortified Axis stronghold defended by Italian and German forces.

On November 25, 1941, British and Commonwealth forces, particularly the 4th Royal Tank Regiment and elements of the 2nd New Zealand Division, launched an assault to capture the position. The defenders, dug in with anti-tank guns and artillery, inflicted significant casualties on the attacking tanks.

At Sidi Omar the enemy fought hard, but it wasn’t enough. Our boys hammered their defenses, smashed the garrison, and bagged hundreds of Italians as prisoners. That victory didn’t just clear the ground—it locked down the left flank for the advance, gave us breathing room, and drove Operation Crusader forward. With Tobruk relieved and the Axis grip on North Africa broken a little more, Sidi Omar proved again: when the Allies hit with weight and will, the enemy breaks.

~~ General Howitzer

6 VP’s

Card Balance:

5 – 5

Complexity:

2

Conditions:

Desert

Context:

Historical

Location:

Libyan – Egyptian border

Year:

1941

Theater:

Mediterranean Theater

Campaign:

North African Campaign

Codename:

Operation Crusader

Summary:

Objectives:

6 VP’s and Exit hexes for the Axis

Battlefield:

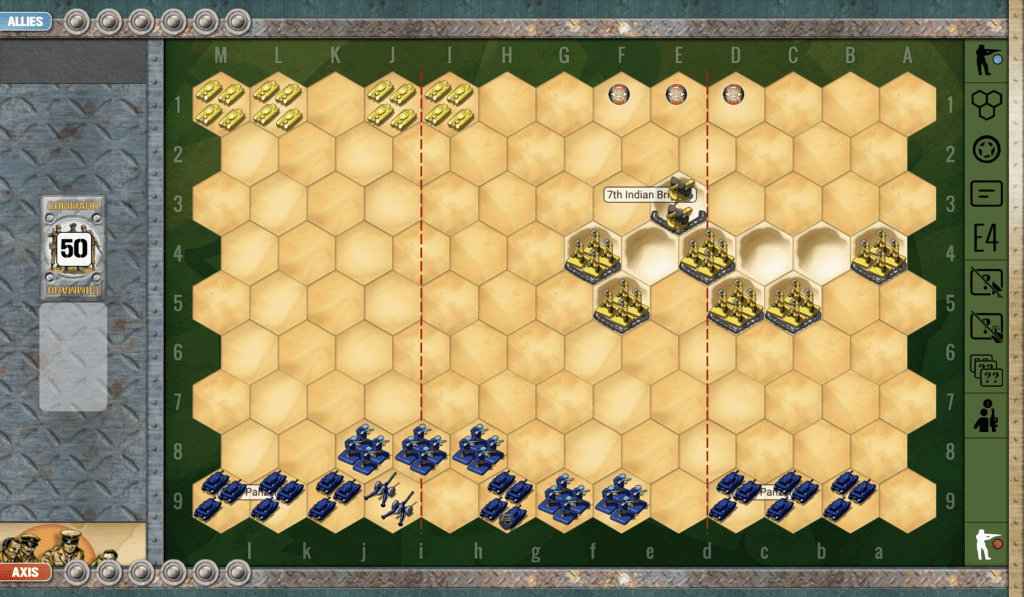
The dominant elements of this scenarios are the hilly dunes controlled by the Allied infantry, and the wide open battlefield for the armor units of both sides to meet in the middle section and one flank.

Troops:

Allies – 6 Infantry, 4 Armor, 1 Artillery

Axis –  5 Infantry 7 Armor, 1 Artillery

🔥 Winning as Allies

1.  Your infantry on the dunes can hold off the enemy for a long time. This should give you enough time to get your armor, which is stuck in the corner on your right flank, into the field of play.

2.  Because your armor can only move two hexes at a time, it may take a couple of turns before you pose enough of a threat for them to stop attacking your infantry on the dunes.

3.  Quickly get to the center section with your forces, in order to prevent any of the enemy from thinking about escaping out of the Exit hexes.

4.  With your artillery in the center section on the dune, you are able to attack any enemy in the center section. Use it to good effect.

🔥 Winning as Axis

1. The principle advantage which the Axis have in this desert scenario, is that the Axis armor can move three hexes vs. the Allies who can only move two. This give you the opportunity to move in quickly on the Allies and take out some armor before they can respond.

2. The enemy have full control of the sand dunes in the middle of the center section and its adjoining flank. But you can keep your armor at a three-hex distance, and just keep attacking them until one or two hexes are eliminated.

3. Remember that there are some Exit hexes in the back of the battlefield for the Axis. If you are able to overwhelm the forces on the dunes, and close in on them, some of your troops may be able to make their way off the field (and make a few attacks on their way).

Battle Reports 
(percentage of Allied victories):

47%

27
BR - Dug-In

Author:

Days of Wonder

Link:

Counter-Attack on Mortain

Counter-attack on Mortain

“Alright, boys—here’s the lowdown on that Axis stunt they called Operation Lüttich. Early August ‘44, the Germans thought they’d knock us back on our heels by punching through at Mortain, aiming to cut us off at Avranches and stop our drive into Brittany. Hell of a plan—if we were asleep!

They hit us hard at first, but we didn’t blink. Our boys dug in, held those lines with guts and grit. And don’t forget—our flyboys were on ‘em like hounds on a fox, raining steel and fire from the skies until those Nazis were howling for mercy.

The result? Germany’s counterattack went up in smoke—smashed, scattered, and thrown back with a hell of a lot of their tanks and men left behind in the dust. That’s the way to fight, boys—no retreat, no surrender, and always give ‘em hell!

~~ General Howitzer

4 VP’s

Card Balance:

Allies – 6

Axis – 5

Complexity:

3

Conditions:

Countryside

Location:

France

Year:

1944

Theater:

Western Front

Campaign:

Codename:

Operation Luttich

Summary:

As it was historically, the Allies are very well protected, and controlling most of the field of play.

Objectives:

4 VP’s, and one Objective Medal for Axis

Battlefield:

This scenario has a nice combination of hills, forests, and hedgerows scattered across the battlefield. There is also a river in one corner making it difficult for extra infantry and armor to engage in the war.

Troops:

Allies – 9 Infantry, 2 Armor, 2 Artillery

Axis – 7 Infantry, 6 Amor

🔥 Winning as Allies

1. You have the advantage of terrain control, defensive positions in hedgrows, forests and towns. But you need to take advantage of it by quickly attacking where you can.

2. Your right flank is your weak one, being outnumbered by enemy forces, 5 to 2.  Use your infantry on Hill 317 to attack the no-retreat armor before it moves away.

3.  Note that as long as you have your forces on either of the two hexes of Hill 317, you can use any Recon (on the right) cards to call down Airpower attacks against the Axis. Use it, and bomb them back to Berlin!

4.  Then move your infantry in the back of the right flank forward into the town of Mortain to support your other infantry unit on the hill, and to box in the enemy even more than they are already.

5. If you have the movement points, you can place your infantry at I1 into the village to defend the Objective Medal.

6. Get your armor in your left corner into the action ASAP. If you can get over to the river before the enemy has moved into safety, you can score one or two VP’s by attacking them in their no-retreat positions.

🔥 Winning as Axis

1.  Your forces on the left flank are bunched up, and you have a no-retreat armor ready to get hit by the infantry hidden in the woods. You need to create some mobility on your left and some of your troops into the woods to attack the enemy.

2. Your right flank is equally problematic. You are a sitting duck back against the border. So you need to get those troops into safety into the nearby towns, at least. Even better if you have the cards to move them out into the action. Or else when the enemy armor in the upper right flank becomes mobile, they will make their way down and easily destroy one or two units.

3.  It is going to be difficult to get all four VP’s, so you should target the Objective Medal in the village on your left flank. If your armor can survive the infantry attacks as you make your way there, it will be an important VP for you.

4. You only need four Medals to win this scenario, and three of them are on your left flank, ready for the taking. Just take out the two Infantry units and roll into the town of St. Hilaire.

Classic Battle Reports

(percentage of Allied victories):

39%

32
BR - Mortain

Author:

Days of Wonder

Link:

Counter-Attack at Arras

Counter-Attack at Arras

Counter Attack at Arras

The Counterattack at Arras occurred on May 21, 1940, during the Battle of France in World War II. It was a British and French counteroffensive aimed at halting the rapid German advance during the Blitzkrieg.

Launched by British forces (the 1st Army Tank Brigade and elements of the 50th Infantry Division) and supported by French infantry, the attack targeted German positions around Arras, where General Erwin Rommel’s 7th Panzer Division was advancing. The Allies hoped to disrupt German momentum and relieve pressure on retreating Allied forces.

The counterattack initially achieved surprise, with British Matilda tanks proving highly effective against German anti-tank weapons. However, the Germans quickly regrouped, bringing in heavy artillery and air support to repel the attack. The Allies were eventually forced to withdraw due to superior German numbers and coordination.

General Howitzer summarizes the battle’s impact:
The counterattack didn’t win the day, but it sure kicked sand in the Germans’ gears and bought the time we needed to pull our boys out at Dunkirk. It was a hard lesson in early tank warfare—fast and mean, but still full of cracks if you knew where to hit.

Background

6 VP’s

Card Balance:

Allies – 6

Axis – 5

Complexity:

3

Conditions:

Countryside

Location:

France

Year:

1940

Theater:

Western Front

Campaign:

Battle of France

Codename:

Operation Frankforce

Summary:
This scenario has a set of hills on one flank, and a row of forests on the other flank, with a three-hex town in the center. It is around these obstacles that the battle ensues.

Objectives:

Six VP’s, so strategy comes into play; not just tactics.

Battlefield:

Countryside with the three-hex town of Arras in the center.

Troops:

Allies, 6 Infantry, 5 Armor, 1 Artillery;

Axis, 9 Infantry, 6 Armor,1 Artillery

🔥 Winning as Allies

1.  Axis is very close to Agny, and may secure it quickly. So use your flanks to provide more lucrative avenues of attack. The ridgeline of trees on your left flank give your infantry, and especially your armor great cover to attack the enemy.  On your right flank, secure it with both infantry and armor. Don’t leave infantry behind.

2.  Move your artillery forward one row to have better hit strength on the entire town of Arras.

🔥 Winning as Axis

1. Your Axis forces begin the scenario very close to Agny. Seize control of the town so that the enemy will have to pay dearly to gain it.

2. There is a path between the forest on your right flank. Seize the town at the end of it, to challenge any forces which may attempt to come through the pass. And as the cards allow, use it yourself to attack the enemy armor at the end of that pass.

3.  Move your artillery forward at least one row to gain more dominance in the center section.

4.  Remember that as Axis in this scenario, blitz rules are in effect, so you can use a Recon card to call in an airstrike against adjacent units. This is most useful in the beginning when the Allied forces are still lined up agains the back border. The Axis airpower only drops one dice per hex, but since it is a six VP game, this kind of softening up of the enemy in the beginning can pay dividends later on.

Scales-Axis-Weighted
22
BR - Arras

Author:

Days of Wonder / RBorg

URL

Matanikau River (Guadalcanal)

Matanikau River

scenario_Matanikau_start

The battle near the Matanikau River in 1942 was a key engagement during the Guadalcanal Campaign in the Pacific Theater of World War II. It involved several clashes between the United States Marines and Imperial Japanese forces as the Marines sought to secure their perimeter around Henderson Field, a critical airstrip on Guadalcanal.

Listen up. September to November ’42, the Matanikau was the hinge of Guadalcanal. The enemy tried to shove our Marines into the sea; our answer was simple—cross the river, hit hard, and keep hitting. We used infantry up front, artillery and naval guns on call, and fighters overhead to hammer every position that dared resist. Result: their strength bled away, our foothold stiffened, and the initiative swung to us. Lesson—seize the crossing, smash the flank, keep air on the target, and don’t stop until the island is yours.

~~ General Howitzer

5 VP’s

Card Balance:

Allies – 6

Japanese – 6

Complexity:

3

Conditions

Location:

Guadalcanal

Year:

1942

Theater:

Pacific Theater

Campaign

Summary:

This scenario is pretty much an infantry battle with a bit of artillery support.

Objectives:

Five VP’s, plus Exit hexes

Battlefield:

The Matanikau River cuts across the battlefield and presents a challenge for both forces as they try to maneuver and attack one another. And there are series of beach hexes along one flank which provides a rapid transit path for attacks.

Troops:

Allies – Infantry 7, Artillery 3

Axis – 10 Infantry, 2 Armor, 2 Artillery

🔥 Winning as Allies

1.  Your forces are outnumbered by the Japanese, so unless you have the cards for it, stay behind the sandbags.

2.  You have three artillery, so use them whenever you can.

3.  Protect the backrow from any Japanese forces that may try to escape.

4.  Remember that as Marines, you get the ‘Gung Ho’ advantage, so every section card allows you to move one extra unit than the card states. Remember that advantage, and use it – you will need it.

🔥 Winning as Axis

1.  You have a strong presence on the right flank. If you get the cards, you should push forward and take control.

2.  If you are able to advance all the way across the battlefield, you may be able to help some troops escape.

3.  You have armor and the Allies do not, so move them in and make them feel your firepower!  Armor are good candidates for escape across the back line. So if you move in close, you may be able to attack and then escape.

4.  You also have two artillery, so if you can move them forward,  you will be able to throw 2D attacks across the river.

Battle Reports (percentage of Allied victories):

67%

Scales-Allies-Weighted
32
BR - Matankau

Author:

Days of Wonder

Link:

Bug River

Bug River

a memoir 44 game field

The Battle of the Bug River was the opening crack of thunder in the great storm called Operation Barbarossa, June 1941. When the Germans hurled their legions eastward, the Bug River stood before them—not just a line of water, but the first Soviet shield guarding their vast frontier. That river marked the edge of two empires, a tense, steel-cold border between Nazi-occupied Poland and the Red giant beyond.

But rivers don’t stop armies with purpose. At dawn, the German assault troops slammed across the Bug with the kind of ruthless precision that defines a well-oiled war machine. Pioneers threw down bridges under fire, infantry surged across in rubber boats, and armored columns rumbled forward the moment the crossings held. The Soviets, caught between disbelief and the sheer violence of the assault, fought hard in pockets, but they were hit before they could fully wake to the scale of the invasion.

What happened on the Bug wasn’t just a crossing—it was the first thrust of a colossal campaign, a declaration that the Germans intended to carve their way deep into the Soviet heartland. The river was supposed to be a barrier. Instead, it became the starting line for one of the most brutal struggles in human history.

~~ General Howitzer

5 VP’s

Card Balance:

Allies – 3
Axis – 6

Allies are seriously impaired on their card management options in this scenario.

Complexity:

4

Conditions:

Countryside


Location:

Russia

Year:

1941

Theater:

Eastern Front

Campaign:

Operation Barbarossa

Codename

Summary:

The Axis are making an attack against a fairly well-defended Russian army. It is a countrside terrain with forests and bunkers. There is also a supply train which can drop off additional defenders if it gets to its depot safely. This adds an interesting element to the battlefield game.

Objectives:
There are five VP’s in this scenario. There is also a bridge medal objective for the Axis to attain. Proper hits on the train will also gain VP’s for the Axis.

Battlefield:
The Russians begin with solid control of two sections. In fact their armor are poised in field bunkers only two hexes from Axis infantry which have no retreat available to them. The train tracks cut across the field also impairing movement. The Bug River weaves across the backline in Axis territory, hampering movement and preventing retreats.

Troops:
The Axis possess 6 infantry, 4 armor, and 2 artillery.
The Russians have 5 infantry, 3 armor, no artillery. Plus possibly two more infantry if the train reaches its destination.

🔥 Winning as Allies

1. As the Russian Allied commander, you need to seek your VP’s. You need 5 and there are six enemy Infantry, which you can target initially. Then as the battle develops, see if any armor or artillery become candidates for attack.

2.  Note that the artillery is pressed up against the backwall with no retreat, so you can seek the chance to hit it with a three-dice armor attack. Your odds will be 33% per dice roll, vs. 16%. Take the chance to hit no-retreat artillery whenever you can. A Barrage card early in the game comes in very handy.

3.  Recognize that your armor in the field bunkers are going to get quickly overwhelmed by the larger Axis forces coming your way. The question is how much you can make them pay for it, before they do so.

🔥 Winning as Axis

1.  You have four infantry hexes which have no retreat and are a mere two hexes away from enemy armor in bunkers. You should attack them immediately and quickly move in on them to maximize your attack. You may be able to neutralize one of the armor units before they do a lot of damage.  With a card like Move Out! you will be able to advance four infantry immediately and nearly surround both field bunkers for a series of two-dice attacks.  In just a couple of turns the enemy should be eliminated.

2.  Do not let the Allied Transport Train get to the train station. Because once they do, they will unload additional forces to fight.

3.  Use your two Artillery as much as possible to attack the enemy Armor in the field bunkers.

Scales-Axis-Weighted
18
BR - Bug

Author:

Days of Wonder

URL