Gallabat & Metemma

Gallabat & Metemma

The Battle of Gallabat and Metema was a significant engagement in the East African Campaign of World War II, taking place in February 1940. The battle occurred between Allied forces, primarily made up of British and Indian troops, and Italian forces in Ethiopia, near the borders of Sudan and Ethiopia.

General Howitzer summarizes:
We hit Gallabat hard in ’40, punched through and took the damn fort—looked like the start of a fine push into Italian turf. But they had the skies, and their bombers kept pounding us. With no cover from the air and stiff resistance on the ground, we had to pull back. Hell of a fight, but not every swing lands the knockout.

4 VP’s

Card Balance:

4 – 4

Complexity:

3

Conditions:

Countryside

Location:

East Africa

Year:

1940

Theater:

Mediterranean Theater

Campaign:

East Africa Campaign

Codename

Summary:

Objectives:

A short 4-medal game; no territorial medals.
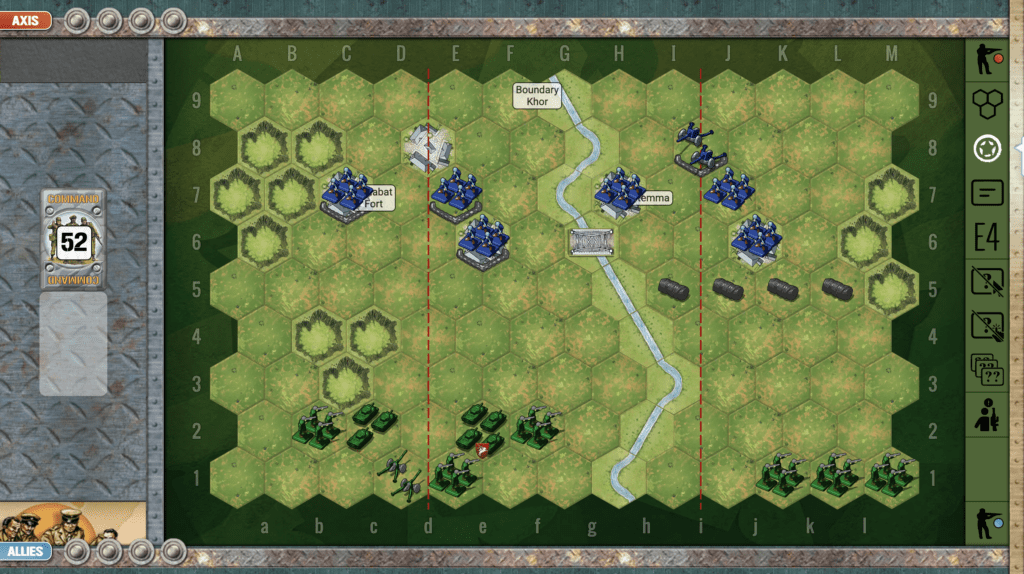
Battlefield:

The Gallabat scenario has a river going down the center which seriously blocks troop movement between both sides. Therefore it is almost like two separate battles so plan your movements carefully.

Troops:

Allies 6 Infantry, 2 Armor, 1 Artillery

Axis – 6 Infantry, 1 Artillery

Allied Strategy:

1. For Allies, the troops on the right section should be moved into play only when you have enough movement cards to quickly get you next to the town for attack. The wire surrounding the town will decrease your attack power, so you will need a full set of cards to continue the attack.

2. You only need 4 medals to win. There are three heavily defended Axis units on the left side. With your armor and artillery, you should be able to weaken or destroy them, leaving just one unit medal to win on your right flank.

Axis Strategy:

1.  Your units are heavily defended with sandbags and town and wire protections. This should give you the time you need to assemble a collection of attack cards.

2. Your artillery is centrally-placed. If you can move it forward a bit, do it. Then use it well to take out any forces that attempt to approach your forces.

3.  Possible attack vector:  Your right flank is very weak as three Infantry units are no match for two enemy Armor, one Artillery, and three enemy Infantry. But your left flank has possibilities.  Although outnumbered three Infantry to two, if you can move your Artillery forward, and then get some good cards like Airpower or Barrage, you can weaken the three enemy Infantry.  Then you can move in and take some out. 

DoW Battle Reports (percentage of Allied victories):

59%

24
BR - Gallabat

Author:

Days of Wonder

Link:


Counter-Attack on Mortain

Counter-attack on Mortain

“Alright, boys—here’s the lowdown on that Axis stunt they called Operation Lüttich. Early August ‘44, the Germans thought they’d knock us back on our heels by punching through at Mortain, aiming to cut us off at Avranches and stop our drive into Brittany. Hell of a plan—if we were asleep!

They hit us hard at first, but we didn’t blink. Our boys dug in, held those lines with guts and grit. And don’t forget—our flyboys were on ‘em like hounds on a fox, raining steel and fire from the skies until those Nazis were howling for mercy.

The result? Germany’s counterattack went up in smoke—smashed, scattered, and thrown back with a hell of a lot of their tanks and men left behind in the dust. That’s the way to fight, boys—no retreat, no surrender, and always give ‘em hell!

~~ General Howitzer

4 VP’s

Card Balance:

Allies – 6

Axis – 5

Complexity:

3

Conditions:

Countryside

Location:

France

Year:

1944

Theater:

Western Front

Campaign:

Codename:

Operation Luttich

Summary:

As it was historically, the Allies are very well protected, and controlling most of the field of play.

Objectives:

4 VP’s, and one Objective Medal for Axis

Battlefield:

This scenario has a nice combination of hills, forests, and hedgerows scattered across the battlefield. There is also a river in one corner making it difficult for extra infantry and armor to engage in the war.

Troops:

Allies – 9 Infantry, 2 Armor, 2 Artillery

Axis – 7 Infantry, 6 Amor

Allied Strategy:

1. You have the advantage of terrain control, defensive positions in hedgrows, forests and towns. But you need to take advantage of it by quickly attacking where you can.

2. Your right flank is your weak one, being outnumbered by enemy forces, 5 to 2.  Use your infantry on Hill 317 to attack the no-retreat armor before it moves away.

3.  Note that as long as you have your forces on either of the two hexes of Hill 317, you can use any Recon (on the right) cards to call down Airpower attacks against the Axis. Use it, and bomb them back to Berlin!

4.  Then move your infantry in the back of the right flank forward into the town of Mortain to support your other infantry unit on the hill, and to box in the enemy even more than they are already.

5. If you have the movement points, you can place your infantry at I1 into the village to defend the Objective Medal.

6. Get your armor in your left corner into the action ASAP. If you can get over to the river before the enemy has moved into safety, you can score one or two VP’s by attacking them in their no-retreat positions.

Axis Strategy:

1.  Your forces on the left flank are bunched up, and you have a no-retreat armor ready to get hit by the infantry hidden in the woods. You need to create some mobility on your left and some of your troops into the woods to attack the enemy.

2. Your right flank is equally problematic. You are a sitting duck back against the border. So you need to get those troops into safety into the nearby towns, at least. Even better if you have the cards to move them out into the action. Or else when the enemy armor in the upper right flank becomes mobile, they will make their way down and easily destroy one or two units.

3.  It is going to be difficult to get all four VP’s, so you should target the Objective Medal in the village on your left flank. If your armor can survive the infantry attacks as you make your way there, it will be an important VP for you. 

4. You only need four Medals to win this scenario, and three of them are on your left flank, ready for the taking. Just take out the two Infantry units and roll into the town of St. Hilaire. 

Classic Battle Reports

(percentage of Allied victories):

39%

24
BR - Mortain

Author:

Days of Wonder

Link:

Battle of Warsaw

Battle of Warsaw

memoir 44 battle

The Battle of Warsaw on September 1, 1939, marked the beginning of World War II, as Germany invaded Poland and launched a full-scale assault on its capital. German forces, using blitzkrieg tactics with tanks, aircraft, and artillery, quickly overwhelmed Polish defenses.

Warsaw held out for several weeks under heavy bombing and siege, but after intense fighting and massive civilian casualties, the city surrendered on September 28, 1939. The fall of Warsaw marked the collapse of organized Polish resistance and the start of a brutal occupation.

General Howitzer summarizes its impact:
Warsaw was the first hard punch of the war—Germany rolled in with tanks and bombers, and Poland never stood a chance. The city fought like hell, but blitzkrieg was fast, brutal, and unforgiving. When Warsaw fell, the world saw what Hitler was willing to do, and what happened when you weren’t ready. It lit the fuse for everything that followed and proved this war wasn’t going to be clean or quick—it was going to be total.

6 VP’s

Card Balance:

Allies – 5

Axis – 6

Complexity:

4

Conditions:

Countryside – Urban

Location:

Warsaw, Poland

Year:

1939

Theater:

Western Front

Campaign:

The Invasion of Poland

Codename:

Case White / Fall Weib

Summary

The Axis begin in countryside, and thus, have ease of movement.  But as soon as they begin to breach Warsaw, it becomes an urban challenge for them, and the tanks are much less useful.

Objectives:
6 VP’s, which can also include one temporary Medal Objective, if two of the four Fortress hexes are occupied.

Battlefield
This is a complex scenario with the Allies defending Warsaw as they are surrounded by Axis invaders. The battlefield is composed of roads, wire bales, sandbagged troops protected in city and church hexes. Since this is an urban scenario, the infantry will play a major role for both sides.

Troops:
Allies – 10 Infantry; 2 Artillery
Axis – 10 Infantry; 6 Armor; 1 Artillery

Allies:

1. Note that although the Axis have overwhelming armor advantage, the number of infantry hexes in this scenario are balanced at ten – ten. And since infantry are the primary forces useful for urban warfare, this part, at least, is good news for the Allies.

2. The Allies also have two well-placed artillery in two corners of the city. They can provide an effective deterrent against the Axis onslaught. Use them at every opportunity.

3. The scenario begins with two infantry forces out in the open on unguarded hexes. Get them into a town or church hex as you are able to, as there is no point in giving up easy VP’s to the enemy.

4.  The Axis Infantry unit at A5 is in a no-retreat position. If you have the cards, you can gain some hits there early in the game.


Axis:

Big Picture strategy for the Axis is to soften the urban infantry defenses with long-distance shelling from your artillery and armor. Only when they are weakened should you move in for the close assault from the infantry. 

1. Two of the four Fortress hexes become a temporary Objective Medal if the Axis can keep and hold them. Note that although they are occupied by Polish troops at the start of the scenario, they are not sandbagged, like some of the town hexes. This makes them a possible point of attack for you.

2. The Axis have overwhelming armor forces, but given that this is an urban scenario, their fire-power is limited. They can be kept at a distance and used to soften the defenses in preparation for an infantry attack. Remember that armor and infantry are designed to work together.

3. However, should you get an armor assault card, you may give consideration to moving right next to all of the heavily guarded infantry hexes, so that you can complete a close assault maneuver with one extra dice for every attack. With two dice per attack, and four armor units, you can do serious damage to the enemy, and soften them up for your infantry assault.  This will have the additional benefit of having the armor units automatically removing the barb wire, so that when the infantry does come, they can attack with more firepower. But once this is completed, then pull back your armor as quickly as possible.

4. The placement of your forces on the right flank is awkward. You have an infantry and an armor unit with no retreat option. Unless you move those to a better spot, they will be targeted by the Allied artillery, granting them a quick early VP.

5.  Remember that, as Axis, you can convert Recon cards into air attacks.  This will give you additional opportunities to take out entrenched units, like the artillery.

Battle Reports

(percentage of Allied victories):

51%

17
BR - Warsaw

Author:

Days of Wonder

Link:

Armored Attack!

Normandy – Vaumicel Manor

Take a look at this situation. The Armor is ready to move. But where should it move, and what should it attack. There are so many choices!

Based on the cards in hand, what should the Axis attack?

Options:

1.  Attack the Armor against the back border?

2.  Attack the Infantry against the back border?

3.  Attack the Armor in the right flank?


Pros vs. Cons of each:

1.  Armor is dangerous and the armor against the back border is in a no-retreat situation.

Odds increase for each die rolled from 33% hit to 50% hit per figure! Throwing three dice will result in 1.5 armored figures being destroyed.

That is good, but the problem is that an armored unit with only 1 or 2 figures is just as powerful and dangerous as one with full forces.


2.  Attack the infantry ?  Because it is pressed-up against the border, the odds of a hit is 66% for each roll of the dice. So for a three-dice attack from armor, you could kill of three of the four infantry.  That’s good, but again, the unit will remain, ready to attack again, and no VP is gained.

3.  Attack the Armor on the right flank?

This one has more possibilities because they armor will attack with three dice and the infantry right next to it, will also hit it for three more dice, for a total of six dice.  Even if the armor is forced back from the first roll one hex in a retreat, the infantry can attack with two dice. Total diced rolled will be 5. The odds of a good result increase dramatically.

Let’s see the results of choice #3.

The first attack wiped out two armor figures leaving just one armor left to be destroyed by the next three dice. And that is just what happened.

But what if the dice went against us (as they seem to do way too often)? We always have to ask the question “What then?”.  Look at the cards in hand. There are two right flank cards, and no middle section attacks.  So a failed attack in the middle would have left enemy forces to retaliate. But a failed attack on the right flank, would still allow the Axis to respond to the eventual Allied retaliation. 

So sometimes units pressed up against the back border are good fodder for destruction, but not always.  In this case, and with the cards in hand, an attack on the right flank was the best choice.


But Commander, what do you think?  What orders would you have issued if you had been in control?  Feel free to leave a comment.