Bastogne Corridor West

Bastogne Corridor West

scenario_BastogneCorridorWest

Let me tell you something: Bastogne Corridor West was a knockout punch thrown in a snowstorm, and our boys delivered it with grit frozen to their faces.

In late December ’44, the Germans came crashing in from the west, hell-bent on slicing through the lifeline that kept Bastogne alive. They thought they could slam the door shut before the Third Army reached the paratroopers. Well, they were wrong.

Patton’s tankers, infantry, gunners, and flyboys stood their ground in the worst winter Europe had seen in years. The enemy hit hard—armor, guns, the works—but our men hit harder. Through drifts, smoke, and steel, they held that corridor like it was the spine of the whole damn war—because it was.

By beating back that counterattack, we kept Bastogne supplied, kept the line unbroken, and broke the enemy’s last real chance to split our forces. It was a turning point in the Bulge, and it proved once again: when the Allies are cornered, they don’t fold—they fight their way out.

~~ General Howitzer

6 VP’s 

including some territorial objective medals.

card

Card Balance:

5 – 5

Complexity:

3

Conditions:

Winter

winter

Location:

Belgium

Year:

1944

Theater: 

Western Front

Campaign:

Ardennes

Codename:

it was part of the larger Battle of the Bulge (German codename: Unternehmen Wacht am Rhein, or Operation Watch on the Rhine)

Summary:

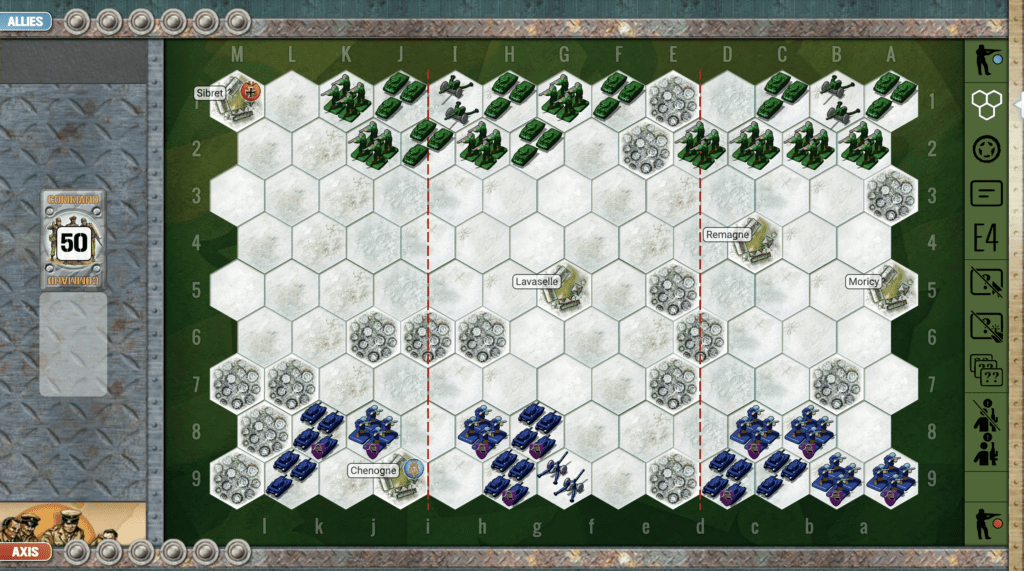
This is a reverse of the Corridor East scenario. But in this scenario both forces are pressed up against their respective borders. The scattered forests in the center of the battlefield are up for grabs to whomever can get to them first.

Objectives:

6 medals including territorial medals for each side by controlling their town objectives.

Terrain:

Winter, wooded, with open plains for fun tank battles

Troops:

Allies – 8 Infantry, 7 Armor, 2 Artillery

Axis – 6 Infantry, 6 Armor, 1 Artillery

🔥 Winning as Allies


1.  Big picture strategy for Allies is to quickly mobilize your forces before the enemy armor moves in for attack.  Get your Infantry into defensive positions in the towns of Moricy, Remagne, Lavaselle, and Sibret if you can.  This will slow the Axis attack while you mobilize your own Armor.

2. You have two Artillery.  If the enemy moves forward quickly, you can begin using them immediately. If they delay advancement, you can move your own Artillery forward one or two hexes. Air Power cards are played as Artillery Bombardment, so it will be good to have your Artillery in a forward position, should that card become available.

 3.  The Axis have the advantage of being closer to the forests. So they will be able to place their Armor in there, and blast you if you try to make a frontal assault out in the open middle section. Your best attack vector is your left flank, where your forces can move forward under the protection of the towns and forest’s on that side.

4.  Wait them out in the center section until either they come out from the forests, or you have the cards for a massive assault.  Of course, if you can capture the forests first, that is the way to go.


🔥 Winning as Axis

1.  Big picture strategy is to move your Infantry into the forests, and mobilize your Armor rapidly for some early hits against the enemy before they have had a chance to mobilize.

2. Because there are a lot of open spaces, and a lot of Armor, this can become very much a tank battle. So choose your section and focus of attack carefully. The center section gives your forces the most mobility.

3.  Capture the center forest hexes. Then begin moving your artillery and your right flank forces forward to put pressure on the enemy.

4.  Keep the pressure on your left flank. If you get close enough to the town of Sibret, in the corner, near the end of the game you can grab that as your last Medal.


18
BR - Bastogne West

Author:

Days of Wonder

URL

Mignano Monte Lungo

Mignano Monte Lungo

Listen up, men—

The Battle of Mignano Monte Lungo was a damn fine example of grit and redemption. After switching sides, the Italian troops had something to prove—and by God, they did it. That mountain was no cakewalk. The Germans were dug in deep, with every ridge covered by fire, and the terrain was as unforgiving as a mule kick to the gut.

But those Italians, with the Yanks watching, clawed their way up that blasted rock from December 8 to the 16th, 1943. Took casualties. Took hell. But they took the mountain too. That wasn’t just a hill—it was a message: Italy was back in the fight, and they were fighting on the right side this time.

Monte Lungo wasn’t just a tactical win. It was a morale sledgehammer. And it cracked open the road to Cassino. That’s how you turn the tide—with steel in your spine and fire in your gut.

~~ General Howitzer

6 VP’s

Card Balance:

Allies – 6

Axis – 5

Complexity:

3

Conditions:

Countryside

Context:

Historical

Location:
Italy

Year:

1943

Theater:

Western

Campaign:

The Italian Campaign

Codename

Summary:

The Axis forces begin this scenario in control of the hexes across two-thirds of the battlefield, protecting two VP town hexes. The challenge for the Allies is to cross the open plain with out being decimated before they can control the hills and get to the VP’s.

Objectives:

6 VP’s, plus Monte Lungo and Monte Rotondo are temporary Medal Objectivese for the Allies.

Battlefield:

Troops:

Allies – 

Axis – 

🔥 Winning as Allies

1.  Big Picture Strategy:  the Axis forces have an Artillery guarding the left flank, and it’s objective medal. But there is an objective medal on the right flank.  Head all of your forces in that direction.

2.  If you can move your Artillery forward one row, you will be able to hit more of the enemy with 2D attacks.


🔥 Winning as Axis

1.  Big Picture Strategy: Guard the Objective Medal on your left flank.  If the enemy gets the right cards, they can very quickly come upon your forces and overwhelm them.

Battle Reports:

(percentage of Allied victories)

18
BR - Mignano

Author:

Days of Wonder

ID:

Link:

Arracourt

Arracourt

scenario_Arracourt_start_Axis

The Battle of Arracourt (September 18–29, 1944) was one of the largest tank engagements on the Western Front — a dramatic clash between the U.S. 4th Armored Division and German Panzer forces near the village of Arracourt, in northeastern France.

After the breakout from Normandy, U.S. forces under General Patton’s Third Army raced across France, outpacing their supply lines. The German High Command, desperate to halt the advance, launched a counteroffensive using newly arrived Panzer brigades from the 5th Panzer Army. Their goal was to cut off the American spearhead and regain the city of Nancy.

By the end of September, the Germans had lost over 200 tanks and assault guns, compared to about 25 U.S. tanks. The American victory at Arracourt shattered the Panzer brigades, halted the German counterattack in Lorraine, and confirmed the U.S. Army’s growing mastery of combined-arms tactics.

Listen up—Arracourt was no accident. That fight proved what I’ve said all along: steel alone doesn’t win battles—men do. When you’ve got training in your bones, clear orders on the radio, and the guts to move fast and hit hard, you can take on any tank the Krauts can throw at you.

Our boys out there turned the rolling fields of Lorraine into a graveyard for German armor. Outnumbered? Maybe. Outclassed? Never. We didn’t dig in and wait—we maneuvered, struck from the flanks, and crushed them before they knew what hit ’em.

Arracourt wasn’t just a victory—it was a lesson to every soldier in this Army: brains, speed, and discipline beat brute strength every damn time.

~~ General Howitzer

6 VP’s

Card Balance:

Allies – 6
Axis – 4

Complexity:

4

Conditions:

Location:

France

Year:

1944

Theater:

Western Front

Campaign

Codename

Summary:

The Arracourt scenario is dominated by a hilly ridge of five hexes which cut across a flank and into the central section, and another smaller ridge in front of that. When the armor comes over the ridge, it becomes a mighty tank battle.

🔥 Winning as the Allies

1.   Be careful to not launch a premature attack on the left flank. If you are not ready, you will be entering a kill box. It may be wiser to pull back to the secondary row of ridges, to get prepared for attack.

2. The Axis forces are together in the upper right section behind the Marne-Rhine Canal. If you can move in with your armor and some artillery attacks, you are may be able to score at least one medal before they can respond.

3. You have three artillery. Use them to your advantage. If you can move your center one forward a bit, it will improve your attack and control of the center section.


🔥 Winning as the Axis

1.  Your right and center sections are strong; the left units stuck behind the canal is your weak side. As you are able, get them out of harms way, or they will be easy pickings for the Allies.

2.  Grand Strategy for Axis: the battle will be fought on your right flank with the armor from both sides on the two ridges and the valley between.  You need to get your tightly condensed and no-retreat armor out into the open so you can battle well. If you stay backed up against the border on the right flank, your troops will be destroyed.

3.  Early goal: eliminate the enemy Infantry at G7, or they will do unnecessary harm to your forces in the center section.


Battle Reports:

(percentage of Allied victories)

 60%

28
BR - Arracourt

Author:

Link: View Here


Across the River Roer

Across the River Roer

scenario_AcrossTheRiverRoer_start

Across the River Roer wasn’t just another bridgehead — it was the kind of operation that tests an army’s guts and grit. In February ’45, the Germans tried to drown the Allies out of the Rhineland by blowing their dams and turning the Roer into a boiling, flooded barrier. They figured the rising water would halt us cold. It didn’t. It just delayed the inevitable.

When the river finally dropped, our boys moved with discipline and fury. Under artillery, machine-gun fire, and every trick the enemy could throw, they forced that crossing, yard by yard, boat by boat. The Germans were dug in, determined, and desperate — but they couldn’t stop an army that had momentum, purpose, and the will to finish the job.

The Roer crossing cracked open Germany’s western shell and put us on the doorstep of the Rhine itself. And once you reach the Rhine, you’re cutting straight into the enemy’s heart. This operation proved again that no flood, no fortress, no line of resistance can hold back an Allied force that’s hell-bent on victory.

~~ General Howitzer

6 VP’s

Card Balance:

6 Allies
4 Axis

Complexity:

3

Conditions:

Countryside

countryside

Location:

Germany

Year:

1945

Theater:

Western Front

Campaign:

Rhineland

Codename:
Operation Grenade

Summary

Artillery plays a major role in this scenario, with three on one side and one on the other. 

Objectives:

Six VP’s including all three town objectives and an exit hex for the Allies, if they can get there.

Terrain:

The River Roer is a major strategic barrier which slows the advance into battle.

Troops:

Allies – 10 Infantry, 3 Artillery

Axis – 7 Infantry, 2 Armor, 1 Artillery

🔥  Winning as the Americans (Allies)

1.  Attack Vector Options: Left Flank:
If you are going for a left flank assault, the enemy artillery will pick off your forces as you advance. So gather at the river first, since that barrier will stop your troops for one turn. Once everyone has breached it, then you will have to attack en masse and quickly attack before the artillery takes you out.

2.  Your artillery on the right can provide support fire for your troops if you pursue a central or right flank attack. But if you can move them forward at least one row before the battle begins, do that. The result will be that the sandbagged infantry in the center will be subject to 2D attacks from the artillery.

3.  Attack Vector Options:  Right Flank
An attack on the right flank is going to be a challenge as long as the enemy armor can move in and attack your infantry on the open plain before the town with the victory hex.  And then should you even reach it, you have to hold it until the end of the game to get the VP’s.

🔥 Winning as the Germans (Axis)

1.  Historically, the Allies were able to move across the Roer and establish a 3-mile beachhead.  This means that the scenario is stacked against you, if you attempt to come out from your defensive positions and launch an assault. You may be able to do it, especially with your armor on your left flank, but be careful, as the Allied artillery is powerful.

2.  Note that the Axis cannot cross the river!  The Allies can, but the Axis are not allowed. Therefore, you cannot launch a raid into enemy territory, except by shooting across the river.

3.  Keep your armor mobile. You will most likely need them on your left flank to defend the town hex medal objective.

4.  Move your infantry in the back of the center section forward to replace the infantry you will lose in the center and right flanks.

25
BR - Roer

Author:

Days of Wonder

URL: