Peleliu Landings [Overlord]
Peleliu Landings (Overlord)

13 VP’s
![]()
Card Balance:
Allies – 11
Axis – 8
Complexity:
5/5
Conditions:
Beach

Context:
Historical
Location:
Palau Islands
Year:
1944
Theater:
Pacific
Campaign:
Guadalcanal Campaign
Summary:
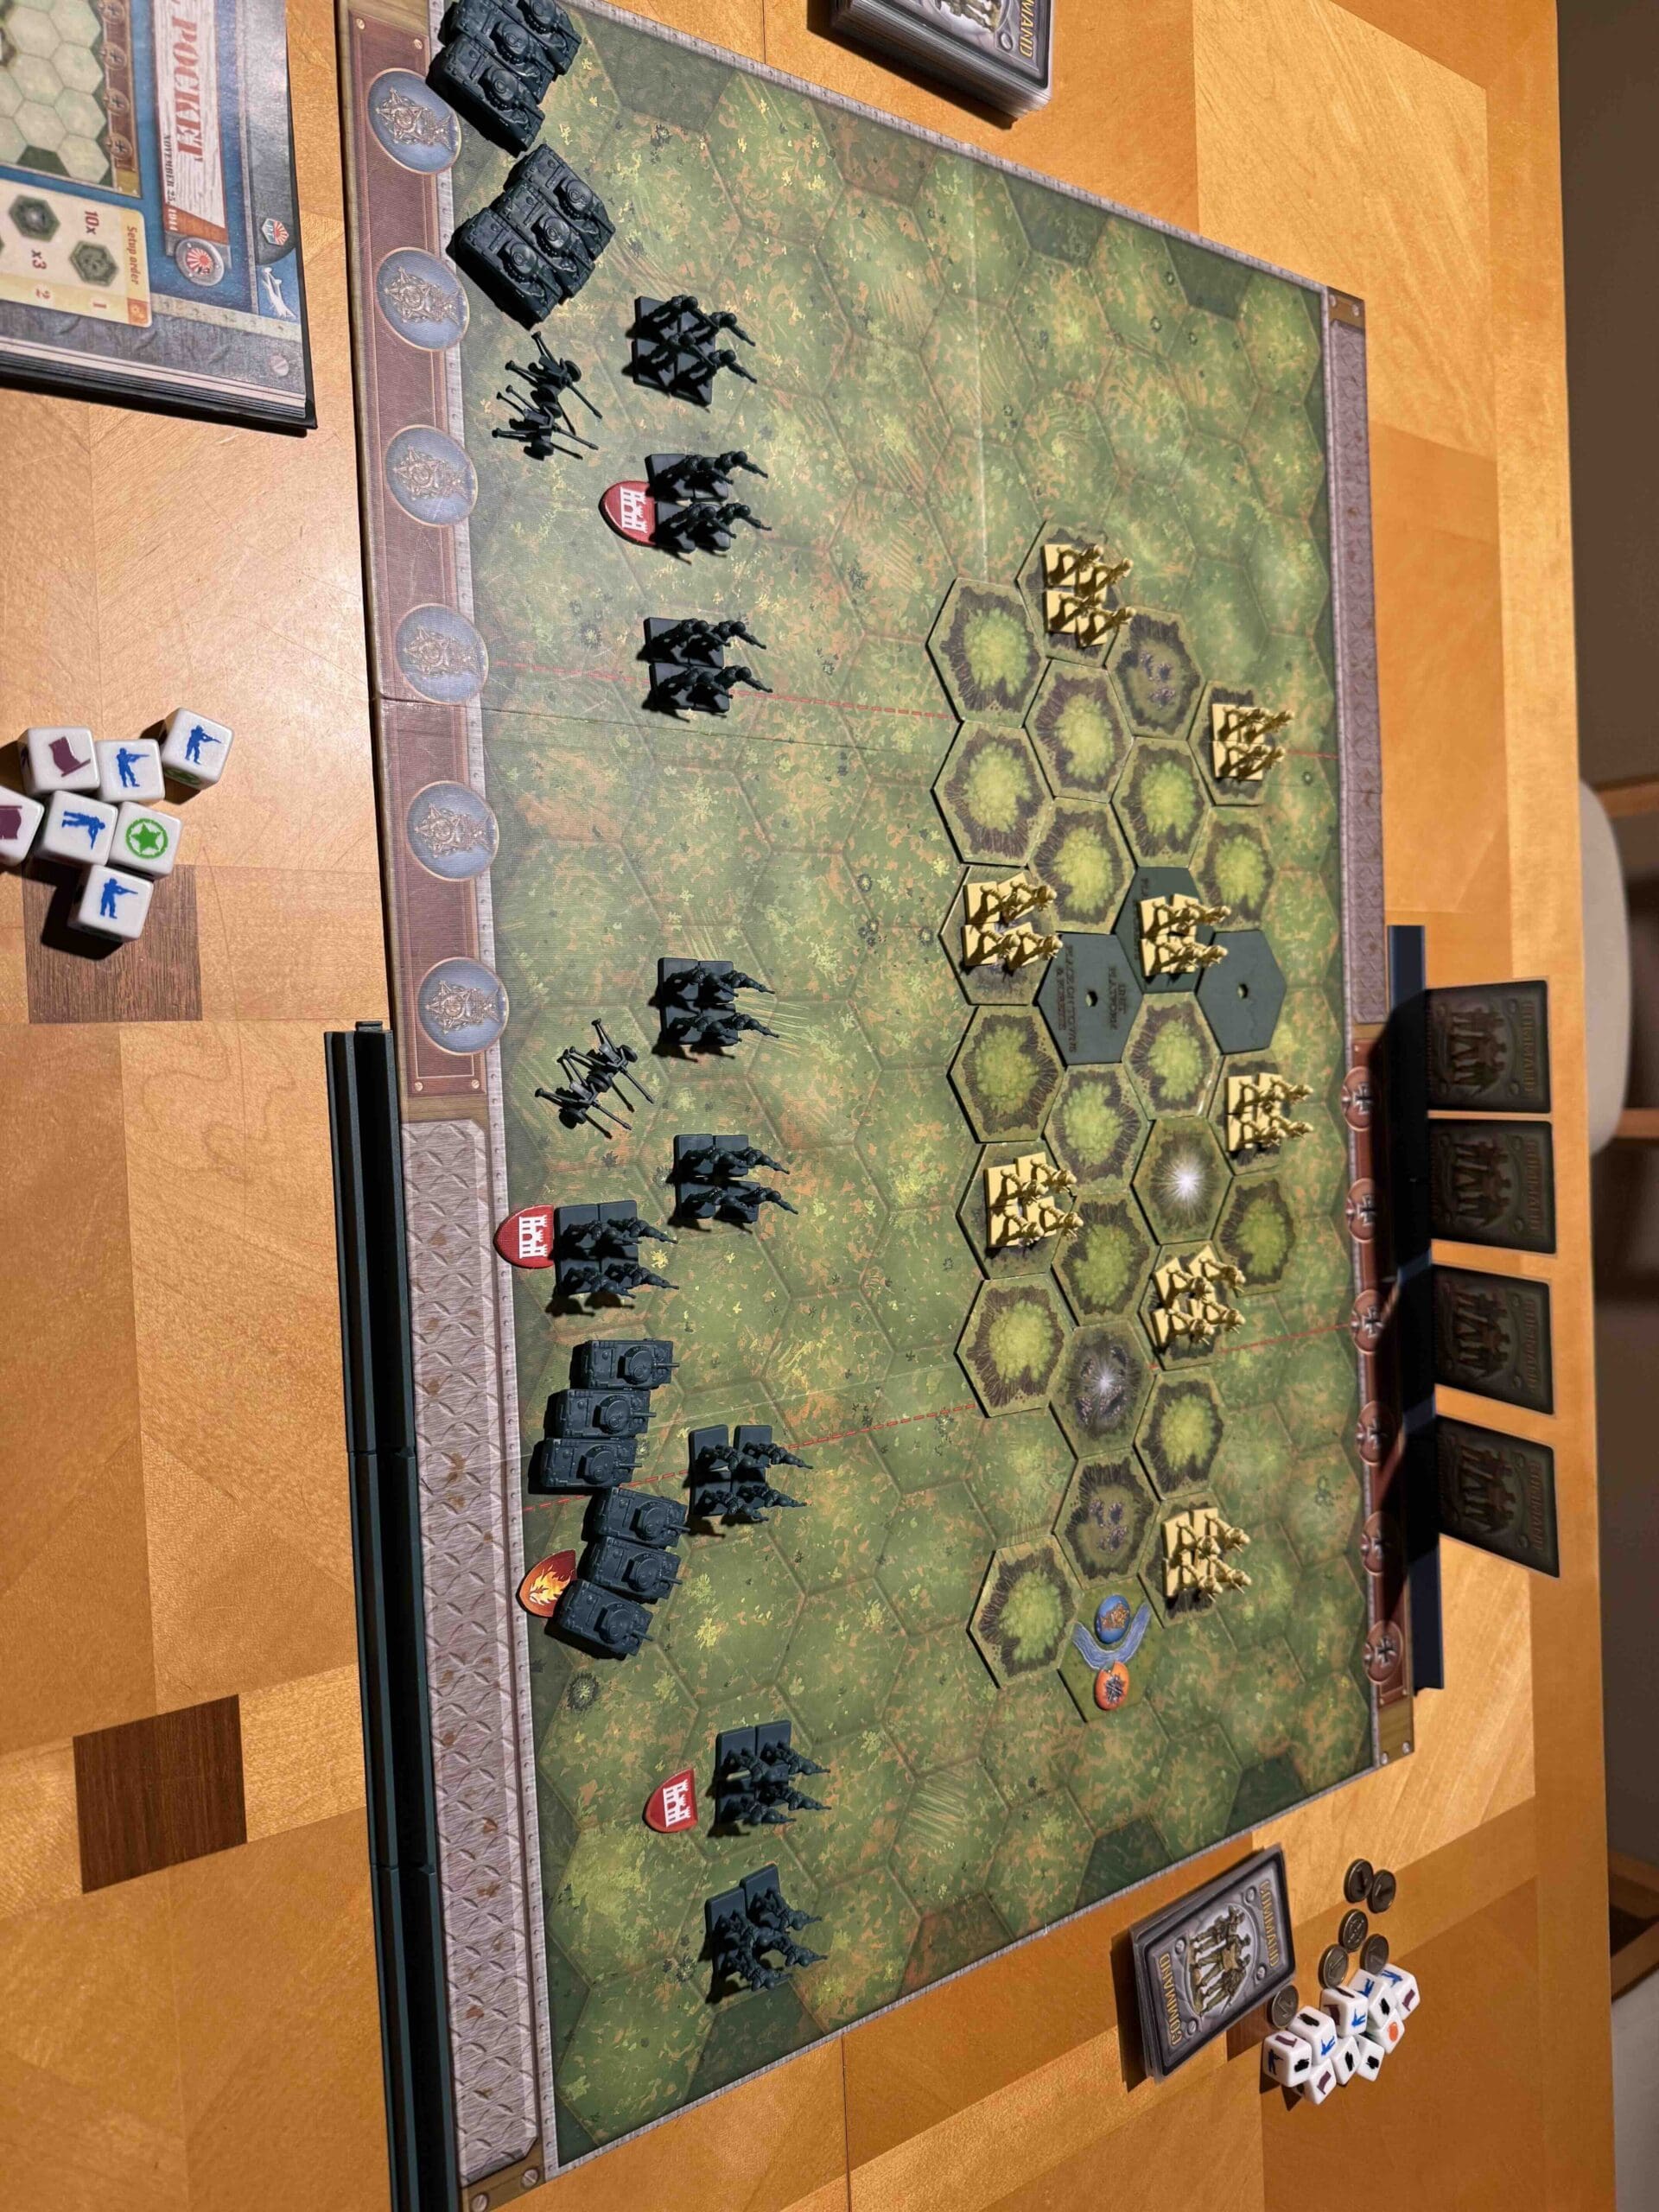
This is an Overlord game, so make use of the Jungle Command cards, two per side.
Objectives:
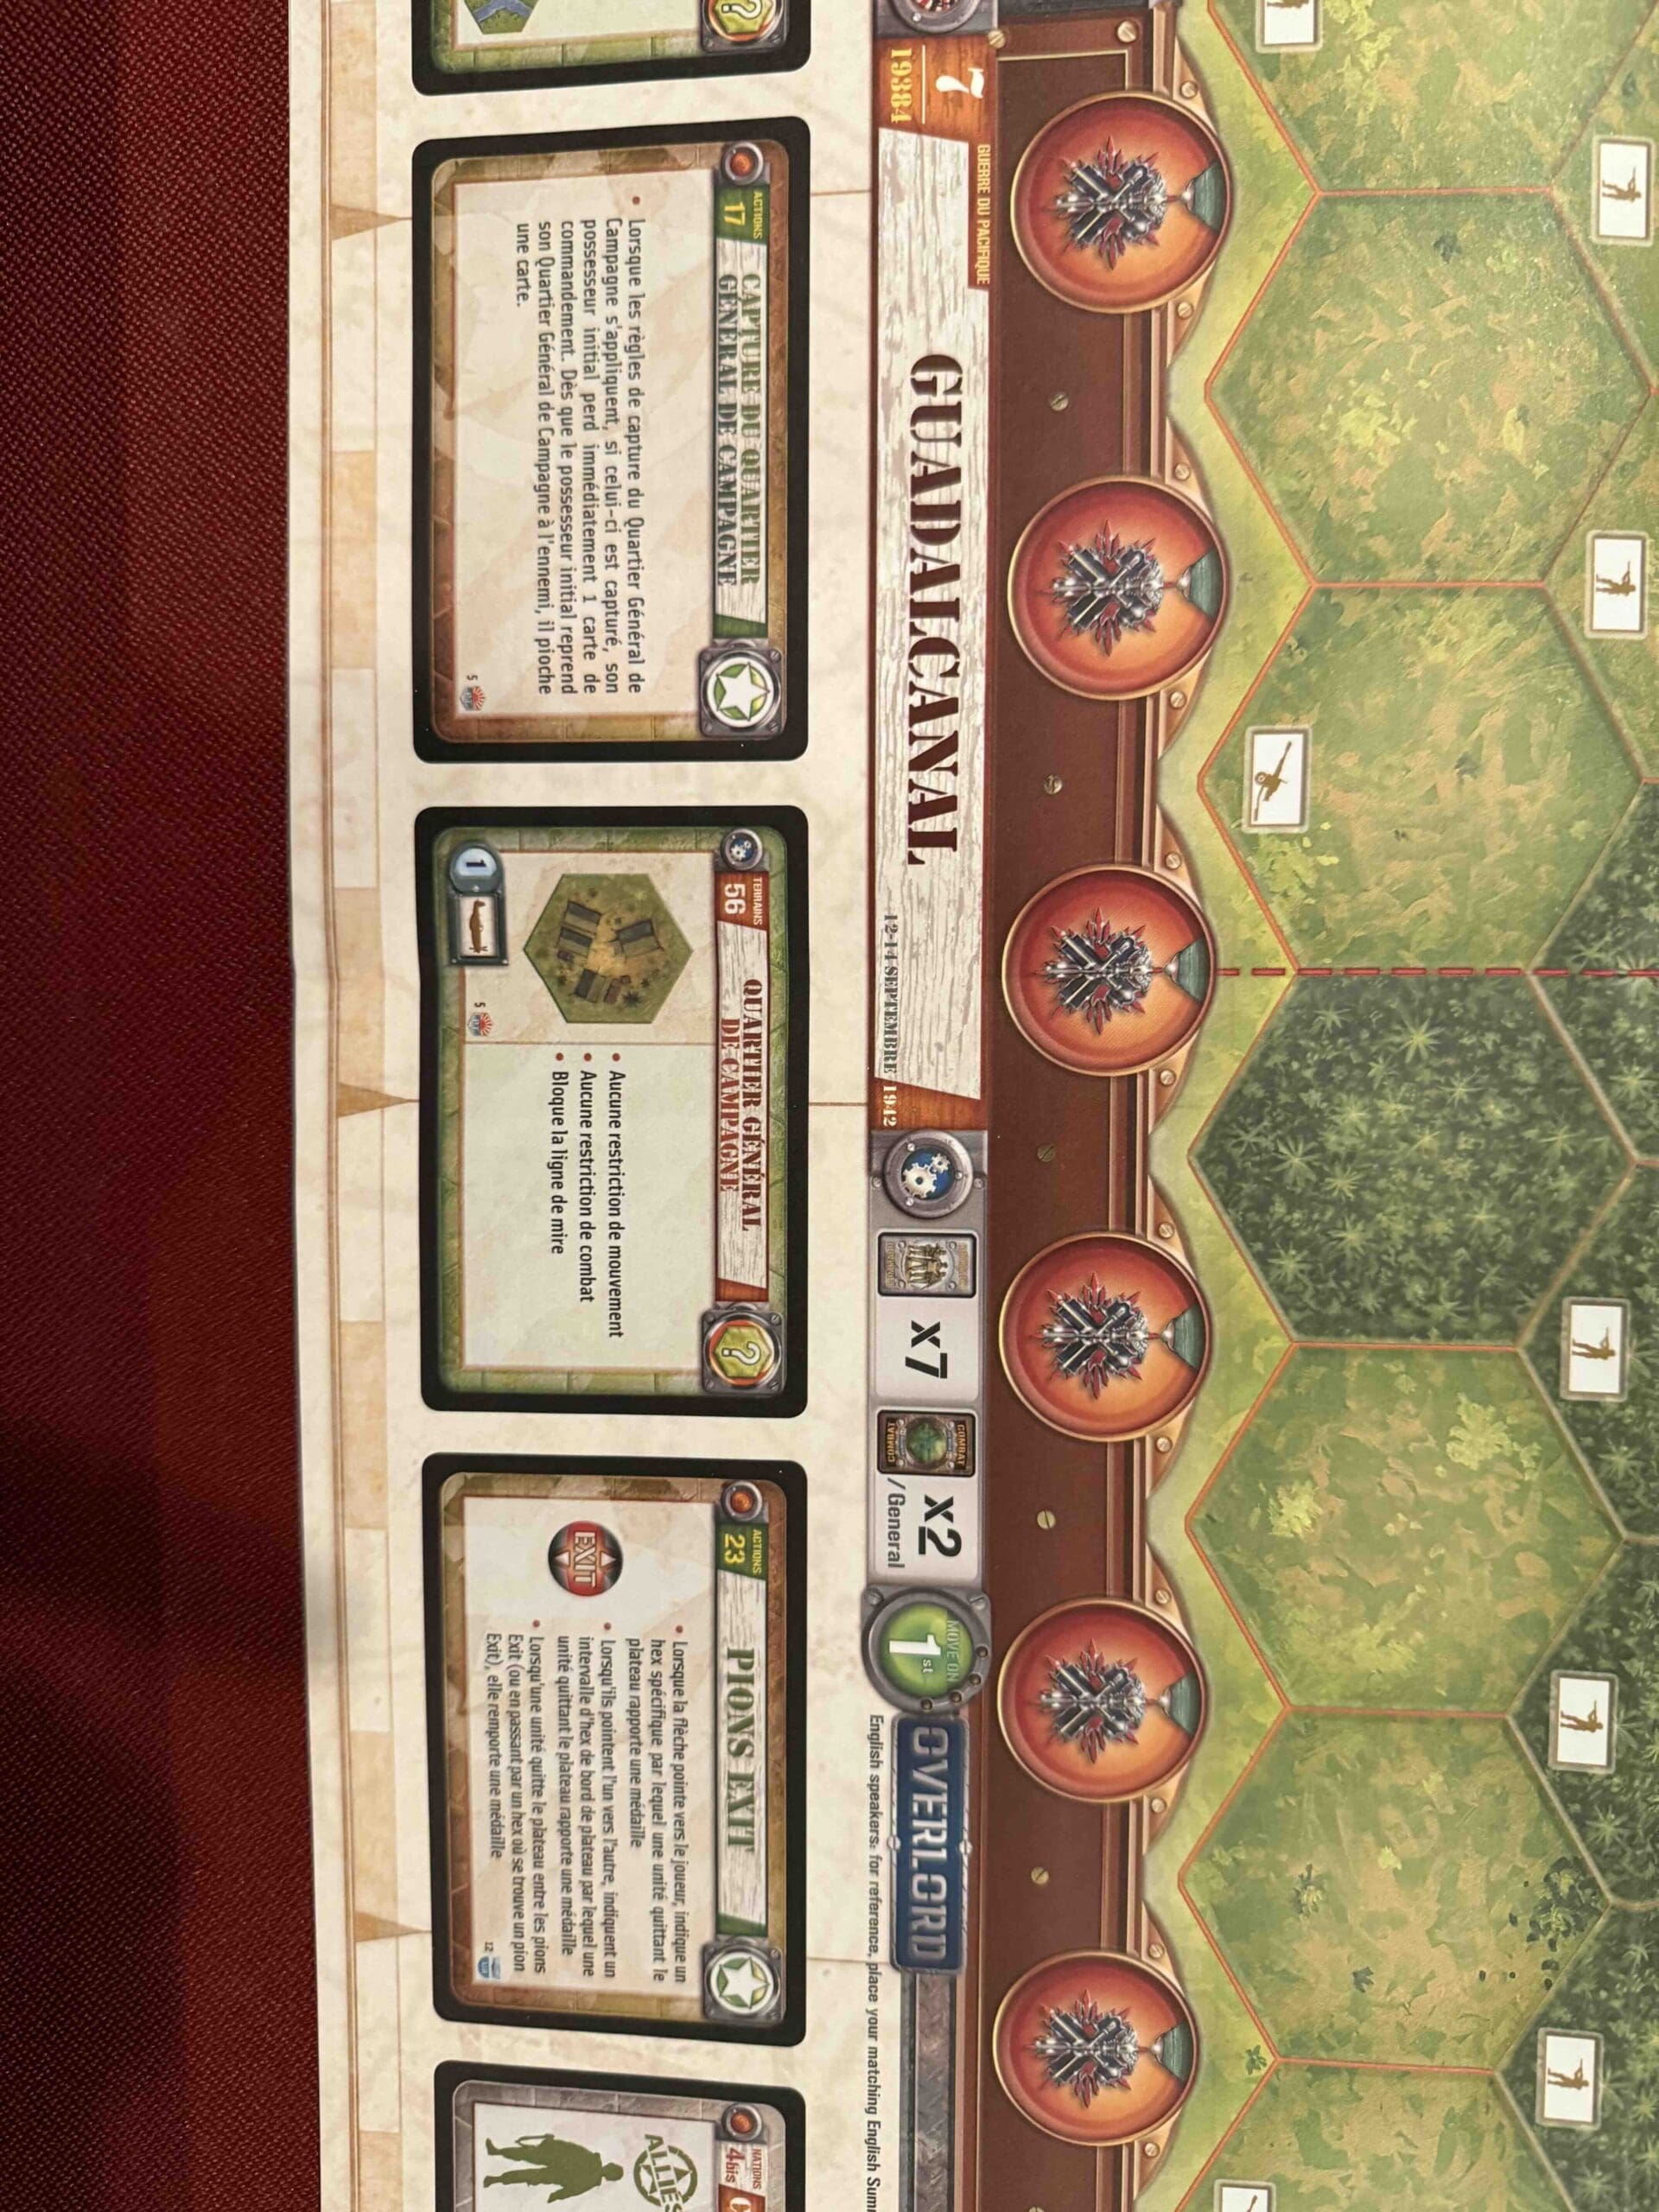
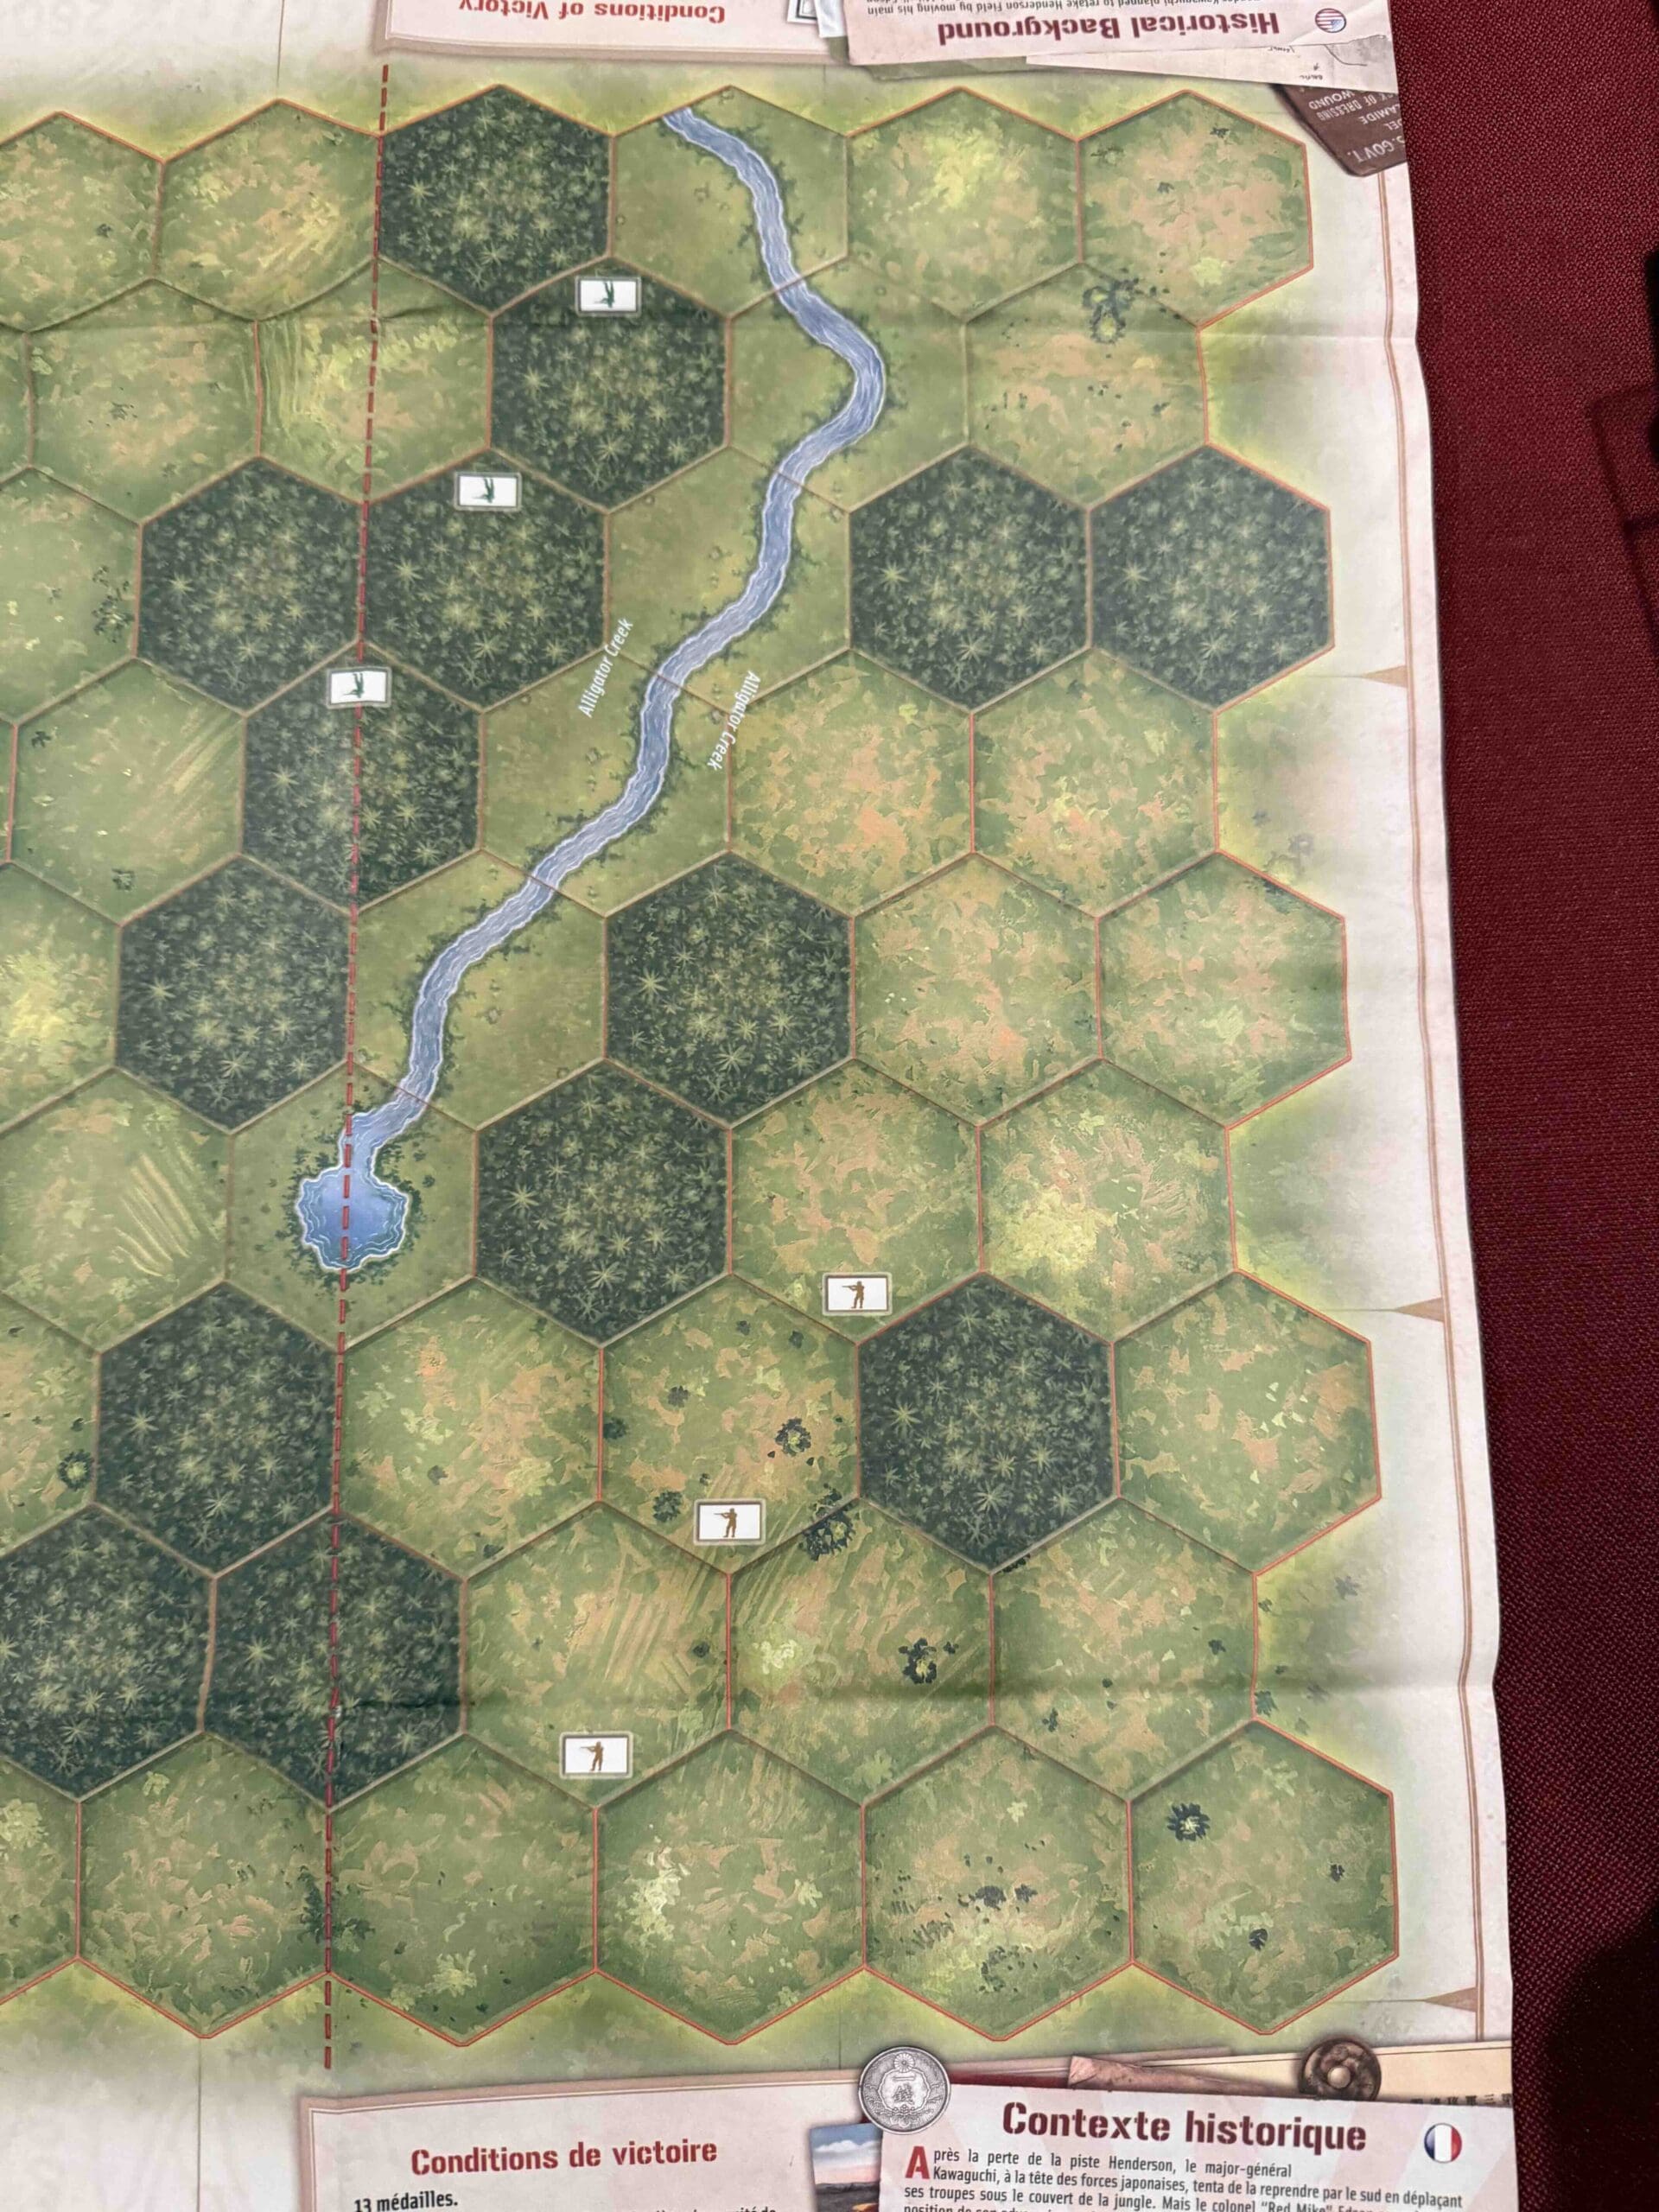
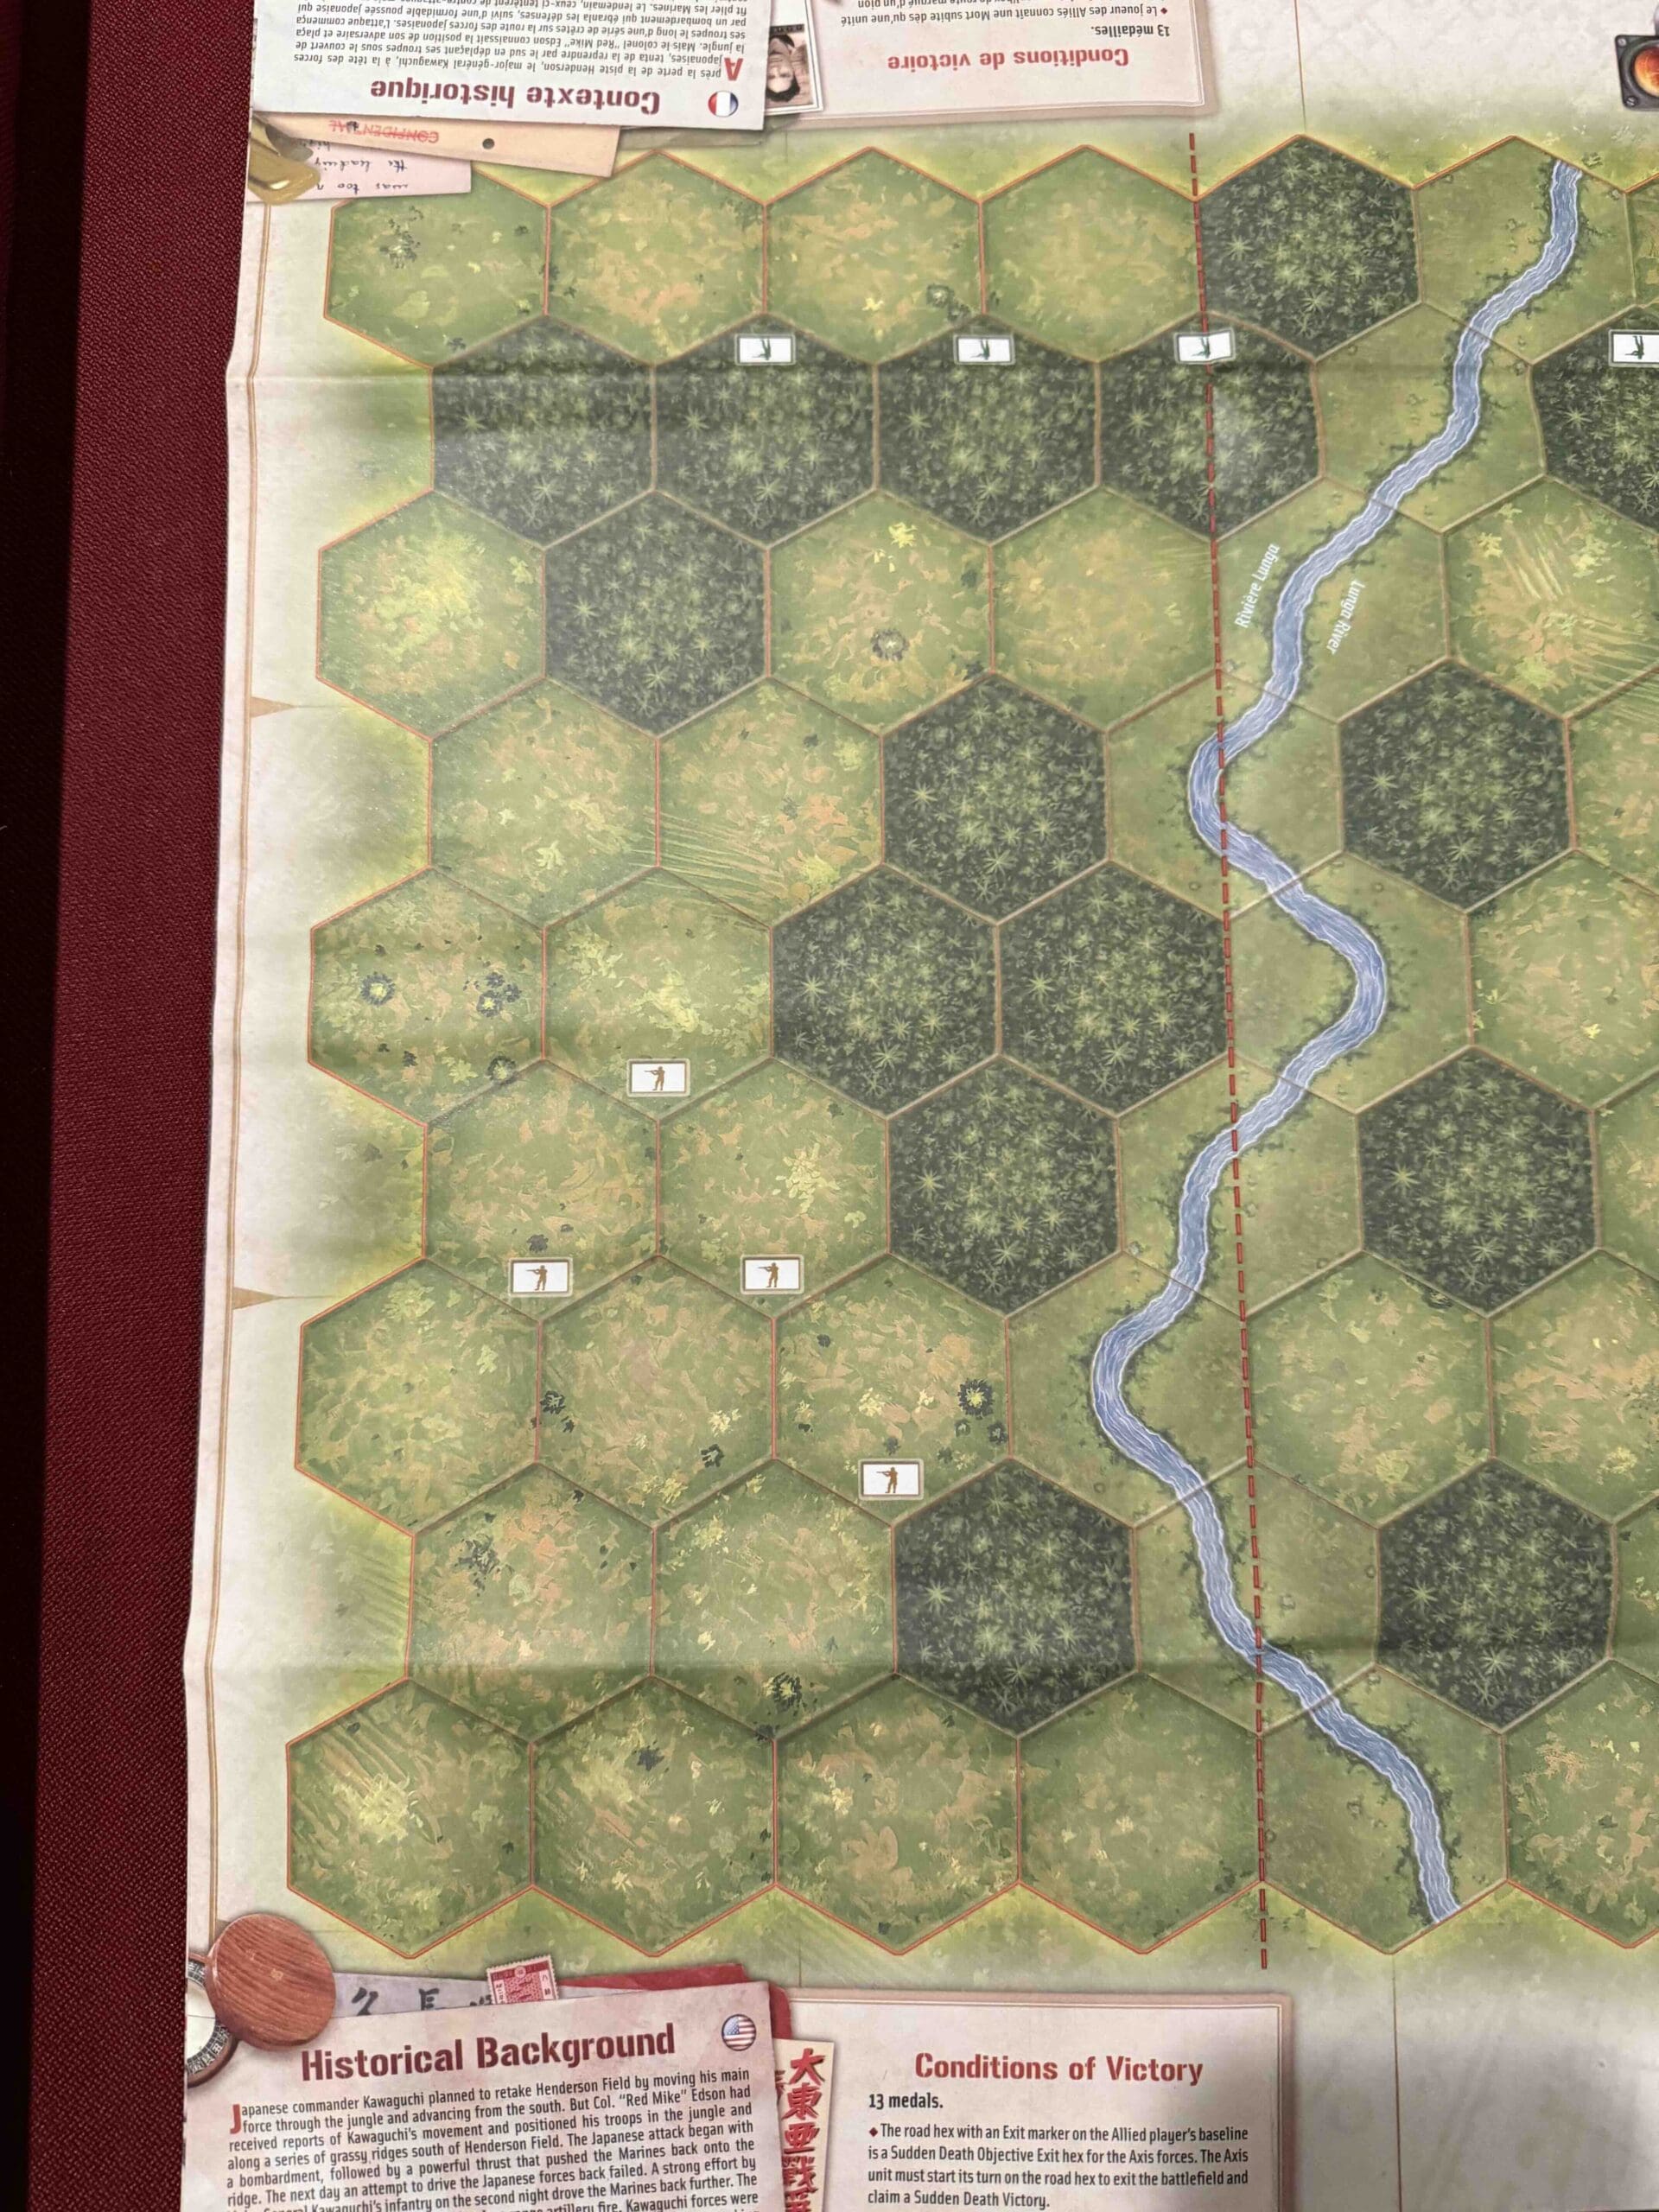
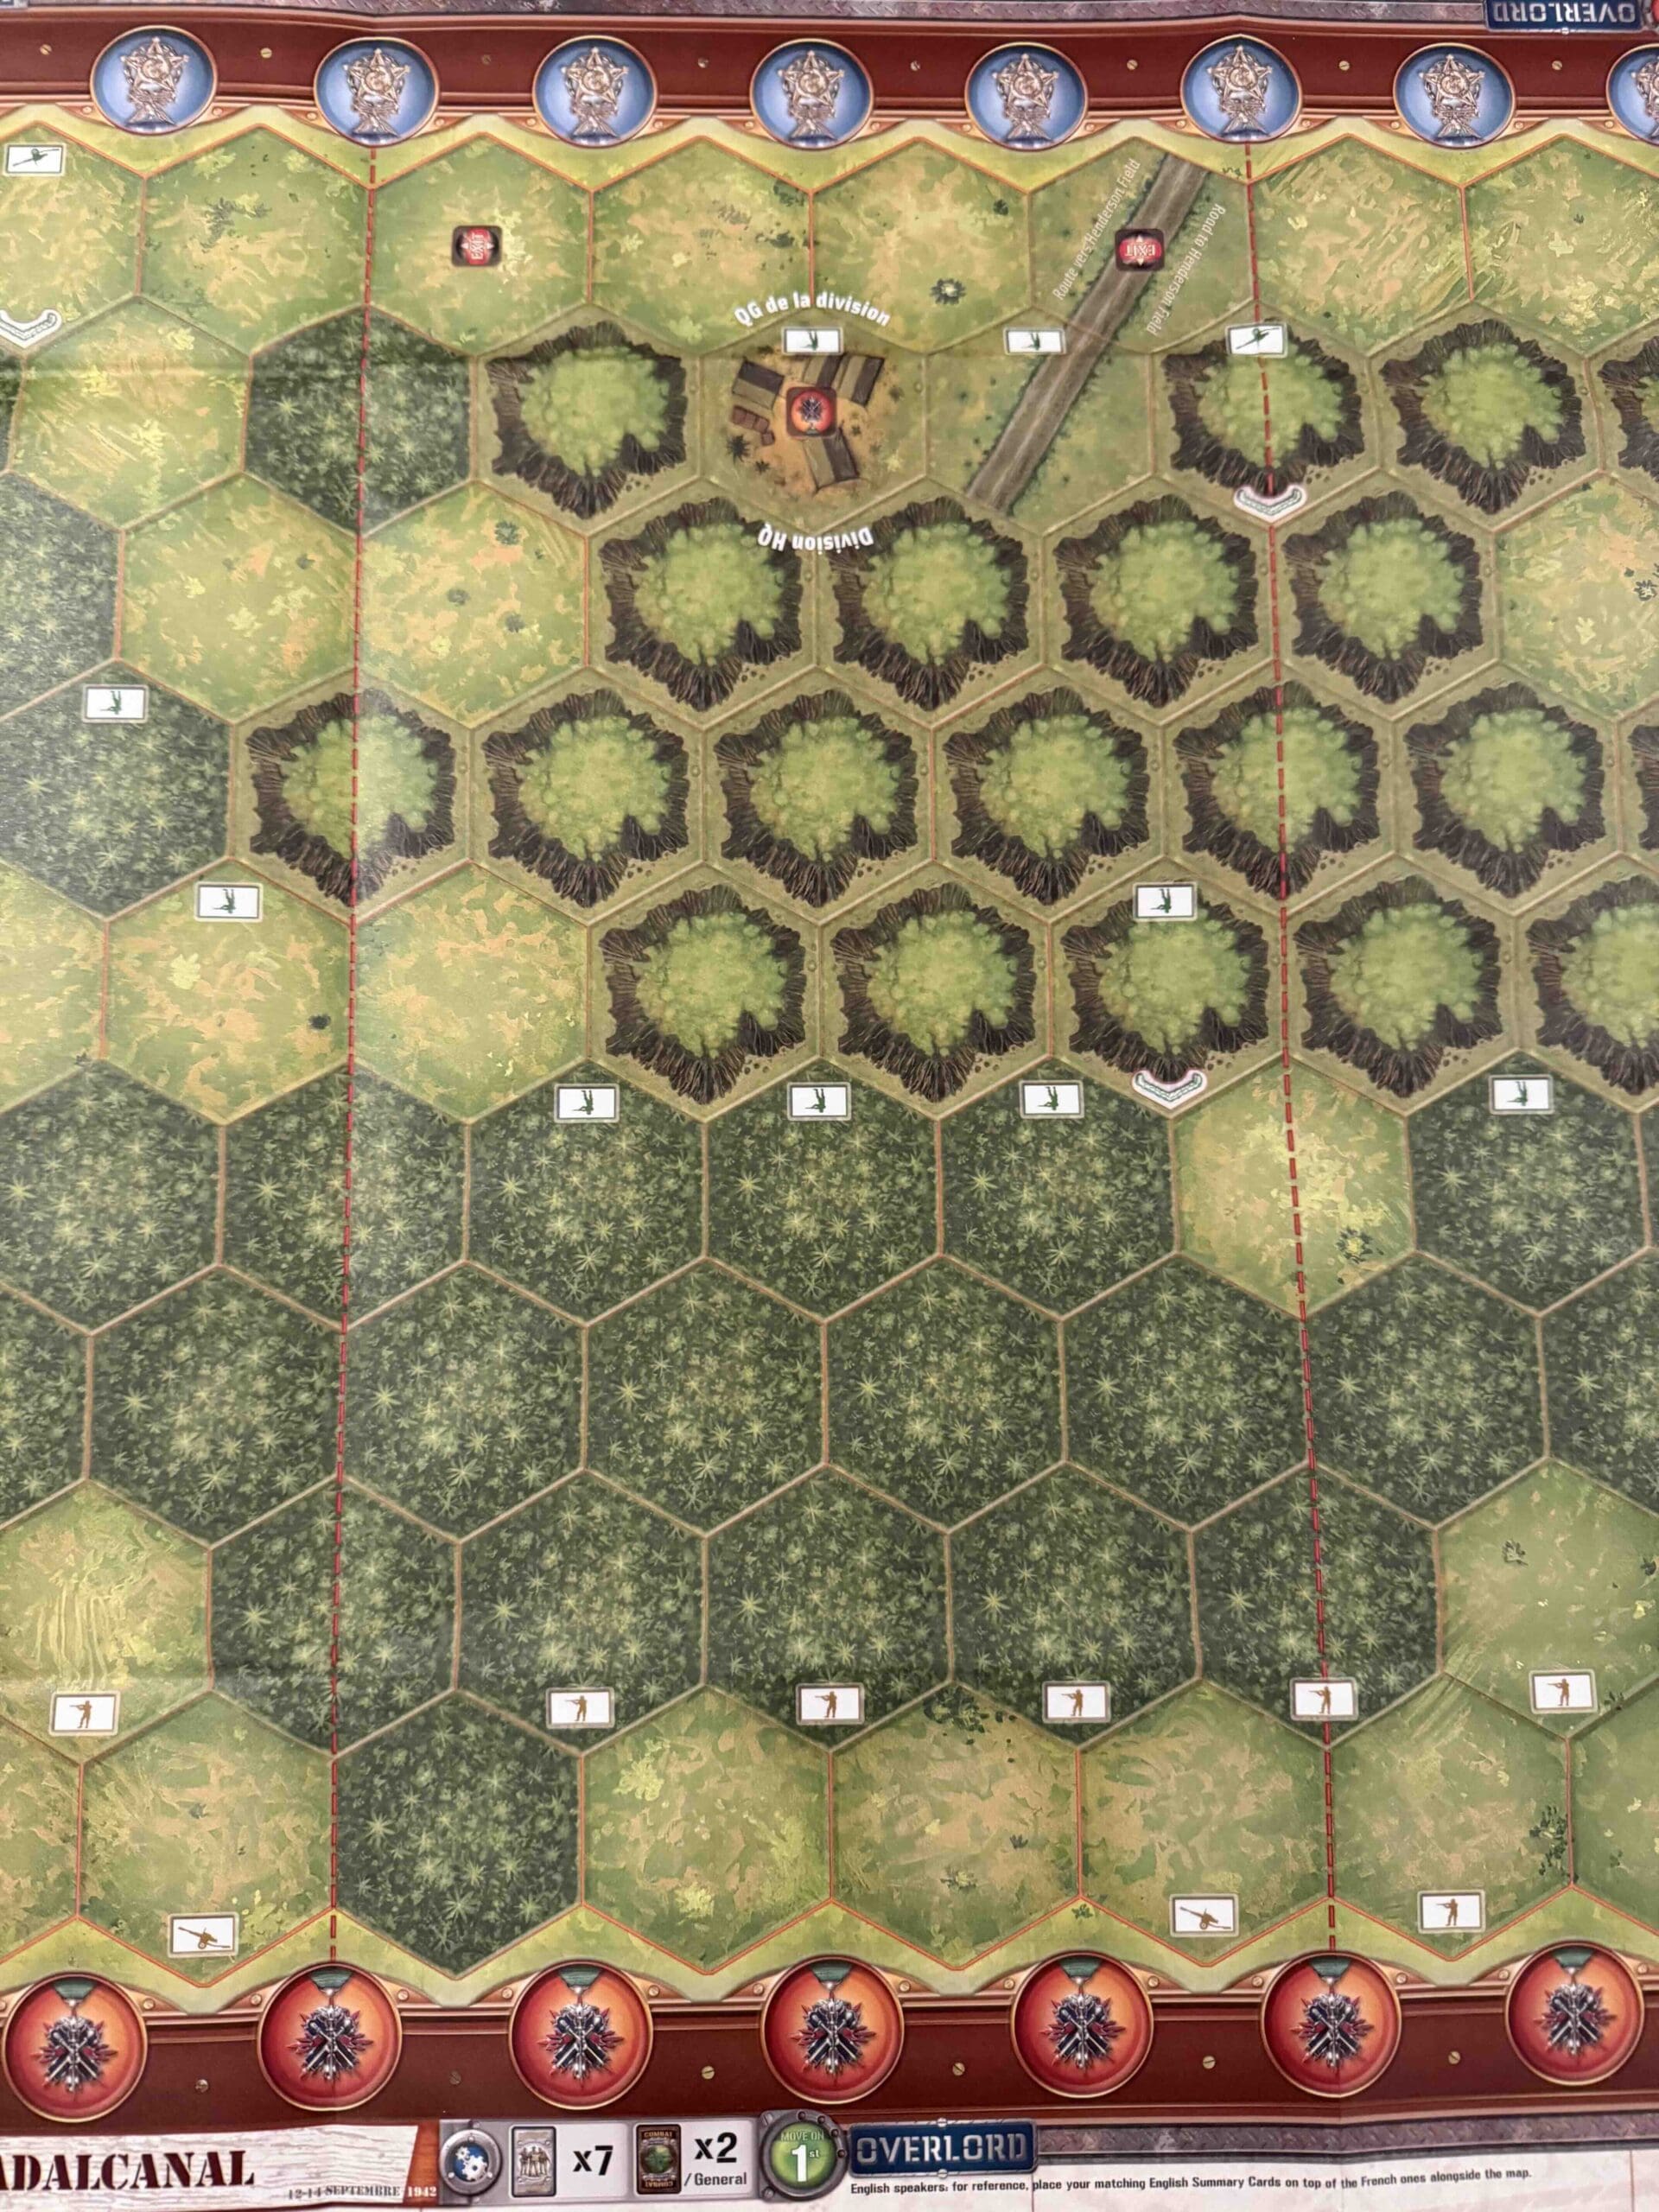
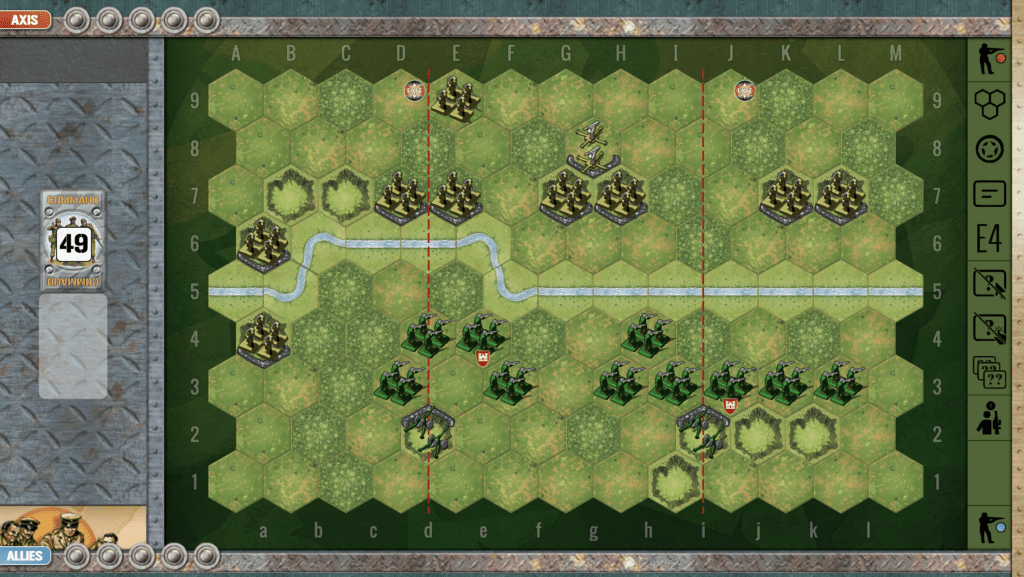
12 Medals including Territorial Control, and Exit Row medals and a sudden death hex all for the Japanese.
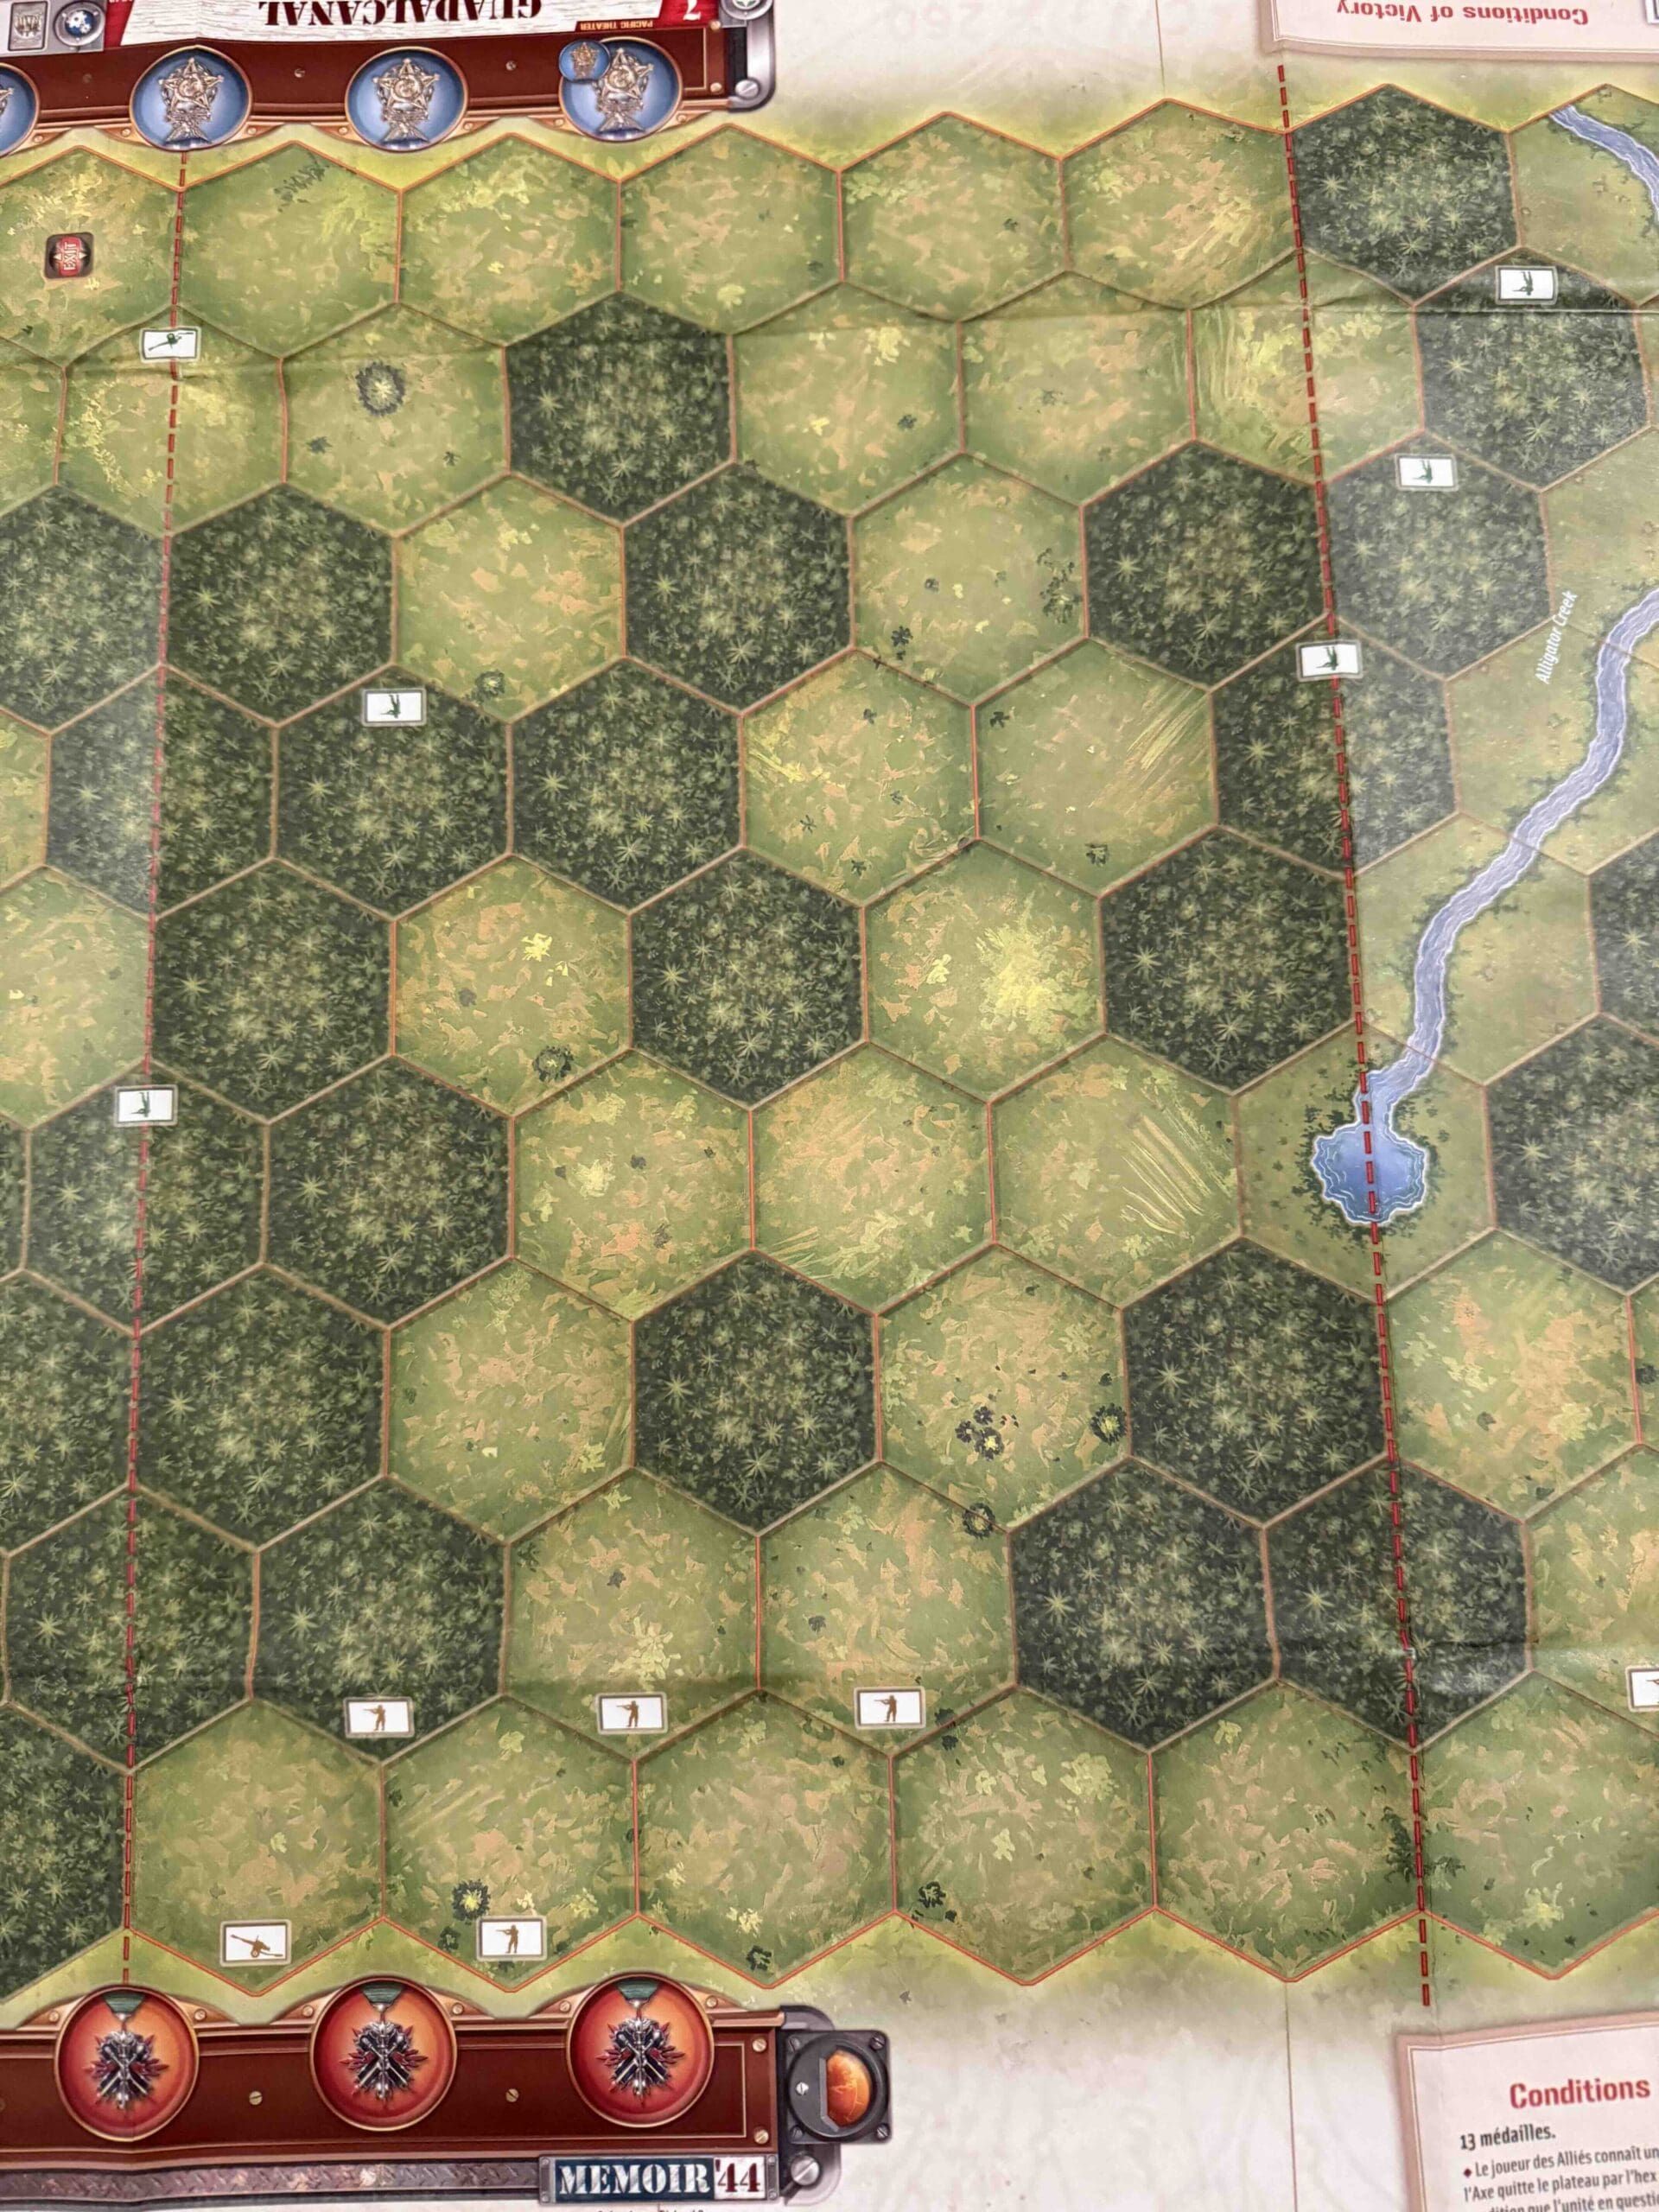
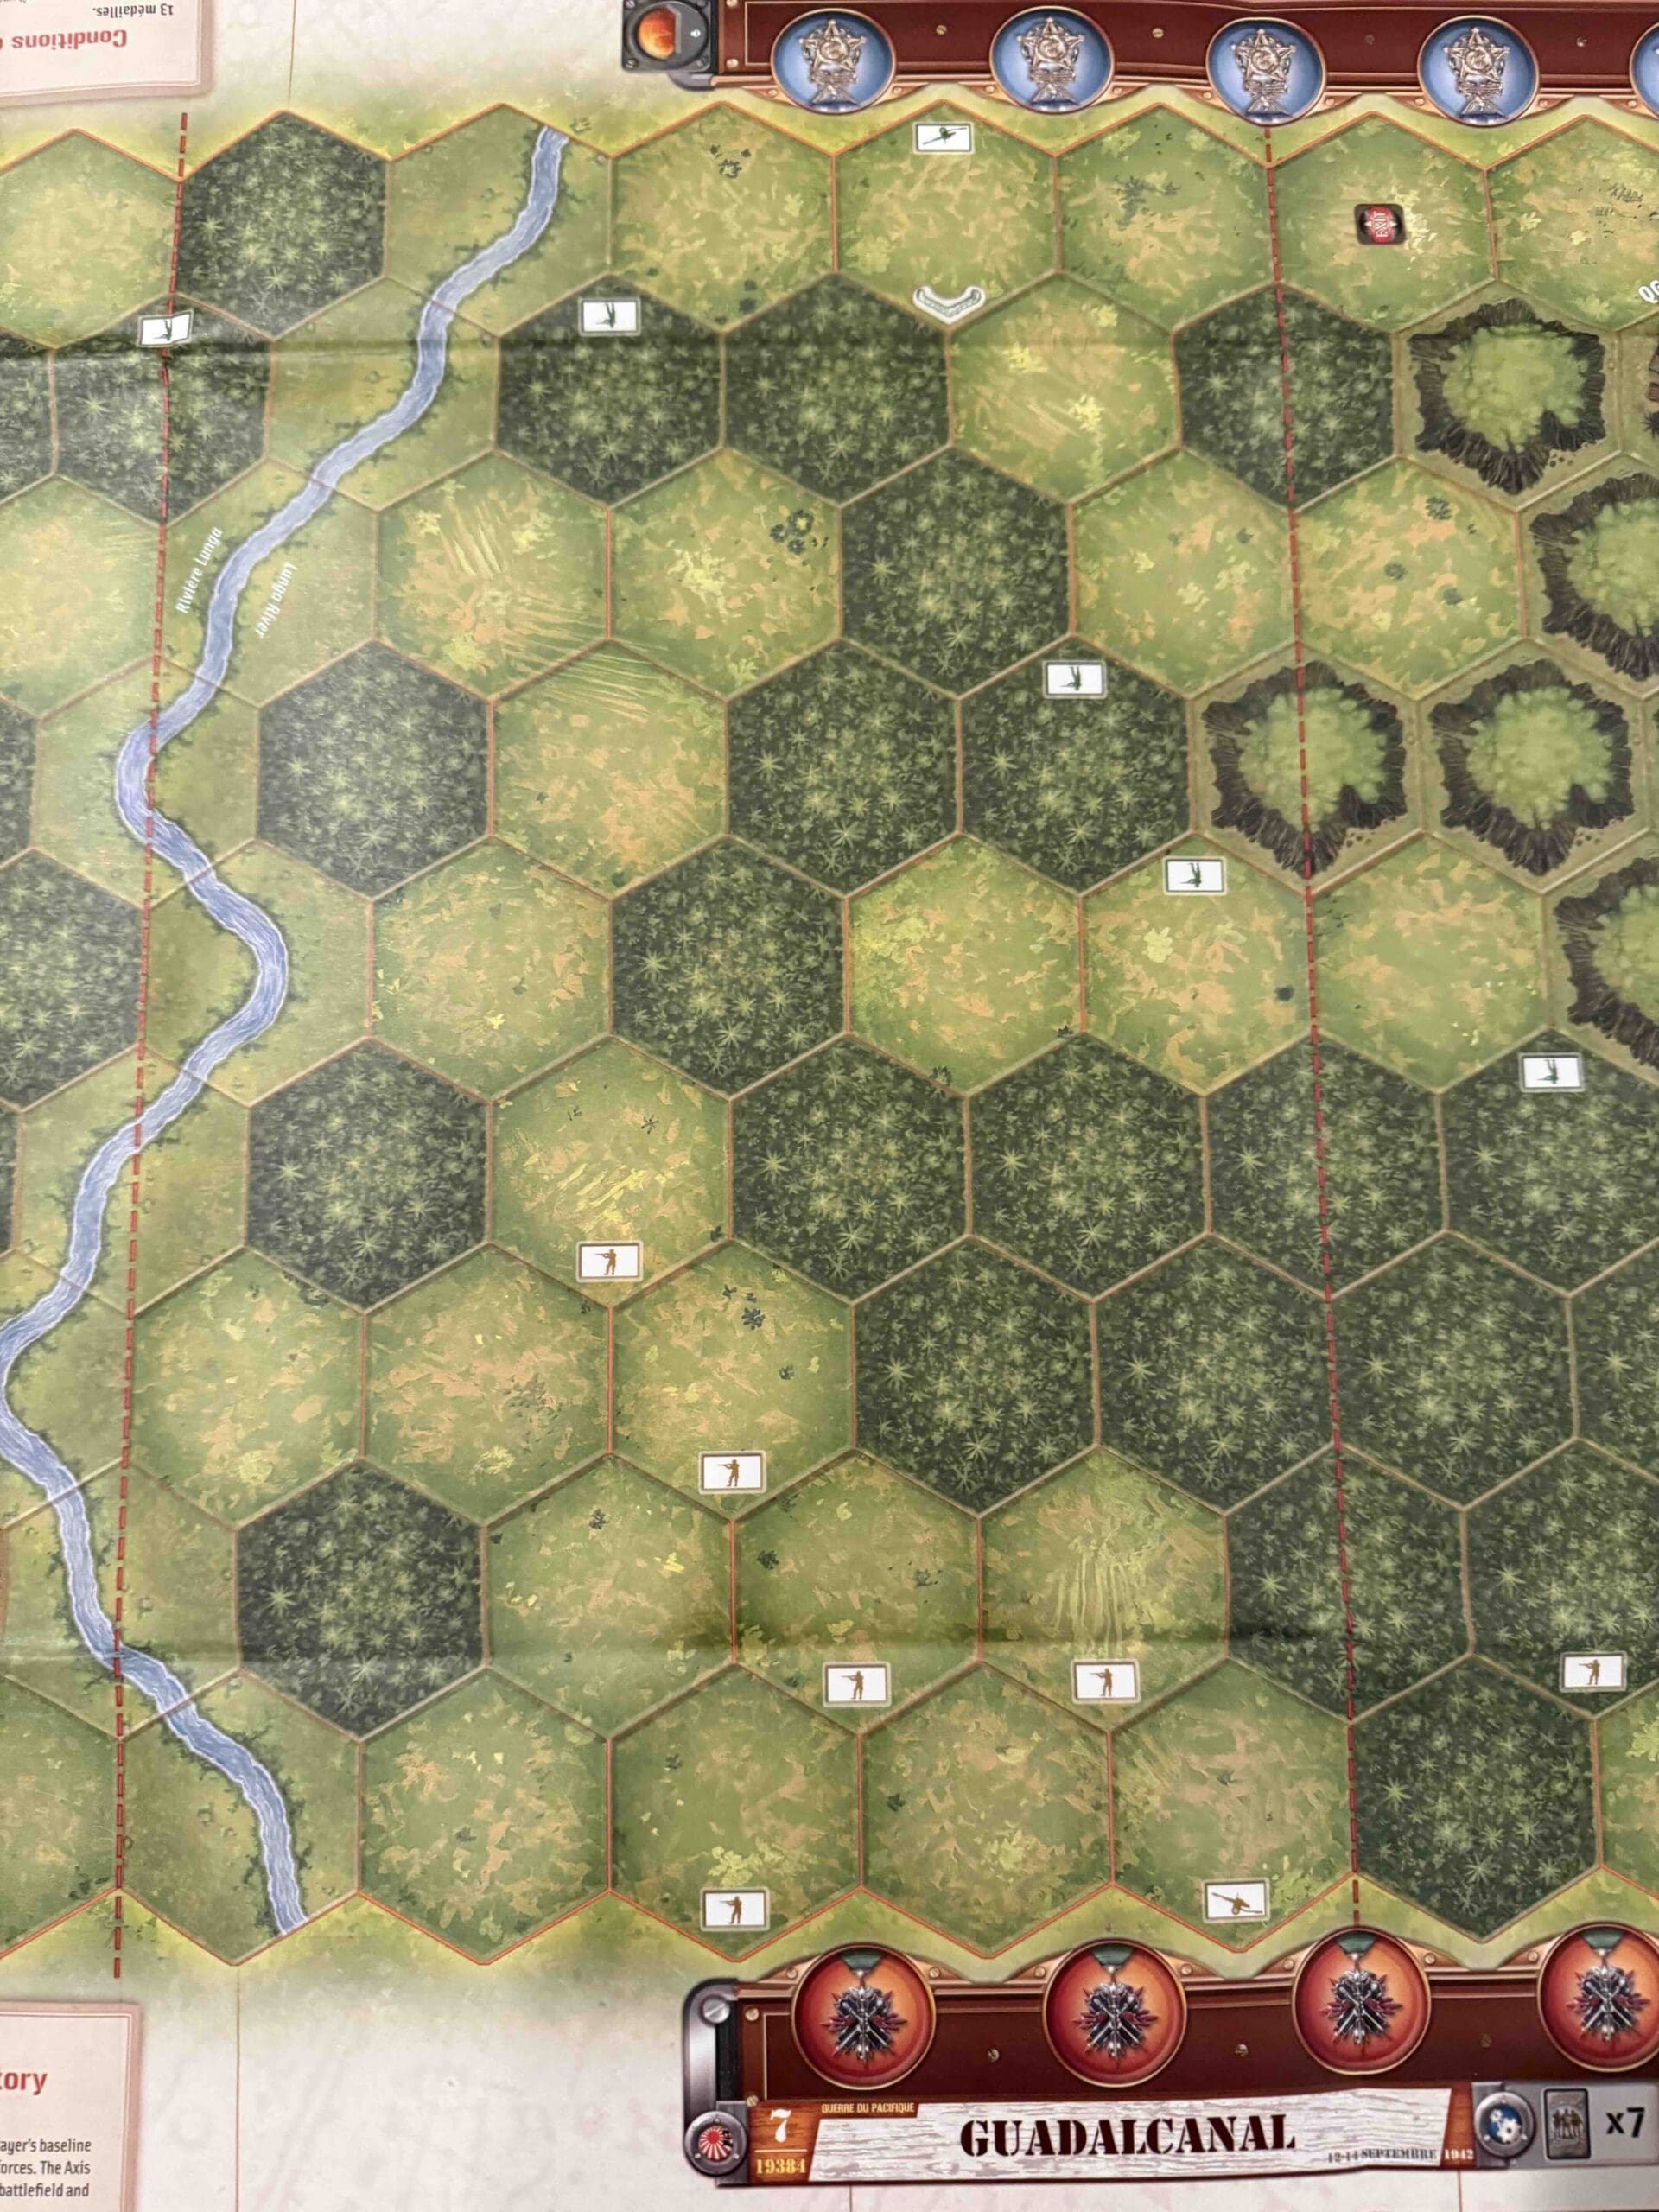
Terrain:
Beach and jungle terrain, and mountains, and an airfield.
Troops:
Allies – Infantry, Armor, Destroyers
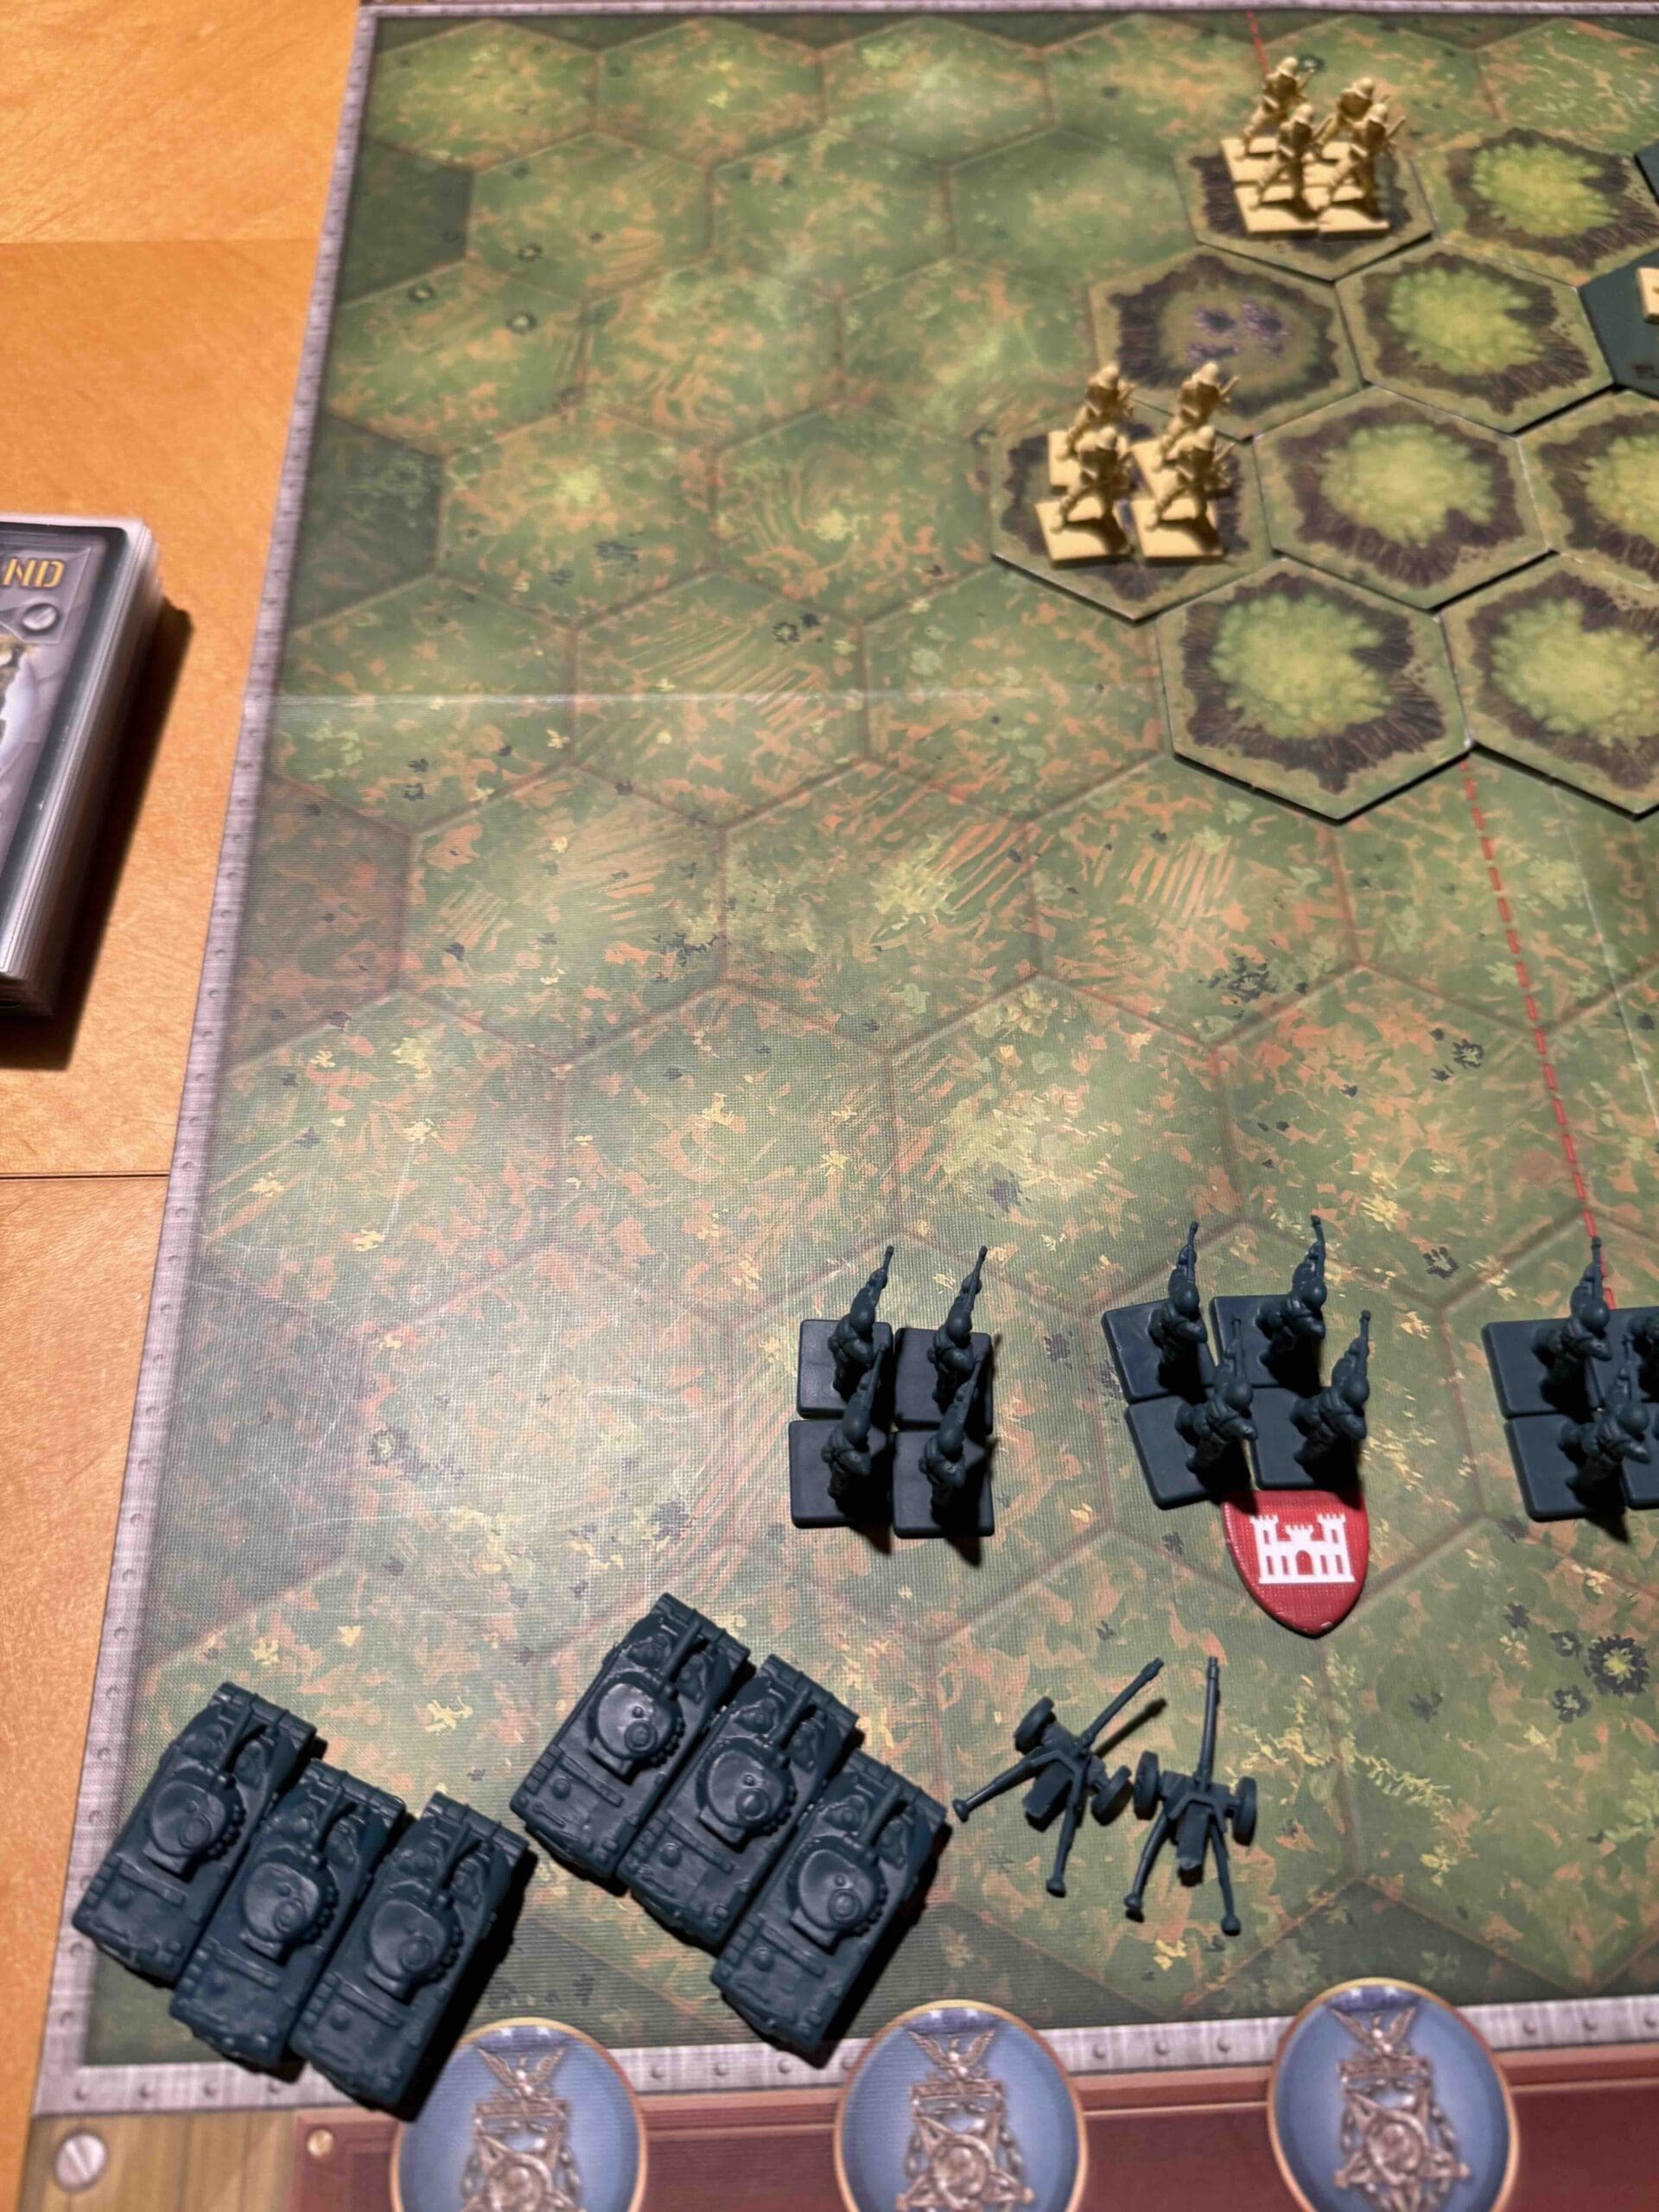
Axis – Infantry, Armor, Artillery
Special Rules:
1. Majority Temporary Territorial Control – whomever controls 3 of the 4 buildings of the airfield
2. Exit Row Medals – to any Marine forces that exit
3. Imperial Japanese Army Command rules – Seishin Kyoiku Doctrine (SKD), Yamato Dashi Concept (No Surrender), Banzai War Cry
4. US Marine Corps rules – Gung Ho! rule – activate one extra unit more than the card played indicates
5. Airfield rules – no movement restrictions, no combat restrictions, no line of site restrictions
6. Jungles – Movement, must stop; Battle, only if starting in, or adjacent to hex; blocks Line of Sight;
7. Minefields,
8. Marshes,
9. Mountain terrain – only Infantry may move onto Mountains; Battle, up the mountain reduces dice by two; blocks Line of Site
10. Destroyers – attacks at 3,3,2,2,1,1,1,1

🔥 Winning as Allies
1. The Marines should avoid the Japanese up in the mountains on their left flank. There is little to be gained in that sector. Instead direct your forces at an angle towards the center, to bring pressure to bear towards the airfield.
2. The two Exit hexes for the Marines are an excellent and achievable goal. Work your way through the jungle and send some of our boys home to safety!
3. You have a warship at your disposal on your left flank. Use it at every opportunity to degrade the enemy forces. It is close enough to the center, that you can provide some good support for the forces fighting on the center beach.
4. The Marines are able to use their Gung Ho! ability to command one additional unit – but only in one section at a time. So the Command-In-Chief (CIC) should decide which sector requires the additional unit to be ordered, to either shore up a section that needs additional defense, or to enhance an attack with one additional unit to command.
5. You start the battle with three Engineer units. Get them off the beach and into the jungle as soon as possible. They will be able to overcome the jungle terrain protections, ignoring them at Close Assault, and being able to roll three dice for each attack. This will help to quickly blunt the Japanese SKD abilities.
BIG PICTURE STRATEGY FOR BOTH SIDES:
1. Because this is an Overlord game, hand management becomes critical. At the start of the game, both sides have plenty of cards to fight with. The Allies get 11 cards, and the Axis get 8. But because they can spend up to three cards per turn, and only get replenished at the rate of 2 cards per turn, each side will begin to run out of playable cards, about half-way through the game, and will have to resort to Initiative Rolls for one of their Field Commanders.
2. The center two sections are where most of the action is going to take place. As the Marines push up toward the Airfield, and the Japanese bring their Armor out from behind the mountains, they will all converge for an awesome bloodbath on the central beach.
3. This is a long scenario with 13 Victory Points. This means strategic hits, and good defensive moves, so that you are attacking the enemy from places of protection, will slowly build up to a successful attack, unit by unit. This scenario is not won in a single decisive attack. You will need to use your forces everywhere for a total war attack methodology.
4. This is an Overlord game, so be sure to understand the rules for how the Commander-In-Chief (CIC) distributes cards, and who is authorized to attack in which sections. Clarify before the game starts, any special rules for how to apply multi-sectional cards, and Tactic cards. The official Days of Wonder Overlord rules can be found here on the General Howitzer site.

🔥 Winning as Axis
1. You have a number of powerful Armor which are capable of doing great damage to the enemy on the beach. But they are blocked in by your Infantry. So get the Infantry moved out of the way, and take a couple of turns to attack the unprotected and helpless forces on the beach.
2. Keep a few forces close to the Airfield, which is a Permanent Majority Medal Objective. If the enemy controls three of the four building hexes at the end of their turn, this will earn a Permanent Medal Objective.
3. Also keep a few forces close to the Exit hexes to prevent the enemy from escaping, and earning medals.
4. Because of the Seishin Kyoiku Doctrine (SKD), your full force Infantry units get to roll one extra dice in Close Assault attacks. If you move your forces quickly forward onto the beach, you can capture the Marines at their weakest, and with your extra dice rolls, either kill them, or push them back into the sea for retreat kills. (Although it should be noted that historically, the Japanese attacked the beach from a distance and waited for the Marines to come to them, all the while inflicting heavy losses upon them for each territorial gain.)
5. You have two Artillery units which can reach all the way to the beach. Use them at every opportunity to attack the enemy from a distance. Do not move out your forces too early to the beach. Make them come to you, and keep hitting them with the Artillery as they approach.
Author:
Days of Wonder
Link: