General Howitzer’s Field Guide to Memoir 44

A Memoir 44 Strategy & Tactics Community

GENERAL HOWITZER

Scenarios

Explore Memoir ’44 battlefields, maps, and player statistics.

GENERAL HOWITZER

Campaigns

Relive historic campaigns through linked Memoir ’44 battles.

GENERAL HOWITZER

Strategy Tips

Sharpen your tactics and take command of the battlefield.

GENERAL HOWITZER

Field Manuals

Explore field guides and manuals for your next battle.

GENERAL HOWITZER

Tournaments

Find Memoir ’44 tournaments, events, and fellow commanders.

GENERAL HOWITZER

My War Room

Track your battles, campaigns, achievements, and next mission.

Securing the Flank

Securing the Flank
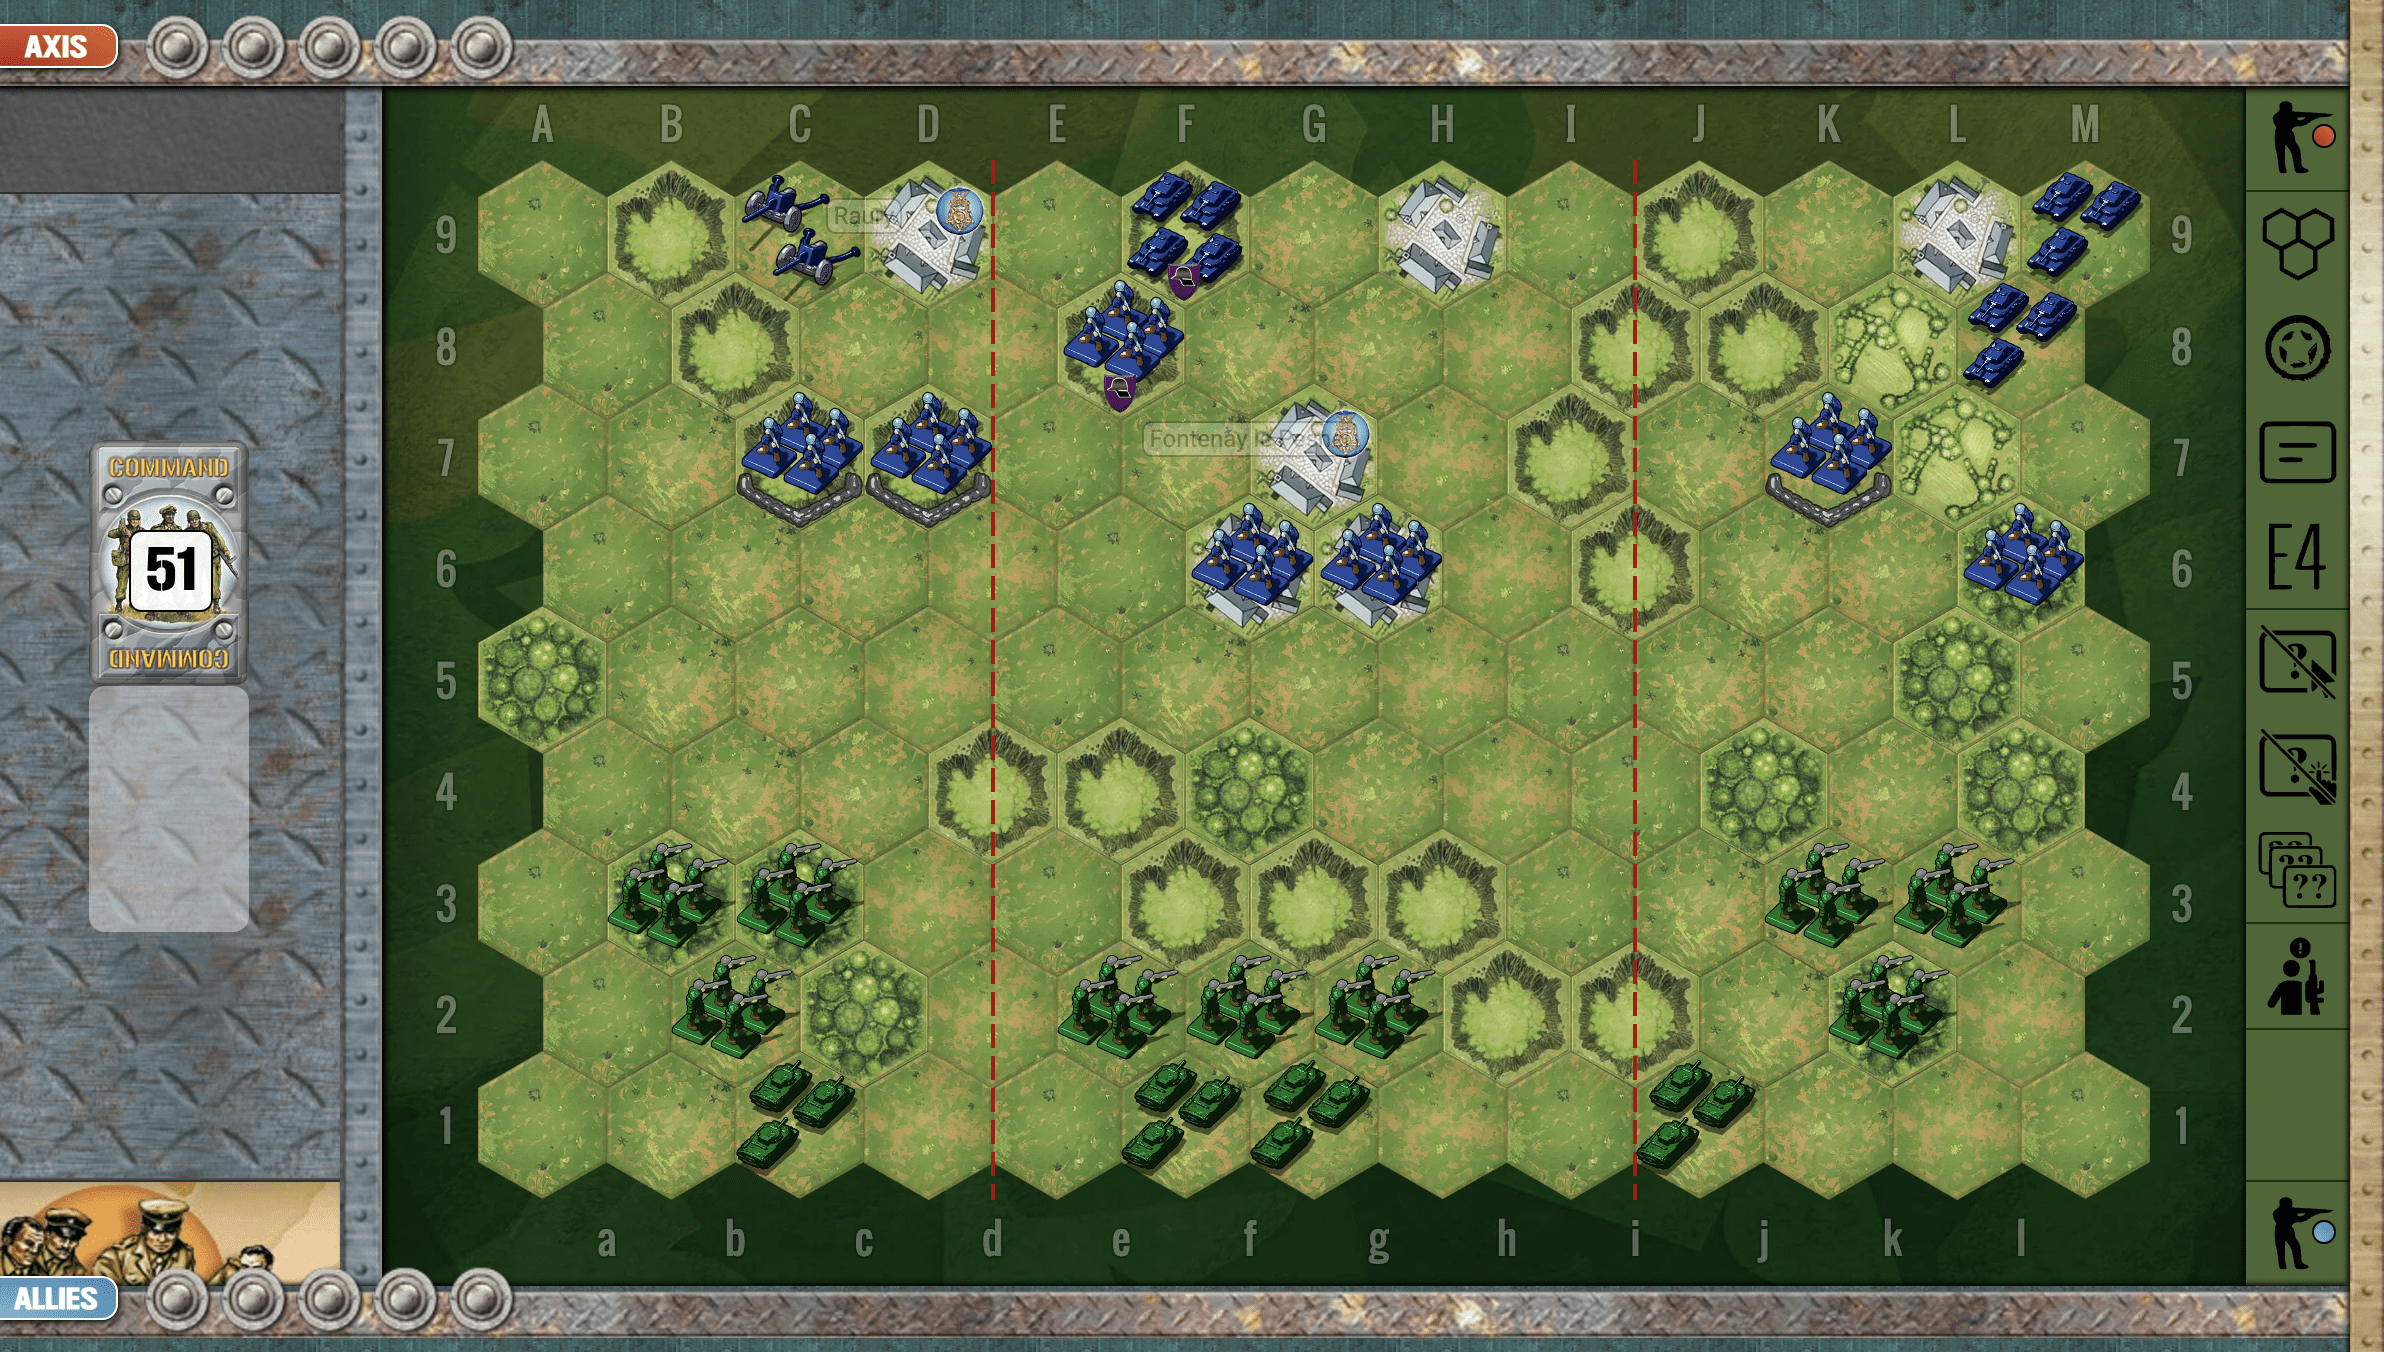
Securing the Flank

The battle “Securing the Flank” near Caen, France, was part of the Allied efforts during the Normandy Campaign of World War II in the summer of 1944. Following the D-Day landings, the Allies sought to expand their beachheads and secure strategic positions to enable further advances into German-occupied France.  The fighting around Caen was marked by intense battles in open fields, villages, and bocage (hedgerow) terrain, which slowed Allied progress and caused heavy casualties. Despite these challenges, the Allies ultimately succeeded in securing the area, paving the way for the liberation of Normandy and the advance toward Paris.

5 VP’s

Card Balance:

Allies – 4

Axis – 5

Complexity:

3

Conditions: 

Countryside

Location:

France

Year:

1944

Theater:

Western

Campaign:

Normandy Invasion

Summary:

Objectives:

5 VP’s, including two temporary Medal Objectives

Battlefield: 

The center of this battlefield has a range of hills facing a three hex town with a Objective medal for the Allies. Control of the center will determine success in this scenario.

Troops:

Allies – 9 Infantry, 4 Armor

Axis – 7 Infantry, 3 Armor, 1 Artillery

🔥 Winning as Allies

1.  The Allies have a temporary medal objective in the town of Fontenay le Pesnel in the top center section.  So grab the hilly ridge just below it, to launch the attack. As you attack the Axis forces around the battle field, you can continue to push up into the city, forcing the enemy to defend on multiple fronts.

2.  Your two infantry in the right section are open and undefended. Get them into the forest hexes as soon as you can.  The Axis have a couple of armor stuck behind hedgerows so you have a bit of time to secure your forces.

3.  Because of the enemy artillery, the left flank is your weak flank. The large open countryside is dangerous territory for your troops to try to cross with the enemy infantry sandbagged in the woods, combined with the artillery.

🔥 Winning as Axis

1.  Your armor in the lower left flank needs to get into action as soon as possible. It will take one move just to move them into a position where they can respond to enemy threats. Do that at your first opporunity.

2. Once you have your armor in place on the left flank, your next concern is your right flank, which can become overwhelmed if the enemy is aggressive and has the right set of cards.

3.  Move your artillery on your right flank forward when you can.  This will give you 2D attack on the front two hexes of the center hill.  This will mute the Axis attack against your fortified infantry in the center.

4.  Protect the city of Fontenay le Pesnel.  Do not let the enemy troops get close enough to hide in the city.  If they control two hexes, you lose the medal to them.

Author:

Days of Wonder

URL

Place Battle Reports on a scenario page, or specify its scenario name in the shortcode.

Pruzana

Pruzana

Pruzana

The Battle of Pruzana, part of the larger Eastern Front conflicts in World War II, took place in the area around Pruzana (now in Belarus) during Operation Barbarossa, the German invasion of the Soviet Union, in 1941. German forces, advancing rapidly through Soviet-held territory, encountered Soviet resistance in Pruzana as part of the initial Soviet defenses against the Axis invasion.

5 VP’s

Card Balance:

Allies – 3

Axis – 6

Complexity:

2

Conditions:

Countryside

Location:

Russia

Year:

1941

Theater:

Eastern Front

Campaign:

Operation Barbarossa

Codename

Summary:

Objectives:
Five VP’s; no Objective Medals.

Battlefield:
The principle feature of the Pruzana scenario are the two tree lines intersecting the battlefield in both a horizontal and a diagonal pattern, providing great cover for both sides.

Troops:
Russians – 7 Infantry, 3 Armor, including one T-34, 1 Artillery.
Axis – 6 Infantry, 6 Armor, 1 Artillery

🔥 Winning as Allies


1.  The Allies can win this one by staying behind their sandbags and resisting and attacking the the Axis forces as they get near.

2.  Make good use of your artillery to degrade the enemy forces as they approach.

3.  Possible Attack Vector:  If you get the cards and are able to bring your Armor around both sides of the center woods, you can sometimes catch the Axis in the center, and then pummel them with your Infantry in the woods, followed by your Armor.  It can create a real kill box in the center, with the right set of cards.

🔥 Winning as Axis

1.  As Axis, you need to be wary of the enemy artillery right in the center of the battlefield.  It will be able to strike much of the field of play. So if you get an early Barrage, or Air Power, take it out as soon as you can.

2.  The big picture strategy is that until the enemy artillery is taken out, your best attack strategy is to move up each flank away from its full power attacks, at the same time as you use your armor to take out the infantry in the woods.

3.  You can use your armor to do long distance degrading of the enemy forces, until they are at a point where your infantry can make an assault across the open fields.

4.  Use your artillery on the right flank at every opportunity.

Author:

Days of Wonder

URL

Place Battle Reports on a scenario page, or specify its scenario name in the shortcode.

Hill 112

Hill 112

Hill 112

In early July 1944, during the Normandy campaign, British forces launched Operation Jupiter to seize Hill 112, a dominant height southwest of Caen. Control of this hill was crucial: whoever held it could observe and direct fire across much of the surrounding countryside, making it a strategically vital position.

On 10 July 1944, the British 43rd (Wessex) Infantry Division, supported by armored units including Churchills of the 31st Tank Brigade, attacked German defenses held mostly by elements of the Waffen-SS, including the 9th SS Panzer Division “Hohenstaufen” and 10th SS Panzer Division “Frundsberg.” The fighting was brutal, confused, and close-quarters, with British infantry repeatedly advancing into heavy machine-gun, mortar, and tank fire.

General Howitzer:
Hill 112 wasn’t conquered—but it served its purpose.
It tied down Germany’s best, burned away their strength, and cracked open the German shield around Caen. A brutal ridge that changed the course of the Normandy campaign by simply refusing to be ignored.

6 VP’s

Card Balance:

5 – 5

Complexity:

3

Conditions:

Countryside

Location:

France

Year:

1944

Theater:

Western Front

Campaign

Codename:

Operation Jupiter

Summary:

Objectives: 

This is a six VP game, so it calls for good positioning, strategic planning, and consistent attack with a goal towards long-term degradation of the enemy.

Battlefield:

The battlefield has a ridge of hills on one flank, moving into the center.  There is also a set of hedgerows and a town hex right in the middle of the field. The Axis controls much of the board at the beginning of the round, while the Allies are pressed up against the back wall.

Troops:

Allies – 9 Infantry, 6 Armor, 1 Artillery

Axis – 7 Infantry, 3 Armor,  1 Artillery

🔥 Winning as Allies

1. The Allies have a significant armor advantage with six armor units vs. three for the Axis. Since you do have an armor advantage, make use of it, by getting your units out into the open field for battle where the long distance firepower of your tanks may prevail.

2. Watch out for the Axis artillery in the upper right flank. Although it is locked behind the Guigne River, its range controls much of the flank and part of the center flank.

3. Note that Hill 112 is an Allied medal objective. It is within range of a one-hex artillery attack. So if you grab the objective too early, the enemy will have time to chase you away. But if you time it right, it can be a late-game objective, to perhaps clinch the win.

🔥 Winning as Axis

1. The Axis begin with control of much of the battlefield. If you can get your armor out into the middle of the field, you may perhaps be able to attack some of the Allied units while they are still up against the wall, and thus take advantage of their no-retreat situation.

2. You have an artillery unit trapped in the lower left flank behind the Guigne River. Use it whenever the enemy gets near the medal objective at h6.

Author:

Days of Wonder

URL

Place Battle Reports on a scenario page, or specify its scenario name in the shortcode.
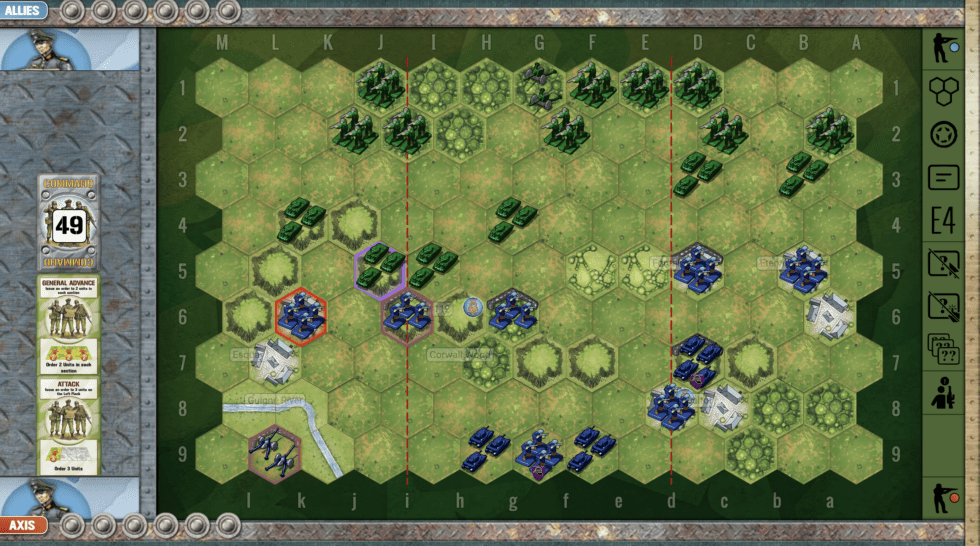
Capturing the Crossing

Capturing the Crossing

Capturing the Crossing

scenario_CapturingTheCrossing_start

“Capturing the Crossing” refers to a World War II battle during the Normandy campaign, focused on securing a key bridge over the Odon River in late June to early July 1944.

Brief Summary:

  • Context:
    Part of Operation Epsom, launched by British forces to outflank Caen and push westward. The Odon River valley was a natural defensive barrier held by the Germans.

  • The Battle:
    British units, fought to capture and hold the bridge crossings over the Odon River.  German SS Panzer divisions mounted fierce counterattacks to repel the advance and regain control.

  • Tactics:
    The British used coordinated infantry, armor, and artillery to secure the crossings under heavy fire and poor weather conditions. Engineers rushed to reinforce and repair bridges under fire.

  • Outcome:
    British forces successfully captured and held key crossings, enabling a bridgehead south of the Odon. However, they faced continued German resistance and did not achieve a full breakthrough.

  • Significance:
    The battle was part of the slow Allied grind toward Caen, tying down German armor and paving the way for later operations like Goodwood and Cobra.

General Howitzer’s Summary:

“Boys, let me tell you about the push across the Odon in the summer of ‘44. It was part of Operation Epsom, the British aiming to outflank Caen and punch westward. The Odon River valley was no picnic—it was a natural fortress that the Germans, including those damn SS Panzer divisions, were ready to die defending.

The British didn’t flinch—they threw in everything they had: infantry, tanks, artillery, and those hard-as-nails engineers. They fought like devils in the mud and the rain, grabbing those bridge crossings under heavy fire and refusing to let go.

The Germans counterattacked like rabid dogs, but the British held firm. They didn’t smash through to Caen, but they sure as hell got a bridgehead south of the Odon, and that put Jerry on the back foot. That bridgehead was the key to bigger things—Goodwood and Cobra wouldn’t have happened without it.

So remember, men: sometimes it ain’t about the breakthrough—it’s about digging in, holding on, and bleeding the enemy dry!”

6 VP’s

Card Balance:

Allies – 6 

Axis – 5

Complexity: 3

Conditions:

Countryside

Context:

Historical

Location:

France

Year:

1944

Theater:

Western Front

Campaign:

The Battle for Caen

Codename:

Operation Epsom

Summary:

Objectives:

6 VP’s, and a territorial objective medal for the Allies

Terrain:

Countryside with forests, hills, some villages and the Odon River.

Troops:

Allies – 9 Infantry, 5 Armor, 1 Artillery

Axis – 8 Infantry, 4 Armor, 1 Artillery

medal allies

🔥 Winning as Allies

1.  Your left flank is strong. Your right flank is weak. The center section is more balanced. You have a bit more firepower, but the enemy has well protected Infantry in hedgerows.  You will need to take up secure positions in the woods facing the enemy and begin to degrade their defensive positions before you launch a frontal attack.

2.  Your artillery in the left corner should be moved forward into the nearby town to increase its effectiveness.

3.  Be aware that an armor battle from your position at L3 to j6 is likely to be lost due to the fact that the enemy Armor is sandbagged. You will need to bring in your additional Armor at i2 into the fray to even out the battle.


medal axis

🔥 Winning as Axis

1.  The Odon River presents a mobility challenge for the armor units behind it, forcing them to angle to the left flank or cross the bridge before they can engage the enemy in the center or right flanks. You will need to get them mobile as soon as you can.

2.  The enemy has you at a disadvantage with slightly more Infantry and Armor, and one additional card, thus increasing their responsiveness.  You will need to compensate with strategic care and precision, and not waste resources on ill-conceived attacks.

3.  Your right flank is weak. Your left flank is strong. The center section is a little more balanced. Allies have a bit more firepower, but your sandbagged infantry will be hard to dislodge.

Author.

URL

Place Battle Reports on a scenario page, or specify its scenario name in the shortcode.

Secret Link