Bug River

Bug River

a memoir 44 game field

The Battle of the Bug River was the opening crack of thunder in the great storm called Operation Barbarossa, June 1941. When the Germans hurled their legions eastward, the Bug River stood before them—not just a line of water, but the first Soviet shield guarding their vast frontier. That river marked the edge of two empires, a tense, steel-cold border between Nazi-occupied Poland and the Red giant beyond.

But rivers don’t stop armies with purpose. At dawn, the German assault troops slammed across the Bug with the kind of ruthless precision that defines a well-oiled war machine. Pioneers threw down bridges under fire, infantry surged across in rubber boats, and armored columns rumbled forward the moment the crossings held. The Soviets, caught between disbelief and the sheer violence of the assault, fought hard in pockets, but they were hit before they could fully wake to the scale of the invasion.

What happened on the Bug wasn’t just a crossing—it was the first thrust of a colossal campaign, a declaration that the Germans intended to carve their way deep into the Soviet heartland. The river was supposed to be a barrier. Instead, it became the starting line for one of the most brutal struggles in human history.

~~ General Howitzer

5 VP’s

Card Balance:

Allies – 3
Axis – 6

Allies are seriously impaired on their card management options in this scenario.

Complexity:

4

Conditions:

Countryside


Location:

Russia

Year:

1941

Theater:

Eastern Front

Campaign:

Operation Barbarossa

Codename

Summary:

The Axis are making an attack against a fairly well-defended Russian army. It is a countrside terrain with forests and bunkers. There is also a supply train which can drop off additional defenders if it gets to its depot safely. This adds an interesting element to the battlefield game.

Objectives:
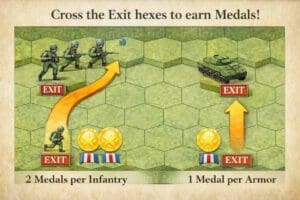
There are five VP’s in this scenario. There is also a bridge medal objective for the Axis to attain. Proper hits on the train will also gain VP’s for the Axis.
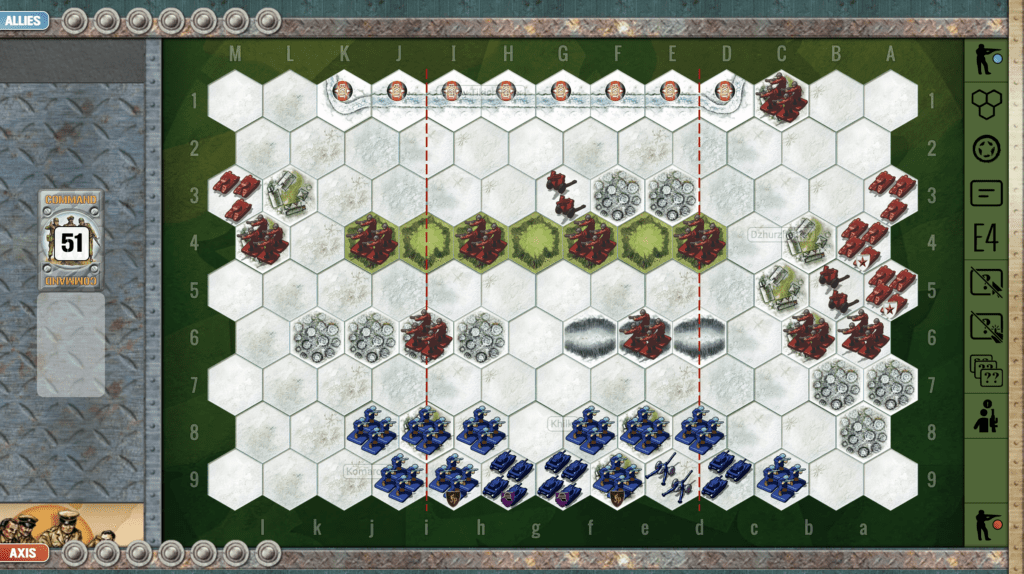
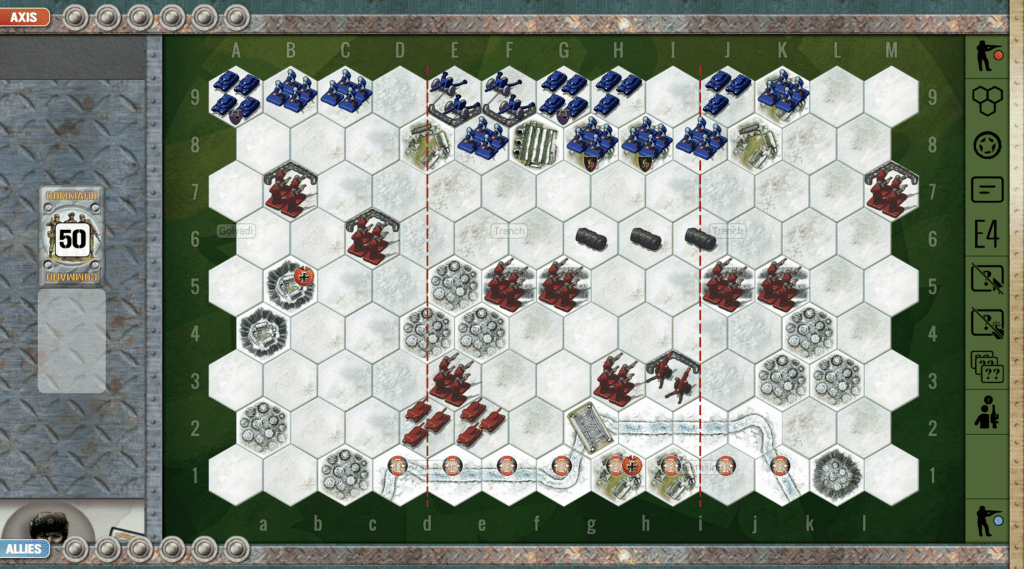
Battlefield:
The Russians begin with solid control of two sections. In fact their armor are poised in field bunkers only two hexes from Axis infantry which have no retreat available to them. The train tracks cut across the field also impairing movement. The Bug River weaves across the backline in Axis territory, hampering movement and preventing retreats.

Troops:
The Axis possess 6 infantry, 4 armor, and 2 artillery.
The Russians have 5 infantry, 3 armor, no artillery. Plus possibly two more infantry if the train reaches its destination.

Allied Strategy:

1. As the Russian Allied commander, you need to seek your VP’s. You need 5 and there are six enemy Infantry, which you can target initially. Then as the battle develops, see if any armor or artillery become candidates for attack.

2.  Note that the artillery is pressed up against the backwall with no retreat, so you can seek the chance to hit it with a three-dice armor attack. Your odds will be 33% per dice roll, vs. 16%. Take the chance to hit no-retreat artillery whenever you can. A Barrage card early in the game comes in very handy.

3.  Recognize that your armor in the field bunkers are going to get quickly overwhelmed by the larger Axis forces coming your way. The question is how much you can make them pay for it, before they do so.

Axis Strategy:

1.  You have four infantry hexes which have no retreat and are a mere two hexes away from enemy armor in bunkers. You should attack them immediately and quickly move in on them to maximize your attack. You may be able to neutralize one of the armor units before they do a lot of damage.  With a card like Move Out! you will be able to advance four infantry immediately and nearly surround both field bunkers for a series of two-dice attacks.  In just a couple of turns the enemy should be eliminated.

2.  Do not let the Allied Transport Train get to the train station. Because once they do, they will unload additional forces to fight.

3.  Use your two Artillery as much as possible to attack the enemy Armor in the field bunkers.

12
BR - Bug

Author:

Days of Wonder

URL

Breakout to Lisyanka

Breakout to Lisyanka

The Breakout to Lisyanka was a key engagement during World War II, fought in early 1944 on the Eastern Front. The battle saw Soviet forces encircling a large German force. The Germans attempted to break out from the encirclement to link up with their reinforcements near Lisyanka, with fierce fighting as they sought to escape Soviet attacks.

While some German units managed to break through, the escape was costly, with heavy losses in men and equipment. The Soviet success significantly weakened German capabilities in Ukraine, contributing to the broader Soviet advance in the region. The battle is often highlighted as a key moment in the Soviet efforts to liberate occupied Ukraine.

General Howizer summarizes it this way:

The Breakout to Lisyanka was a blood-soaked slugfest where the Soviets slammed the trap shut, and while some of the doomed Germans clawed their way out, they left behind a graveyard of men and machines—crippling their grip on Ukraine and fueling the Red steamroller westward.

7 VP’s

Card Balance:

Allies – 4

Axis – 5

Complexity:

3

Conditions:

Winter

Location:

Ukraine

Year:

1944

Theater:

Eastern Front

Campaign

Codename

Summary:

The goal for the Axis is to breakthrough, as the name implies, over the hilly ridge and across the river exits. For Allies, the goal is to of course prevent this. The forces begin in a non-symmetrical dispersion, which makes for a fun scenario.

Objectives:

7 VP’s, plus the Axis have Exit Medals they can try for.

Battlefield:

There is a ridge of hills going across the center, plus some ravines to provide a bit of cover to infantry.

Troops:

Allies – 10 Infantry, 4 Armor, 2 Artillery

Axis – 9 Infantry, 3 Armor, 1 Artillery

Allied Strategy:

1.  As the Allies you must defend against three objective medal locations, the two-hex towns of Golyadi, and Nekrasino, each worth one VP, there is also the frozen river exits along the bottom of the battlefield. Your objectives however, are simply to destroy six enemy units. There are seven enemy infantry units to target and some armor and artillery, if they give you the chance.

2. Be aware that the Axis have Combat Engineers who can attack your infantry in the trenches at close range – with no combat restrictions. So make it one of your early goals to finish them off.

3. Make good use of your artillery in the middle section to defend your troops in the trenches.

Axis Strategy:

1.  Attack with your frontline infantry right away, to create some movement space for your armor, and also to neutralize the nearby enemy who will quickly attack from close range.

2. Try to avoid your right flank which is packed with enemy forces ready to pounce with both armor, infantry, and artillery. You may have better luck on your left flank which has less enemy artillery power. 

3. You can also quickly overwhelm the enemy infantry at i6, to provide a proving ground for your forces to prepare for the breakout.

4.  Remember that if you get any of your Infantry across the Exit hexes, you will earn two! Medals per Infantry (and one for Armor).  So if you get a Behind Enemy Lines, then get your Infantry into the forest on row 6; this will provide you with the distance to move in, attack the enemy, and then quickly escape out the back row for an easy two medals.

Classic Battle Reports:

(percentage of Allied victories)

52%

Battle Reports:
24
BR - Lisyanka

Author:

Link:

Breakout at Klin

Breakout at Klin

  • When & Where:
    December 1941, near the town of Klin, northwest of Moscow, during the Soviet counteroffensive in the Battle of Moscow.

  • Context:
    After months of German advances toward Moscow, Soviet forces launched a major counterattack. German troops, particularly from Army Group Center, found themselves overextended and at risk of encirclement near Klin.

  • The Battle:
    Soviet forces attacked from multiple directions, threatening to trap German units in the Klin salient. The Germans, under pressure and facing severe winter conditions, conducted a fighting withdrawal, breaking out of the encirclement and retreating westward.

  • Outcome:
    The Soviet Red Army recaptured Klin, dealing a blow to German morale and momentum. The breakout marked a turning point in the Moscow campaign, with German forces now on the defensive for the first time in the war.

Lessons from General Howitzer:

“The Breakout at Klin wasn’t just a German retreat—it was the moment the Red Army showed the world it could counterpunch. And it was the first time the German war machine started to cough and stall. Learn from it, gentlemen: never overreach, never underprepare, and never, ever give your enemy a second chance to swing.

6 VP’s

Card Balance:

Allies – 3

Axis – 6

Complexity:

3

Conditions:

Winter

Location:

Russia

Year:

1941

Theater:

Eastern Front

Campaign:

Battle of Moscow

Codename

Summary:
At the start, the Axis are line up mostly against the lower border, while the Russians have control of much of the board. The objective for the Axis is to either destroy the forces, or as the name implies breakout past them to the exit hexes at the top of the battlefield. If the Axis can effect rapid movement (and Blitz rules are in effect to help with this ) they can make it past the Russian troops blocking their path in excellent defensive positions, and achieve victory.

Objectives:
It is a long 6 VP game, fought at, often, close quarters, while they Axis seek two objectives, to destroy the enemy and to escape the enemy.

Battlefield:
This is a winter war with a mix of urban and countryside, making for an intersting battlefield deployment and field of play.

Troops:
The Axis –  7 infantry, 4 armor, 2 artillery.
The Russians –  9 infantry, 2 armor, 1 artillery.

Allies:

 1.  You are positioned very closely to the enemy  on your left flank, and in the center at the trenches.  Attack as much as you can before the enemy breaks out from their center section congestion.

2. You also have a well-placed center section artillery which you can use to decimate the enemy forces. Use it!

3. Your best opportunity for some significant kills is on your left flank.  You will need to get your armor up there to assist your forward infantry. But you need to do it quickly before they are wiped out by the nearby enemy.  And because of winter conditions, you can only move your armor two hex per turn, so don’t waste any time and get them moving!

Axis:

1. Axis, note that on your right flank the Russians are nearly on top of you, with a sandbagged infantry only two hexes away from your backwall, and another one three hexes away. Since you have two infantry hexes pressed against your back border, with no retreats, an early attack against you is going to result in several hits. If you can move on your right flank right away with a decisive attack, you can begin the breakout successfully.

2. The next immediate objective for the Axis forces is to get some mobility for your armored forces. Get them out from behind the town and factory hexes with which they begin the battle.

3. Note that you have two artillery units at your disposal in the center section. At the start of the battle, there are four enemy hexes within your full power two-hex attack. Use those artillery at every chance.

Class Battle Reports:

(percentage of Allied victories)

19%

22
BR - Klin

Author

URL