General Howitzer’s Field Guide to Memoir 44

A Memoir 44 Strategy & Tactics Community

GENERAL HOWITZER

Scenarios

Explore Memoir ’44 battlefields, maps, and player statistics.

GENERAL HOWITZER

Campaigns

Relive historic campaigns through linked Memoir ’44 battles.

GENERAL HOWITZER

Strategy Tips

Sharpen your tactics and take command of the battlefield.

GENERAL HOWITZER

Field Manuals

Explore field guides and manuals for your next battle.

GENERAL HOWITZER

Tournaments

Find Memoir ’44 tournaments, events, and fellow commanders.

GENERAL HOWITZER

My War Room

Track your battles, campaigns, achievements, and next mission.

Payagyi Burma

Payagyi Burma

Payagyi Burma

Payagyi-Burma

The Battle of Payagyi occurred in early March 1942 during the Burma Campaign of World War II. British forces, specifically ‘B’ Squadron of the 7th Queen’s Own Hussars, engaged Japanese troops near the village of Payagyi, north of Pegu. The British operated American-made M3 Stuart light tanks, while the Japanese fielded Type 95 Ha-Go light tanks.

Upon arrival, the British encountered Japanese forces already present in the village. Despite poor visibility and challenging radio communications, the British launched an attack. In the ensuing combat, they destroyed two Type 95 tanks, disabled two more, and captured four Japanese anti-tank guns. However, the British also suffered losses, including the disabling of a Stuart tank by enemy fire.

The Battle of Payagyi exemplifies the intense and fluid nature of the early stages of the Burma Campaign, highlighting the challenges faced by Allied forces in the face of the Japanese advance.

6 VP’s

Card Balance:

Allies – 6 + 2 Combat Cards

Axis – 4  + 2 Combat Cards

Complexity:

3

Conditions:

Jungle

Context:

Historical

Location:

Burma

Year:

1942

Theater:

Pacific

Campaign:

Burma Campaign

Codename:

Summary:

Objectives:

6 VP’s, plus the building hex as a  Temporary Medal objective for the Allied forces, and the bridge hex is a Last to Occupy Temporary Medal Objective for both sides.

Battlefield:

A jungle map with jungle, rice paddies, hills, and a river cutting across the entire map, and intersecting roads which come together at the bridge hex.

Troops:

Allies – 8 Infantry, 4 Armor

Axis – 9 Infantry, 3 Armore


medal allies

🔥 Winning as Allies

1.  The key objective for the Allies is to capture the bridge hex, and then as a bonus the building hex. 

2.  Your Armor is back on the left flank. You will need to get it into action as soon as you can. This will be hampered by the river,so while some may breach the river, some other Armor units will need to head toward the road in the center to support the approach and capture of the bridge hex, and its accompanying Medal.

medal axis

🔥 Winning as Axis

1.  The Axis begin the scenario with control of the building hex and its Last to Occupy Temporary Objective Medal.  Maintain this territory, and push to the Bridge Hex Medal Objective when you are ready. But do not do so prematurely, or your forces will be destroyed by the British counter-attack.

2.  Your Armor is stuck in the corner on the right flank. You will need to get them and the nearby Infantry up into the action right away.

Battle Reports

Author:

Days of Wonder

Link:

Indian-Troops-17th-Division-Payagyi-1945

Courtesy of National Army Museum

Place Battle Reports on a scenario page, or specify its scenario name in the shortcode.

Sword of Stalingrad

Sword of Stalingrad

Sword of Stalingrad

Sword-Stalingrad

Stalingrad. July ’42 to February ’43. One of the bloodiest, ugliest slugfests in the history of war—and the place where Hitler’s dreams started bleeding out in the snow.

The Germans charged in hard, aiming to take the city and crack open the Soviet underbelly on their way to the Caucasus oil fields. They bombed Stalingrad to rubble, thinking they could steamroll the Soviets in the ashes.

But rubble favors the defender—and the Soviets fought like wild dogs in every street, every cellar, every damn staircase. House-to-house, room-by-room, tooth-and-nail. The Germans took ground, lost it, and bled for every inch.

And then came the real punch: a Soviet counterattack that closed the trap, surrounded the German 6th Army, and squeezed until there was nothing left but cold, hunger, and surrender.

Stalingrad wasn’t just a Soviet victory—it was the beginning of the end for the Nazi war machine. From that frozen hellhole, the Red Army started marching west—and they didn’t stop till they hit Berlin.

You want to talk grit? Talk Stalingrad. That’s what happens when an enemy pushes too far and meets a defender with nothing left to lose.

~~ General Howitzer

17  VP’s

Card Balance:

Allies – 9

Axis – 10

plus Combat Cards

Complexity:

5

Conditions:

Urban

Location:

Russia

Year:

1942

Theater:

Eastern Front

Campaign:

Context:

Historical

Summary:

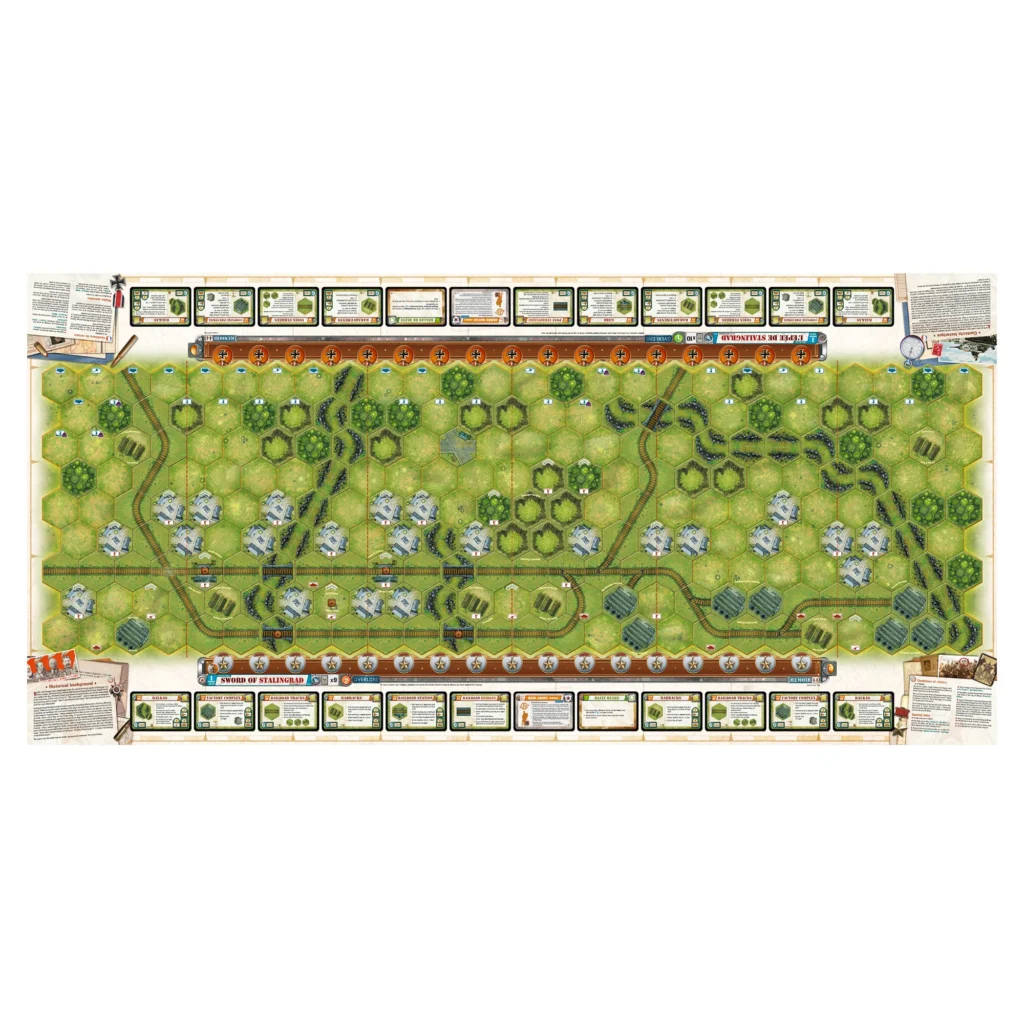
This is a massive and complex scenario with many strategic elements that makes for an exciting and challenging game.

Objectives:

17 VP’s (!), including numerous territorial medals

Battlefield:

This battlefield has countryside on the Axis side, and urban factories, towns, and other buildings on the Allied side. It is a quite complex battlefield.

Troops:

Allies – Infantry, Armor, Artillery

Axis – Infantry, Armor, Artillery 

Allied Strategy

1.  Historically, the Russians were defending themselves from the Nazi’s, so much of this scenario is spent behind sandbags, attacking the enemy where you can, to degrade their offensive capabilities.

2.  You need to protect the territorial medals which are available to the Axis, should they gain control of various railroad stations, the central hills, or the factory complexes.  At the start of the game, you will be granted control of these and the three medals that go with them. But as the game proceeds it will be increasingly difficult to defend and keep this territory and its medals. 

3.  Your left flank is the most medal-rich area for the Axis to target.  So be prepared for an attack there. Manage your cards so that you can respond to aggression.

Axis Strategy

1. This game is won by making your forces mobile.  Invade the city hexes with your infantry, and get your armor onto the Allied back row to start snatching those territorial medals. 

2. There is a large hill and woods complex in the center section which is worth two VP territorial medals. Control it with both infantry and armor.

Author:

Days of Wonder

Battle Maps, Vol. 3

Link:

Place Battle Reports on a scenario page, or specify its scenario name in the shortcode.
Battle of Bataan

Battle of Bataan

Battle of Bataan: Abucay Line

Scenario_Battle-Bataan_setup

On January 7th, 1942 Japan invaded the Philippines. Under orders from General MacArthur American troops and their allies retreated to a defensive line that stretched from Mt. Bataan to the China Sea. The American troops, although outnumbering Japan, were of mixed quality and had low morale. After three months of hard fighting and with American supplies dwindling, the line broke and thousands of American troops were forced to surrender.

6 VP’s

2 victory metals are placed at the bottom of the American line. Japanese units who make it to the hexs between the metals count as a victory point and are moved to the Japanese players victory stand.

Card Balance:

Allies – 5

Axis – 6

For the Air Power card Japan will roll 2 dice and America will roll 1

Complexity:

2

Conditions:

Jungle

Context:

Historical

Location:

Year:

1942

Theater:

Pacific Theater

Campaign:

Codename:

Summary:

Requires base Memoir ’44 and Pacific Theater Expansion. Imperial Japanese army command rules are in effect. Marine rules are in effect for units marked with the Marine emblem. Units marked with Chindits emblem are Philippino guerilla fighters and follow same rules as French resistance.

Objectives:

This is a six VP scenario, with Medal Objectives

Battlefield:

Jungle

Troops:

(There is no indication from the author of the troop deployments.)

Allies – 

Axis –     

Allied Strategy:

Axis Strategy:

Author:

Fan Creation

Link:

Place Battle Reports on a scenario page, or specify its scenario name in the shortcode.

FROM BORGO A MAZZANO TO BARGA

FROM BORGO A MAZZANO TO BARGA

From Borgo a Mazzano to Barga (BrEF)

After victories in the Massarosa, Camaiore and Monte Prana, the Brazilian troops were directed towards the village of Borgo a Mozzano. Aware in advance of the location and capabilities of the Germans in this stretch of the Gothic Line, the US command ordered the Brazilians to follow a course parallel to the Serchio River. While US troops proceeded on the opposite side of the river. By entering the Serchio River valley the FEB could avoid the expected German defences of the Gothic Line. It was discovered however that much of the line in that area had already been abandoned by the Axis, who had retreated about 9 miles to the north.

Further on, crossing the river, the FEB came across a factory of ammunition and aeronautical materials in Fornaci, which the Germans abandoned intact (but tried to recover in a counterattack.) The FEB then headed north to liberate Gallicano and Barga. In the process of doing this they clashed with the battle hardened veterans of the 148th German Division.

5 VP’s

Card Balance:
Allies – 5
Axis – 4

Complexity:

4

Conditions:  

Countryside

Context:

Historical

Location:

Italy

Date:

Sept. – Oct. 1944

Theater:

Western

Campaign:

Brazilian Expeditionary Force

Code Name

Context:

Historical

Summary:

Objectives:

5 VP’s

Battlefield:

Battlefield has a road and a river cutting across each other in an x-shape, with a couple of bridges.

Troops:

Allies – 9 Infantry, 1 Armor

Axis – 8 Infantry

Allied Strategy

Axis Strategy:

This scenario is something a little different. It’s an Axis tactical withdrawal across a bridge and then a regroup in a factory. A well deployed Behind Enemy Lines Card for the Axis can deliver a crushing blow on the Smoking Snakes on the Axis right flank. This can then be followed up with a dash across the bridge. [ Marcus Wallis ]

Battle Reports:

Author:

Icles Rodriquez & Memoir 44 Japan

Place Battle Reports on a scenario page, or specify its scenario name in the shortcode.

Battle of Tebourba

Battle of Tebourba

Battle of Tebourba (Tigerfibel)

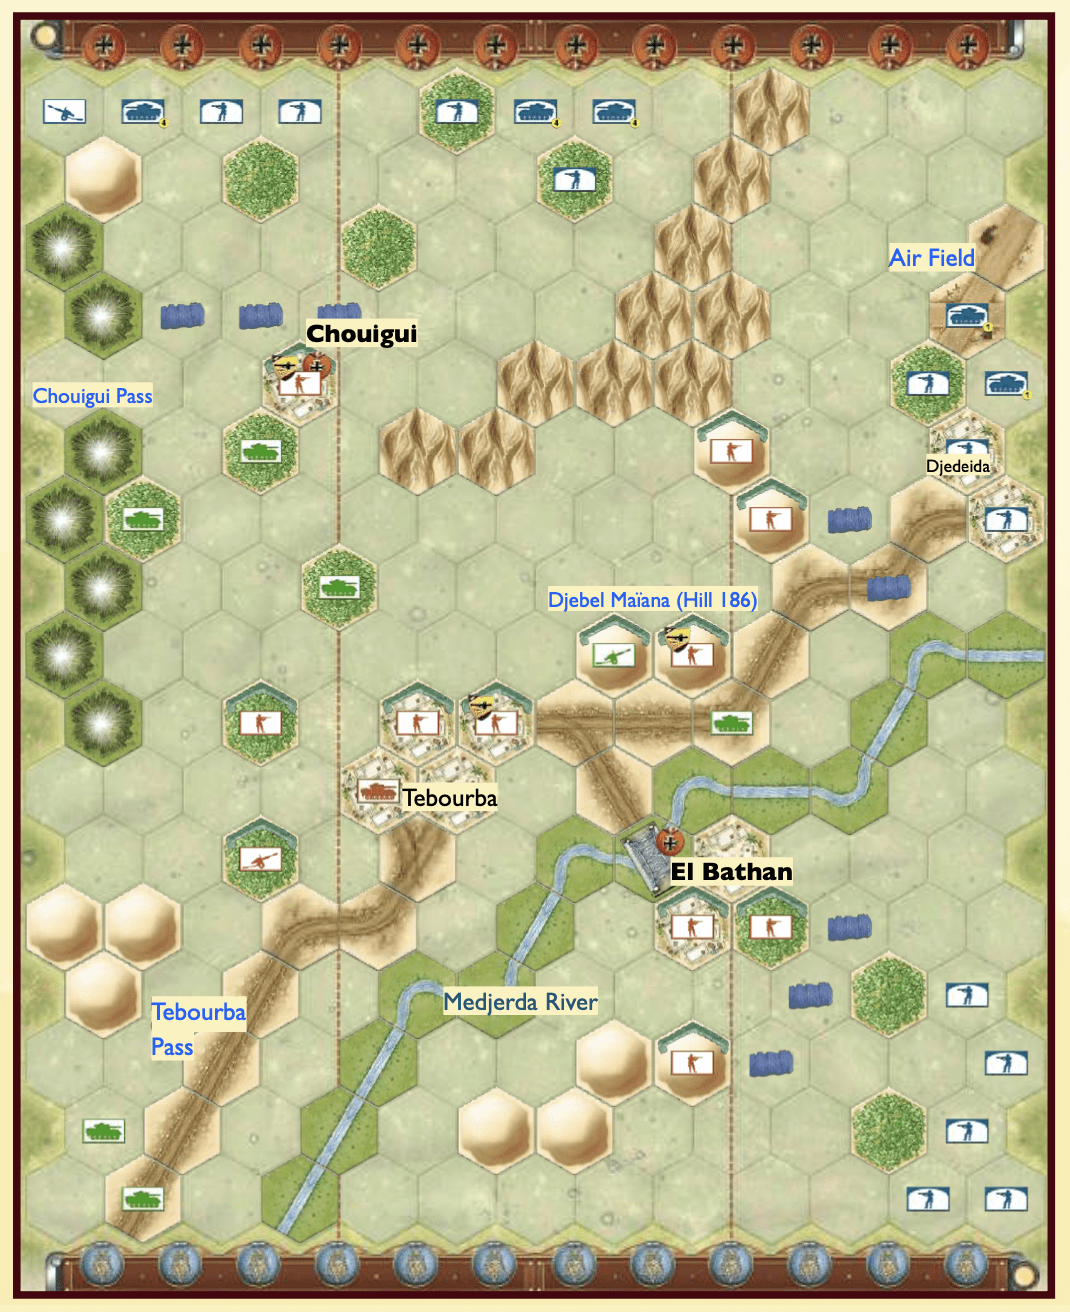
On the November 28 1942, the US led Blade Force failed in its attack on the city of Djedeida.
However, the British controlled Tebourba, Djebel Maïana (Hill 186), the bridge on the Medjerda River, El Bathan and the village of Chouigui.
German Generalleutnant Wolfgang Fischer, commander of the 10th Panzer Division, was ordered to clear the threat on Djedeida.

Initially 3 Tigers and 4 Panzer III’s went into action in the Battle of Tebourba. They were later joined by 3 more Tigers on December 1 1942. By the time the Germans had won the battle on December 5 1942, the Allies, under General Kenneth Anderson, had lost 55 tanks, hundreds of vehicles, and more than 1000 troops had been captured. The Tigers had been devastating, and were responsible for knocking out most of the Allied tanks. The Allied troops were forced to evacuate Tebourba.

12 VP’s

Card Balance:
Allies – 6
Axis – 6

Complexity:

4

Conditions:

Context:

Historical

Location:

Date:

Nov/Dec 1942

Theater:

Western

Campaign:

Code Name

Context:

Historical

Summary:

Objectives:

12 VP’s

Battlefield:


Troops:

Allies – 

Axis – 

Allied Strategy

Axis Strategy:

Battle Reports:

Author: Jdrommel

( Download )

Place Battle Reports on a scenario page, or specify its scenario name in the shortcode.

Secret Link