Ponyri (Kursk)

Ponyri (Kursk)

scenario_Ponyri_start

The Battle of Ponyri took place in Ponyri, a small town in the Kursk Oblast of Russia, during World War II. It occurred in July 1943 as part of the larger Battle of Kursk, one of the biggest tank battles in history.

General Howitzer summarizes:

Ponyri was a slugfest in the mud and blood of Kursk—like a Stalingrad on a smaller scale. The Germans threw their Panzers and infantry at that rail junction with everything they had, trying to break through to Kursk, and the Soviets met them with steel, fire, and sheer grit. House to house, trench to trench, they held the line. The enemy never got past it—and Ponyri became the anvil that broke the German spear.

7 VP’s

Card Balance:

Russian – 4

Axis – 6

Complexity:

3

Conditions:

Countryside

Location:

Russia

Year:

1943

Theater:

Eastern Front

Campaign:

Battle of Kursk

Codename:

part of Operation Citadel

Summary:

Objectives:  7 VP’s.

The key to winning Ponyri is controlling the town. It is worth two VP’s. Whichever side controls the town will cause the opponent to waste a lot of troops trying to gain control.
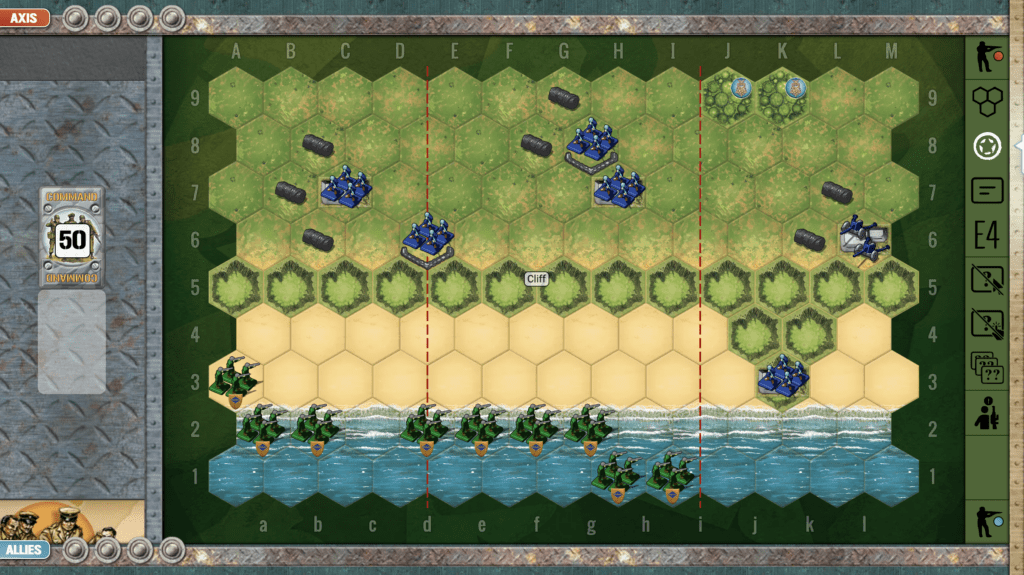
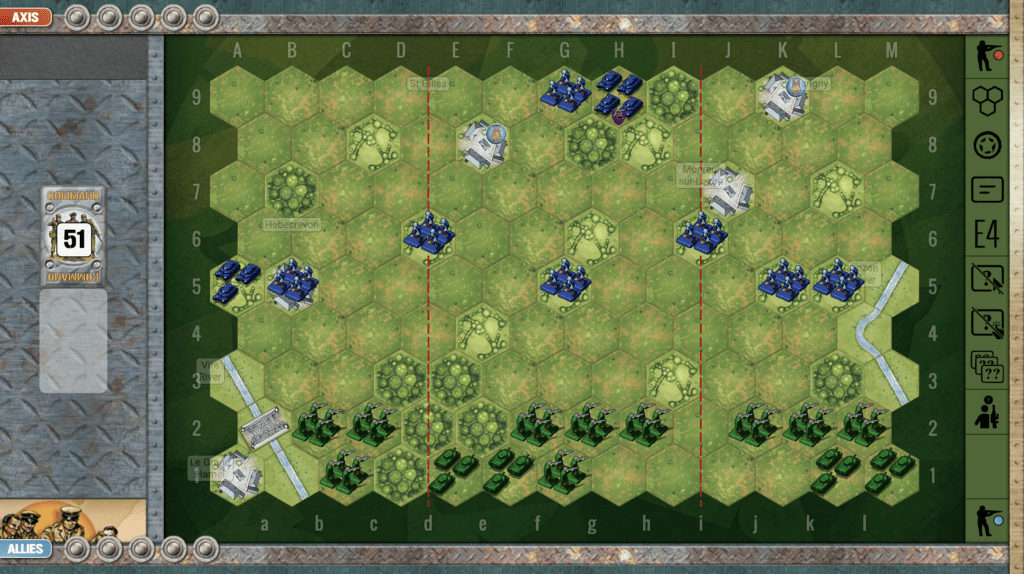
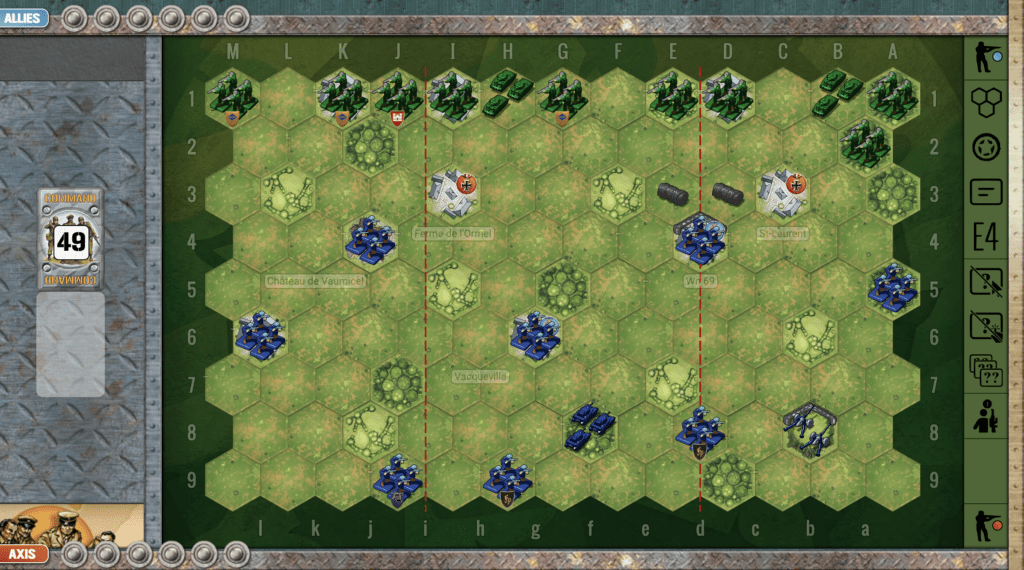
Terrain:

Countryside with forest and hills on one side, mines on the other, and the five-hex town of Ponyri in the center.

Troops:

Allies – 9 Infantry, 4 Armor, 3 Artillery

Axis – 8 Infantry, 7 Armor

medal allies

🔥 Winning as Allies

1. The town of Ponyri is worth two VP’s. You begin with control of it, but since it has 5 hexes, you should take control of the central hex of Ponyri so that you have majority control. This will force the enemy to waste a lot of forces throwing themself against this well-defended town.

2. The Allied role in this scenario is primarily defensive. Use your sandbags and be slow to leave them. But if the enemy begins pummeling your armor on the left flank, you may need to consider a more aggresive approach, if your cards allow it.

3. You have three artillery. Take the time to move them forward one row early in the battle while you still have time, so that they can improve their hit rate against the enemy.
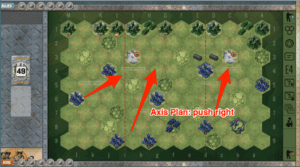
medal axis

🔥 Winning as Axis

1.  Because the town of Ponyri is worth two VP’s! , you should attempt to get your infantry into it pretty quickly, before the enemy occupies all town hexes.  But only take it, if you can keep them there, as they will be surrounded by the enemy on all sides.

2. On your left flank, use the forest and hills to advance your infantry under cover. If you try to make a direct assault in the open countryside, they will get decimated.

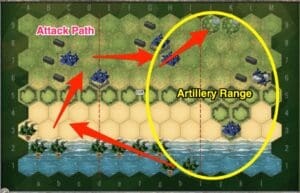
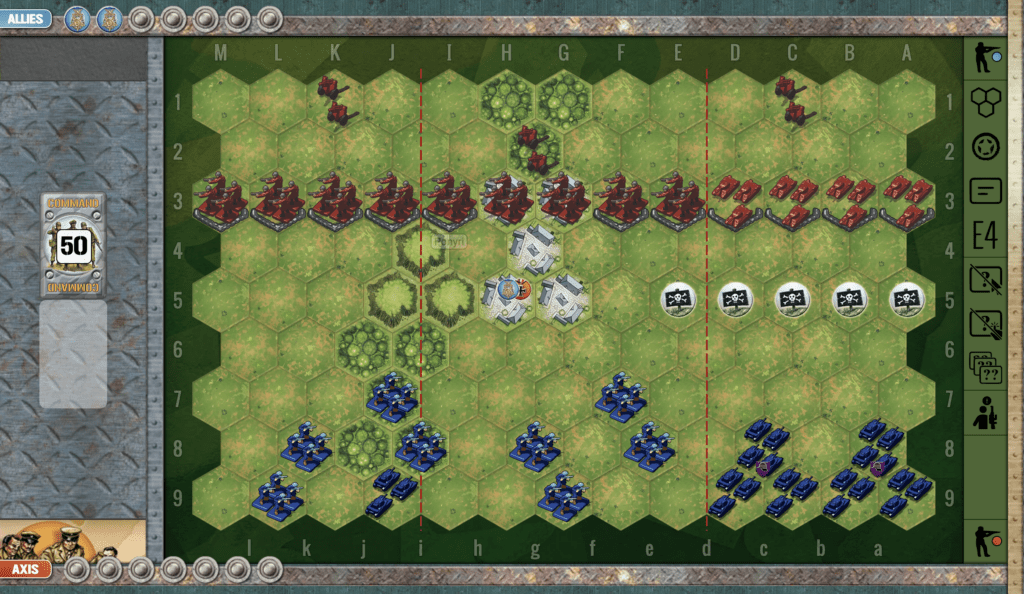
3. On your right flank, you have an armor superiority, so you can place yourself behind the mines and continuously degrade the enemy’s strength. But be aware of the artillery on the right. If the Allies move it one row forward, your armor directly behind the row of mines will be subject to 2D rolls against your forces.

4.  When the enemy is sufficiently degraded, you may consider breaching the mines. (Expect some hits, but if you use your elite forces that begin with 4 armor figures, you should have a sufficient survival rate to continue the attack.) If you find the opening, you can push through for direct assaults against the enemy armor.

Battle Reports:

( percentage of Allied Victories):

54%

24
BR - Ponyri

Author:

Days of Wonder

Link:

Soviet_troops_and_T-34_tanks_counterattacking_Kursk_Voronezh_Front_July_1943

Battle of Kursk
(Copyright: www.mil.ru)

Pointe-du-Hoc

Pointe-du-Hoc

scenario_PointeHoc_start_Allies

The Battle of Pointe du Hoc was a critical part of the D-Day invasion on June 6, 1944. Pointe du Hoc, a steep cliff overlooking the English Channel between Utah and Omaha beaches, was targeted because it housed a German gun battery capable of threatening the Allied landings.

U.S. Army Rangers were tasked with scaling the 100-foot cliffs to neutralize the German artillery positions believed to be in bunkers at the top.  About 225 Rangers from the 2nd and 5th Ranger Battalions led by Lieutenant Colonel James Rudder.  Using ropes, ladders, and grappling hooks under intense German fire, the Rangers climbed the cliffs while under heavy fire.  The Rangers discovered the artillery guns had been moved inland. They located and destroyed the guns using thermite grenades. The Rangers suffered heavy losses—fewer than half were still capable of fighting after the battle.

General Howitzer sums up its importance:

Listen up, men—Pointe du Hoc wasn’t just another hill; it was the lynchpin in the whole damned invasion. Our boys scaled those cliffs under fire, ripped out the German artillery, and made damn sure nothing could rain hell on Utah and Omaha. It was guts, grit, and glory—one of the boldest strikes of D-Day, and it damn well helped crack open Fortress Europe.

~ General Howitzer

4 VP’s

Card Balance:

Allies – 6

Axis – 4

Complexity:

2

Conditions:

Beach

Location:

Normandy

Year:

1944

Theater:

Western Front

Campaign:

Invasion of Normandy

Codename:

Part of Operation Overlord

Briefing:

This scenario is a tough one for the Germans, as the Allies have a 69% success rate.

Objectives:

Because this is a 4 VP scenario, every single hit matters, so both Axis and Allies need to carefully target and concentrate their fire.

Battlefield:

This scenario has a ridge running across the entire battlefield. It is a two-hex move to climb the hill, so it is a challenge for the Allies to mount it. But once they do, it is a short trip to the forest in the corner containing additional victory points. 

Troops:

Allies – 9 Infantry

Axis – 5 Infantry, 1 Artillery

🔥 Winning as Allies

1. Like all beach scenarios, the goal is to get off the beach as quickly as possible. But the ridge running across the beach, does allow Allies to assemble their forces just behind the ridge, massing together, until they are ready to climb the ridge together and attack.

2. Watch out for the infantry hex on the Pointe, and for the artillery on your right flank. You will need to shift your forces to the left as quickly as possible, or the enemy could gain one VP before you even get out of the water. You can move your infantry in a straight lateral move while still in the water, to get away from the Pointe.

3. The best pathway to the VP’s in the forest on your right flank, is to overwhelm the enemy on the left flank, and work your way all the way across the middle section into the forest. Once you make your way off the beach on the left flank, you can take a bit of time to assemble all of your forces, and gather the cards you need for your center section attack.  This will keep you out of the Artillery range.

Memoir 44 scenario Pointe de Hoc

🔥 Winning as Axis

1. Take advantage of the ridge facing the shore. If you have the infantry movement cards, get to the ridge and batter the troops as they approach. If you just sit in your bunkers or sandbags, and wait for them to mass and attack, you will be overwhelmed.

2. First moves are to attack with your infantry from on the point, and your artillery while Allies are still in the water. This will force them up the coast away from your artillery, and most importantly, away from the victory points in the woods.

3. Use your artillery well to slow down, harass, and destroy the troops while they are still on the beach.

4. Once the Allies make it up onto the ridge, if you can restore your remaining forces back into your bunkers, it may give you enough time to degrade the enemy forces enough to prevent their achievement of the VP’s in the forest on your left flank.

Battle Reports

(percentage of Allied victories):

69%

Scales-Allies-Weighted
34
BR - Pointe

Author:

Days of Wonder

Link:


Panzers vs. Grants

Panzers vs. Grants

“Listen up, boys! In May ‘42, in the blazing North African desert, the British 7th Armoured Division rolled out their shiny new Grants—those big 75mm guns looked damn impressive on paper. They thought they’d finally have the edge over Rommel’s Panzers.

But let me tell you, those German 15th Panzer boys weren’t in the habit of rolling over for anyone! They didn’t give a damn about new tanks—they had the tactics, the guts, and the desert smarts. The British fought hard, but the Germans danced circles around them, turning that desert into a killing ground.

In the end, those Grants put up a hell of a fight, but the Germans sent ‘em packing. That’s the lesson of that day, boys—firepower alone don’t win the battle; it’s the man in the tank and the way he fights that makes the difference!

~~ General Howitzer

5 VP’s

Card Balance:

Allies – 4

Axis – 6

Complexity:

2

Conditions:

Desert

Location:

North Africa

Year:

1942

Theater:

Mediterranean Theater

Campaign:

Battle of Gazala

Codename

Summary:

This scenario is played out on an almost wide-open sandy battlefield with tanks battling it out. It is a great test of the attacking power of the Allied Grants vs. the German Panzers.

Objectives:
This is a 5 VP game, and since it is on an open desert battlefield, it will proceed rather quickly. There is one Medal Objective hex for the Axis in the form of the British HQ and Supply Tents.

Battlefield:
An open desert terrain with just a few sand dunes and an oasis.

Troops:
Seven Panzers vs five Grants, balanced by the fact the Axis only have 1 infantry, and the British have five. No artillery.

🔥 Winning as Allies

1. As the Allies, you are at an armor disadvantage. The enemy starts the scenario with most of the armor misplaced on the flanks, and only two in the center section. But as soon as they consolidate their forces together, you will feel the might of their firepower. Therefore you need to work your units, infantry and armor as a cohesive force. Do not let your armor get out way ahead of the infantry. Work them together for a stronger attack.

2. Focus your effort and cards, as they will allow, on the center section where you can defend against attacks from either flank.

3. The goal is five VP’s, and since the enemy only has two infantry, this means you will have to take out at least three Panzer units.

🔥 Winning as Axis

1.  Your Panzers in the center and right flank are outnumbered due to the four-figure tank units of the British, so you will need to get your Panzers which are stuck behind the palm forest on left flank into the game as soon as you can.

2.  Do not attack on your right flank until you have the material and cards to do it.

3.  Note that the HQ/Supply Tent is a Permanent Medal Objective.  If you are able to push them out and take the terrain, you gain a Permanent Medal, even if you leave the hex.

Classic Battle Reports:

(percentage of Allied victories)

32%

15
BR - Panzers

Author:

Days of Wonder

URL

Operation Goodwood

Operation Goodwood

scenario_Goodwoord_1

The Battle of Goodwood (July 18–20, 1944) was a major Allied offensive during the Normandy Campaign in World War II. The operation was spearheaded by the British Second Army, under Lieutenant General Sir Miles Dempsey, and aimed to break through German defenses east of Caen and open the way for a broader advance.

General Howitzer explains:

“Listen up! The Battle of Goodwood was one hell of a slugfest in the summer of ‘44. It kicked off with the skies roaring—a massive aerial bombardment to soften up those German positions, and then the British and Canadian tanks rolled out, thousands of ‘em, across that open French ground.

But you know how it goes— the Germans were dug in deep. Minefields, anti-tank guns, artillery—the whole works—slowed down that armored push, and the Germans counterattacked with everything they had.

Even though they didn’t break through like they hoped, it wasn’t for nothing—the Germans were bleeding, and those tanks kept ‘em busy. It gave us breathing room to launch Operation Cobra and tear open the western flank.

So remember this, boys—even when the breakthrough doesn’t come, if you’re tying up the enemy and keeping him on his heels, you’re still doing the job! That’s the mark of a real fighting force!

6 VP’s

card

Card Balance:

5 – 5

Complexity:

3

Conditions:

Countryside

countryside

Location:

France

Year:

1944

Theater:

Western Front

Campaign:

Normandy Invasion

Summary:

 In the Goodwood scenario, whichever side can gain control of the ridge on the flank, will be in a position of dominance for that flank. Control of the town in the other flank, will lend an advantage to whomever controls it.

Objectives:

Six medals, no terrain objectives

Terrain:

The Goodwood scenario is marked by a large hilly ridge on one flank, while the other two sections are basically a wide open battlefield, with just one two-hex town in the center of it. The center section is wide-open to allow the tank battle which occurred historically.

Troops:

Allies – 6 Infantry, 6 Armor

Axis – 7 Infantry, 3 Armor, 2 Artillery

medal allies

🔥 Winning as Allies

1. The most important first thing which the Allies need to do in this scenario is in the center section. Their armor is only two hexes away from the Axis infantry in the town of Cagny. The armor has no retreat option. Therefore, the typical odds of a one in three hit ratio, increase by 17% to a one in two possibility of a hit, per die. So the armor will need to be moved into the adjacent forest, or moved away entirely to a spot where it has a retreat option.

2.  You have six armor to the enemy’s three armor.  Use it by rapidly gaining control of the center and attacking from there.  You will also need to be ready to move into your left flank to defend your weak infantry.

medal axis

🔥 Winning as Axis

1. Although outnumbered, the Axis’ armor has been able to defeat the Allied armor with the right combination of tactics and patience.  You need to stay in your defensive positions, and attack as opportunities present themselves. Then with the right combination of cards, you can push up through the center and take control.

2.  Potential Attack Vector:  You are strong on the right flank, while the enemy is weak.  If you can move your armor forward rapidly, you could score a lot of points.

3.  Defensive Posture:  Move your Armor into the woods on row 7, and wait for the enemy to enter the open terrain in the center section; then blast ‘.

Scales-Axis-Weighted
15
BR - Goodwood

Author:

Days of Wonder

URL

Operation Cobra

Operation Cobra

scenario_Cobra_start_Allies

Operation Cobra was a key World War II military offensive launched by the Allies in late July 1944 during the Battle of Normandy. Its goal was to break through German defenses and enable a rapid advance across France. Following the D-Day landings, Allied forces faced strong German resistance, slowing their progress.

General Howitzer summarizes:
Operation Cobra was a hammer blow—Bradley opened with a sky full of bombs, and when the smoke cleared, our boys rolled right through Saint-Lô and tore the German line apart. We punched deep into France, drove the enemy into the Falaise Pocket, and opened the road straight to Paris. That’s how you break a front—fast, hard, and without mercy.

5 VP’s

Card Balance:

Allies – 5

Axis -4

Complexity:

3

Conditions:

Countryside

Location:

France

Year:

1944

Theater:

Western Front

Campaign:

Battle of Normandy

Codename:

Cobra

Context:

Historical

Summary:

The Allies begin with a numerical advantage at the start of the scenario. But they have to make it past well-protected Axis forces who are lodge in hedgerows scattered across the battlefield.

Objectives:

5 VP medals including two territorial medal objectives.

Terrain:

Hedgerows and countryside

Troops:

Allies – 10 Infantry, 4 Armor

Axis – 7 Infantry, 2 Armor

🔥 Winning as Allies

1.  Big picture strategy is to push up the center and to the right towards the territorial medal objectives in the two towns. You should be able to dislodge the infantry in the center hedgerow at G5. But the two infantry in the hedgerows at L5 and K5 are going to be more difficult. You may be able to by-pass them by just going up the center. If you gain the initiative, the enemy will have to respond. And then you can hit him with your superior firepower from your armor, and overwhelm him with your infantry.

2.  You have a numerical superiority everywhere except your left flank. That will be quickly under attack by the enemy forces which can attack your no-retreat infantry. So first turn available, get them into the woods to their right.

3. All of your armor is stuck behind the infantry, so get some movement on your troops. The goal is to maximize mobility, in order to capitalize on opportunity.  Based on the cards, you can decide whether to attack center or right; preferably with armor at a distance to degrade enemy preparedness.

🔥 Winning as Axis

1.  Big picture strategy is that the Allies outnumber you, and your role may be primarily defensive. But your front units in the hedgerows can put up a good fight. If you can get a Dig-In! card early on that will help.

2. Get your armor which is trapped in the back out into a mobile position as soon as you can.

3.  Some early attacks from your troops on the right flank against the trapped Allied troops could gain you a medal, or at least a weakened Allied force in that section.

4.  If it looks like the Allies are going to push past you towards the territorial medal of St. Gilles, you will want to move some infantry there as an additional defensive measure.  Protect your two territorial medals from enemy capture!

Battle Reports
(percentage of Allied victories):
52%

26
BR - Cobra

Author:

Days of Wonder

Link:

Normandy – Vaumicel Manor

Normandy - Vaumicel Manor

scenario_VaumicelManor_start

The Battle of Vaumicel Manor occurred on June 6, 1944, as part of the D-Day landings during Operation Overlord in Normandy. It was a localized but intense engagement involving the U.S. 502nd Parachute Infantry Regiment of the 101st Airborne Division.

The battle focused on the capture of Vaumicel Manor, a key German stronghold near the beachheads. The heavily fortified manor served as a command post and artillery position, threatening Allied movements inland. The paratroopers, despite being scattered during their drop, regrouped and launched a coordinated assault on the manor.

After fierce fighting, including close-quarters combat, the U.S. forces captured the manor, neutralizing its defenders and securing a critical position. This success contributed to the broader efforts to consolidate the Allied beachheads and disrupt German defenses in the region.

The battle exemplified the resourcefulness and determination of airborne troops in achieving their objectives under challenging conditions.

General Howitzer comments on this battle:

“Now listen here! After some downright brutal fighting, including hand-to-hand combat, our boys took that manor and wiped out the defenders. It wasn’t just a fancy house—it was a key position, and taking it helped us lock down the beachhead and throw the enemy’s plans into disarray.

That fight showed exactly what airborne troops are made of—grit, guts, and the will to get the job done no matter the conditions. They didn’t wait for perfect—they took the fight to the enemy and came out on top.

That’s how you win a war, gentlemen—by fighting smart, pushing hard, and never backing down!

6 VP’s

Card Balance:

Allies – 5

Axis – 6

Complexity:

3

Conditions:

Countryside

countryside

Location:

Normandy

Year:

June 5th – 6th 1944

Theater:

Western Front

Campaign:

Normandy Invasion

Codename:
Operation Overlord

Summary:


The Axis forces are scattered across the battlefield, while the Allies are lined up against their border ready for attack. The challenge for both sides is to make their way across the open battlefield. Using hedgerows and forest hexes is the best way to move your forces towards the medal objectives in each of the towns. There are two medals each for Axis and Allies. They seem to be within reach, but getting to it, and holding it are two different things. You will have to make sure you have dealt a crippling blow to any nearby enemy infantry before you seek to posses a town hex medal.

Objectives:
Six VP’s, with two Objective Medals in the towns of Ferme de l’Ormel and St. Laurent for the Axis, and one Objective Medal for the Axis at the town of Vacqueville and at Wn.69.

Battlefield:
Countryside scattered with forests and hedgerows.

Troops:

Allies – 9 Infantry; 2 Armor
Axis – 8 Infantry, 1 Armor, 1 Artillery

🔥 Winning as Alllies

1. Big picture strategy is that your right flank is your strong one, and your left flank, although you have a lot of firepower, is up against a well-entrenched artillery which will cut you to ribbons unless you deal with it.  If you get the cards, you can make a good push up the right flank. But you will have to target each unit along the way and take them out one hex at a time. 

2.  Be careful of the Axis artillery on your left flank. They can reach nearly to the back row of hexes. And any attack attempted upon the two infantry hexes at A5 and d4 will be supported by a two-dice response attack from the artillery.

3.  Be sure to protect the two town hexes on the third row which contain Medal Objectives for the Axis.  

🔥 Winning as Axis

1. You are primarily in a defensive position in this scenarios as the Allies advance against you, so remain in defensive positions. But should the cards present an attack opportunity, then take it.

2.  However, you have some Combat Engineers and Special Forces in the back. Move them forward, under protection, but get them into a spot to assault some of the forward positions of the enemy. The special abilities of the Combat Engineers can attack while ignoring terrain battle restrictions.

3.  You have two Temporary Medal Objectives up on row 3, deep in enemy territory.  If you hope to occupy and hold them, you will first need to degrade the enemy forces.  Your best hope of doing this is in the right section, where you have both your Armor (in the center, but can quickly get to the right) and Artillery at. your disposal.

4. General Plan of Attack: Push your forces forward to the right, to gather momentum where you are strongest.

Memoir 44 Vaumicel Manor

33
BR - Vaumicel Manor

Author

URL