Capturing the Crossing

Capturing the Crossing

scenario_CapturingTheCrossing_start

“Capturing the Crossing” refers to a World War II battle during the Normandy campaign, focused on securing a key bridge over the Odon River in late June to early July 1944.

Brief Summary:

  • Context:
    Part of Operation Epsom, launched by British forces to outflank Caen and push westward. The Odon River valley was a natural defensive barrier held by the Germans.

  • The Battle:
    British units, fought to capture and hold the bridge crossings over the Odon River.  German SS Panzer divisions mounted fierce counterattacks to repel the advance and regain control.

  • Tactics:
    The British used coordinated infantry, armor, and artillery to secure the crossings under heavy fire and poor weather conditions. Engineers rushed to reinforce and repair bridges under fire.

  • Outcome:
    British forces successfully captured and held key crossings, enabling a bridgehead south of the Odon. However, they faced continued German resistance and did not achieve a full breakthrough.

  • Significance:
    The battle was part of the slow Allied grind toward Caen, tying down German armor and paving the way for later operations like Goodwood and Cobra.

General Howitzer’s Summary:

“Boys, let me tell you about the push across the Odon in the summer of ‘44. It was part of Operation Epsom, the British aiming to outflank Caen and punch westward. The Odon River valley was no picnic—it was a natural fortress that the Germans, including those damn SS Panzer divisions, were ready to die defending.

The British didn’t flinch—they threw in everything they had: infantry, tanks, artillery, and those hard-as-nails engineers. They fought like devils in the mud and the rain, grabbing those bridge crossings under heavy fire and refusing to let go.

The Germans counterattacked like rabid dogs, but the British held firm. They didn’t smash through to Caen, but they sure as hell got a bridgehead south of the Odon, and that put Jerry on the back foot. That bridgehead was the key to bigger things—Goodwood and Cobra wouldn’t have happened without it.

So remember, men: sometimes it ain’t about the breakthrough—it’s about digging in, holding on, and bleeding the enemy dry!

6 VP’s

Card Balance:

Allies – 6 

Axis – 5

Complexity: 3

Conditions:

Countryside

Context:

Historical

Location:

France

Year:

1944

Theater:

Western Front

Campaign:

The Battle for Caen

Codename:

Operation Epsom

Summary:

Objectives:

6 VP’s, and a territorial objective medal for the Allies

Terrain:

Countryside with forests, hills, some villages and the Odon River.

Troops:

Allies – 9 Infantry, 5 Armor, 1 Artillery

Axis – 8 Infantry, 4 Armor, 1 Artillery
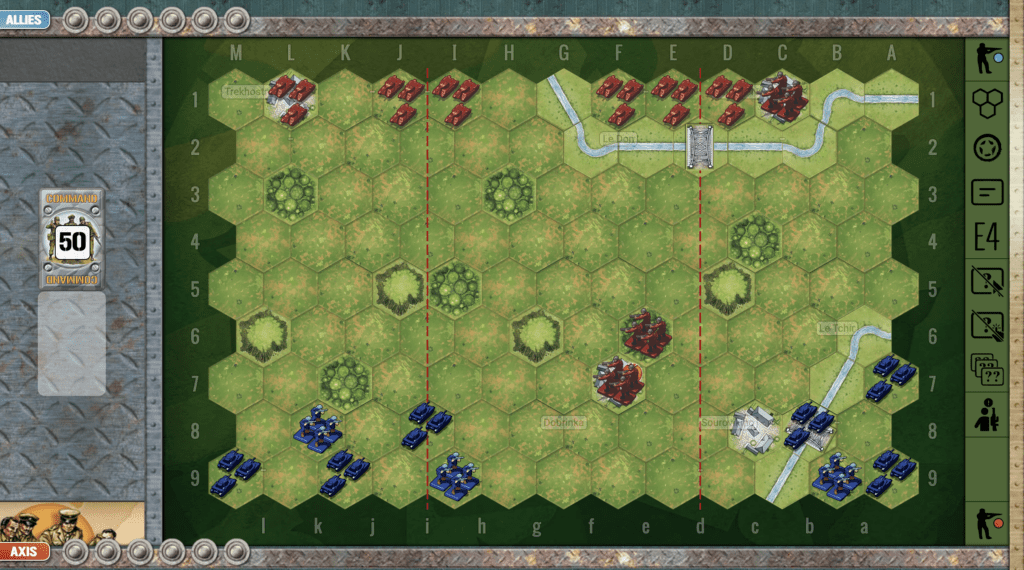
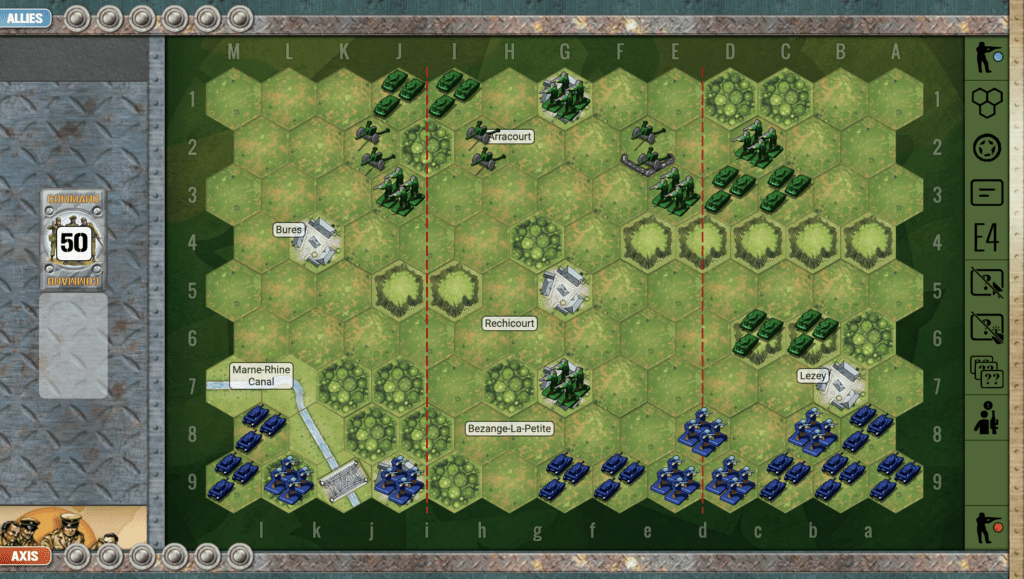
medal allies

Allied Strategy:

1.  Your left flank is strong. Your right flank is weak. The center section is more balanced. You have a bit more firepower, but the enemy has well protected Infantry in hedgerows.  You will need to take up secure positions in the woods facing the enemy and begin to degrade their defensive positions before you launch a frontal attack.

2.  Your artillery in the left corner should be moved forward into the nearby town to increase its effectiveness.

3.  Be aware that an armor battle from your position at L3 to j6 is likely to be lost due to the fact that the enemy Armor is sandbagged. You will need to bring in your additional Armor at i2 into the fray to even out the battle.
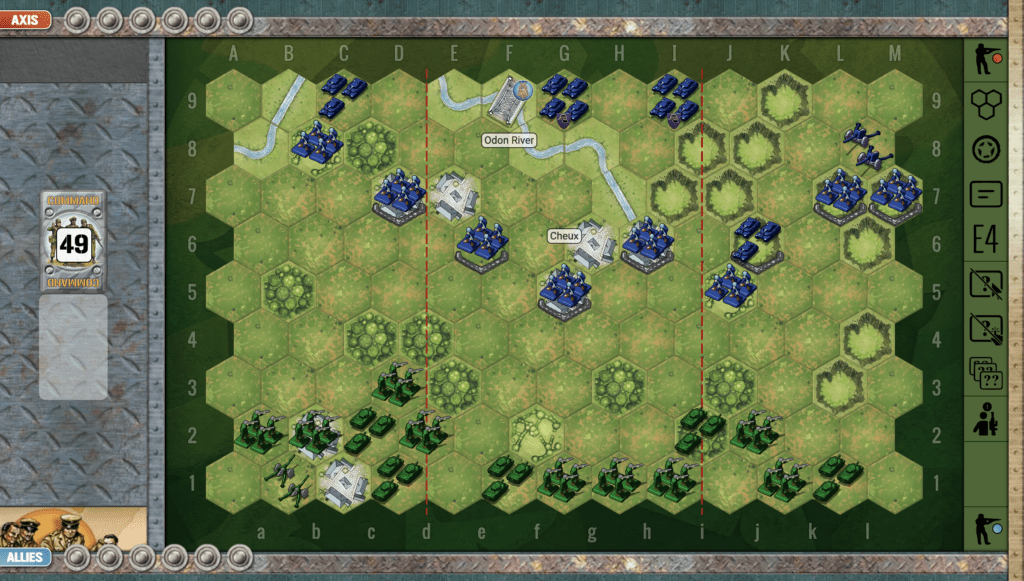


medal axis

Axis Strategy:

1.  The Odon River presents a mobility challenge for the armor units behind it, forcing them to angle to the left flank or cross the bridge before they can engage the enemy in the center or right flanks. You will need to get them mobile as soon as you can.

2.  The enemy has you at a disadvantage with slightly more Infantry and Armor, and one additional card, thus increasing their responsiveness.  You will need to compensate with strategic care and precision, and not waste resources on ill-conceived attacks.

3.  Your right flank is weak. Your left flank is strong. The center section is a little more balanced. Allies have a bit more firepower, but your sandbagged infantry will be hard to dislodge.

10
BR - Capturing the Crossing

Author.

URL

Bug River

Bug River

a memoir 44 game field

The Battle of the Bug River was the opening crack of thunder in the great storm called Operation Barbarossa, June 1941. When the Germans hurled their legions eastward, the Bug River stood before them—not just a line of water, but the first Soviet shield guarding their vast frontier. That river marked the edge of two empires, a tense, steel-cold border between Nazi-occupied Poland and the Red giant beyond.

But rivers don’t stop armies with purpose. At dawn, the German assault troops slammed across the Bug with the kind of ruthless precision that defines a well-oiled war machine. Pioneers threw down bridges under fire, infantry surged across in rubber boats, and armored columns rumbled forward the moment the crossings held. The Soviets, caught between disbelief and the sheer violence of the assault, fought hard in pockets, but they were hit before they could fully wake to the scale of the invasion.

What happened on the Bug wasn’t just a crossing—it was the first thrust of a colossal campaign, a declaration that the Germans intended to carve their way deep into the Soviet heartland. The river was supposed to be a barrier. Instead, it became the starting line for one of the most brutal struggles in human history.

~~ General Howitzer

5 VP’s

Card Balance:

Allies – 3
Axis – 6

Allies are seriously impaired on their card management options in this scenario.

Complexity:

4

Conditions:

Countryside


Location:

Russia

Year:

1941

Theater:

Eastern Front

Campaign:

Operation Barbarossa

Codename

Summary:

The Axis are making an attack against a fairly well-defended Russian army. It is a countrside terrain with forests and bunkers. There is also a supply train which can drop off additional defenders if it gets to its depot safely. This adds an interesting element to the battlefield game.

Objectives:
There are five VP’s in this scenario. There is also a bridge medal objective for the Axis to attain. Proper hits on the train will also gain VP’s for the Axis.

Battlefield:
The Russians begin with solid control of two sections. In fact their armor are poised in field bunkers only two hexes from Axis infantry which have no retreat available to them. The train tracks cut across the field also impairing movement. The Bug River weaves across the backline in Axis territory, hampering movement and preventing retreats.

Troops:
The Axis possess 6 infantry, 4 armor, and 2 artillery.
The Russians have 5 infantry, 3 armor, no artillery. Plus possibly two more infantry if the train reaches its destination.

Allied Strategy:

1. As the Russian Allied commander, you need to seek your VP’s. You need 5 and there are six enemy Infantry, which you can target initially. Then as the battle develops, see if any armor or artillery become candidates for attack.

2.  Note that the artillery is pressed up against the backwall with no retreat, so you can seek the chance to hit it with a three-dice armor attack. Your odds will be 33% per dice roll, vs. 16%. Take the chance to hit no-retreat artillery whenever you can. A Barrage card early in the game comes in very handy.

3.  Recognize that your armor in the field bunkers are going to get quickly overwhelmed by the larger Axis forces coming your way. The question is how much you can make them pay for it, before they do so.

Axis Strategy:

1.  You have four infantry hexes which have no retreat and are a mere two hexes away from enemy armor in bunkers. You should attack them immediately and quickly move in on them to maximize your attack. You may be able to neutralize one of the armor units before they do a lot of damage.  With a card like Move Out! you will be able to advance four infantry immediately and nearly surround both field bunkers for a series of two-dice attacks.  In just a couple of turns the enemy should be eliminated.

2.  Do not let the Allied Transport Train get to the train station. Because once they do, they will unload additional forces to fight.

3.  Use your two Artillery as much as possible to attack the enemy Armor in the field bunkers.

10
BR - Bug

Author:

Days of Wonder

URL

Battle of Warsaw

Battle of Warsaw

memoir 44 battle

The Battle of Warsaw on September 1, 1939, marked the beginning of World War II, as Germany invaded Poland and launched a full-scale assault on its capital. German forces, using blitzkrieg tactics with tanks, aircraft, and artillery, quickly overwhelmed Polish defenses.

Warsaw held out for several weeks under heavy bombing and siege, but after intense fighting and massive civilian casualties, the city surrendered on September 28, 1939. The fall of Warsaw marked the collapse of organized Polish resistance and the start of a brutal occupation.

General Howitzer summarizes its impact:
Warsaw was the first hard punch of the war—Germany rolled in with tanks and bombers, and Poland never stood a chance. The city fought like hell, but blitzkrieg was fast, brutal, and unforgiving. When Warsaw fell, the world saw what Hitler was willing to do, and what happened when you weren’t ready. It lit the fuse for everything that followed and proved this war wasn’t going to be clean or quick—it was going to be total.

6 VP’s

Card Balance:

Allies – 5

Axis – 6

Complexity:

4

Conditions:

Countryside – Urban

Location:

Warsaw, Poland

Year:

1939

Theater:

Western Front

Campaign:

The Invasion of Poland

Codename:

Case White / Fall Weib

Summary

The Axis begin in countryside, and thus, have ease of movement.  But as soon as they begin to breach Warsaw, it becomes an urban challenge for them, and the tanks are much less useful.

Objectives:
6 VP’s, which can also include one temporary Medal Objective, if two of the four Fortress hexes are occupied.

Battlefield
This is a complex scenario with the Allies defending Warsaw as they are surrounded by Axis invaders. The battlefield is composed of roads, wire bales, sandbagged troops protected in city and church hexes. Since this is an urban scenario, the infantry will play a major role for both sides.

Troops:
Allies – 10 Infantry; 2 Artillery
Axis – 10 Infantry; 6 Armor; 1 Artillery

Allies:

1. Note that although the Axis have overwhelming armor advantage, the number of infantry hexes in this scenario are balanced at ten – ten. And since infantry are the primary forces useful for urban warfare, this part, at least, is good news for the Allies.

2. The Allies also have two well-placed artillery in two corners of the city. They can provide an effective deterrent against the Axis onslaught. Use them at every opportunity.

3. The scenario begins with two infantry forces out in the open on unguarded hexes. Get them into a town or church hex as you are able to, as there is no point in giving up easy VP’s to the enemy.

4.  The Axis Infantry unit at A5 is in a no-retreat position. If you have the cards, you can gain some hits there early in the game.


Axis:

Big Picture strategy for the Axis is to soften the urban infantry defenses with long-distance shelling from your artillery and armor. Only when they are weakened should you move in for the close assault from the infantry. 

1. Two of the four Fortress hexes become a temporary Objective Medal if the Axis can keep and hold them. Note that although they are occupied by Polish troops at the start of the scenario, they are not sandbagged, like some of the town hexes. This makes them a possible point of attack for you.

2. The Axis have overwhelming armor forces, but given that this is an urban scenario, their fire-power is limited. They can be kept at a distance and used to soften the defenses in preparation for an infantry attack. Remember that armor and infantry are designed to work together.

3. However, should you get an armor assault card, you may give consideration to moving right next to all of the heavily guarded infantry hexes, so that you can complete a close assault maneuver with one extra dice for every attack. With two dice per attack, and four armor units, you can do serious damage to the enemy, and soften them up for your infantry assault.  This will have the additional benefit of having the armor units automatically removing the barb wire, so that when the infantry does come, they can attack with more firepower. But once this is completed, then pull back your armor as quickly as possible.

4. The placement of your forces on the right flank is awkward. You have an infantry and an armor unit with no retreat option. Unless you move those to a better spot, they will be targeted by the Allied artillery, granting them a quick early VP.

5.  Remember that, as Axis, you can convert Recon cards into air attacks.  This will give you additional opportunities to take out entrenched units, like the artillery.

Battle Reports

(percentage of Allied victories):

51%

17
BR - Warsaw

Author:

Days of Wonder

Link:

Battle of Kalatch

Battle of Kalatch

scenario_Battle_of_Kalatch_start

The Battle of Kalach (August 8–11, 1942) was a significant engagement on the Eastern Front during Operation Blue, the German summer offensive aimed at capturing the oil-rich Caucasus and Stalingrad. The battle occurred near the town of Kalach (now Kalach-na-Donu), located west of Stalingrad.

German forces, primarily from the 6th Army, clashed with Soviet troops in an attempt to secure critical crossings over the Don River. The Germans aimed to encircle Soviet forces defending the area and advance toward Stalingrad. Despite stiff resistance, the Soviets were forced to retreat across the river after suffering heavy casualties. The German victory at Kalach cleared the way for their advance on Stalingrad, where the subsequent battle would become a turning point of the war.

While a tactical success for the Germans, the battle highlighted the growing determination of Soviet forces and set the stage for the eventual encirclement of the 6th Army during the Battle of Stalingrad later in 1942.

General Howitzer summarizes this battle’s significance:
The Germans may have won the ground, but they missed the bigger picture—those Soviet boys weren’t breaking, they were digging in. This fight lit the fuse that would blow the 6th Army to hell at Stalingrad. You can win a battle and still lose the war if you don’t see what’s coming.

~~ General Howitzer

6 VP’s

card

Card Balance:

Allies – 4

Axis – 5

Complexity:

3

Conditions:

Countryside

countryside

Location:

Russia

Year: 

1942

Theater:

Eastern Front

Campaign:

Codename:

Operation Blue

Summary:

This scenario begins with half of the Russian forces stuck behind an impassable river with only a single bridge from which to advance. At the same time, one third of the German forces are stuck in the corner.

Objectives: 6 Medals, including the town of Dobrinka as a temporary territorial medal for the Axis

Terrain:

Mostly open countryside with a few forests and hills. There are two rivers with bridges behind which many forces for each side are stuck.

Troops:

Allies – 3 Infantry, 6 Armor

Axis – 3 Infantry, 6 Armor

medal allies

Allies:

1.  If you want to defend your units around the town of Dobrinka and the accompanying medal, you will need to get your forces moved forward very quickly. Many of them are stuck behind the Le Don river, so you will need to cross the bridge with your armor quickly.

2.  Move your armor on your right flank into the center, to defend your other center section armor which is behind the Le Don River and will need some protection until they do so.

 3.  About the only way to win this scenario is to get your armored forces out from behind the Le Don river.  Make it your first priority, before attacking the enemy, no matter how tempting, to get your forces into play. You each of six Armor units, but with three of yours stuck behind the river, and backed up against the border wall, they are as good as sitting ducks.  Get them across the bridge ASAP!


medal axis

Axis:

1. Historically, the Axis executed a pincer move from both sides. You will have to get your forces across the bridge of the Le Tchir River as rapidly as possible. 

2.  The natural focus for your first attack is of course the two Allied infantry units defending the town of Dobrinka.

3.  The Allies have two Armor units up against the border at columns J and I.  If you can get your Armor up there in time, you can smash them against the wall. Six dice on average will give you an extra hit for each flag.  It is a very quick way to take out that half of the battle forces. 


19
BR - Kalatch

Author.

URL

Mignano Monte Lungo

Mignano Monte Lungo

Listen up, men—

The Battle of Mignano Monte Lungo was a damn fine example of grit and redemption. After switching sides, the Italian troops had something to prove—and by God, they did it. That mountain was no cakewalk. The Germans were dug in deep, with every ridge covered by fire, and the terrain was as unforgiving as a mule kick to the gut.

But those Italians, with the Yanks watching, clawed their way up that blasted rock from December 8 to the 16th, 1943. Took casualties. Took hell. But they took the mountain too. That wasn’t just a hill—it was a message: Italy was back in the fight, and they were fighting on the right side this time.

Monte Lungo wasn’t just a tactical win. It was a morale sledgehammer. And it cracked open the road to Cassino. That’s how you turn the tide—with steel in your spine and fire in your gut.

~~ General Howitzer

6 VP’s

Card Balance:

Allies – 6

Axis – 5

Complexity:

3

Conditions:

Countryside

Context:

Historical

Location:
Italy

Year:

1943

Theater:

Western

Campaign:

The Italian Campaign

Codename

Summary:

The Axis forces begin this scenario in control of the hexes across two-thirds of the battlefield, protecting two VP town hexes. The challenge for the Allies is to cross the open plain with out being decimated before they can control the hills and get to the VP’s.

Objectives:

6 VP’s, plus Monte Lungo and Monte Rotondo are temporary Medal Objectivese for the Allies.

Battlefield:

Troops:

Allies – 

Axis – 

Allied Strategy

1.  Big Picture Strategy:  the Axis forces have an Artillery guarding the left flank, and it’s objective medal. But there is an objective medal on the right flank.  Head all of your forces in that direction.

2.  If you can move your Artillery forward one row, you will be able to hit more of the enemy with 2D attacks.


Axis Strategy

1.  Big Picture Strategy: Guard the Objective Medal on your left flank.  If they enemy gets the right cards, they can very quickly come upon your forces and overwhelm them.

Battle Reports:

(percentage of Allied victories)

15
BR - Mignano

Author:

Days of Wonder

ID:

Link:

Arracourt

Arracourt

scenario_Arracourt_start_Axis

The Battle of Arracourt (September 18–29, 1944) was one of the largest tank engagements on the Western Front — a dramatic clash between the U.S. 4th Armored Division and German Panzer forces near the village of Arracourt, in northeastern France.

After the breakout from Normandy, U.S. forces under General Patton’s Third Army raced across France, outpacing their supply lines. The German High Command, desperate to halt the advance, launched a counteroffensive using newly arrived Panzer brigades from the 5th Panzer Army. Their goal was to cut off the American spearhead and regain the city of Nancy.

By the end of September, the Germans had lost over 200 tanks and assault guns, compared to about 25 U.S. tanks. The American victory at Arracourt shattered the Panzer brigades, halted the German counterattack in Lorraine, and confirmed the U.S. Army’s growing mastery of combined-arms tactics.

Listen up—Arracourt was no accident. That fight proved what I’ve said all along: steel alone doesn’t win battles—men do. When you’ve got training in your bones, clear orders on the radio, and the guts to move fast and hit hard, you can take on any tank the Krauts can throw at you.

Our boys out there turned the rolling fields of Lorraine into a graveyard for German armor. Outnumbered? Maybe. Outclassed? Never. We didn’t dig in and wait—we maneuvered, struck from the flanks, and crushed them before they knew what hit ’em.

Arracourt wasn’t just a victory—it was a lesson to every soldier in this Army: brains, speed, and discipline beat brute strength every damn time.

~~ General Howitzer

6 VP’s

Card Balance:

Allies – 6
Axis – 4

Complexity:

4

Conditions:

Location:

France

Year:

1944

Theater:

Western Front

Campaign

Codename

Summary:

The Arracourt scenario is dominated by a hilly ridge of five hexes which cut across a flank and into the central section, and another smaller ridge in front of that. When the armor comes over the ridge, it becomes a mighty tank battle.

Allied Strategy:

1.   Be careful to not launch a premature attack on the left flank. If you are not ready, you will be entering a kill box. It may be wiser to pull back to the secondary row of ridges, to get prepared for attack.

2. The Axis forces are together in the upper right section behind the Marne-Rhine Canal. If you can move in with your armor and some artillery attacks, you are may be able to score at least one medal before they can respond.

3. You have three artillery. Use them to your advantage. If you can move your center one forward a bit, it will improve your attack and control of the center section.


Axis:

1.  Your right and center sections are strong; the left units stuck behind the canal is your weak side. As you are able, get them out of harms way, or they will be easy pickings for the Allies.

2.  Grand Strategy for Axis: the battle will be fought on your right flank with the armor from both sides on the two ridges and the valley between.  You need to get your tightly condensed and no-retreat armor out into the open so you can battle well. If you stay backed up against the border on the right flank, your troops will be destroyed.

3.  Early goal: eliminate the enemy Infantry at G7, or they will do unnecessary harm to your forces in the center section. 


Battle Reports:

(percentage of Allied victories)

 60%

19
BR - Arracourt

Author:

Link: View Here