Securing the Flank

Securing the Flank

The battle “Securing the Flank” near Caen, France, was part of the Allied efforts during the Normandy Campaign of World War II in the summer of 1944. Following the D-Day landings, the Allies sought to expand their beachheads and secure strategic positions to enable further advances into German-occupied France.  The fighting around Caen was marked by intense battles in open fields, villages, and bocage (hedgerow) terrain, which slowed Allied progress and caused heavy casualties. Despite these challenges, the Allies ultimately succeeded in securing the area, paving the way for the liberation of Normandy and the advance toward Paris.

5 VP’s

Card Balance:

Allies – 4

Axis – 5

Complexity:

3

Conditions: 

Countryside

Location:

France

Year:

1944

Theater:

Western

Campaign:

Normandy Invasion

Summary:

Objectives:

5 VP’s, including two temporary Medal Objectives
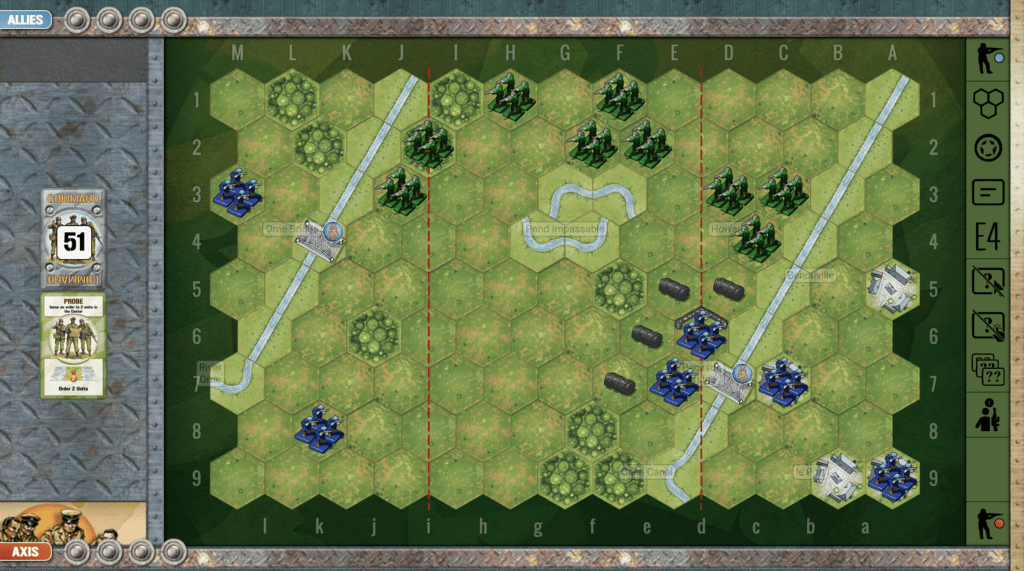
Battlefield: 

The center of this battlefield has a range of hills facing a three hex town with a Objective medal for the Allies. Control of the center will determine success in this scenario.

Troops:

Allies – 9 Infantry, 4 Armor

Axis – 7 Infantry, 3 Armor, 1 Artillery

Allied Strategy:

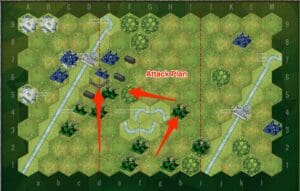
1.  The Allies have a temporary medal objective in the town of Fontenay le Pesnel in the top center section.  So grab the hilly ridge just below it, to launch the attack. As you attack the Axis forces around the battle field, you can continue to push up into the city, forcing the enemy to defend on multiple fronts.

2.  Your two infantry in the right section are open and undefended. Get them into the forest hexes as soon as you can.  The Axis have a couple of armor stuck behind hedgerows so you have a bit of time to secure your forces.

3.  Because of the enemy artillery, the left flank is your weak flank. The large open countryside is dangerous territory for your troops to try to cross with the enemy infantry sandbagged in the woods, combined with the artillery.

Axis Strategy:

1.  Your armor in the lower left flank needs to get into action as soon as possible. It will take one move just to move them into a position where they can respond to enemy threats. Do that at your first opporunity.

2. Once you have your armor in place on the left flank, your next concern is your right flank, which can become overwhelmed if the enemy is aggressive and has the right set of cards. 

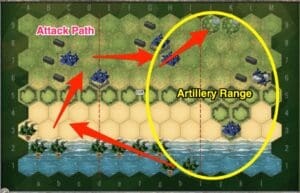
3.  Move your artillery on your right flank forward when you can.  This will give you 2D attack on the front two hexes of the center hill.  This will mute the Axis attack against your fortified infantry in the center.

4.  Protect the city of Fontenay le Pesnel.  Do not let the enemy troops get close enough to hide in the city.  If they control two hexes, you lose the medal to them. 

15
BR - Securing the Flank

Author:

Days of Wonder

URL

Saverne Gap, Vosges

Saverne Gap

scenario_SaverneGap_start_Allies

Listen up, soldiers. The Saverne Gap is the low door through the Vosges—and the key to Strasbourg. On 21 November, XV Corps under Haislip hit the line at Phalsbourg and started prying that door open. While our infantry pressed the pass, Leclerc did exactly what I like—speed and audacity—splitting his 2e DB into two hard-driving task forces: one swinging north via La Petite-Pierre, the other knifing south through the woods by Dabo. They struck Saverne from both flanks, and a southern column punched in from the west, climbing to the Gap and rolling the defenses from behind. The enemy fought, but without depth or reserves you can’t stop a three-pronged hammer. Result: Saverne falls, the hinge breaks, and the road to Strasbourg yawns wide.

Lesson: find the gap, hit it fast, hit it twice, and exploit without blinking. Keep moving—because momentum, not caution, wins cities and ends campaigns.

~~ General Howitzer

5 VP’s

Card Balance:

Allies – 6

Axis – 4

Complexity:

4

Conditions:

Moutaneous Countryside

Location:

France

Year:

1944

Theater:

Western Front

Campaign

Codename

Summary:

Because of the impassable mountains, Saverne Gap is almost like three separate battles taking place.

Allied Strategy:

1. As Allies, there is very little opportunity to move troops from one section to another, so you need to watch your tactics carefully and be careful with your attack.

2. One possible opportunity for attack is up the center, if you have the right combination of cards, such as Infantry Assault, you goal is to quickly overwhelm the first town in your way. While they enemy controls that town they can force you back against the wall and score some extra hits with retreat flags. The wire bales in front of the town will definitely decrease your attacking power, but with two or three good center section attack cards, you will eventually be successful. From there, your forces will be able to spread out a bit for the attack against the forces defending town of Saverne.

3. Your right flank will be the most difficult one to maneuver through. With the tight quarters and the enemy protected in a town and forest hex, it will be difficult for your tanks to succeed agains them. The tanks can only fire with one dice at a time. And you only have one infantry force to attack the town and forest hexes. If you can lead with your infantry, they will be more successful by being able to throw two dice at a time for each close assault attack.

4. Watch your card play, and when you get the right combination of special Combat cards, use that as the basis for your decision of which section to pursue your victorious attack.

5.  With a number of left flank cards, you can attack the infantry in the woods and town at a distance.  Degrade and eliminate them, and then move in to attack the town of Saverne itself from the flank, surprising the enemy, just as they did historically.

Axis Strategy:

1. Note that because the mountains are impassible, you will not be able to fire your artillery at the outer sections.

2. The center section will be the most important to guard as the town of Saverne represents one VP. If you can delay the advance of the infantry up the center, you may be able to wait for the right combination of cards to assist you with the task of preventing their forward advance.

3. Keep your forces in the forests and town hexes and never leave them. Just stay safely hidden inside as you continuously attack them relentlessly degrading their attacking power.

Battle Reports

(percentage of Allied victories):

46%

22
BR - SaverneGap

Author:

Days of Wonder

Link:

Sainte-Mere-Eglise

Sainte-Mere-Eglise

scenario_StMereEglise_start_Allies

“Listen up! On June 6th, 1944—D-Day—the boys of the 82nd Airborne Division as part of Operation Neptune, jumped out of those planes and straight into history. Sainte-Mère-Église—that was the prize. Those paratroopers were dropped right on top of the town, some hanging from steeples and some dropping straight into Germany’s lap!

But those boys didn’t flinch. They fought like hell, street by street, house by house, until Sainte-Mère-Église was ours. That town was the first piece of France to taste freedom again, and by God, it stayed that way.

They didn’t just take a town—they choked off German reinforcements and cleared the way for the boys coming in at Utah Beach. That’s how you make a landing stick, boys—you seize the ground, hold it like a bulldog, and keep moving forward! Sainte-Mère-Église was just the start of the march that would bring Hitler’s Reich to its knees!”

~~ General Howitzer

4 VP’s

card

Card Balance:

Allies – 5

Axis – 4

Complexity: 

2

Conditions:

countryside

Location:

France

Year:

June 6th, 1944

Theater:

Western Front

Campaign:

Normandy Campaign

Codename:

Operation Neptune

Summary:

The option to drop paratroopers in either of the three sections at the start of the battle makes for a very interesting strategy, and a battle that varies quite a bit from game to game. Is there a better choice between dropping the paratroopers in the center section, or left or right flank? It comes down to the cards in your hand. So before you do the para-drop, check your cards, and determine where your most likely result of overwhelming force will occur. Combine a strong set of cards, with the presence of 3 or 4 additional infantry, could turn the tide in favor of the Allies.

Objectives:  4 VP’s

This is a four VP game, so there it is fast, and there is no room for mistakes. It is not so much about strategic positioning; it is about hitting the enemy hard and fast.

Terrain:

Countryside with forests on each side of the town of Mere-Eglise in the center section.

Troops:

Allies – Infantry, 6 -10, depending on the success of the paradrop.

Axis – 9 Infantry, 1 Armor

medal allies

Allied Strategy:

1. Check your cards before you drop. Then use the drop to give even more power in your strong section. However, note that there is no guarantee that all four paratrooper units will survive the drop. You may end up with half of the force you expect. And you must be prepared for that contingency, should you drop them in the midst of enemy forces. A good commander prepares for this eventuality.

2. Your center section infantry should be ready to deploy in either direction, depending on enemy actions.

3. If you can maximize your firepower in one section, and quickly destroy the enemy, then you may have enough time and movement to bring your forces to strengthen the attack in the next section.

4. The Allies control five cards to the Axis four, so the principles of flexibility and responsiveness are on your side.

medal axis

Axis Strategy:

1.  You are going to have to respond to the surprise attack by the Allies before you can do much else. But as soon as you have a chance, move your Armor out into the battle.

2.  You will have superior forces on whichever side they did not drop into, so do what you can to get your four kills before their forces overwhelm you. Your armor will be essential to the win.


Battle Reports

(percentage of Allied victories):

62%

28
BR - Eglise

Author:

Days of Wonder

Pointe-du-Hoc

Pointe-du-Hoc

scenario_PointeHoc_start_Allies

The Battle of Pointe du Hoc was a critical part of the D-Day invasion on June 6, 1944. Pointe du Hoc, a steep cliff overlooking the English Channel between Utah and Omaha beaches, was targeted because it housed a German gun battery capable of threatening the Allied landings.

U.S. Army Rangers were tasked with scaling the 100-foot cliffs to neutralize the German artillery positions believed to be in bunkers at the top.  About 225 Rangers from the 2nd and 5th Ranger Battalions led by Lieutenant Colonel James Rudder.  Using ropes, ladders, and grappling hooks under intense German fire, the Rangers climbed the cliffs while under heavy fire.  The Rangers discovered the artillery guns had been moved inland. They located and destroyed the guns using thermite grenades. The Rangers suffered heavy losses—fewer than half were still capable of fighting after the battle.

General Howitzer sums up its importance:

Listen up, men—Pointe du Hoc wasn’t just another hill; it was the lynchpin in the whole damned invasion. Our boys scaled those cliffs under fire, ripped out the German artillery, and made damn sure nothing could rain hell on Utah and Omaha. It was guts, grit, and glory—one of the boldest strikes of D-Day, and it damn well helped crack open Fortress Europe.

~ General Howitzer

4 VP’s

Card Balance:

Allies – 6

Axis – 4

Complexity:

2

Conditions:

Beach

Location:

Normandy

Year:

1944

Theater:

Western Front

Campaign:

Invasion of Normandy

Codename:

Part of Operation Overlord

Briefing:

This scenario is a tough one for the Germans, as the Allies have a 69% success rate.

Objectives:

Because this is a 4 VP scenario, every single hit matters, so both Axis and Allies need to carefully target and concentrate their fire.

Battlefield:

This scenario has a ridge running across the entire battlefield. It is a two-hex move to climb the hill, so it is a challenge for the Allies to mount it. But once they do, it is a short trip to the forest in the corner containing additional victory points. 

Troops:

Allies – 9 Infantry

Axis – 5 Infantry, 1 Artillery

Allied Strategy:

1. Like all beach scenarios, the goal is to get off the beach as quickly as possible. But the ridge running across the beach, does allow Allies to assemble their forces just behind the ridge, massing together, until they are ready to climb the ridge together and attack.

2. Watch out for the infantry hex on the Pointe, and for the artillery on your right flank. You will need to shift your forces to the left as quickly as possible, or the enemy could gain one VP before you even get out of the water. You can move your infantry in a straight lateral move while still in the water, to get away from the Pointe.

3. The best pathway to the VP’s in the forest on your right flank, is to overwhelm the enemy on the left flank, and work your way all the way across the middle section into the forest. Once you make your way off the beach on the left flank, you can take a bit of time to assemble all of your forces, and gather the cards you need for your center section attack.  This will keep you out of the Artillery range.

Memoir 44 scenario Pointe de Hoc

Axis Strategy:

1. Take advantage of the ridge facing the shore. If you have the infantry movement cards, get to the ridge and batter the troops as they approach. If you just sit in your bunkers or sandbags, and wait for them to mass and attack, you will be overwhelmed.

2. First moves are to attack with your infantry from on the point, and your artillery while Allies are still in the water. This will force them up the coast away from your artillery, and most importantly, away from the victory points in the woods.

3. Use your artillery well to slow down, harass, and destroy the troops while they are still on the beach.

4. Once the Allies make it up onto the ridge, if you can restore your remaining forces back into your bunkers, it may give you enough time to degrade the enemy forces enough to prevent their achievement of the VP’s in the forest on your left flank.

Battle Reports

(percentage of Allied victories):

69%

30
BR - Pointe

Author:

Days of Wonder

Link:


Pegasus Bridge

Pegasus Bridge

The Battle of Pegasus Bridge took place on June 6, 1944, during the D-Day invasion of Normandy. Just after midnight, British airborne troops from the 6th Airborne Division, led by Major John Howard, carried out a daring glider assault to capture two critical bridges over the Caen Canal and the Orne River, later known as Pegasus Bridge and Horsa Bridge.

General Howitzer:

Now listen up! The mission was crystal clear: secure those bridges, and do it without hesitation. Why? So no German panzers dare roll onto our beaches and stomp the Allied advance inland. You shall not let them through!

Despite stiff resistance, the British airborne forces struck swiftly and clean—bridges seized, German counterattacks cut off, and few casualties to count. That’s the hallmark of precision, restraint, and utter battlefield dominance.

Capturing Pegasus Bridge wasn’t a side theater—it was the backbone of D‑Day success. Once secured, reinforcements poured inland and German armored units were effectively nailed down before they ever saw the fight. This operation wasn’t coincidence—it was craftsmanship.

Let me be blunt: this was one of the most precise airborne operations in history—pure planning, unshakeable bravery, executed in lockstep with strategic vision. That’s how wars are won—not by waiting for luck, but by making it happen.

4 VP’s

Card Balance:

Allies – 6

Axis – 2, 3, 4

Complexity:

1

Conditions:

Countryside

Location:

Normandy

Year:

1944

Theater:

Western Front

Campaign

Codename

Briefing:

This intro scenario to M44 has only infantry, so managing their movements and ability to attack will determine victory and success. It is heavily favored for the Allies, to represent history, so the Axis need to have a great combination of card management, lucky dice and good strategy to win.

Objectives
Four VP’s, and two bridge Objective Medals.

Battlefield:
Countryside, slashed by two rivers – the Orne and the Caen Canal, whose bridges are the focus of the Objective Medals.

Troops:
Allies – 9 Infantry
Axis – 6 Infantry

🔥 Winning as Allies:

1. The Allies are faced with the need to literally ‘divide and conquer’ on two fronts. One strategy to address this is to focus your energies first on your right flank and take out the units defending the bridge. Once they are gone, and the bridge is gained you will already have three of your needed four points. You will of course have to manage your forces on your left flank so that the enemy is not picking them off one by one from acrosss the sandbags and from across the river.

2. The other attack option is to encircle the enemy by going around the lake with your excess Infantry forces. The Allies have more Infantry than can effectively attack in the narrow range between the river and the lake.  So you can send some around the lake on a long-range mission to attack the enemy from the other side as well.

Memoir 44 Pegasus Bridge Scenario

🔥 Winning as Axis:

1, Because Allies are heavily favored with a 9-6 infantry count, and a 69% success rate, the Axis must get all of their infantry into the fight as soon as possible. Early moves to activate the infantry in the corner of the right flank should be implemented. They can bring a good flanking maneuver to slow down the Allied attack on their sandbagged comrades by firing across the Benouville river.

2. An alternative attack strategy, if you have the movement cards for it is to get at least one of your infantry units across the bridge and into the fight in the center section.

3. Although the Objective Medal of Orne Bridge is within easy reach of the Allies, there is no need to sit on it and wait to be attacked out in the open (As a bridge provides no defensive value). A better strategy would be to have the two infantry units on the left flank to secure protection in the grove of trees above and below near the bridge. Each unit would be within two hexes of the bridge and able to send a withering attack against any Allied units who prematurely try to grab the bridge without first clearing the Axis defenders.

DoW Battle Reports

( percentage of Allied victories):

69%

26
BR - Pegasus

Author:

Days of Wonder

Link

Operation Goodwood

Operation Goodwood

scenario_Goodwoord_1

The Battle of Goodwood (July 18–20, 1944) was a major Allied offensive during the Normandy Campaign in World War II. The operation was spearheaded by the British Second Army, under Lieutenant General Sir Miles Dempsey, and aimed to break through German defenses east of Caen and open the way for a broader advance.

General Howitzer explains:

“Listen up! The Battle of Goodwood was one hell of a slugfest in the summer of ‘44. It kicked off with the skies roaring—a massive aerial bombardment to soften up those German positions, and then the British and Canadian tanks rolled out, thousands of ‘em, across that open French ground.

But you know how it goes— the Germans were dug in deep. Minefields, anti-tank guns, artillery—the whole works—slowed down that armored push, and the Germans counterattacked with everything they had.

Even though they didn’t break through like they hoped, it wasn’t for nothing—the Germans were bleeding, and those tanks kept ‘em busy. It gave us breathing room to launch Operation Cobra and tear open the western flank.

So remember this, boys—even when the breakthrough doesn’t come, if you’re tying up the enemy and keeping him on his heels, you’re still doing the job! That’s the mark of a real fighting force!

6 VP’s

card

Card Balance:

5 – 5

Complexity:

3

Conditions:

Countryside

countryside

Location:

France

Year:

1944

Theater:

Western Front

Campaign:

Normandy Invasion

Summary:

 In the Goodwood scenario, whichever side can gain control of the ridge on the flank, will be in a position of dominance for that flank. Control of the town in the other flank, will lend an advantage to whomever controls it.

Objectives:

Six medals, no terrain objectives

Terrain:

The Goodwood scenario is marked by a large hilly ridge on one flank, while the other two sections are basically a wide open battlefield, with just one two-hex town in the center of it. The center section is wide-open to allow the tank battle which occurred historically.

Troops:

Allies – 6 Infantry, 6 Armor

Axis – 7 Infantry, 3 Armor, 2 Artillery

medal allies

Allied Strategy:

1. The most important first thing which the Allies need to do in this scenario is in the center section. Their armor is only two hexes away from the Axis infantry in the town of Cagny. The armor has no retreat option. Therefore, the typical odds of a one in three hit ratio, increase by 17% to a one in two possibility of a hit, per die. So the armor will need to be moved into the adjacent forest, or moved away entirely to a spot where it has a retreat option.

2.  You have six armor to the enemy’s three armor.  Use it by rapidly gaining control of the center and attacking from there.  You will also need to be ready to move into your left flank to defend your weak infantry.

medal axis

Axis Strategy:

1. Although outnumbered, the Axis’ armor has been able to defeat the Allied armor with the right combination of tactics and patience.  You need to stay in your defensive positions, and attack as opportunities present themselves. Then with the right combination of cards, you can push up through the center and take control.

2.  Potential Attack Vector:  You are strong on the right flank, while the enemy is weak.  If you can move your armor forward rapidly, you could score a lot of points.

9
BR - Goodwood

Author:

Days of Wonder

URL