Montelimar

Montelimar

scenario_Montelimar_start_Axis

The Battle of Montélimar (August 21–28, 1944) occurred as Allied forces, advancing quickly north from the Operation Dragoon landing beaches, sought to disrupt the German retreat along Route N-7, a critical supply and escape route near the Rhône River. The battlefield featured a mix of open farmland, rugged hills, and strategic chokepoints.

By August 22, skirmishes intensified as both sides probed each other’s strength. On August 24, German forces gained a critical edge after capturing detailed Allied operational plans. Despite this intelligence, their ambitious counterattacks on August 25 faltered. Efforts to cut off American forces and secure key terrain like Hill 300 and the Condillac Pass achieved mixed results. While some German gains were made, they were driven back by American artillery. Conversely, Allied attempts to sever N-7 were repelled by strong German counterattacks, leading to a tactical stalemate.

That fight was no game of chess—it was a brawl for the lifelines out of there. Both sides knew whoever held those escape routes held the keys to the whole sector. We clawed and fought for every inch, and in the end, that struggle fed right into the bigger job—kicking the enemy out and driving on to liberate southern France.

~~ General Howitzer

6 VP’s

card

Card Balance:

5 – 5

Complexity:

3

Conditions:

Countryside

countryside

Location:

Southern France

Year:

1944

Theater:

Western Front

Campaign:

Normandy Invasion

Codename:

Operation Dragoon

Summary:

Objectives:

Six VP’s, plus terriotorial objective medals for the Axis if they capture the towns, and for the Allies if they reach the river’s edge.

Terrain:

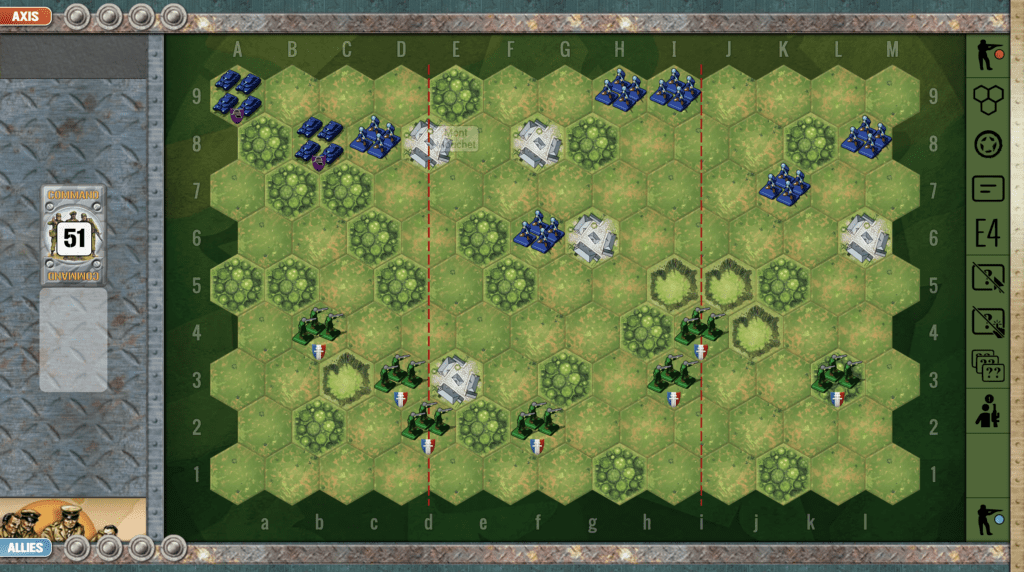
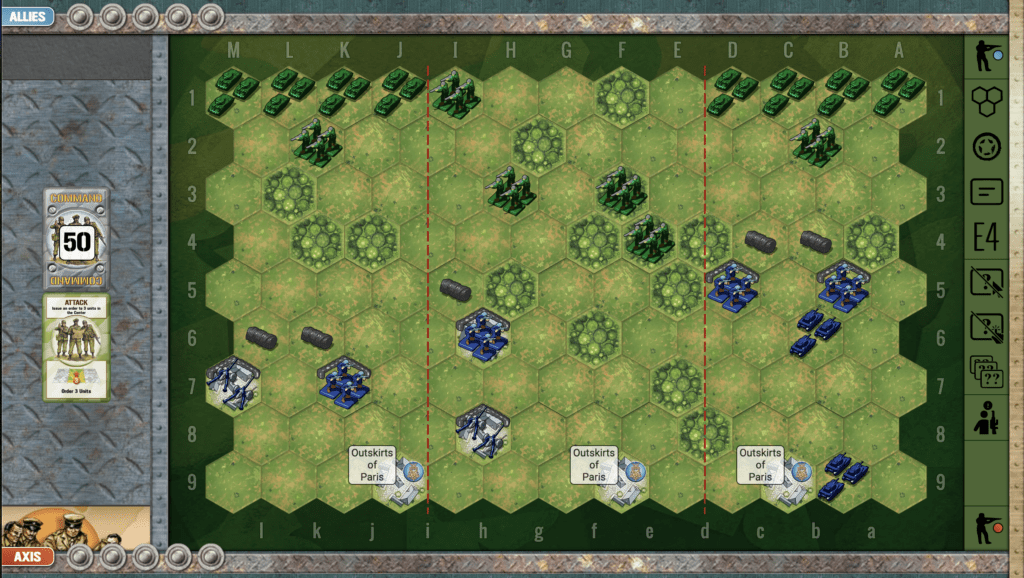
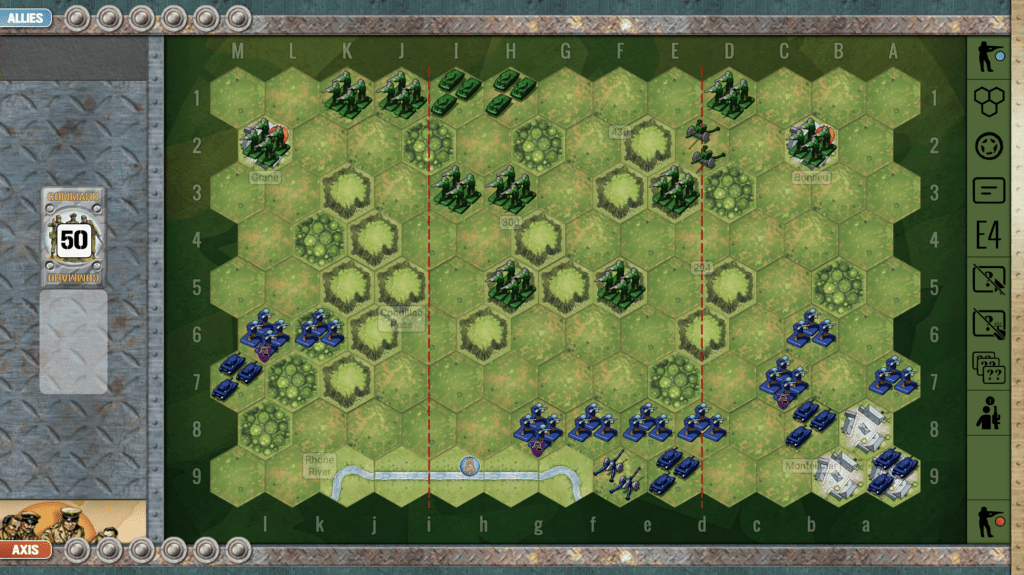
The Montelimar scenario has 5 hllly hexes dominating the center of the field of battle, plus several nearby hills. The side which controls this has some hope of reaching their objectives, whether it is the victory point towns, or the victory point riverway.

Troops:

Allies – 9 Infantry, 2 Armor, 1 Artillery

Axis – 9 Infantry, 4 Armor, 1 Artillery

thenmedal allies

Allied Strategy:

1.  The Allies begin the scenario in control of the central hilly hexes, which gives them an immediate edge. This is only blunted by the fact that the Axis are able to move first. If they get the right cards, such as an Assault in the Center or an Infantry Assault command card, they can make an immediate bid to challenge that central control.

2. Note that the hills on the right flank are impassable. This makes the right section almost its own battlefield. If the Axis get an attack advantage down that lane, they will be able to reach the Objective Medal in the town of Grane. 

3. If you hope to hold the right flank, you will need to get a unit into the forest at K4.  A Probe on the Right would allow you to swap places quickly by moving Infantry at L2 to K4, and Infantry K1 to L2

4.  The killer move is to station a unit on the hill (h6) next to, or on the hex (i6) in Condillac Pass.  Then when you are ready to finish off an enemy unit to gain your fifth medal, then also move your other unit from the sixth row hexes where they have been waiting, right up to the Rhone River to capture your sixth medal as a territorial objective! 


medal axis

Axis Strategy:

1.  Both of your flanks are strong compared to the Allies. So advance down those if you can, as they each also have an objective medal waiting for you at the end. However, your right flank is guarded by Allied artillery, so the left may be the place to make your biggest push.

2.  You need to take control of the hill in your central section. Your forces are pressed up against the Rhone River and subject to no-retreat hits.

3.  Attack Vector: left flank.  Because the hill hexes of the Condillac Pass are impassable, your entire left flank is its own battlefield.  Should you have the right combination of attack cards, you could pick up three medals by dominating that sector.


Battle Reports 
(percentage of Allied Victories):

54%

14
BR - Montelimar

Author:

Days of Wonder

Link:


Mont Mouchet

Mont Mouchet

scenario_MontMouchet_start_Allies

The Battle of Mount Mouchet took place in June 1944 in south-central France, where the French Resistance (Maquis) mounted a significant stand against German forces. Mount Mouchet served as a major base for the Maquis, who aimed to disrupt German supply lines and occupation efforts in preparation for the Allied invasion of Normandy.

At Mount Mouchet, the Germans came in hard, determined to smash the Maquis stronghold once and for all. Outnumbered and outgunned, those French Resistance fighters didn’t flinch—they fought like lions, slowed the enemy, and bled them for every step. Their stand forced the Germans to pour in resources they could’ve used elsewhere, and that alone was a victory of sorts.

In the end, the Maquis were overrun and the mountain fell—but their grit and sacrifice echoed loud. That fight showed the world that France’s spirit was unbroken, and in the critical months after D-Day, it helped weaken the enemy’s grip on the region. The Maquis proved you don’t need tanks and planes to make a difference—you just need guts, and plenty of it.

~~ General Howitzer

4 VP’s

card

Card Balance:

Allies – 5

Axis – 4

Complexity:

2

Conditions:

Countryside

Location:

France

Year: 
1944

Theater:

Western Front

Summary:

The asymmetrical starting pattern of this game makes for an interesting and challenging battle for both sides.

Objectives: 4 Medals
(Each Axis Armor unit counts as two VP’s.)

Terrain: 

Countryside

Troops:

Allies – 7 French Resistance

Axis – 6 Infantry, 2 Armor

medal allies

Allied Strategy:

1. The Allies quickest path to victory lies in eliminating the Axis armor units, which each count as two VP’s for the Allies. This means quickly gaining control of the forest hexes on the left flank in order to attack the armor from a position of defensive cover.

2.  Also grab control of the hill on the right flank to gain the heights advantage against the enemy.

medal axis

Axis Strategy:

1.  As soon as possible, get your armor into the battle, as your infantry is slightly outnumbered.  But be careful, and do not get too close as each lost armor counts as two VP’s for the enemy.

 2. Your forces begin in disarray, so you will need to coordinate your troops into a cohesive fighting force.

Classic Battle Reports
(percentage of Allied victories):

42%

11
BR - Mount Mouchet

Author:

Days of Wonder

Link:

Market Garden (Nijmegen Bridges)

Market Garden (Nijmegen Bridges)

scenario_NijmgenBridge_MarketGarden

The Battle of Nijmegen Bridge was a key engagement during Operation Market Garden in September 1944, a large Allied operation aimed at securing key bridges in the Netherlands to create a direct route into Germany.

General Howitzer’s comments:

“Listen up, men! In September of ‘44, at Nijmegen, those bridges over the Waal River were the keys to the kingdom—a direct shot into Germany itself. The plan was big—Operation Market Garden—take the bridges, link up the airborne and the armor, and ram straight for the Ruhr.

But those Germans weren’t just going to hand over those bridges. They had them locked down tight, and it took the 82nd Airborne, those American paratroopers, to cross that river in flimsy little boats under fire like hell itself. They paddled across, outflanked the Germans, and took those bridges with guts and bayonets.

We got the bridges, but we couldn’t hold Arnhem, and the whole damn operation fell short. But don’t let that fool you—the boys at Nijmegen showed what it means to fight with everything you’ve got. That’s how you break the enemy’s back—take the objective, hold it, and never let go until the job’s done!

6 VP’s

card

Card Balance:

Allies – 6

Axis – 5

Allies move first.

Complexity: 4

Conditions:

Countryside

countryside

Context:

Historical

Location:

Netherlands

Year:

1944

Theater:

Western Front

Codename:

Operation Market Garden

Summary:

Objectives:

6 Medals including bridge hex objectives.

Terrain:

Countryside with a river and train tracks cutting across the battlefield.

Troops:

Allies –  7 Infantry, 6 Armor, 1 Artillery

Axis – 9 Infantry, 1 Armor, 1 Artillery

medal allies

Allied Strategy:

1.  Use your armor to attack the many defensive positions of the enemy.  When the time is right, then capture your objective medals.

2.  Take the time to move your artillery into a more centralized position for attack.

3.  The Axis forces are so well-defended that you will need to attack them from a distance and significantly degrade them before direct assaults.  But you need to do this quickly as many of their forward forces are close to your and able to launch some subtantial attacks against you.

4.  The Axis Artillery is a Big Gun! That means that once they hone in on you with one hit, they are able to increase the dice attacks by one. So if they hit you once, and you have any figures remaining in the hex, you need to bug out, and move those figures to a new hex. 

medal axis

Axis Strategy:

1.  The Allies have an overwhelming armored force, so much of your work is defensive in nature, although you should pursue any soft targets you can locate. However, your two advanced infantry forces in the center have the ability to do significant damage to the enemy armor if you can quickly attack them while they are in no-retreat positions.  Be aggressive and you may be rewarded!

2.  There are two bridge objectives which you must protect. Stay close to each of them, and protect them well.

3.  Your Artillery is a Big Gun, so use it on semi-permanent targets so that you can take advantage of the additional die roll.

17
BR - Nijmegen

Author

Longvilly Trap

Longvilly Trap

December 19th, 1944: They sprang the Longvilly Trap because we were stretched thin and caught standing still—never a good idea in a shooting war. Near Longvilly, ahead of Bastogne, the enemy pushed armor hard through the Ardennes and found American units sitting exposed on narrow, jammed roads with broken communications. The Germans hit fast and coordinated tanks with infantry, rolled right over isolated formations, and smashed them before they could maneuver. It was a bloody setback, no question—but it bought the enemy only time, not victory. Longvilly opened the road to Bastogne, yes, but it also set the stage for us to dig in, turn, and hit back harder—because wars aren’t won by trapping men, they’re won by destroying the enemy, and that bill was coming due.

~~ General Howitzer

VP’s: 6

Card Balance:

Allies – 4

Axis – 5

Complexity:

4

Conditions:

Winter

winter

Location:

Belgium

Year:

1944

Theater:

Western 

Campaign:

Battle of the Bulge

German Name:

Unternehmen Wacht Am Rhein

Summary:

This is a fun and exciting scenario as the Americans attempt to survive the seige of Bastogne and open up an escape route.  The Axis are able to pummel the Americans from all directions with Artillery, Mortars, and Tanks, while the Americans force their powerful Armor across the countryside and toward the Exit hexes.

Objectives:

The Americans need to break through the German roadblock and open the way to Bastogne.

Six Medals.  There are also two Exit Medal Objectives for the Americans to breakthrough.

Battlefield:

Winter conditions, with roads and rivers cutting through the battlefield.

Troops:

Allies – 5 Infantry, 6 Armor, 1 Artillery

Axis – 5 Infantry, including some SWA’s (Mortars), 6 Armor including two Tank Destroyers (2,2,2,2),  3 Artillery

Special Rules:

1.  Winter Combat rules – two hex armor movement

2.  Reduced Visibility rules – only hit with Grenades unless in Close Assault

2.  Special Weapon Asset rules for Mortars – 3,2,1,1

3.  The river is frozen, but impassable.

4.  Roadblock rule

5.  Also play with Winter Combat cards in addition to regular Combat cards

medal alliesAllied Strategy:

1.  Primary Objective is to break through and provide a passage to Bastogne so the troops can be rescued, as they were, historically.  You may want to keep the roadblock in place, so that your Armor can exit to the east without worry about rearguard action.  

2.  Your forces are congested in the town of Bastogne.  Retreat flags from the enemy will cause losses, so you will want to spread them out by moving your forces east along the road toward the Exit hex.  Remember that with winter conditions, you will only be able to move your Armor three hexes at a time on the road (instead of the usual four).

3.  If you have the cards for it, some gains can be had by removing the roadblock and heading west to attack the enemy directly. Otherwise, they will continue to pummel you from the woods in the north, and with their Artillery and Mortars to your southwest.  

medal axisAxis Strategy:

1.  You have the enemy completely surrounded, except for that pesky escape route along the road.  Move to block the Exit hexes ASAP.  It will only take two turns for the Allies to begin evacuating along the road.

2.  With three Artillery and two Mortar units, you can continuously attack the enemy and decimate their forces.  

3.  Remember that the Limited Visibility rules require that, unless you are in Close Combat, typically only Grenades will score a hit.  But Retreat Flags can be a very effective way to reduce the enemy in their congested situation in Bastogne. 

3.  Move the two Armor on your right and center section into the two forest hexes across the river from Bastogne.  From there you will be able to safely pick off the enemy bit by bit throughout the battle. 

4.  Take the time to move the Artillery on your right flank forward at least one row forward.  It will pay off every turn afterwards with increased firepower against the enemy hiding like cowards in Bastogne.

1
BR - Longvilly Trap

Author.

URL

Liberation of Paris

Liberation of Paris

The Liberation of Paris took place from August 19 to August 25, 1944, as Allied forces advanced through France following the D-Day landings. Resistance fighters in Paris, along with civilians, began an uprising against the German occupiers, seeking to reclaim the city before it could be destroyed.

General Howitzer’s summary:

Leclerc’s Free French rolled in with our 4th Infantry on August 24, linking up with the resistance and blasting through what was left of the German holdouts. After some damn fine street fighting, their commander—von Choltitz—had the good sense to ignore orders to torch the city and surrendered the next day.

Taking Paris wasn’t just a win—it was a thunderclap. It lit a fire under Allied morale, crushed the myth of Nazi invincibility, and gave us back the heart of France. From that point on, the road to Berlin got a whole lot shorter.

5 VP’s

Card Balance:

Allies – 5

Axis – 4

Complexity:

3

Conditions:

Countryside

Context:

Historical

Location:

France

Year:

1944

Theater:

Western Front

Summary:

The Allies vastly outnumber the Axis in this scenario. Their objective is to reach the three town hexes on the outskirts, which are permanent medal objectives. But first they have to get past the forest in the center, and the German defenses made up of sandbagged troops, barbwire, and artillery.

Objectives:

5 VP’s, plus the Allies have three towns available to them as Permanent Medal Objectives.

Battlefield:

Countryside with a lot of forests, and the outskirts of Paris at the Axis side of the field.

Troops:

Allies – 6 Infantry, 8 Armor

Axis – 4 Infantry, 2 Armo, 2 Artillery

Allied Strategy:

1.  You have a lot of tanks. Use them. You should be able to very quickly take out the infantry behind the sandbags and move down to the towns to scoop up our Permanent Objective Medals.

2.  The Battle Reports for this scenario heavily favor the Allies, so if you are playing both sides in a full game, make sure to capture all you can while you are playing the Allies.

3. As Allies, it really comes down to the battle on your strong left flank.  You have to break through the blockade of the enemy sandbagged infantry and the defending armor unit.  The more quickly you break through, the more likely the win.  But if the Axis are able to make you pay dearly with two or more units to break through, the game odds may even out.

Axis Strategy:

1.  This is mostly a defensive game for the Axis.  Keep your infantry behind the sandbags, and maximize the use of your armor and artillery to slow down the enemy advance.

2.  At a certain point, you may need to move your infantry into the towns in order to make it more difficult for the Allies to capture those Permanent Objective Medals. Remember, once they get one, they can leave the town and go for the next Objective.

3.  It generally seems to be a mistake to move one of your armor to C5 between your two infantry, in an attempt to get some easy hits on the enemy no-retreat infantry on the second row. You may get as much as three hits. However, in most cases, the Allies are able to bring forward two to four armor units and target all their forces on your lone armor hex, resulting in a quick VP for the enemy.

Battle Reports (percentage of Allied victories):
75%

20
BR - Liberation Paris

Author:

Days of Wonder

Link:

Juno Beach

Juno Beach

The invasion of Juno Beach was part of the Allied D-Day landings on June 6, 1944, during World War II. Juno Beach, one of the five beaches targeted in the Normandy invasion, was assigned to Canadian forces from the 3rd Canadian Infantry Division and the 2nd Canadian Armoured Brigade. Their mission was to secure a beachhead, push inland, and capture key objectives such as the town of Caen.

Juno Beach was no picnic—it was hell from the start. The Canadians hit the shore under rough seas, late and scattered, with German guns pouring lead and shells across the sand. Machine guns, artillery, mines—everything the enemy could throw at them was waiting.

But those Canadians didn’t back off. They regrouped fast, pushed inland with infantry and armor working shoulder to shoulder, and smashed through the fortifications. By nightfall, they hadn’t just taken Juno—they’d driven farther inland than any other Allied unit on D-Day.

They paid dearly in blood, but their victory cracked open Hitler’s wall, anchored the Allied foothold in France, and lit the road that led to the liberation of Europe. Juno Beach proved it plain: Canadian steel and courage could punch just as hard as any force in the world.

~~ General Howitzer

6 VP’s

Card Balance: 

Allies – 6

Axis – 4

Complexity:

2

Conditions:

Beach

Location:

Normandy

Year:

1944

Theater:

Western Front

Campaign:

D-Day

Codename

Summary:

Objectives:

6 Victory Points, including the possibility of four! Objective Medals for the Allies.

Battlefield:

With the River Seulles going through the center of the battlefield, the Juno Beach scenario is almost two different battles taking place at once. There is no beach ridge to slow down the advance of the Allies.

Troops:

Allies – 10 Infantry, 3 Armor

Axis – 7 Infantry, 1 Artillery

Allied Strategy:

1. The Allies need to be aware of the VP goal of six points, and then count up the number of medals and forces on the right side of the map: three Objective Medals (two towns and one bridge) and three infantry. This means, that with the “right” set of cards, an Allied player could win the battle completely just by focusing on the right flank. Now it will rarely happen that such a single-minded focus can occur based on the luck of the cards. But keeping the enemy off-balance by occasional forays on the left flank is a good strategy also. But this scenario reminds us of an important principle, to always keep your overall objectives and plan in mind throughout the battle. And do not deviate unless cards, or circumstances dictate otherwise.

2.  Of course, the left flank is a little more secure, as it is outside the range of the artillery.

3.  With the River Seulles splitting your center section, you will need to make a determination of which direction your troops will head to. This will need to be determined by the cards in your hand.

4.  As you move off the beach, the two Medal Objectives on the bridges look very tempting. But they are quite close to the enemy artillery, so you will not want to take those bridges until near the end of the game, so they cannot be chased away.

Axis Strategy:

1. Your Infantry in the bunker at I5 is in a great location to make some early hits on the enemy while they are still in the water, or backed up against it.

2. Your Infantry unit in the town of Graye-su-Mere in your left flank, is pretty useless in the early stage of the battle. Rather than wait for the action to come to them, at which point it may be too late, you may want to move it forward.

Battle Reports (percentage of Allied victories):
64%

19
BR - Juno Beach

Author:

Days of Wonder

Link: