Russian Breakout

Russian Breakout

The Russian Breakout of 1941, often referring to Soviet counteroffensives following the initial German advance during Operation Barbarossa, marked a desperate but determined attempt by the Red Army to halt the Wehrmacht’s momentum. After suffering massive losses and encirclements, Soviet forces launched breakout attacks—particularly around Kiev, Smolensk, and later Moscow—aimed at escaping German pockets and stabilizing the front.

General Howitzer summarizes it:
The Russians took one hell of a beating in ’41, but instead of folding, they came out swinging—fighting their way out of pockets around Kiev, Smolensk, and Moscow. It was messy, bloody, and half-mad, but it stalled the German steamroller just long enough for winter to slam the door. That breakout didn’t win the war—but it sure as hell kept them in it.

6 VP’s

Card Balance:

Russian – 4

Axis – 6

Complexity:

2

Conditions:

Countryside

Location:

Russia

Year:

1941

Theater:

Eastern Front

Campaign:

Barbarossa

Codename

Summary:


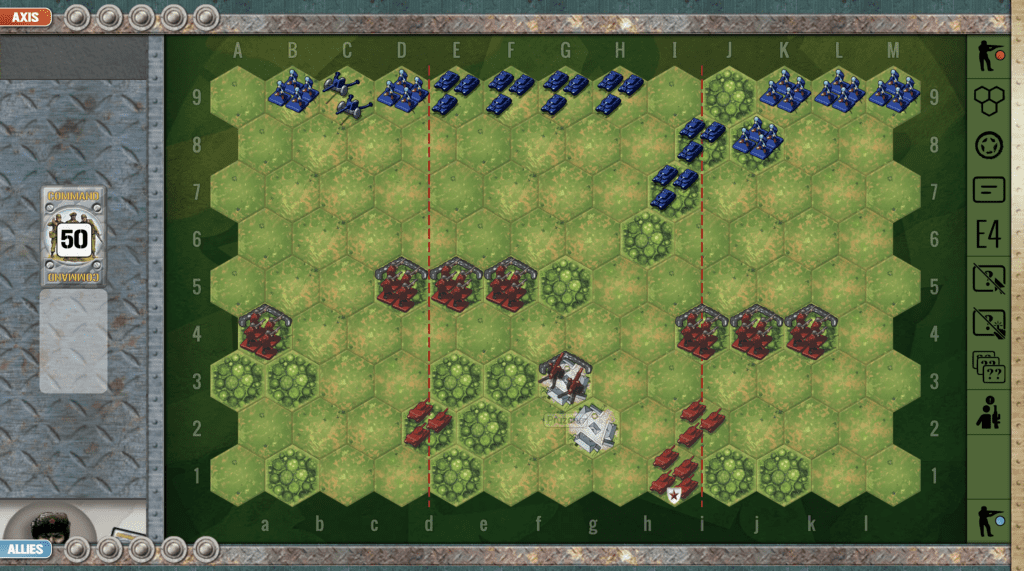
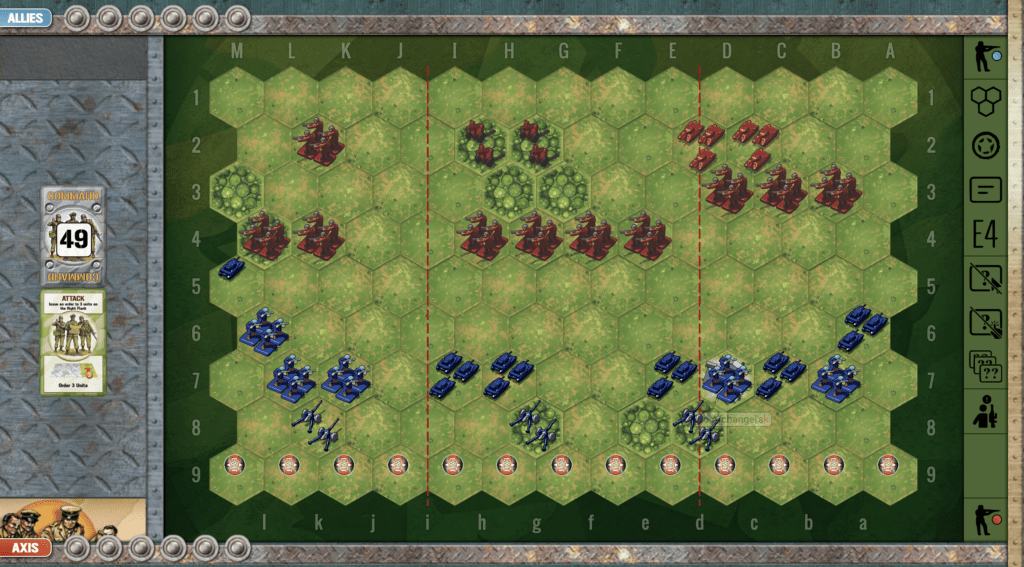
This scenario begins with both forces arrayed across the battlefield and ready to engage in warfare. If the Russian forces are able to break through to the other side, they can gain a VP for each unit that escapes the battlefield.

Objectives:

Battlefield:

Troops:

Allies – 10 Infantry, 2 Armor, 2 Artillery

Axis – 5 Infantry, 6 Armor, 3 Artillery

Allied Strategy:

1.  As the Russian commander, you are hindered by needing pre-approval on almost everything from the Political Commissar. This will make your card management – responsiveness – much more difficult.  You will need to arrange your forces to maximize mobility, and preserve the multi-sectional and Tactics cards for when you are in a real emergency.

 2.  You are outnumbered in every section except the center, where although you have more units the enemy has more fire-power with three armored units to your one.  But the enemy artillery in the right flank is not protected by the woods, so is a bit weaker. If you have the cards for a breakout on the right, you should pursue it.

3.  Many of your infantry are exposed on the open countryside right in front of the enemy armor. If you can get some of them into the woods, to give you artillery and armor time to weaken the enemy, then your infantry can come out to play shortly thereafter.

4. However, if you get a great set of cards, like Infantry Assault, or center section Assault, you absolutely can overwhelm the armor by your sheer numbers.  If you can get right next to armor with infantry, you are rolling 3D’s, just like them.

Axis Strategy:

1.  Big picture strategy for you is that you have overwhelming armored force, and you should use it before you get overwhelmed by the enemy infantry. 

2.  You need to prevent the enemy from forcing their way through your lines to the exit row. 

17
BR - Russian Brkout

Author:

Days of Wonder

URL

Pruzana

Pruzana

The Battle of Pruzana, part of the larger Eastern Front conflicts in World War II, took place in the area around Pruzana (now in Belarus) during Operation Barbarossa, the German invasion of the Soviet Union, in 1941. German forces, advancing rapidly through Soviet-held territory, encountered Soviet resistance in Pruzana as part of the initial Soviet defenses against the Axis invasion.

5 VP’s

Card Balance:

Allies – 3

Axis – 6

Complexity:

2

Conditions:

Countryside

Location:

Russia

Year:

1941

Theater:

Eastern Front

Campaign:

Operation Barbarossa

Codename

Summary:

Objectives:
Five VP’s; no Objective Medals.

Battlefield:
The principle feature of the Pruzana scenario are the two tree lines intersecting the battlefield in both a horizontal and a diagonal pattern, providing great cover for both sides.

Troops:
Russians – 7 Infantry, 3 Armor, including one T-34, 1 Artillery.
Axis – 6 Infantry, 6 Armor, 1 Artillery

Allied Strategy:

1.  The Allies can win this one by staying behind their sandbags and resisting and attacking the the Axis forces as they get near.

2.  Make good use of your artillery to degrade the enemy forces as they approach.

3.  Possible Attack Vector:  If you get the cards and are able to bring your Armor around both sides of the center woods, you can sometimes catch the Axis in the center, and then pummel them with your Infantry in the woods, followed by your Armor.  It can create a real kill box in the center, with the right set of cards. 

Axis Strategy:
1.  As Axis, you need to be wary of the enemy artillery right in the center of the battlefield.  It will be able to strike much of the field of play. So if you get an early Barrage, or Air Power, take it out as soon as you can.  

2.  The big picture strategy is that until the enemy artillery is taken out, your best attack strategy is to move up each flank away from its full power attacks, at the same time as you use your armor to take out the infantry in the woods.

3.  You can use your armor to do long distance degrading of the enemy forces, until they are at a point where your infantry can make an assault across the open fields.

4.  Use your artillery on the right flank at every opportunity.

18
BR - Pruzana

Author:

Days of Wonder

URL

Lipovec

Lipovec

scenario_Lipovec_start_Axis

July 22nd, 1941—Lypovec. Operation Barbarossa was tearing into the Soviet Union, and here came the Slovak Mobile Brigade—five thousand men, 43 tanks, and 123 artillery guns—charging into their first real scrap against the Red Army.

They smashed into General Tkachenko’s 44th Rifle Division—some fresh, some worn ragged—but the fight was no parade. The Slovaks had spirit, but their tanks ran thirsty, and fuel was scarce. They pushed into the town, only to be hammered by furious Soviet counterattacks.

What saved them? The guns. Artillery thundered, covering their retreat and keeping the whole affair from turning into a disaster. In the end, the Slovaks learned the hard truth—courage and machinery mean little without supply and strength in numbers. Against a seasoned, determined foe, they were blooded, beaten back, and reminded that war is unforgiving to the unprepared.

~~ General Howitzer

6 VP’s

Card Balance:

5 – 5

Complexity:

3

Conditions:

Countryside

Context:

Historical

Location:

Ukraine

Year:

1941

Theater:

Eastern Front

Campaign:

Operation Barbarossa

Codename

Summary:

The dominant factors in the Lipovec scenario is the river going across the battlefield, and the two artillery units safely ensconced in each of their own city hexes.

Objectives
Six VP’s. No medal objectives

Battlefield
The battlefield is split horizontally by the River Szob, which is a fordable river. There is also one bridge crossing.

Troops:
Allies – 10 Infantry, 2 Artillery
Axis – 10 Infantry, 3 Armor,  1 Artillery

Allied Strategy:

1. The Allies begin the round with three forest hexes deep into Axis territory, controlled by sandbagged infantry. This presents an early point of attack, and becomes the locus of the seesaw battle for control. Take advantage of those forward points and attack as quickly as possible at the Axis enemy pressed up against the battlefield barrier. For every flag thrown against a unit against “the wall” will be counted as a hit. This increases your chance of getting a hit by 17% for each unit.

2.  Allies have two artillery vs. the Axis’ one. So take advantage of the long-range hits available to you. The central artillery has reach of most of the battlefield. Use it.

3. As defenders in this game, unless the cards clearly dictate otherwise, you can wait across the river for the Allied attack, and then hit them when they are paused at the Szob River.

Axis Strategy:

1. The enemy begins with control of three hexes on the Axis side. So Axis will have to target the enemy incursion hex by hex to push him back. Unless Axis is given a great set of cards for a flanking attack, they will want to clear all enemy troops on their side of the river before trying to cross over.

2. You have six infantry units on your left flank. They can approach the enemy under the cover of the forest and hills, to get very close for the attack.

3.  Axis have an overwhelming advantage with armor.  Put them into action by dealing with the infantry hiding in the forest hex center seciton.

14
BR - Lipovec

Author:

Days of Wonder

URL

Hellfire Pass

Hellfire Pass

Hellfire Pass was the kind of battleground that earns its name the hard way. In June 1941, on that blasted strip of desert between Egypt and Libya, British and Commonwealth troops dug in on the heights while Rommel’s Afrika Korps came at them like wolves scenting blood. That pass wasn’t just a notch in the ridgeline — it was the key to the whole frontier, a gate that controlled who moved and who stalled in the desert war.

The Germans hit fast, hit hard, and kept hitting, using tanks, guns, and every trick they had to crack the British line. And the men holding that ridge fought with grit, firing until their barrels burned and their positions were blown apart around them. They didn’t stop the Axis forever, but they made the enemy pay for every yard and bought precious time for the larger fight ahead.

Hellfire Pass proved a simple truth: when you stand your ground on the high ground, and you fight like you mean it, even the best the enemy has can’t roll over you without bleeding for it.

~~ General Howitzer

6 VP’s

Card Balance:

Allies – 4

Axis – 6

Complexity:

3

Conditions:

Desert

Context:

Historical

Location:

Egyptian – Libyan border

Year:

1941

Theater:

North Africa

Campaign

Codename:

Operation Battleaxe

Summary:

Hellfire Pass begins with the Axis dominating over two-thirds of the battlefield. The challenge for the Allies is to break through to the exit hexes, if they can make it through Hellfire Pass.

Objectives:
Six VP’s, plus the Allies have exit hexes for additional Objective Medals

Battlefield:
Desert with the Halfaya Pass through which the battle takes place. Much of the battlefield is lined with Axis mines, which will slow the advance of the Allies.

Troops:
Allies have 9 Infantry, and 5 Armor.

Axis have 8 Infantry (including two Anti-tank units), 2 Armor, 2 Artillery

Allied Strategy:

1.  Allies have a numerical advantage in the center, of 3 Infantry, and 5 Armor. However, the Axis have a row of mines, and two artillery defending the section.  So Allies will need a good set of cards which provide for rapid advance, and a Barrage or Airpower card to attack the artillery would definitely help.

2. Because this scenario has an escape option for the British, speed is paramount. So remember that units which begin on the road are able to travel one extra hex.

3.  The Allies have a significant armor advantage of 5 – 2.  Use their attack and mobility to your advantage.  Some of them begin the scenario trapped behind infantry, so you need to get them out and into the game.

Axis Strategy:

1.  Initial plan for the Axis is defensive. Stay behind the sandbags and mines which you have set up.

2.  There are two Infantry units on your left flank which have no retreat.  Some lucky one-shot dice hits can quickly cut their firepower in half.

3. Your Armor has mobility, and are at the ready to defend against a flank attack on either side, or do a quick run up the road to defend the center section.

4. Your Artillery is well-positioned, but the enemy starts at the one-dice hit range.  It may be wise to wait a turn or two until they advance forward one row and then come within range of two-dice hits.

Battle Reports

(percentage of Allied victories):

48%

13
BR - Hellfire

Author:

Link:

Gates of Moscow (Typhoon)

Gates of Moscow (Typhoon)

scenario_GatesMoscow_start

Operation Typhoon was the German military campaign to capture Moscow during World War II, launched in early October 1941 as part of their broader invasion of the Soviet Union (Operation Barbarossa). The offensive aimed to deliver a decisive blow by taking the Soviet capital before winter set in.

German forces, under Field Marshal Fedor von Bock, advanced with two large army groups and made initial gains, encircling and destroying significant Soviet forces. However, stiff Soviet resistance, logistical challenges, and worsening weather slowed the German advance. Muddy conditions in October, followed by the onset of harsh winter, further hampered their progress.

By December ’41, the Germans thought they had Moscow in their grip—but Zhukov and his Siberian wolves had other plans. Hardened for winter, those Red Army troops stormed forward in a counteroffensive that drove the Wehrmacht off the city’s doorstep. It was the first time Hitler’s war machine got its teeth kicked in, proof that Blitzkrieg had limits when it slammed into a determined foe with steel in its spine and snow in its veins.

~~ General Howitzer

7 VP’s

Card Balance:

Allies – 5

Axis – 5

Complexity: 

4

Conditions:

Urban

Location:

Russia

Year:

1941

Theater:

Eastern Front

Campaign:

Barbarossa

Codename:

Operation Typoon

Summary:

The Gates of Moscow is a complex scenario which results in a brutal battle with many digital ‘casualties’ on both sides.

Objectives:

7 VP’s, including two Objective Medals for Axis

Terrain:

Frozen field with Kaluga river cutting vertically and a ridge of hills cutting across horizontally.

Troops:

Allies – 10 Infantry, 2 Armo, 2 Artillery

Axis – 10 Infantry, 8 Armor, 1 Artillery

Allied Strategy:

1. Big picture strategy for the Allies. This is a defensive scenario, so stay behind your sandbags and defend the two medal objectives.  Move your Artillery and Armor forward into the battle.

2.  Although there is a large Axis force massed against the Allies, the Axis side starts back against the game border. Allies can use this to their advantage, by turning retreat flags into deadly kills. Target the Axis forces which have no retreat available to them. This will increase your odds of a kill by another 17%. This increases the likelihood of an armor hit from 33% to 50%, and an infantry hit from 50% to 67%.

3.  Attack Vector Left Flank:  The enemy forces are congested. If you have a good set of cards, you can move in, and clear out many of the forces, including the armor.

Axis Strategy:

1.  Big picture strategy for Axis is to disperse your bunched-up troops and concentrate your forces on the front-line enemy to eliminate them as quickly as possible before they score too many hits against your forces.

2.  Keep pushing forward as you attack with the goal to eventually be to capture the bridge hex medal (often as a final decisive move to end the game).

3.  This is a long scenario of 7 medals, so you will have to take out the centrally located enemy Artillery. It is sand-bagged on a hill, but it needs to be attacked quickly.

4.  Beware of your armor trapped behind the row of trees on your right flank.  Do not try to take out the enemy infantry in the woods, because they will inflict heavy penalties on such an attempt.  Best option is to get them into the tree line and then out into the open for more fruitful attacks.


Battle Reports (percentage of Allied victories):

34%

(These are historical records. The poll on the right is new results.)

23
BR - Gates

Author:

Days of Wonder

Link:


Dug in at Sidi Omar

Dug in at Sidi Omar

scenario_DugInSidiOmar_start

The Battle of Sidi Omar (November 1941) occurred during the broader Operation Crusader in the North African Campaign of World War II. Sidi Omar, located on the Libyan-Egyptian border, was a heavily fortified Axis stronghold defended by Italian and German forces.

On November 25, 1941, British and Commonwealth forces, particularly the 4th Royal Tank Regiment and elements of the 2nd New Zealand Division, launched an assault to capture the position. The defenders, dug in with anti-tank guns and artillery, inflicted significant casualties on the attacking tanks.

At Sidi Omar the enemy fought hard, but it wasn’t enough. Our boys hammered their defenses, smashed the garrison, and bagged hundreds of Italians as prisoners. That victory didn’t just clear the ground—it locked down the left flank for the advance, gave us breathing room, and drove Operation Crusader forward. With Tobruk relieved and the Axis grip on North Africa broken a little more, Sidi Omar proved again: when the Allies hit with weight and will, the enemy breaks.

~~ General Howitzer

6 VP’s

Card Balance:

5 – 5

Complexity:

2

Conditions:

Desert

Context:

Historical

Location:

Libyan – Egyptian border

Year:

1941

Theater:

Mediterranean Theater

Campaign:

North African Campaign

Codename:

Operation Crusader

Summary:

Objectives:

6 VP’s and Exit hexes for the Axis

Battlefield:

The dominant elements of this scenarios are the hilly dunes controlled by the Allied infantry, and the wide open battlefield for the armor units of both sides to meet in the middle section and one flank.

Troops:

Allies – 6 Infantry, 4 Armor, 1 Artillery

Axis –  5 Infantry 7 Armor, 1 Artillery

Allied Strategy:

1.  Your infantry on the dunes can hold off the enemy for a long time. This should give you enough time to get your armor, which is stuck in the corner on your right flank, into the field of play.

2.  Because your armor can only move two hexes at a time, it may take a couple of turns before you pose enough of a threat for them to stop attacking your infantry on the dunes.

3.  Quickly get to the center section with your forces, in order to prevent any of the enemy from thinking about escaping out of the Exit hexes.

4.  With your artillery in the center section on the dune, you are able to attack any enemy in the center section. Use it to good effect.

Axis Strategy:

1. The principle advantage which the Axis have in this desert scenario, is that the Axis armor can move three hexes vs. the Allies who can only move two. This give you the opportunity to move in quickly on the Allies and take out some armor before they can respond.

2. The enemy have full control of the sand dunes in the middle of the center section and its adjoining flank. But you can keep your armor at a three-hex distance, and just keep attacking them until one or two hexes are eliminated.

3. Remember that there are some Exit hexes in the back of the battlefield for the Axis. If you are able to overwhelm the forces on the dunes, and close in on them, some of your troops may be able to make their way off the field (and make a few attacks on their way).

Battle Reports 
(percentage of Allied victories):

47%

25
BR - Dug-In

Author:

Days of Wonder

Link: