Counter-Attack of the BEF
Counter-Attack of the BEF

France, May ’40—Guderian cuts to the Channel and splits the front. Gort answers with a punch at Arras: Franckforce—Matildas and Durhams—drives south of the city, hits Rommel by surprise, scatters his cyclists, and rolls over light guns like they’re tin. Then Rommel does what winners do—drags up heavy artillery and 88s, fires direct, and stops the thrust. Dusk brings the Luftwaffe; the counterattack bleeds out. By nightfall the BEF falls back, and the only road left is the sea—Dunkirk.
Lesson: shock opens the door, but you hold it with guns and air. Mass your armor, keep your flanks covered, bring the big artillery, own the sky—and don’t stop moving.
~~ General Howitzer
VP’s
12
![]()
Card Balance
Allies – 6
Axis – 5
Complexity:
4
Conditions:
Countryside

Location:
France
Year:
1940
Theater:
Western
Campaign
Codename
Summary:
This scenario accurately reflects the difficult job the British had in 1940 to try to stop the Axis onslaught with a courageous Counter-Attack by the British Expeditionary Force (BEF).

🔥 Winning as Allies
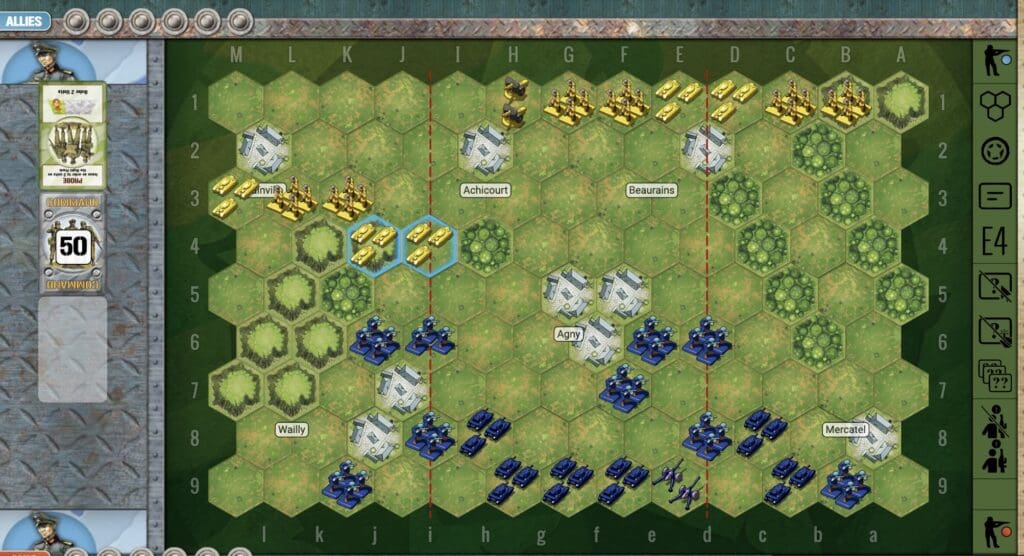
1. There are a couple of medal objectives available to you, just beyond the train tracks (row 8) at the towns of Agny and Wailly (row 11). If you can position two of your forces within movement distance of both of them, you can set yourself up for a final medal capture and win.
2. Attack Plan: do not cross the railroad tracks on row 8, until you have eliminated all enemy forces on row 7. Just line up – with appropriate safety spacing – your Armor and Artillery and pick off the Infantry units on that row until they are gone. Deal with any enemy Armor that gets moved into the battle as well.
3. It is going to be difficult to protect and hold control of the town of Arras at A9. If you can get enough forces over there in time, you may be able to put up a good fight. But you will be in enemy territory the entire time, and it will be difficult to control. You could consider either a strategic withdrawal, to preserve your Infantry unit, or stay and fight, attempting to take out as many enemy forces as possible before your demise.
4. Your weak section is your right flank. With the enemy 88 Artillery in the woods, they present a formidable challenge to advance in that sector. You will need to deal with it first. The way to do this is to get your Artillery unit in the region up to row 4 or 5. You will be out of reach of the 88, and will be able to pick it off.
5. Your Artillery units are too far back. Take every opportunity to move them forward.

🔥 Winning as Axis
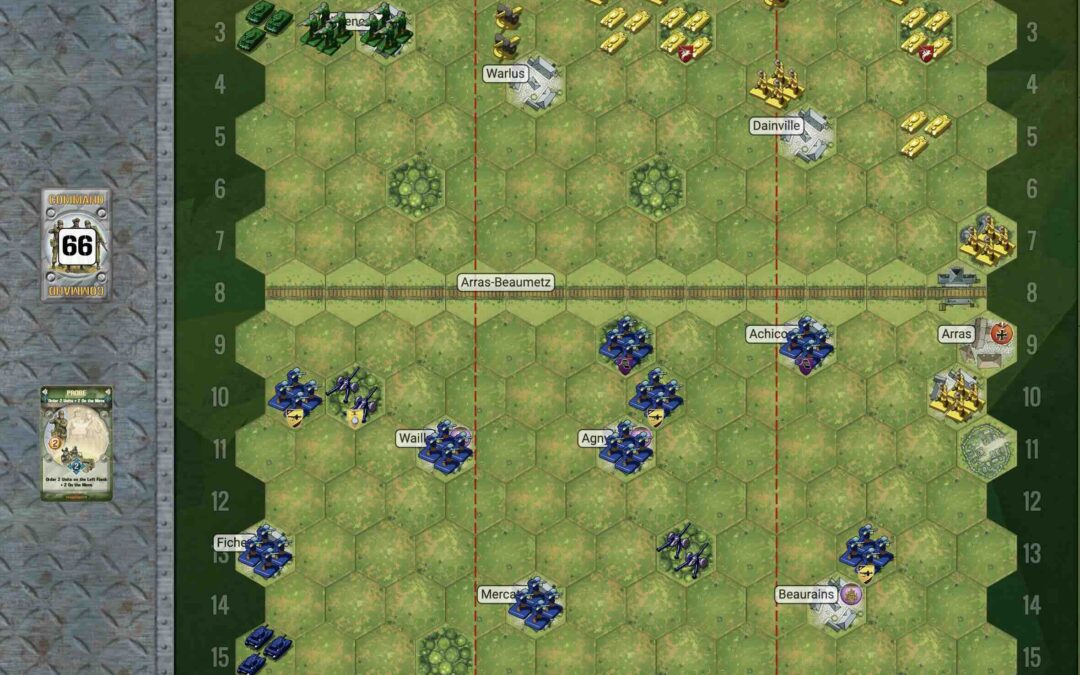
1. You can actually win this one without crossing the railroad tracks on row 8. But the BEF must cooperate by attempting to come in for the kill. You can finish them off, and then save your final coup-de-grace for the Medal in the town at A9.
2. Possible Attack Vector: Target the town of Arras at A9, which has an Axis Temporary Medal Objective. Start moving forces up in that direction. It will have two benefits of concentrating your firepower into one sector, and then after a successful destruction of the enemy in that region, you can capture the town of Arras – and hold it – for an additional medal. This attack plan could potentially yield two to three medals, maybe more.
3. Your Armor is misplaced at the start of the battle. Take every opportunity to move it forward, so it can begin to attack across the railroad tracks at the enemy.
Battle History Results
Author.
URL