Belle-Lande

Belle-Lande

Listen up. Our attack on Hauts-Vents bogged down. Hobbs did the right thing—shifted weight to the 119th and drove on Belle-Lande to turn the enemy’s flank. Task Force X pressed; Task Force Y moved to back up the 2nd and 3rd Battalions. Then the surprise: Belle-Lande, reported empty, lit us up—tanks dug in, infantry stiff as a board. That unexpected fire choked the relief and killed momentum.

We clawed to the village edge, took the measure, and found steel in the hedgerows. With darkness closing, we pulled the forward elements, called in the guns, and set to blast a path for dawn. End of the day: no objectives taken.

Lesson: never trust last night’s report—recon twice, flank hard, and keep artillery married to the advance. Momentum is earned; when it stalls, you reset and hit harder.

~~ General Howitzer

Medals

5 VP’s

card

Card Balance:

Allies – 5

Axis – 5

Complexity:

3

Conditions:

Countryside

Location:

France

Year: 
1944

Theater:

Western Front

Summary:

The asymmetrical starting pattern of this game makes for an interesting and challenging battle for both sides.

Objectives: 5 Medals
Plus, the town of Belle-Lande is a complete set of temporary medals for the Allies.)
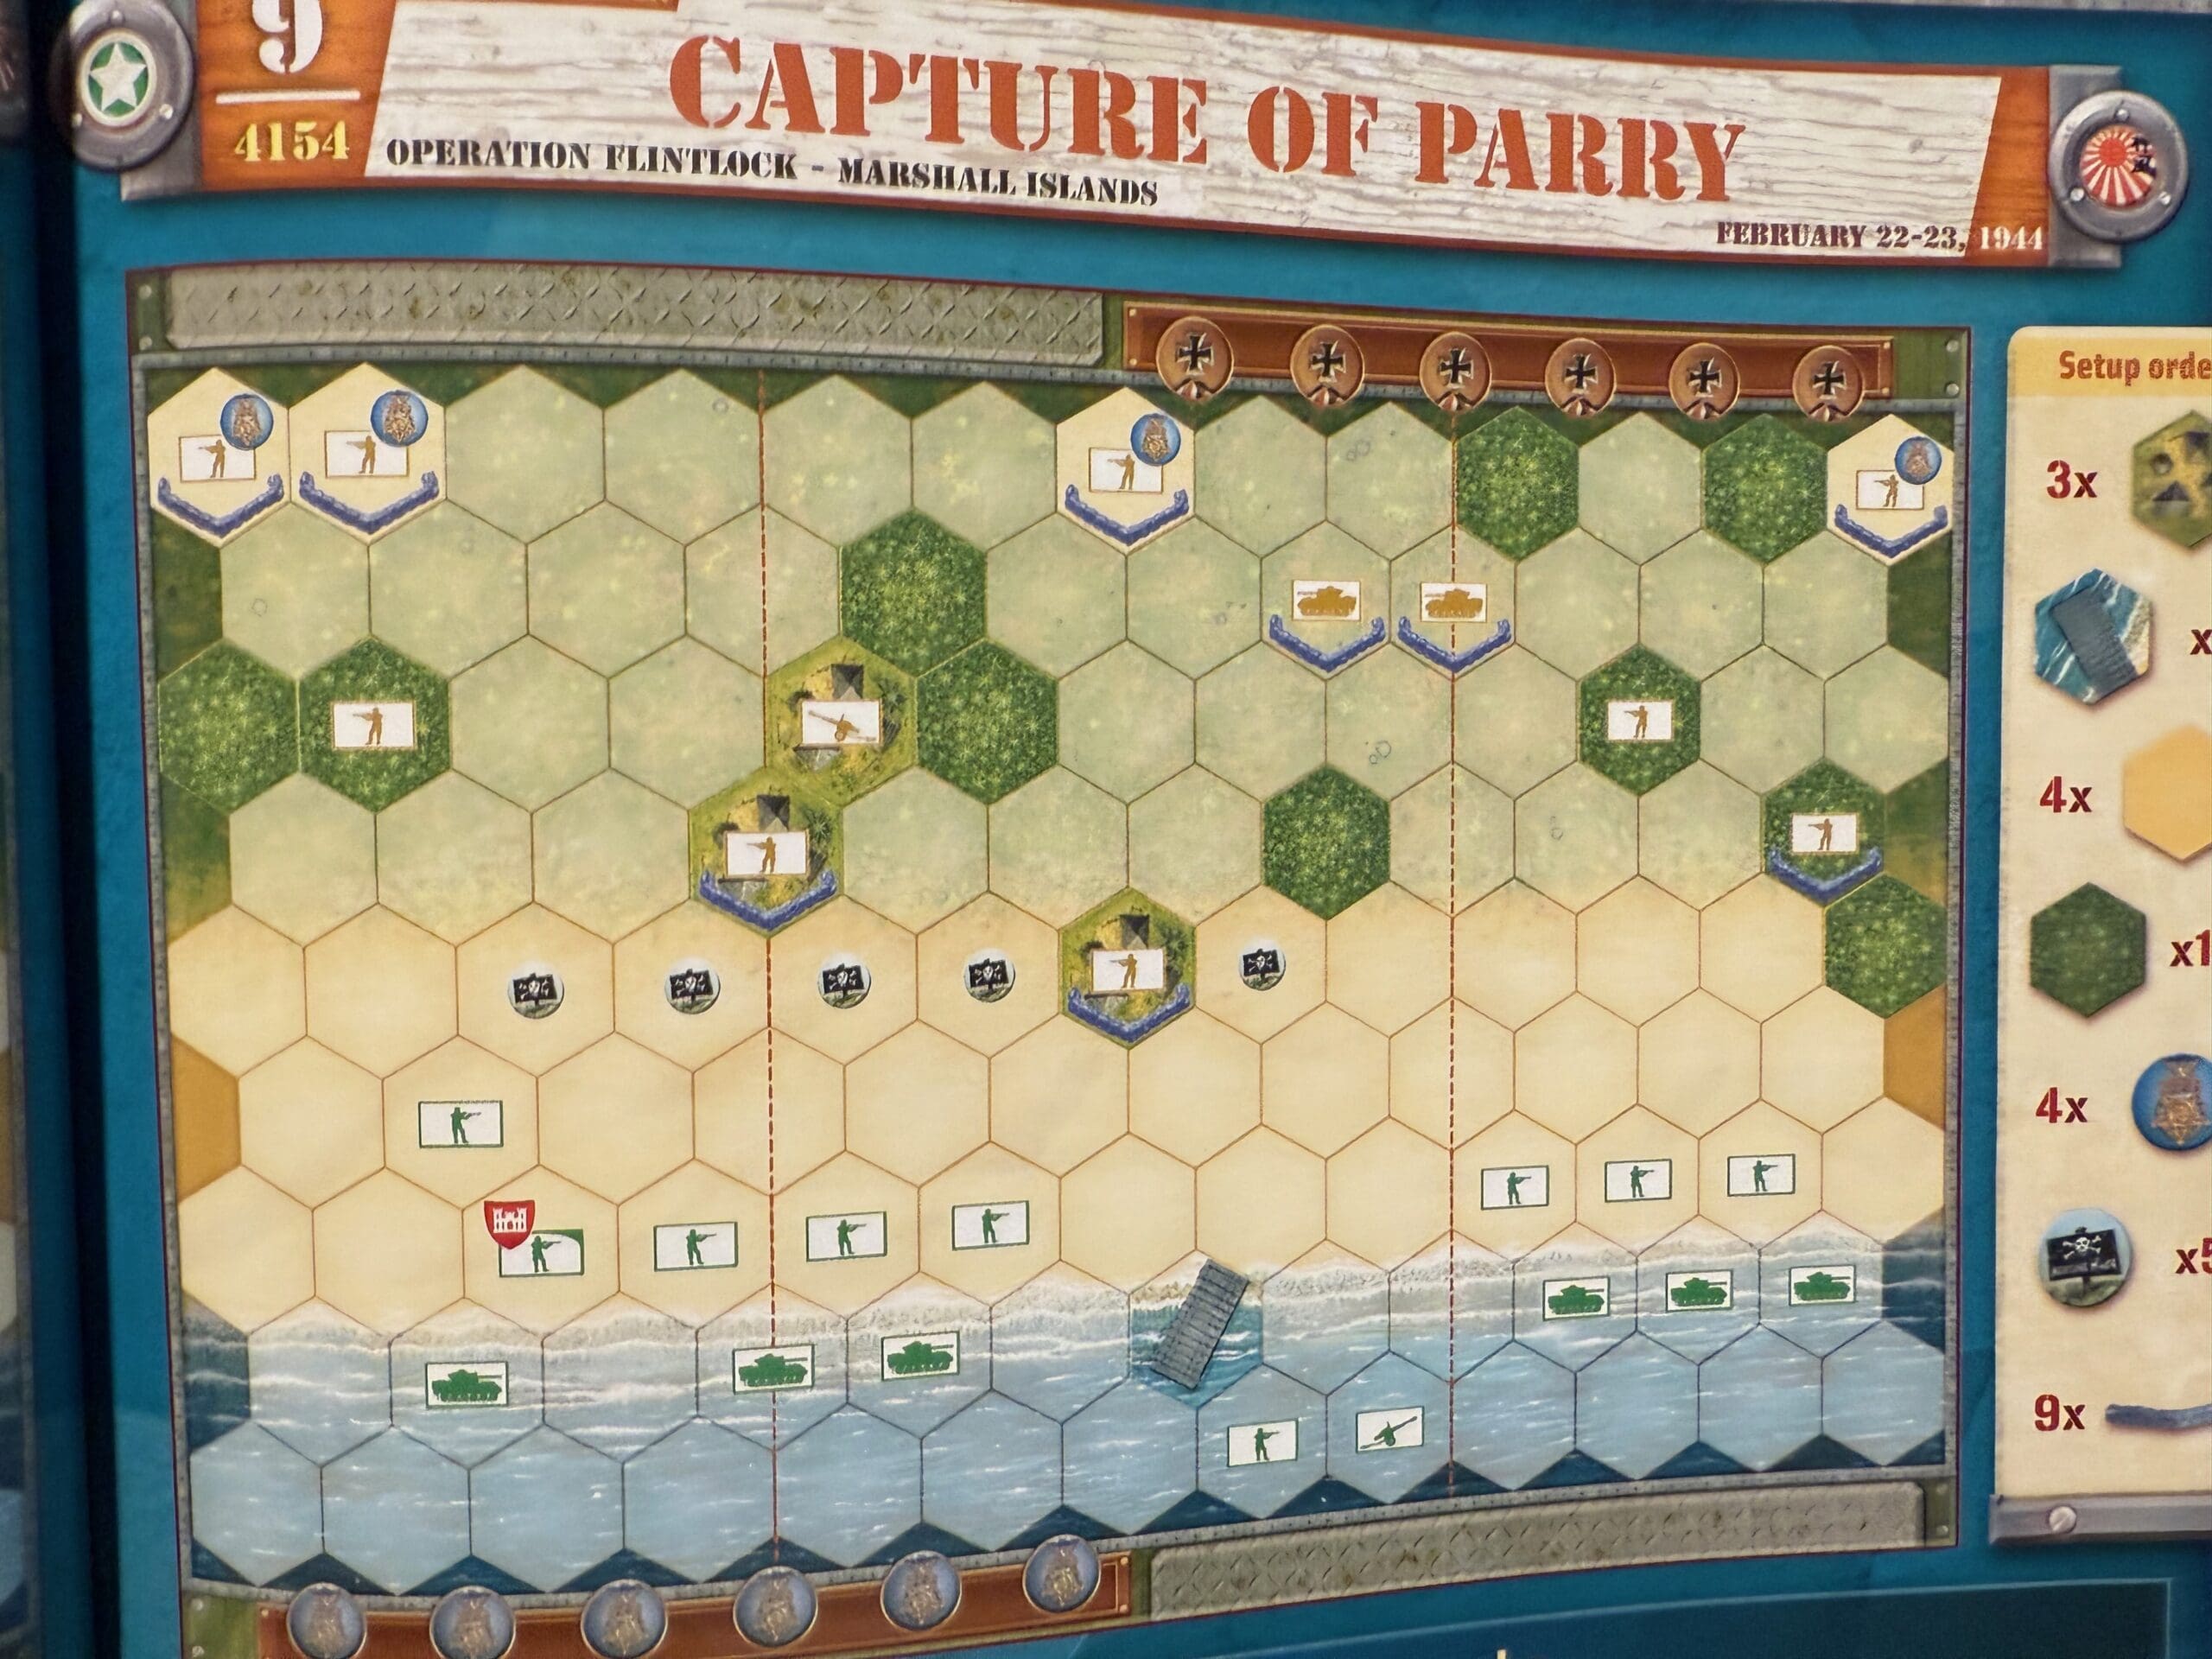
Terrain: 

Countryside with hedgerows, hills, and 8 hexes for the town of Belle-Lande

Troops:

Allies – 7 Infantry, 6 Armor, 1 Artillery

Axis – 6 Infantry, 5 Armor

medal allies

Allied Strategy:

1.  Historically, the Allies had a hard time attacking Belle-Lande, so your forces on the right flank will be facing a challenge if they attempt to cross the open land into the two defended hexes on the right.  It may be better to pursue the ridge on the right and the hedgerows on the left for the Infantry forces.  Then your Armor can attack from a distance to soften the town defenses before you launch your Infantry against it.

2.  Every hex of Belle-Lande is a Temporary Medal Objective.  Taking out just two hexes of Infantry and moving in, will gain you four of the five Medals needed to win.

medal axis

Axis Strategy:

1.  This is primarily a defensive role for the Axis. Stay behind your sandbags and fire away.

Battle Reports

1
BR - Belle-Lande

Author:

Days of Wonder, part of the 2025 Refresh of the Base Game

Link:

Battlegroup Heintz at Hauts-Vents

Battlegroup Heintz at Hauts-Vents

Listen up. Hauts-Vents was a knuckle of roads west of St-Lô—the kind of crossroads that decides a campaign. The Germans threw together Kampfgruppe Heintz from the 275th Infantry to sit on it. We pushed XIX Corps—30th and 9th Infantry up front with 3rd Armored’s CCB—to rip that hinge off the door.

They fed in Panzer Lehr on the 10th and counterattacked hard on the 11th. Didn’t matter. We took Hill 91, smashed their thrusts, and CCB seized the Hauts-Vents crossroads. Result? Their screen cracked, their line started to sag, and St-Lô’s fall became a question of hours, not weeks.

Lesson: take the crossroads, break the spine, keep moving. Momentum wins France.

~~ General Howitzer

5 VP’s

4 VP’s

card

Card Balance:

Allies – 4

Axis – 5

Complexity:

3

Conditions:

Countryside

Location:

France

Year: 
1944

Theater:

Western Front

Summary:

The asymmetrical starting pattern of this game makes for an interesting and challenging battle for both sides.

Objectives: 5 Medals
The town of La Rocher has two hexes worth one medal each.)

Terrain: 

Countryside

Troops:

Allies – 9 Infantry, 2 Armor, 1 Artillery

Axis – 7 Infantry, 1 Armor, 1 Artillery

medal allies

Allied Strategy:

1.  Since you only need five medals to win, the town of Le Rocher is of great tactical value for you.  It is close, and it is worth two victory medals.  When you take out the two Infantry guarding it, and move into the town, you will have four of the five medals needed to win.

medal axis

Axis Strategy:

1.  While Hill 91 needs to be protected, you should consider moving your Infantry from the hill in the direction of Le Rocher in order to lend some support against the forces of 120th Infantry.  

Battle Reports

1
BR - Battlegroup Heintz

Author:

Days of Wonder

Link:

Sword Beach (Breakthrough)

Sword Beach (Breakthrough)

Sword Beach

The Battle of Sword Beach took place on June 6, 1944 (D-Day) — the easternmost of the five Allied landing beaches during the Normandy invasion. It was assigned primarily to British forces, with support from Free French commandos, as part of Operation Overlord.

By nightfall on June 6, the Allies had:

  • Landed over 28,000 troops

  • Secured a beachhead about 5 miles deep

  • Linked up with Canadian forces from Juno Beach

  • Held their positions despite German counterattacks

Listen up, men — Sword Beach wasn’t just another patch of sand; it was the gateway to Caen and the key to cracking open Hitler’s Atlantic Wall on the eastern flank. At dawn on June 6th, the British 3rd Infantry hit that beach under a storm of lead and steel. Mines, wire, and concrete — it didn’t matter. They went straight through it, methodical as a tank rolling downhill.

While naval guns thundered from offshore, the Royal Engineers cleared obstacles like veterans of a hundred storms. And those Free French commandos — they fought like lions, linking up with the boys from Pegasus Bridge to lock down the flank before Jerry could regroup.

The Germans tried to hit back with their 21st Panzer Division, and for a moment, they even reached the coast — but our airmen and artillery smashed them flat. By nightfall, the British held Sword, linked up with the Canadians at Juno, and built a bridgehead five miles deep.

Caen didn’t fall that day — but Sword showed the world how an army fights when it’s trained, disciplined, and led with purpose. That’s how you take a beach — with steel in your hands and fire in your gut.

~~ General Howitzer

VP’s

12

card

Card Balance:

Allies – 6

Axis – 4

Complexity:

4

Conditions:

Beach

Context:

Historical

Location:

Normandy

Year:

1944

Codename:

Operation Overlord

Summary:

12 Victory Points:

12 Medals, including Permanent Medal Objectives for Allied control of Casino Riva Bella, Strong-point Cod, and Strong-point Trout.   Also a 2-Medal Temporary Objective for which ever side controls the Orne River and Canal.  Finally,  massive 3-Medal Temporary Objective for whomever controls the two Hexes representing Caen. Initially the Axis player gets these three medals at game start. 

Terrain:

Countryside and Beach

Troops:

Allies – 8 Infantry including 3 Elites, 5 Armor, 2 Artillery

Axis – 10 Infantry, 3 Armor, 2 Artillery

medal allies

Allies:

Big Picture Strategy:  Like all beach scenarios, the number one primary goal for your forces is to Get Off the Beach!.  Do not pause to capture the three frontline enemy medals.  You can encircle them and then attack from all sides.

1.  Once you have gotten your forces out of the water, then you can encircle the enemy at the three Permanent Medal Objectives at Casino Riva Bella, Strong-point Trout and the Chateau.  Those medals are almost a given, so do not lose an excessive number of forces attacking them before you are out of the water. 

3.  Get your Artillery out of the water as soon as possible. They will be vital to breaking through the strongholds of the enemy on the beach. It will be especially important to take out the Artillery in the bunker as soon as possible, or it will destroy your forces.

medal axis

Axis:

Big Picture Strategy: Get your forces forward. Bring the battle to them.

1. You have Armor stuck in your lower left flank which you need to get forward to the beach as quickly as possible. Practice some delaying techniques for a couple of turns to allow your Armor forward. You will be in a much better position to repel the enemy forces.

2.  Two approaches to deal with the enemy forces in your lower right flank:

Option A: Eliminate the enemy forces on your lower right flank along the Canel de Orne as quickly as possible so that you will not have to worry about a rear-action attack. Then you can move your forces forward towards the beach.

Option B:  Surround them and slowly pick them off throughout the game, saving the coup-de-grace for the end, when you can kill off the final Infantry for one Medal, and then move onto the bridge for two Medals.  This will earn you three! medals in a single turn. Save it for last to win the round.

10
BR - Sword Breakthrough

Author: Days of Wonder

URL

The Defense of Wanssum Woods

The Defense of Wanssum Wood

The Defense of Wanssum Woods in 1945 was part of Operation Snowman, a late World War II engagement in the Netherlands. German forces mounted a stubborn defense in the wooded area near Wanssum to delay the Allied advance.

General Howitzer has some thoughts on this battle:
Wanssum Woods was a thick, muddy brawl—Germans dug in deep, using every tree and shadow to stall us. The Brits and Canucks had to fight for every damn yard, ambush after ambush. But they didn’t quit. They rooted the enemy out, inch by inch, and kept the advance rolling into northern Germany. Forest or no forest, when you’re relentless, no defense holds.

6 VP’s

card

Card Balance:

Allies (Great Britain) – 6

Axis – 5

Complexity:

3

Conditions:

Winter Forest

Context:

Location:

Netherlands

Year:

1945

Theater:

Western

Campaign:

Codename:

Summary:

Objectives:

6 VP’s

Battlefield:

Combination of woods and winter.

Troops:

Allies – 13 Infantry

Axis – 9 Infantry


medal allies

Allied Strategy:

1.  

medal axis

Axis Strategy

1.

Battle Reports

0
BR - Wanssum Woods

Author:

Days of Wonder

Resource:

Campaign Book, Volume 2

Umurbrogol Pocket

Umurbrogol Pocket

The Battle of the Umurbrogol Pocket in November 1944 was one of the fiercest and most grueling phases of the Battle of Peleliu during World War II. U.S. Marines faced deeply entrenched Japanese defenders in a mountainous, cave-ridden area known as “Bloody Nose Ridge.”

General Howitzer’s summary:

The Umurbrogol Pocket was a nightmare carved into rock—our Marines went up against die-hard defenders holed up in caves. The Japanese were dug in deep, fighting to the last man, and made us pay for every inch in blood. Flamethrowers, grenades, and guts—that’s what it took to root them out. It was slow, savage, and costly, but in the end, we crushed them. That ridge showed just how far the enemy would go—and how much farther we were willing to go to win.

5 VP’s

card

Card Balance:

Allies (US Marines) – 5

Axis – 4

Complexity:

3

Conditions:

Jungle Beach

Context:

Historical

Location:

Marianas & Palau Islands

Year:

1944

Theater:

Pacific

Campaign:

The Battle of Peleliu

Codename:

Operation Stalemate II

Summary:

Objectives:

5 VP’s plus a Last to Occupy Medal Objective

Battlefield:

Combination of hills and hills with caves .

Troops:

Allies – 9 Infantry, 4 Armor, and 2 Artillery

Axis – 8 Infantry


medal allies

Allied Strategy:

1.  Use your Artillery and Armor as much as you can to attack the Japanese defenders at a distance.  When they are sufficiently weakened, you can move in your infantry, beginning with your Engineers to finish up the forward units.

2.  The fresh water river is a victory medal which goes to the  Last to Occupy.  Keep some forces on hand to grab it as a final victory point.

medal axis

Axis Strategy

1.  You have a very strong defensive position which allows you to quickly move between caves and hide your weak units when necessary.

2.  Take advantage of your Seishin Kyoiku powers and attack any enemy troops using the Banzai War Cry which come within two hexes of your Infantry.

3.  Guard the fresh water source, and keep the enemy away from it, as they will attempt to grab it on their final move. 

Battle Reports

0
BR - Umurbrogol Pocket

Author:

Days of Wonder

Resource:

Campaign Book, Volume 2