Utah Beach

Utah Beach

The invasion of Utah Beach was part of the Allied D-Day landings on June 6, 1944, during World War II. Utah Beach was the westernmost landing area, assigned to U.S. forces, primarily the 4th Infantry Division, under Major General Raymond O. Barton. The objective was to secure the beachhead, push inland, and link up with airborne troops dropped earlier to capture key roads and bridges.

Strong currents caused some landing craft to drift about a mile south of the intended target area. This accidental landing proved advantageous, as it placed the troops in a less heavily defended section of the beach. The U.S. forces quickly overwhelmed the German defenses, suffering relatively few casualties compared to other D-Day beaches.

Listen up.

At Utah we hit fast, secured the sand, and drove inland until we shook hands with the paratroopers. That link-up turned a strip of beach into a springboard—men, guns, and fuel pouring ashore to feed the advance. With the beachhead anchored, momentum was ours. That’s how you start a liberation: seize, link, expand—and keep moving.

~~ General Howitzer

5 VP’s

Card Balance:

Allies – 6

Axis – 4

Complexity:

3

Conditions:

Beach

Location:

Normandy

Year:

1944

Theater:

Western Front

Campaign:

D-day Invasion

Codename

Summary:

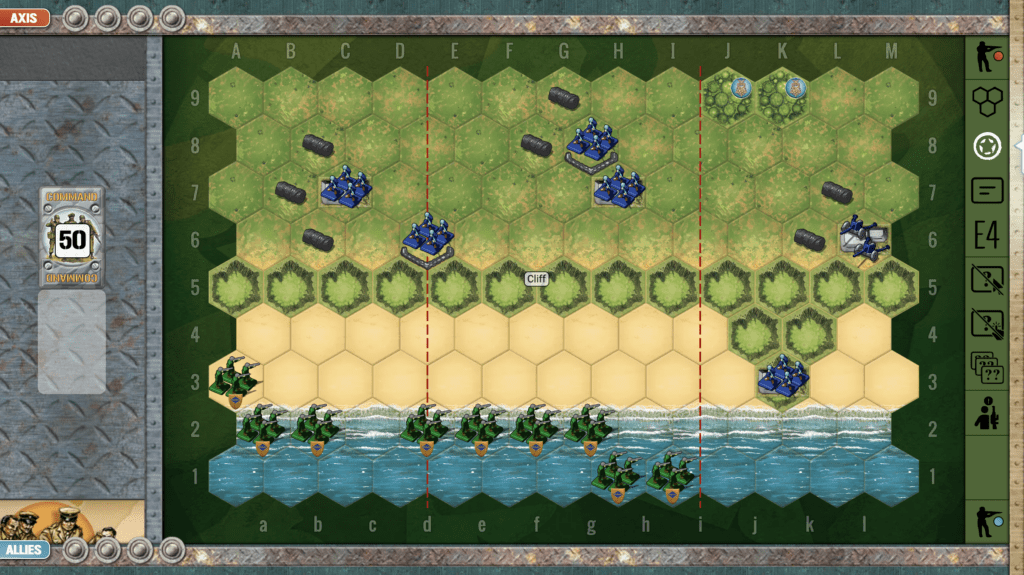
The challenge for the Allies in this scenario is to get off the beach as quickly as possible, and exit out one of the three exit hexes. The Axis are protected in towns and bunkers in order to slow down the advance of the Allies.

1. Objectives

This is a 5 VP game, so it moves rather quickly, and the Allies will need to minimize losses while they pick away at the Axis forces inside their bunkers, all the while making their way towards the exit hexes.
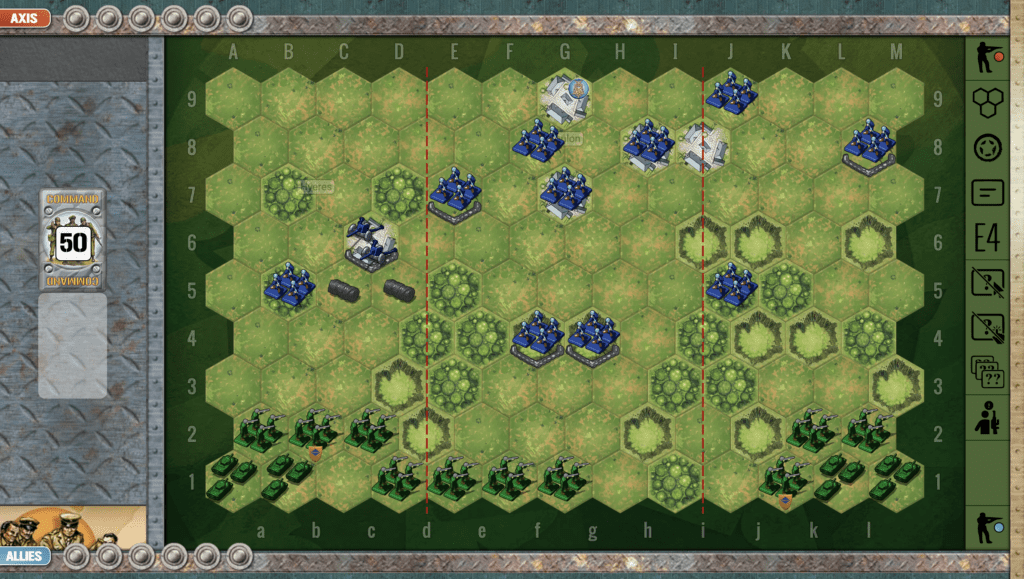
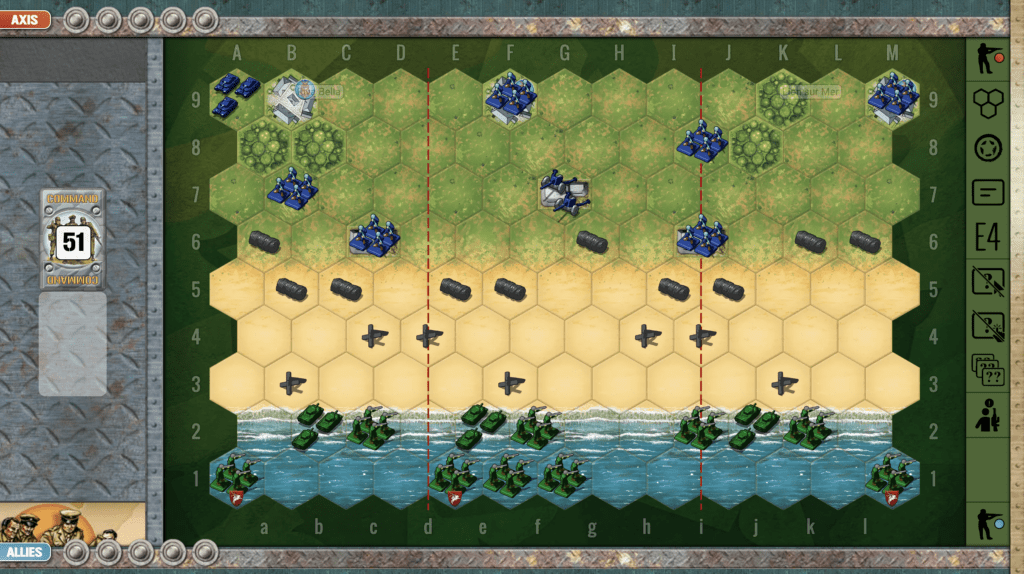
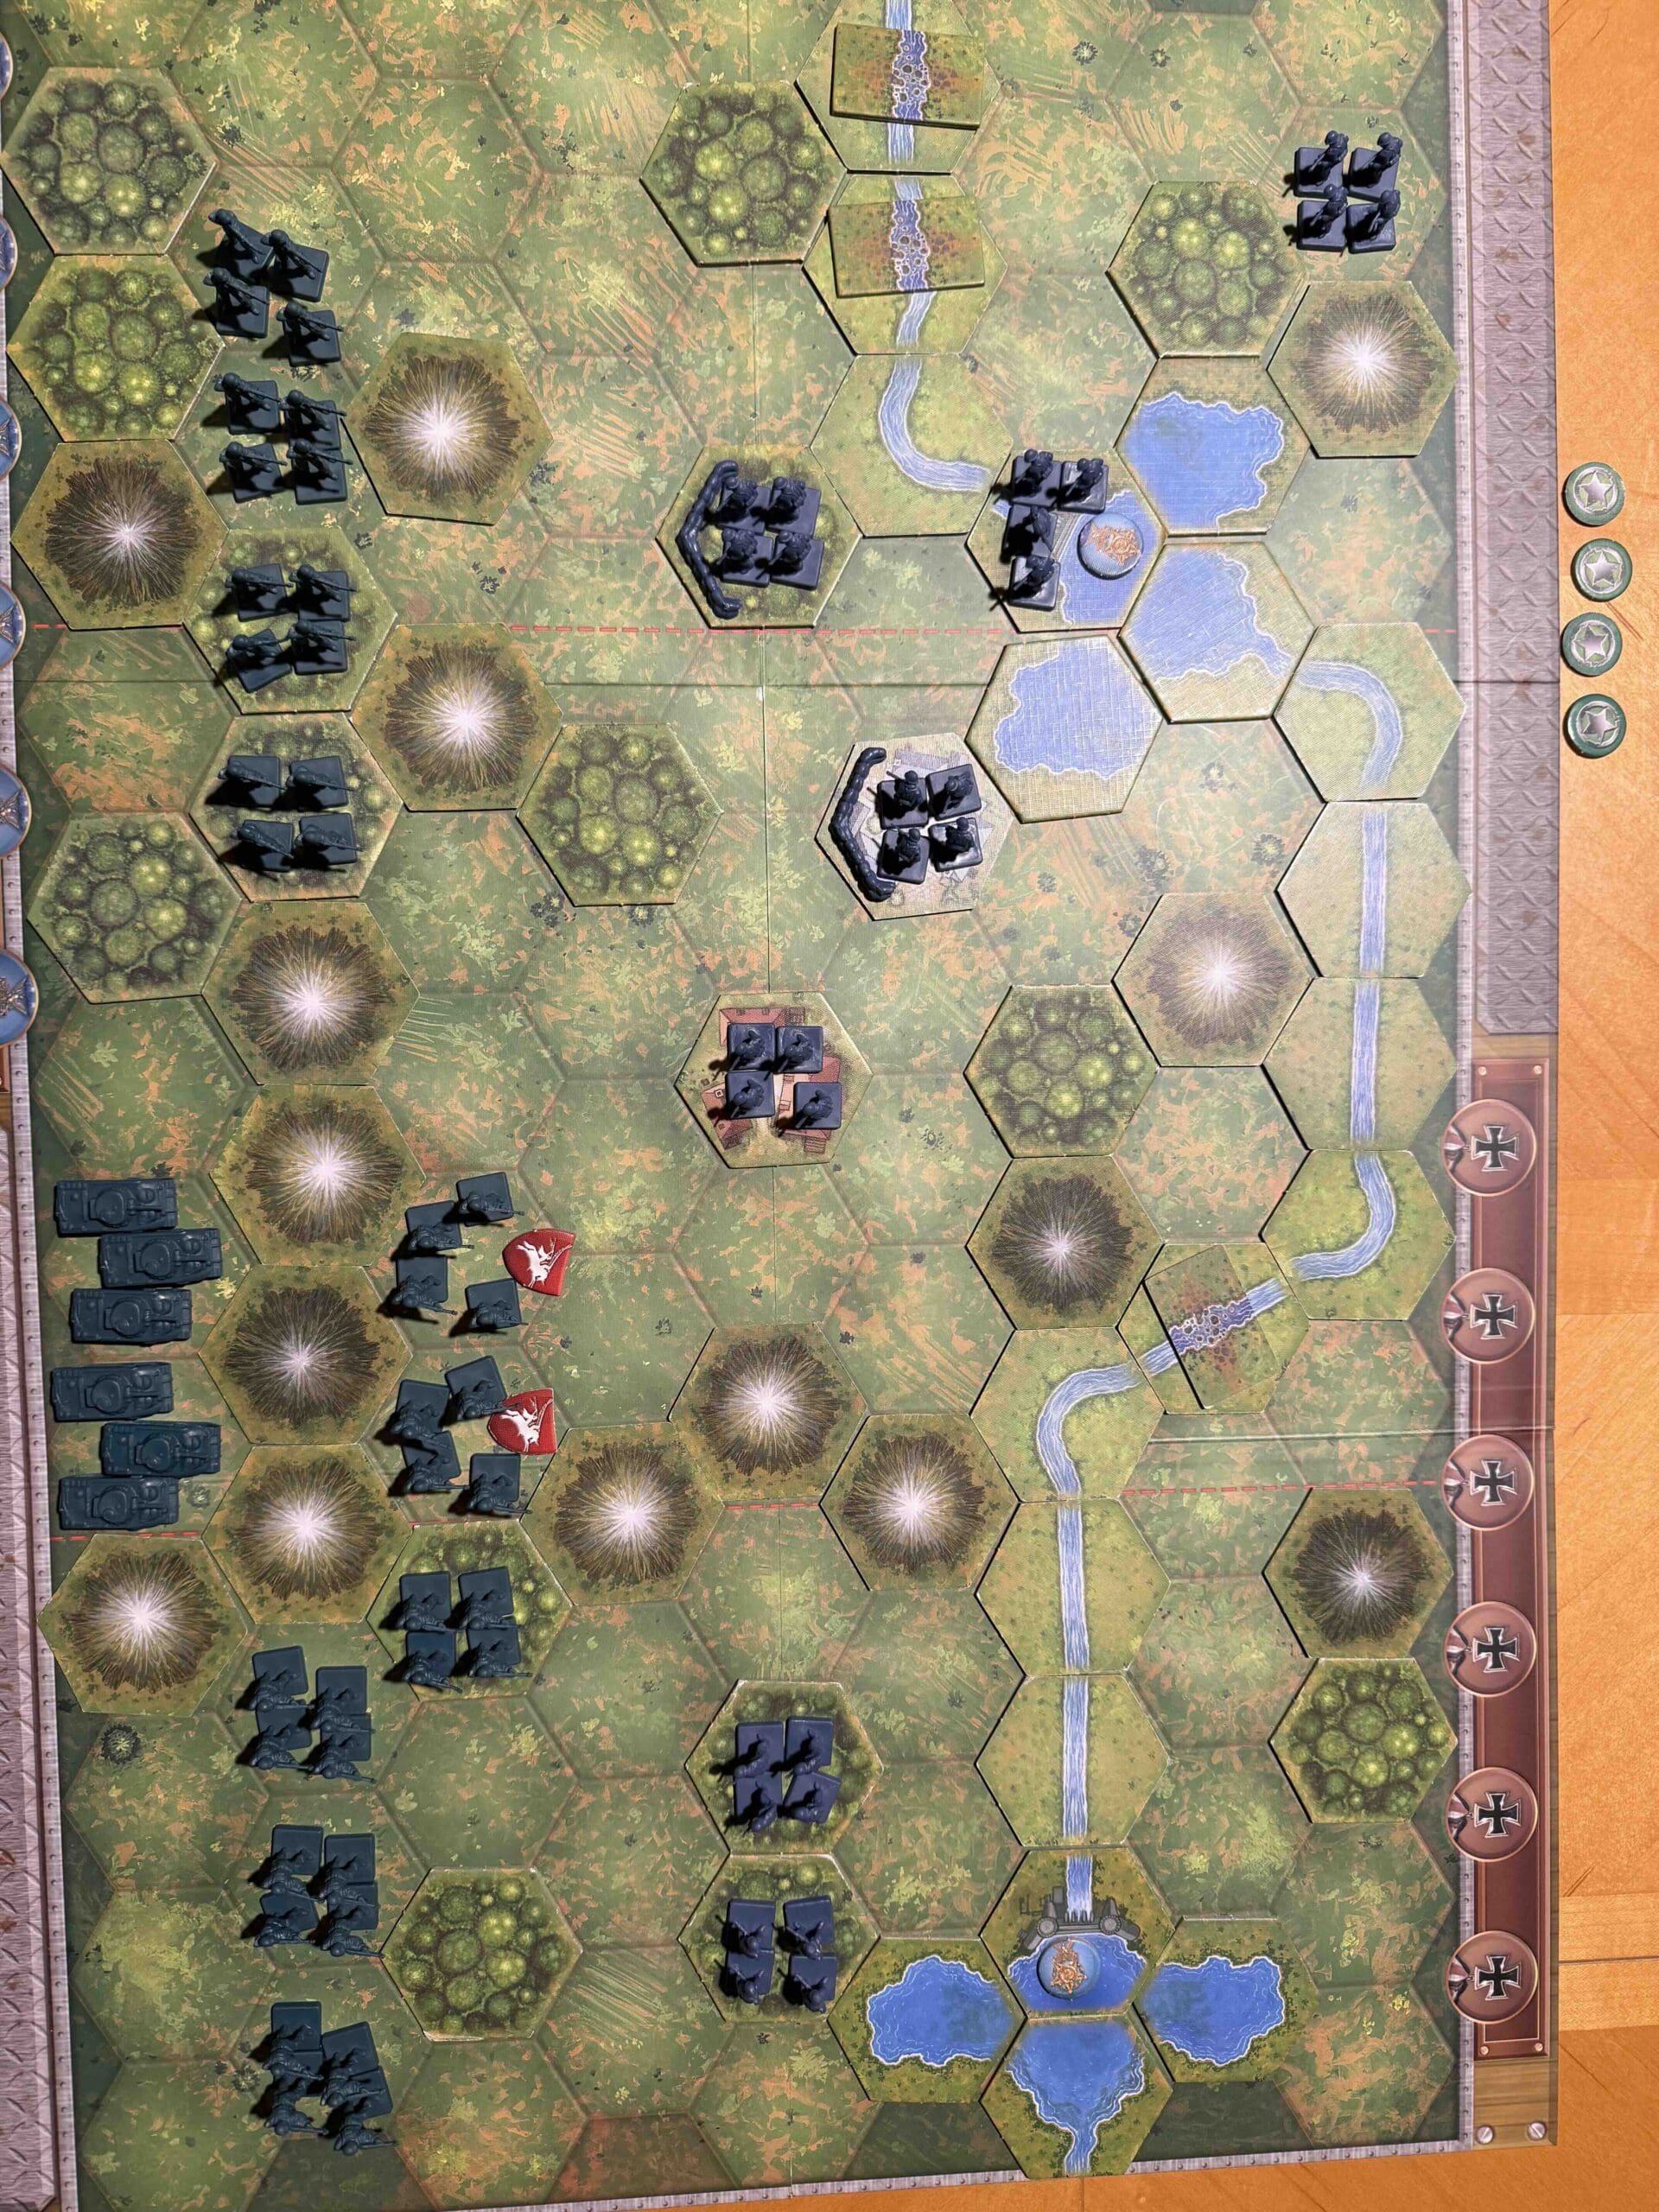
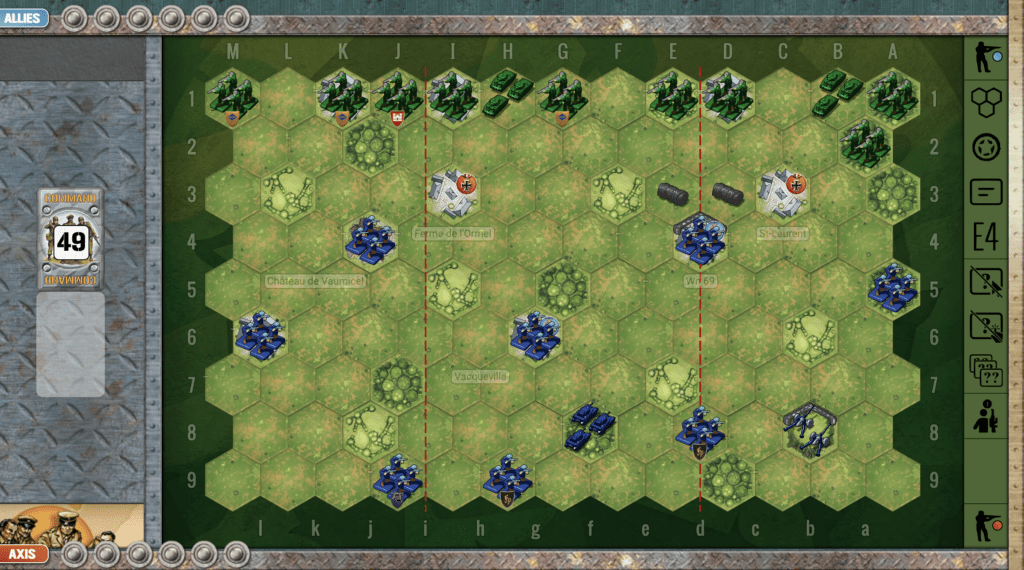
2. Battlefield

There are three exit hexes at the top of the battlefield. The Allies can seek two objectives: First to destroy enemy units, Second to exit out the back.

3. Troops

Allies – 10 Infantry, 4 Armor

Axis – 5 Infantry, 1 Artillery

Allied Strategy:

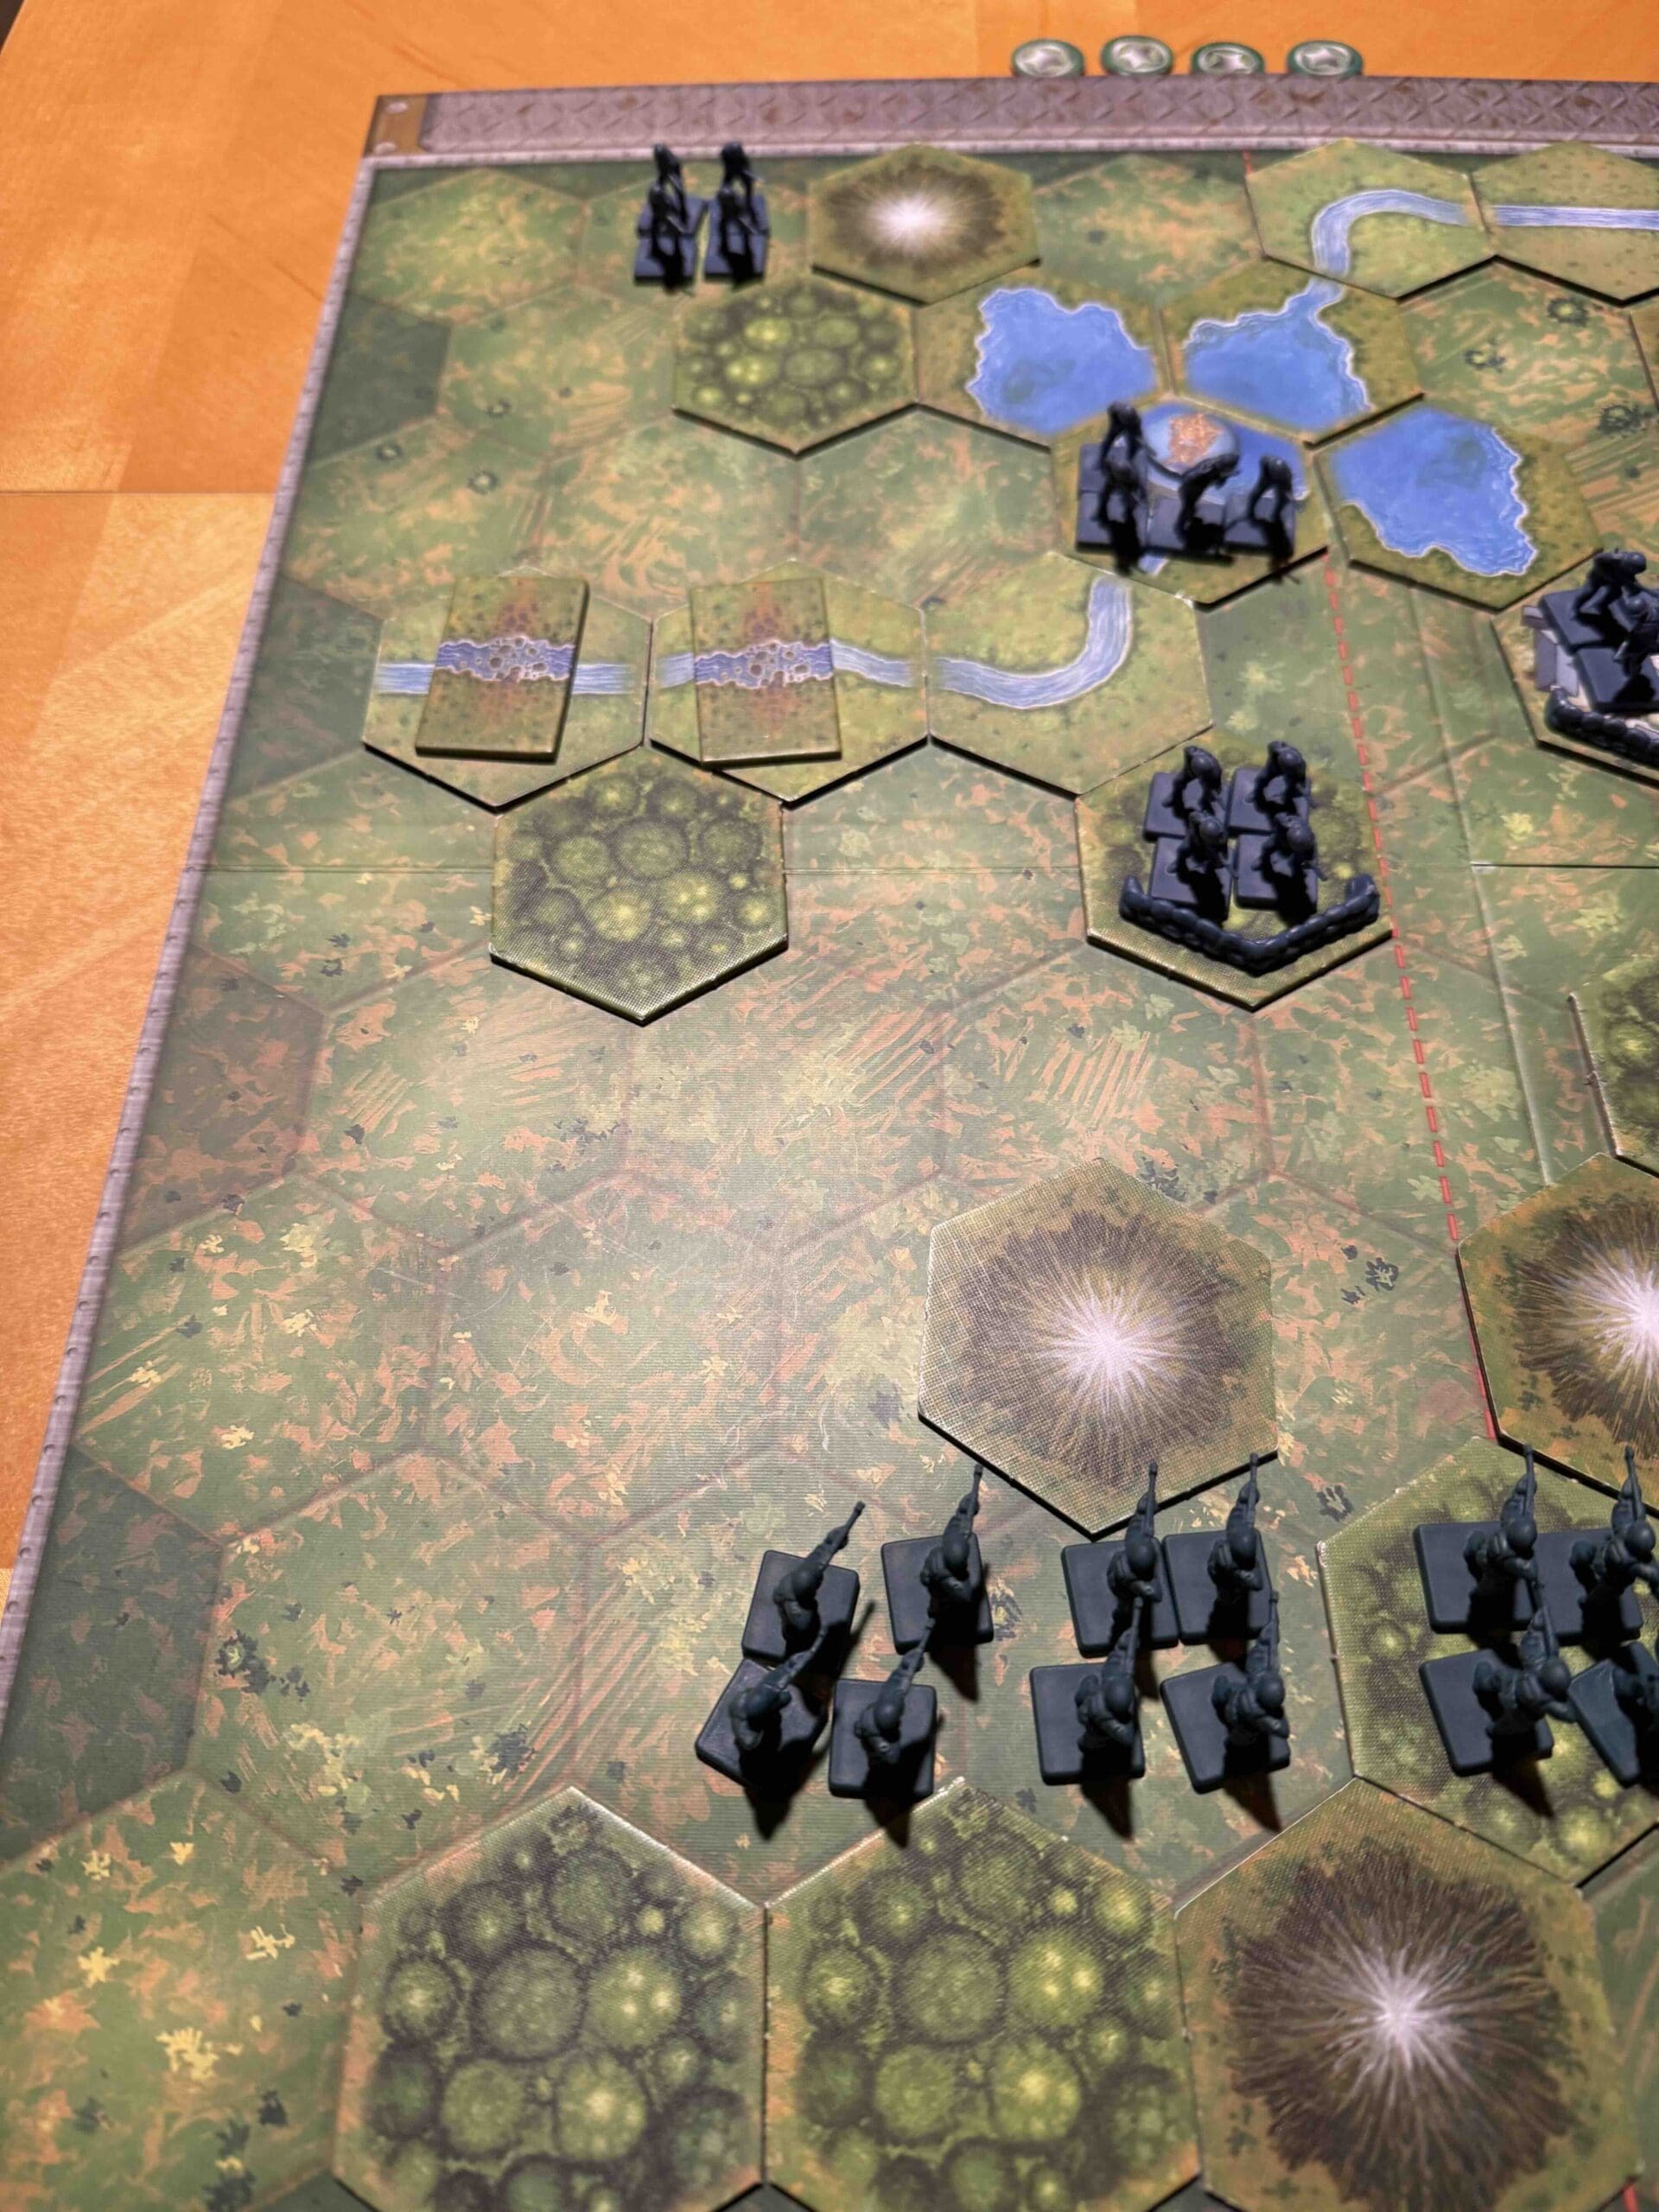
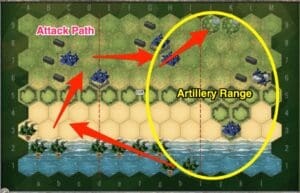
1. Allies begin with their forces congested together in the left and center sections. This is not all bad, as they need to stay away from the artillery in the right flank. But they do need to disengage their forces from one another and create some separation from the shores of the beach.

2. Keep attacking! As you approach the enemy forces in their bunkers, you may be tempted to pause and amass more forces for the attack. This depends on your circumstances. If you are out in the open and under enemy attack with two-dice attacks, you need to just keep attacking with those forces. Create the beachhead by continuing to attack, attack, attack.

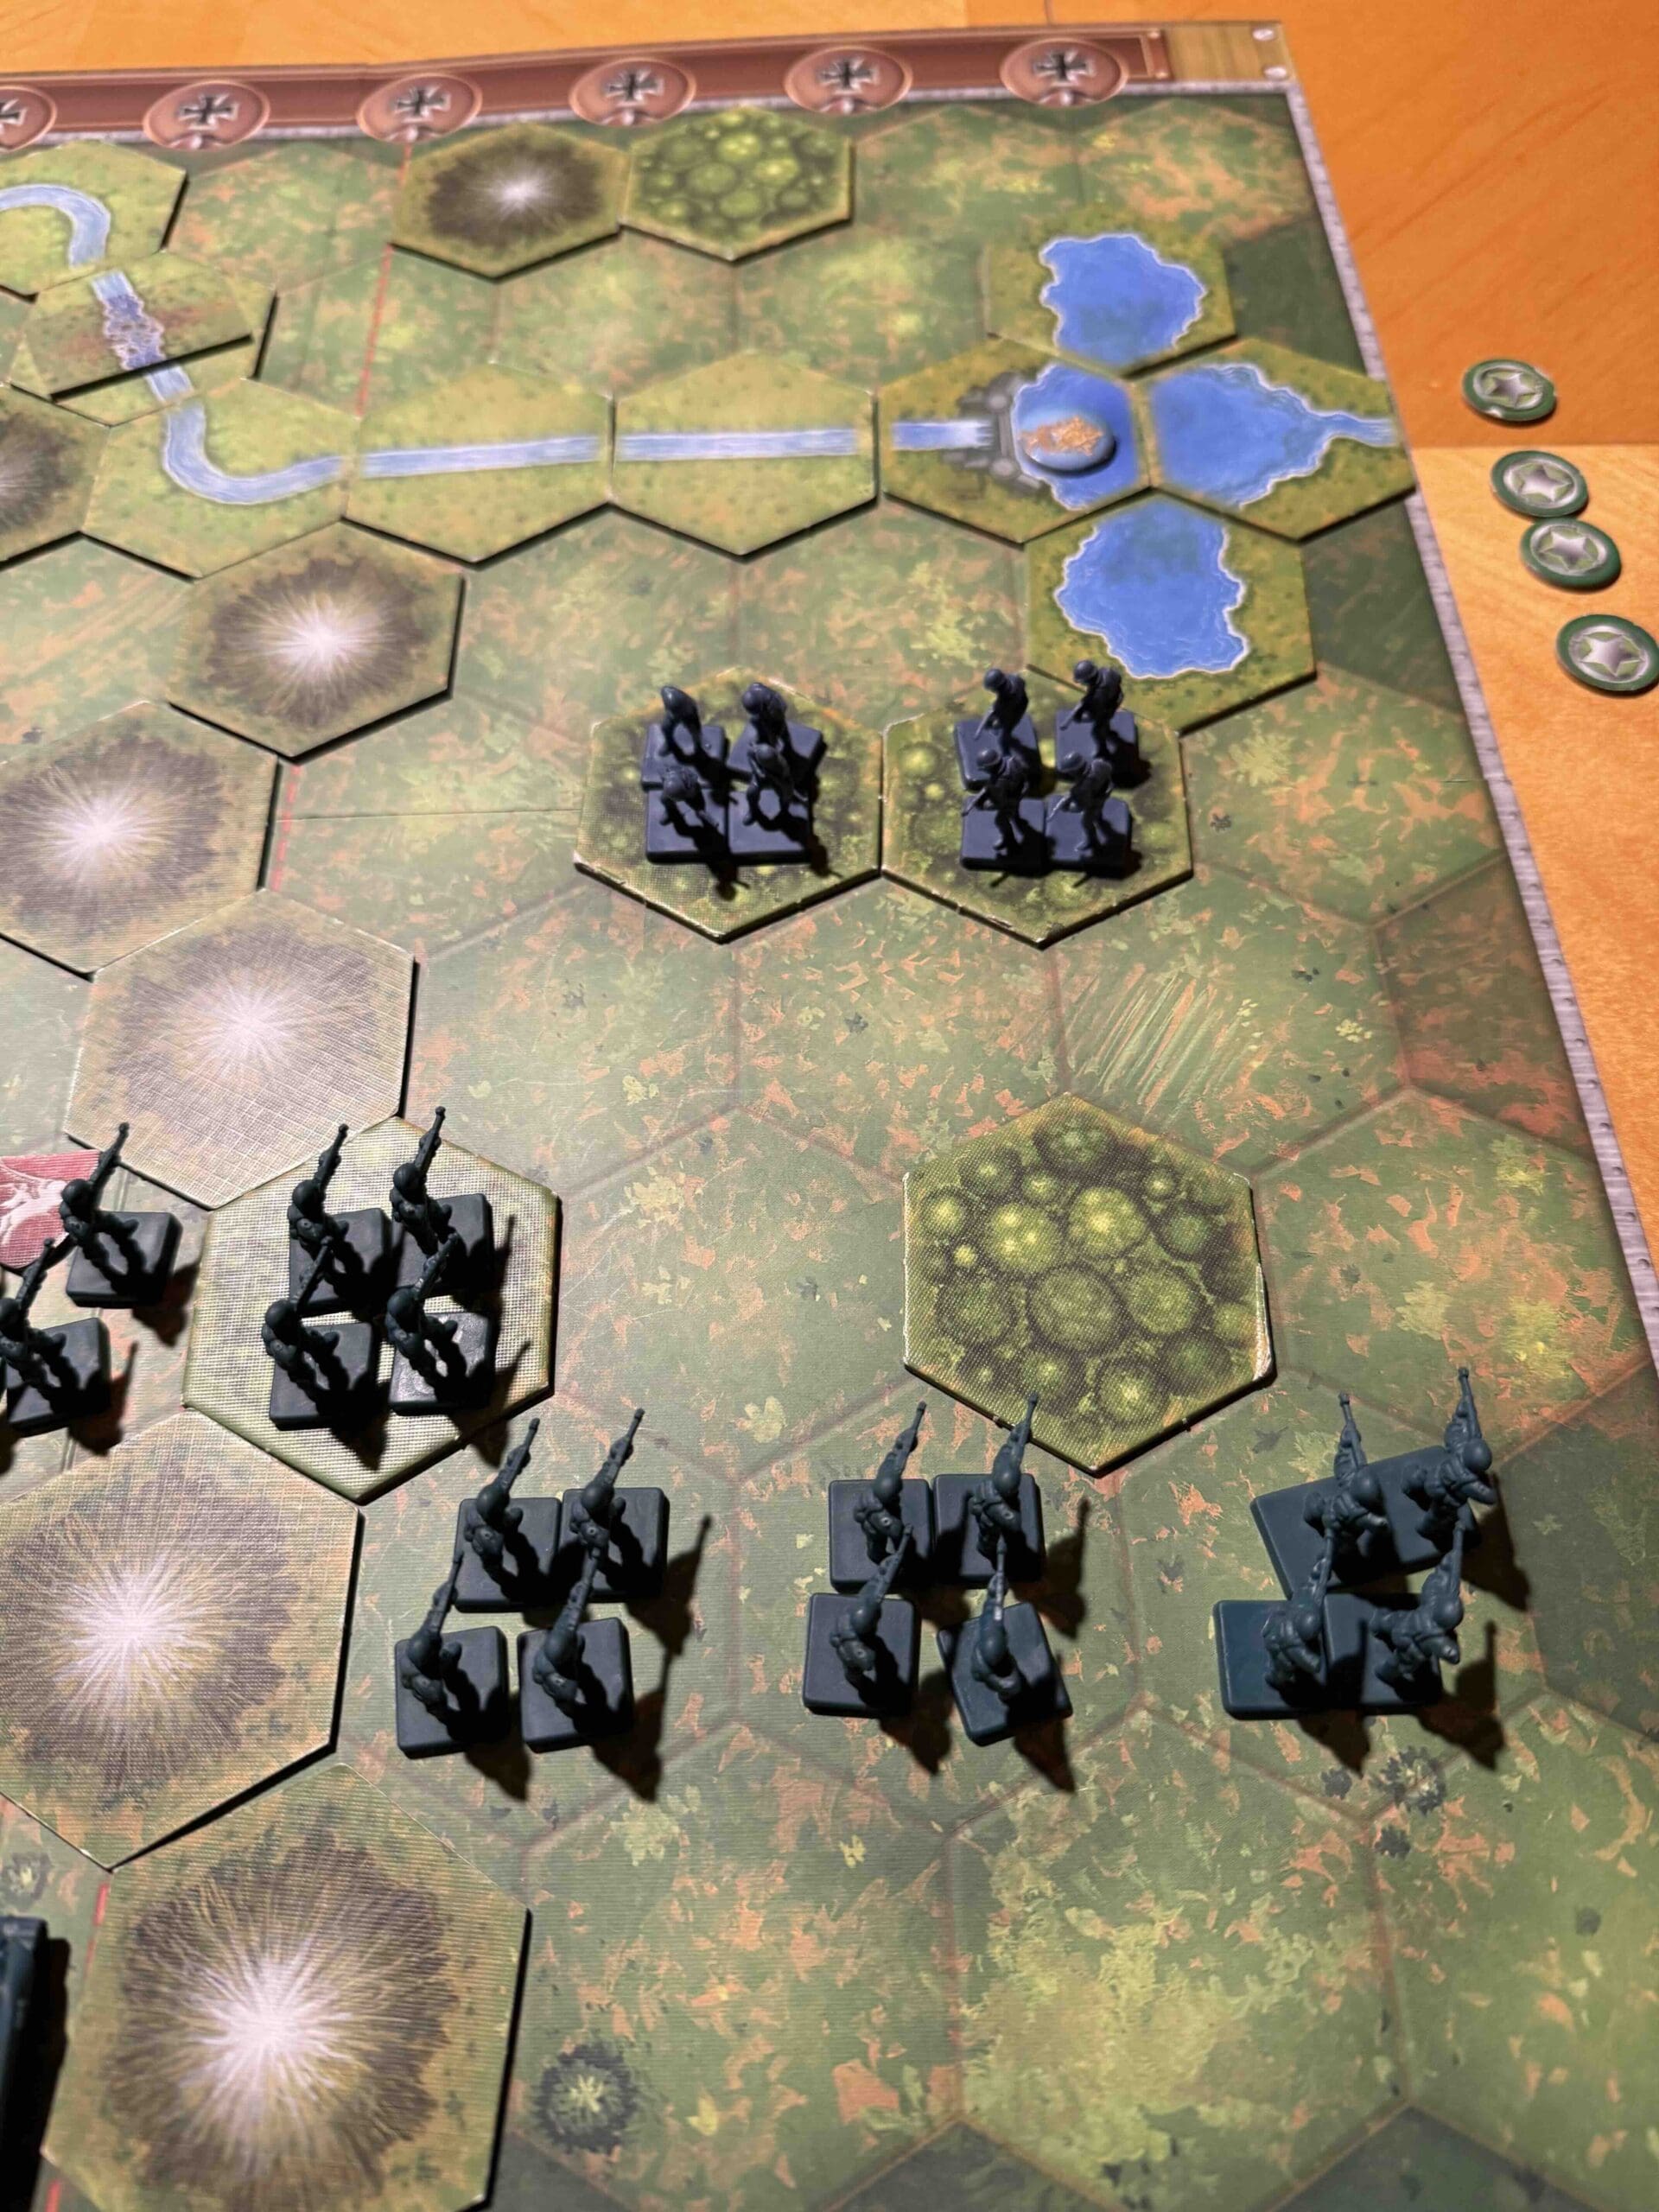
3. You can expect to receive a fair number of casualties as you progress up the beach. But as soon as you get your armor out of the water, things will change for any enemy units unfortunate enough to be found outside their bunkers.

4.  The big picture strategy for Utah Beach is to: Stay Left, Take Out the Infantry, Escape out the back.  The scenario only needs 5 VP’s.  All five of those are available to you on the left and middle section.  Take out the three infantry for your first three points; then send two units out the escape hexes, and you are golden!
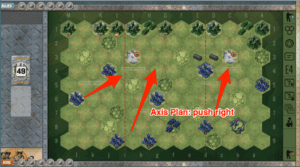
Axis Strategy:

1. The general rule for this scenario, is to stay in your bunkers! With no hilly ridge slowing the movement of the Allies onto the beach, they are able to very quickly reach your bunkers and begin attacking. If you make a fool-hardy rush forward in an attempt to knock out a few more figures, they will make you pay with an overwhelming retaliation of their forces. The only exception to this is your infantry unit in the bunker at M7 on your left flank. The Allies are going to avoid much of that section due to your artillery at J7, so it is best to get that unit into play in the central section as soon as you can. Also, there are so many wire bails in your left flank, that they will severely slow down any troops who try to come in there, allowing your artillery to demolish them.

2. The goal for Axis is to slow down their movement. Besides actual hits, retreat flags on the Allies are your friend, as it will push them back and give you more time to build up your deck with powerful attack cards. A last ditch effort, if needed would be to move your infantry onto or in front of the exit hexes, to prevent the Allies from escaping before you have given them a good beating.

3. Your one saving grace as the Axis player is your artillery. Use it as much as you can, especially while the enemy is still in the water, where retreat flags count as hits.

Scales-Allies-Weighted
20
BR - Utah

Author:

Days of Wonder

Link:

Toulon

Toulon

Scenario_Toulon_start_Allies

The Battle of Toulon (August 20–26, 1944) was a key engagement during the Allied invasion of southern France in World War II, as part of Operation Dragoon. The objective was to liberate the strategic port city of Toulon, essential for supplying the advancing Allied forces.

Now here’s a fight that showed the grit of France reborn. General de Lattre and his men from the French Army of Africa hit Toulon like a hammer on an anvil. The Germans had dug in—guns, bunkers, street traps—you name it. Every block was a battlefield. But the French didn’t flinch. They fought yard by yard, with their artillery pounding and the Navy blasting from offshore.

Six bloody days later, the tricolor flew over the port, and the German garrison laid down its arms. Toulon was free, Marseille followed, and the Allies had their supply lifeline to drive deeper into France. It wasn’t just a victory of arms—it was France standing up, shoulder to shoulder with her liberators, and proving she still had fire in her soul.

~~ General Howitzer

6 VP’s

Card Balance:

Allies – 6

Axis – 4

Complexity:

4

Conditions:

Countryside

Context:

Historical

Location:

France

Year:

1944

Theater:

Mediterranean

Campaign:

Codename:

Operation Dragoon

Summary:

Objectives:

6 VP’s, plus the City of Toulon

Battlefield:

Because of the two sets of thick hilly forests cutting across the left and right flanks at an angle, it limits movement of both forces from section to section. Thus proper placement of troops in the early moves of the game can have a dramatic effect on its final outcome.

Troops:

Allies – 10 Infantry, 4 Armor

Axis – 10 Infantry, 1 Artillery


medal allies

Allied Strategy:

1.  The key objective for the Allies is to capture the town of Toulon. If the Allies occupy three of the town hexes at the end of any turn, they win immediately. So, besides the need to simply destroy Axis units, the Allied player should keep up a relentless push toward the center section which contains Toulon. This will force the Axis player to not only defend individual hexes, but also to move troops toward defending the center, thus dislodging some from behind sandbags.

2. The most imminent need for the Allies is to get their infantry away from the back wall and into the fight against the two sandbagged hexes right in front of them. Any retreat flags thrown by the Axis powers will increase odds of a hit from 50% to 67% against the Allies.

medal axis

Axis Strategy:

1.  Because the Allies have four Armor units, the Axis are outnumbered. So the scenario is primarily defensive. Given the right cards, some offensive operations may be possible. But historically, the Germans had to eventually pull back, so be aware, and be careful.

2.  Your forward infantry in the center section may get overwhelmed by the Allies, so you will want to get in your hits while you can. If appropriate, you may consider a strategic retreat to let your infantry fight another day.

3. Because you are outnumbered in terms of forces, your best chance of scoring hits will be to remain in your defensive positions and hit the enemy as they approach.

4. Be sure to protect the four hexes of Toulon, for should the enemy gain control of three hexes, you will lose instantly.

Memoir 44
Classic Battle Reports

(percentage of Allied victories):

66%

Scales-Allies-Weighted
30
BR - Toulon

Author:

Days of Wonder

Link:

Sword Beach

Sword Beach

Scenario_SwordBeach_start_Allies

June 6th, 1944—Sword Beach. The British came in swinging on the eastern flank of Normandy, and they made it count.

Under General Miles Dempsey, the 3rd Infantry Division, backed by tanks, naval guns, and airborne troops, hit that beach like a battering ram. Their mission? Take the beach, punch inland, link up with the Canadians on the left and airborne boys on the right, and grab the city of Caen.

They ran headfirst into resistance from the German 716th Infantry, dug in and waiting. But it didn’t matter—Allied firepower and planning turned those bunkers into scrap. The Brits cleared the beach, pushed several miles inland, and set up a strong foothold by nightfall.

They didn’t take Caen on Day One—but they owned Sword Beach, and that was the damn prize. That success helped anchor the whole eastern flank of the invasion and gave us the momentum we needed to crack open Nazi-occupied France.

Sword Beach was no walk in the park—but it was a well-executed, hard-hitting assault that helped open the gate to Western Europe.

~~ General Howitzer

5 VP’s

Card Balance:

Allies – 5

Axis – 4

Complexity:

2

Conditions:

Beach

Location:

Normandy

Year:

June 5th, 1944

Theater:

Western Front

Campaign:

D-Day Invasion

Codename:

Overlord

Summary:

Like all Normandy beach invasions, this is a battle between well-defended but overwhelmed Axis forces who are trying to slow down the Allied onslaught.

Objectives:

This is a five VP game with three town hexes as Objective Medals. The goal for the Allies is to get to the town VP Objective hexes ASAP, and for the Axis it is all about slowing down the Allied advance enough to get a few knockout Tactic cards against them.

Battlefield:

Sword Beach has no hills or bluffs to slow the Allied advance off the beach

Troops:

Axis –
6 Infantry,
1 well-placed artillery in the center of the field,
1 badly positioned armor unit stuck in the corner behind a forest.

The Allies –  9 Infantry,  3 Armor

medal allies

Allied Strategy:

1.  As with all beach scenarios, the challenge is for the Allies to get off the beach as quickly as possible.

2.  The three! objective medals in the towns against the back border represent a clear and compelling goal for the Allies. If the Allies can maximize their movement cards off the beach and blitz past the defenders for the town hexes, victory can be had rather quickly.

3.  The Axis artillery in the center of the battlefield is very dangerous and unless the Allies have an excellent set of cards, should not be attacked. The best strategy – as indicated by Alexis Beuve in the Memoir 44 Tactics & Strategy Guide is to attack on the flanks in order to avoid the devastating pounding from the centrally placed artillery.

4.  You have three Elite Infantry which are capable of moving two hexes and still attacking. This is imminently valuable for a beach assault. They all start way back in the ocean hexes, but if you take the time in the early gameplay to get them moved forward, they will help you to quickly approach and attack the enemy forces.

5.  Possible Attack Vector:  split your forces in a “V” formation, and send half to the left, and half to the right, so that you can avoid the enemy Artillery in the center sector.  It is set so far back from the beach that if you try to assault it with your Infantry, they will get decimated before they get close to it, so unless you have a Bombard or Airpower card, it is best to avoid it. 

medal axis

Axis Strategy:

1. The Axis armor in the corner is hidden away and of no use. Therefore, as early as possible, the Axis needs to move the tank into the forest hex, where it will have to stop for one turn. But from there it can make its way out to the battlefield. The decision as to whether to place the armor in the center section or the right flank, will depend in part on where the Allies choose to deploy their forces. But once this armor gets out the Axis player should be able to score one or two VP’s, especially if he catches the Allied forces while they still have their back to the water, resulting in some no-retreat hits.

2. Use your artillery as much as possible, before the enemy takes it out with Barrage or Air Power, or an Infantry Assault. This will be one of the Allies’ early objectives. So use it well while you have it.

3. Should you pull your infantry from the back row where they are defending Objective Medals? Early on, if you have the opportunity, they could bolster your forces which are trying to prevent the Allies from coming off the beach. But once the full scale Allied invasion begins to form, they will be sitting ducks in the open terrain, and should be pulled back to guard a Medal Objective.

Battle Reports

(percentage of Allied victories):

46%

22
BR - Sword Beach

Author:

Days of Wonder

Link

Schwammenauel Dam

Schwammenauel Dam

Historical Summary

We didn’t fight our way to the Schwammenauel Dam for scenery — we took it because it was choking our advance. The Germans thought they could hold the Roer hostage by flooding the valley and buying themselves time. That was a mistake. American infantry went in, took that dam under fire, and shut the valve on German delay tactics. Once the dam was secured, Operation Grenade could roll forward without interference, and the Roer was crossed on our terms. That action tore down the last real barrier in the Rhineland and put our armies back on the march straight into the heart of Germany — exactly where we intended to go.

~~ General Howitzer

VP’s:

5

Card Balance:

Allies – 5

Axis – 5

Complexity:

4

Conditions: 

Mountains & Countryside

Location:

Germany

Year: 

1945

Theater:

Western Front

Campaign:

Allied Rhineland Campaign

Summary

This is an exciting scenario with some unique features which recreate actual events on the battlefield in 1945.

Objective:

Six Medals will win, but the principle objective for the Allies is to preserve the two dams, Schwammenauel and Urft.  Should either of them get successfully sabotaged by the Germans, and the Allies will likely lose the scenario.

Battlefield:

It is rugged mountainous terrain encircled by a river, mountains, and forests, with a dam at either end of the River Roer.

Troops:

Allies: 10 Infantry, 2 Armor

Axis: 8 Infantry

Special Rules:

Sabotaging a Dam – each of the two dams require a total of 4 stars to be destroyed.  At the start of every turn, no matter what cards they hold in their hand, the Axis player rolls two dice, one of each dam.  However, the dice will only count and apply to a dam if an Axis unit is on the actual dam hex.  For each Star rolled, if the dam is occupied by Axis forces, a star icon is placed on that dam. Once a total of four stars accrue, the dam is destroyed, and the Axis player receives 4! victory medals per dam. 

medal allies

🔥 Winning as Allies


1.  Big Picture Strategy:  Destroy the enemy or capture the dams before they are sabotaged. Your best option, historically is to capture the Urft Dam first.

2.  You have two Armor units, but given the rugged terrain, they will be almost useless to you.  If you waste your time trying to get them out from behind the mountain, you will be giving the Axis time to sabotage the dam.

3.  Your paratroopers have landed in a dangerous spot, pressed up against the mountain wall as they are. Move them forward to attack ASAP, before they are destroyed.

4.  Your right flank is your strongest at the start.  Move quickly forward to overwhelm the enemy and secure the  Urft Dam.

medal axis

🔥 Winning as Axis

1.  Big Picture Strategy:  the goal is to delay the Allies (delaying tactics) as long as possible so that you can blow the dam(s).  This will take at least four turns, but in reality, much longer.  If you successfully sabotage one dam, (worth 4 medals!), you only need to take out one other Allied unit to win.  Should you blow both dams, you are guaranteed a win.  (Historically, the Germans were able to blow the discharge valves of the Schwammenauel Dam and flood the Roer River.

2.  The Dam provides no battle protection. The only reason to stay on the hex is to attempt to sabotage the dame.  But once the Allies get close, keep some forces in the woods to attack and slow down the enemy.

3.  The Allied Paratroopers are easy prey, backed up against the mountain.  Take them out quickly before they can attack your forces in the town of Kommerscheit.

1
BR - Schammenauel Dam

Author:

Days of Wonder

URL

Pointe-du-Hoc

Pointe-du-Hoc

scenario_PointeHoc_start_Allies

The Battle of Pointe du Hoc was a critical part of the D-Day invasion on June 6, 1944. Pointe du Hoc, a steep cliff overlooking the English Channel between Utah and Omaha beaches, was targeted because it housed a German gun battery capable of threatening the Allied landings.

U.S. Army Rangers were tasked with scaling the 100-foot cliffs to neutralize the German artillery positions believed to be in bunkers at the top.  About 225 Rangers from the 2nd and 5th Ranger Battalions led by Lieutenant Colonel James Rudder.  Using ropes, ladders, and grappling hooks under intense German fire, the Rangers climbed the cliffs while under heavy fire.  The Rangers discovered the artillery guns had been moved inland. They located and destroyed the guns using thermite grenades. The Rangers suffered heavy losses—fewer than half were still capable of fighting after the battle.

General Howitzer sums up its importance:

Listen up, men—Pointe du Hoc wasn’t just another hill; it was the lynchpin in the whole damned invasion. Our boys scaled those cliffs under fire, ripped out the German artillery, and made damn sure nothing could rain hell on Utah and Omaha. It was guts, grit, and glory—one of the boldest strikes of D-Day, and it damn well helped crack open Fortress Europe.

~ General Howitzer

4 VP’s

Card Balance:

Allies – 6

Axis – 4

Complexity:

2

Conditions:

Beach

Location:

Normandy

Year:

1944

Theater:

Western Front

Campaign:

Invasion of Normandy

Codename:

Part of Operation Overlord

Briefing:

This scenario is a tough one for the Germans, as the Allies have a 69% success rate.

Objectives:

Because this is a 4 VP scenario, every single hit matters, so both Axis and Allies need to carefully target and concentrate their fire.

Battlefield:

This scenario has a ridge running across the entire battlefield. It is a two-hex move to climb the hill, so it is a challenge for the Allies to mount it. But once they do, it is a short trip to the forest in the corner containing additional victory points. 

Troops:

Allies – 9 Infantry

Axis – 5 Infantry, 1 Artillery

🔥 Winning as Allies

1. Like all beach scenarios, the goal is to get off the beach as quickly as possible. But the ridge running across the beach, does allow Allies to assemble their forces just behind the ridge, massing together, until they are ready to climb the ridge together and attack.

2. Watch out for the infantry hex on the Pointe, and for the artillery on your right flank. You will need to shift your forces to the left as quickly as possible, or the enemy could gain one VP before you even get out of the water. You can move your infantry in a straight lateral move while still in the water, to get away from the Pointe.

3. The best pathway to the VP’s in the forest on your right flank, is to overwhelm the enemy on the left flank, and work your way all the way across the middle section into the forest. Once you make your way off the beach on the left flank, you can take a bit of time to assemble all of your forces, and gather the cards you need for your center section attack.  This will keep you out of the Artillery range.

Memoir 44 scenario Pointe de Hoc

🔥 Winning as Axis

1. Take advantage of the ridge facing the shore. If you have the infantry movement cards, get to the ridge and batter the troops as they approach. If you just sit in your bunkers or sandbags, and wait for them to mass and attack, you will be overwhelmed.

2. First moves are to attack with your infantry from on the point, and your artillery while Allies are still in the water. This will force them up the coast away from your artillery, and most importantly, away from the victory points in the woods.

3. Use your artillery well to slow down, harass, and destroy the troops while they are still on the beach.

4. Once the Allies make it up onto the ridge, if you can restore your remaining forces back into your bunkers, it may give you enough time to degrade the enemy forces enough to prevent their achievement of the VP’s in the forest on your left flank.

Battle Reports

(percentage of Allied victories):

69%

Scales-Allies-Weighted
34
BR - Pointe

Author:

Days of Wonder

Link:


Normandy – Vaumicel Manor

Normandy - Vaumicel Manor

scenario_VaumicelManor_start

The Battle of Vaumicel Manor occurred on June 6, 1944, as part of the D-Day landings during Operation Overlord in Normandy. It was a localized but intense engagement involving the U.S. 502nd Parachute Infantry Regiment of the 101st Airborne Division.

The battle focused on the capture of Vaumicel Manor, a key German stronghold near the beachheads. The heavily fortified manor served as a command post and artillery position, threatening Allied movements inland. The paratroopers, despite being scattered during their drop, regrouped and launched a coordinated assault on the manor.

After fierce fighting, including close-quarters combat, the U.S. forces captured the manor, neutralizing its defenders and securing a critical position. This success contributed to the broader efforts to consolidate the Allied beachheads and disrupt German defenses in the region.

The battle exemplified the resourcefulness and determination of airborne troops in achieving their objectives under challenging conditions.

General Howitzer comments on this battle:

“Now listen here! After some downright brutal fighting, including hand-to-hand combat, our boys took that manor and wiped out the defenders. It wasn’t just a fancy house—it was a key position, and taking it helped us lock down the beachhead and throw the enemy’s plans into disarray.

That fight showed exactly what airborne troops are made of—grit, guts, and the will to get the job done no matter the conditions. They didn’t wait for perfect—they took the fight to the enemy and came out on top.

That’s how you win a war, gentlemen—by fighting smart, pushing hard, and never backing down!

6 VP’s

Card Balance:

Allies – 5

Axis – 6

Complexity:

3

Conditions:

Countryside

countryside

Location:

Normandy

Year:

June 5th – 6th 1944

Theater:

Western Front

Campaign:

Normandy Invasion

Codename:
Operation Overlord

Summary:


The Axis forces are scattered across the battlefield, while the Allies are lined up against their border ready for attack. The challenge for both sides is to make their way across the open battlefield. Using hedgerows and forest hexes is the best way to move your forces towards the medal objectives in each of the towns. There are two medals each for Axis and Allies. They seem to be within reach, but getting to it, and holding it are two different things. You will have to make sure you have dealt a crippling blow to any nearby enemy infantry before you seek to posses a town hex medal.

Objectives:
Six VP’s, with two Objective Medals in the towns of Ferme de l’Ormel and St. Laurent for the Axis, and one Objective Medal for the Axis at the town of Vacqueville and at Wn.69.

Battlefield:
Countryside scattered with forests and hedgerows.

Troops:

Allies – 9 Infantry; 2 Armor
Axis – 8 Infantry, 1 Armor, 1 Artillery

🔥 Winning as Alllies

1. Big picture strategy is that your right flank is your strong one, and your left flank, although you have a lot of firepower, is up against a well-entrenched artillery which will cut you to ribbons unless you deal with it.  If you get the cards, you can make a good push up the right flank. But you will have to target each unit along the way and take them out one hex at a time. 

2.  Be careful of the Axis artillery on your left flank. They can reach nearly to the back row of hexes. And any attack attempted upon the two infantry hexes at A5 and d4 will be supported by a two-dice response attack from the artillery.

3.  Be sure to protect the two town hexes on the third row which contain Medal Objectives for the Axis.  

🔥 Winning as Axis

1. You are primarily in a defensive position in this scenarios as the Allies advance against you, so remain in defensive positions. But should the cards present an attack opportunity, then take it.

2.  However, you have some Combat Engineers and Special Forces in the back. Move them forward, under protection, but get them into a spot to assault some of the forward positions of the enemy. The special abilities of the Combat Engineers can attack while ignoring terrain battle restrictions.

3.  You have two Temporary Medal Objectives up on row 3, deep in enemy territory.  If you hope to occupy and hold them, you will first need to degrade the enemy forces.  Your best hope of doing this is in the right section, where you have both your Armor (in the center, but can quickly get to the right) and Artillery at. your disposal.

4. General Plan of Attack: Push your forces forward to the right, to gather momentum where you are strongest.

Memoir 44 Vaumicel Manor

33
BR - Vaumicel Manor

Author

URL