Liberation of Paris

Liberation of Paris

The Liberation of Paris took place from August 19 to August 25, 1944, as Allied forces advanced through France following the D-Day landings. Resistance fighters in Paris, along with civilians, began an uprising against the German occupiers, seeking to reclaim the city before it could be destroyed.

General Howitzer’s summary:

Leclerc’s Free French rolled in with our 4th Infantry on August 24, linking up with the resistance and blasting through what was left of the German holdouts. After some damn fine street fighting, their commander—von Choltitz—had the good sense to ignore orders to torch the city and surrendered the next day.

Taking Paris wasn’t just a win—it was a thunderclap. It lit a fire under Allied morale, crushed the myth of Nazi invincibility, and gave us back the heart of France. From that point on, the road to Berlin got a whole lot shorter.

5 VP’s

Card Balance:

Allies – 5

Axis – 4

Complexity:

3

Conditions:

Countryside

Context:

Historical

Location:

France

Year:

1944

Theater:

Western Front

Summary:

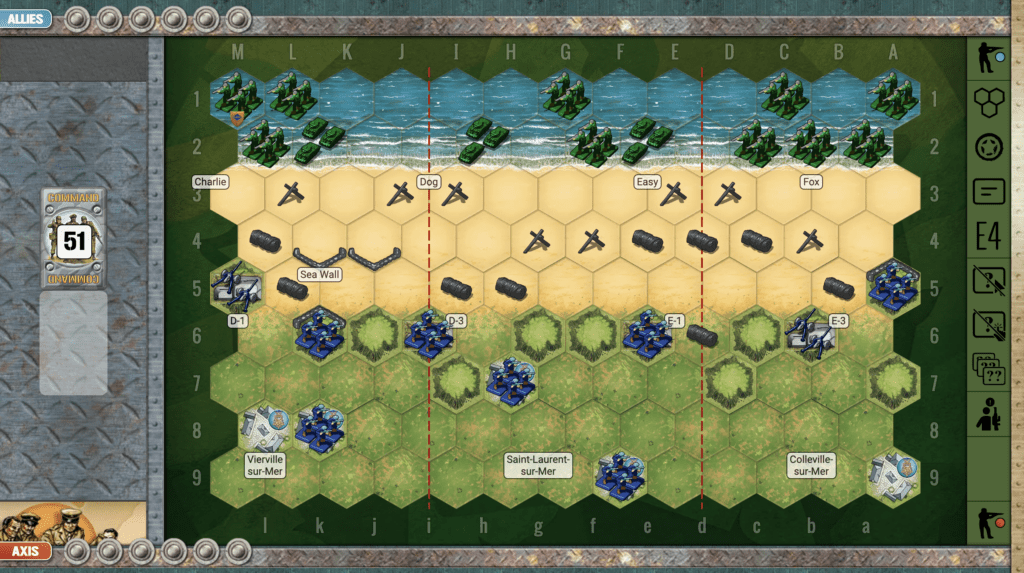
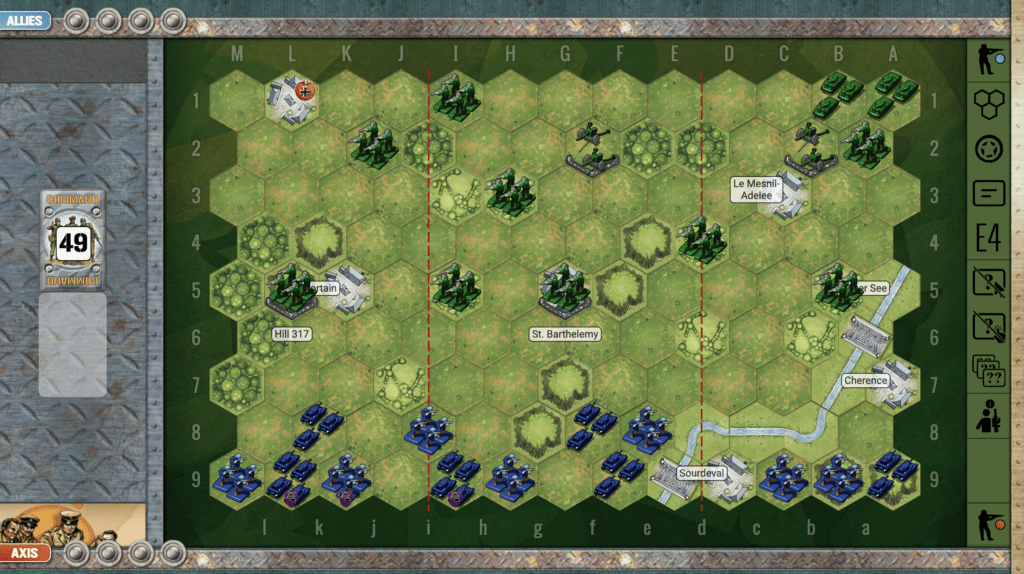
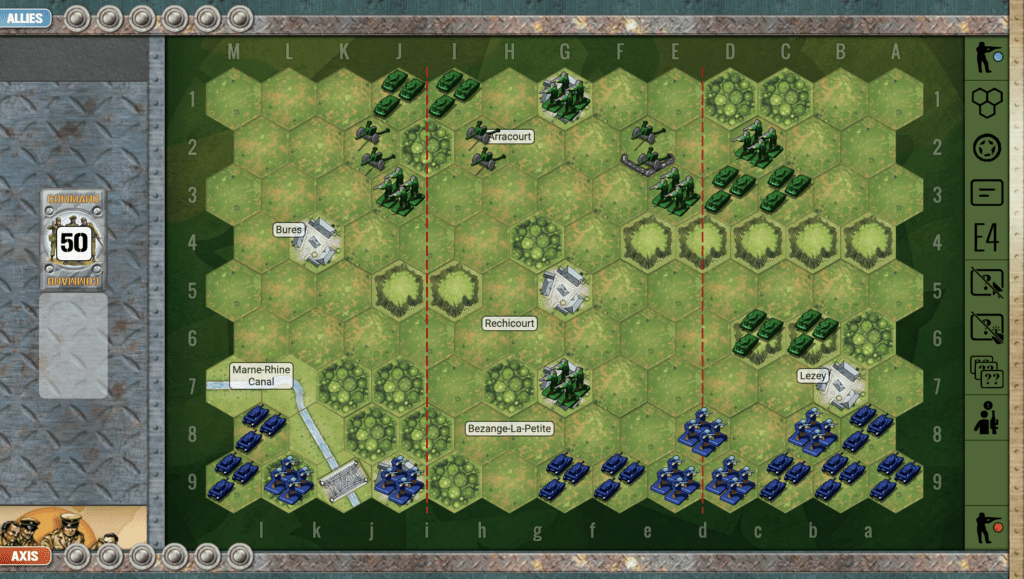
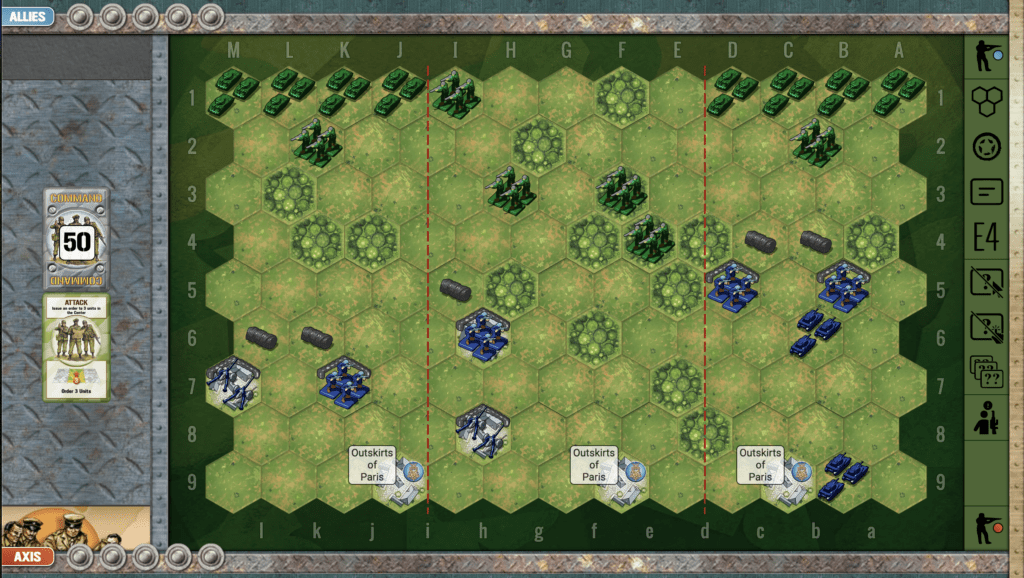
The Allies vastly outnumber the Axis in this scenario. Their objective is to reach the three town hexes on the outskirts, which are permanent medal objectives. But first they have to get past the forest in the center, and the German defenses made up of sandbagged troops, barbwire, and artillery.

Objectives:

5 VP’s, plus the Allies have three towns available to them as Permanent Medal Objectives.
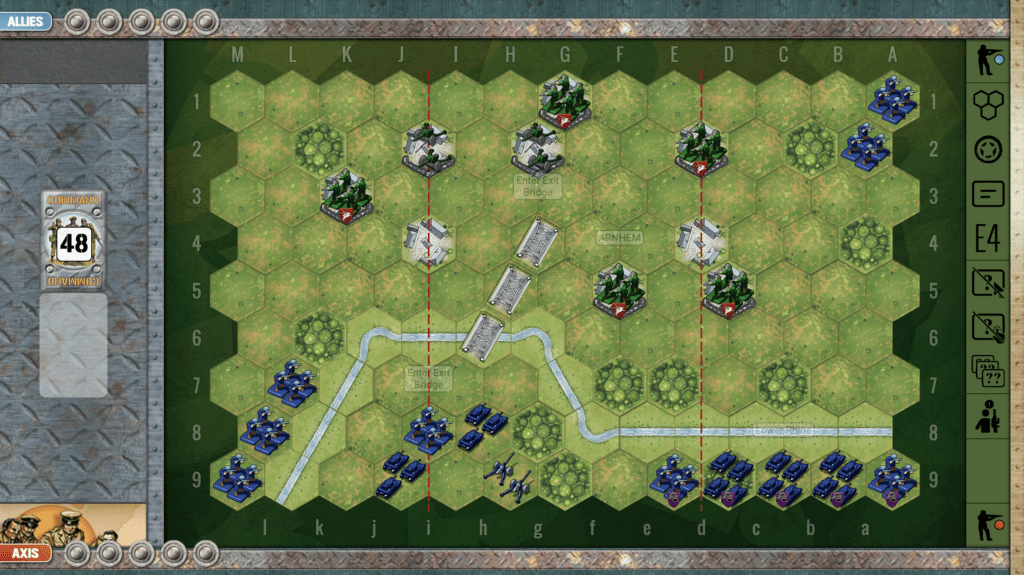
Battlefield:

Countryside with a lot of forests, and the outskirts of Paris at the Axis side of the field.

Troops:

Allies – 6 Infantry, 8 Armor

Axis – 4 Infantry, 2 Armo, 2 Artillery

Allied Strategy:

1.  You have a lot of tanks. Use them. You should be able to very quickly take out the infantry behind the sandbags and move down to the towns to scoop up our Permanent Objective Medals.

2.  The Battle Reports for this scenario heavily favor the Allies, so if you are playing both sides in a full game, make sure to capture all you can while you are playing the Allies.

3. As Allies, it really comes down to the battle on your strong left flank.  You have to break through the blockade of the enemy sandbagged infantry and the defending armor unit.  The more quickly you break through, the more likely the win.  But if the Axis are able to make you pay dearly with two or more units to break through, the game odds may even out.

Axis Strategy:

1.  This is mostly a defensive game for the Axis.  Keep your infantry behind the sandbags, and maximize the use of your armor and artillery to slow down the enemy advance.

2.  At a certain point, you may need to move your infantry into the towns in order to make it more difficult for the Allies to capture those Permanent Objective Medals. Remember, once they get one, they can leave the town and go for the next Objective.

3.  It generally seems to be a mistake to move one of your armor to C5 between your two infantry, in an attempt to get some easy hits on the enemy no-retreat infantry on the second row. You may get as much as three hits. However, in most cases, the Allies are able to bring forward two to four armor units and target all their forces on your lone armor hex, resulting in a quick VP for the enemy.

Battle Reports (percentage of Allied victories):
75%

21
BR - Liberation Paris

Author:

Days of Wonder

Link:

First Assault Wave (Omaha Beach)

First Assault Wave (Omaha Beach)

scenario_FirstAssaultWave_start_Axis

The invasion of Omaha Beach on June 6, 1944, was a pivotal part of the D-Day landings during World War II’s Operation Overlord. Omaha Beach, one of five landing sites in Normandy, was assaulted by U.S. forces, primarily the 1st and 29th Infantry Divisions, supported by specialized units.

Heavily fortified by German defenders from the 352nd Infantry Division, the beach presented challenging terrain with high bluffs, barbed wire, and entrenched gun emplacements. American troops faced intense machine-gun fire, artillery, and obstacles as they landed, resulting in high casualties, particularly in the initial waves.

Despite the heavy losses, small groups of soldiers managed to breach the German defenses, scaling the bluffs and neutralizing key positions. By the end of the day, the U.S. forces had secured a tenuous foothold, paving the way for the larger Allied advance into occupied France. The success at Omaha Beach, though costly, was crucial to the ultimate liberation of Europe from Nazi control.

General Howitzer’s perspective:

“Let me tell you something—Omaha Beach was no picnic. The enemy had the high ground, the machine guns, and every advantage. But our boys? They didn’t stop. Through smoke, blood, and hell itself, small squads clawed their way up those bluffs, took out key positions, and broke through the defenses.

By day’s end, we had ourselves a fragile foothold—but it was ours. And that patch of bloody sand became the launch point for the drive to liberate France and crush the enemy war machine.

So don’t ever forget—victory doesn’t come easy. It comes from courage, sacrifice, and the will to fight forward when every instinct says to drop. That’s what won Omaha. That’s what wins wars.

6 VP’s

Card Balance:

Allies – 4

Axis – 5

Complexity:

2

Conditions:

Beach

Context:

Historical

Location:

France

Year:
1944

Theater:

Western Front

Campaign:

D-Day

Codename

Summary:

True to history, this is a tough battle for the Allies to win.

Objectives:

5 VP’s including Medal Objectives

Battlefield:

Omaha Beach is well-guarded with hedgehogs, barbwire, and numerous hills to slow down the Allied advance. If they successfully make it off the beach, there are three towns at the edge of the battlefield with victory points for them.

Troops:

Allies – 10 Infantry, 3 Armor

Axis – 7 Infantry, 2 Artillery

Allied Strategy:

1.  Get off the beach as quickly as possible!

2.  Keep your armor and infantry attack cohesive. They are both needed to successfuly breach the bunkers. The armor fires from a safe distance, and then when ready, the infantry moves in for the kill and take over.

3.  One of your Infantry on the right flank is a special forces which can move two hexes and still attack.  Get it up to the enemy as quickly as possible.

Axis Strategy:

1.  The Axis have artillery on each flank, which gives you control over nearly every hex on the beach. Use them to good effect.

2.  There are five! town medal objectives which need to be defended for this scenario. If you can slow down the advance of the Allies, it will give time for your artillery to hit them.


Battle Reports (percentage of Allied victories):

19%

25
BR - First Assault Wave

Author:

Days of Wonder

Link:


Counter-Attack on Mortain

Counter-attack on Mortain

“Alright, boys—here’s the lowdown on that Axis stunt they called Operation Lüttich. Early August ‘44, the Germans thought they’d knock us back on our heels by punching through at Mortain, aiming to cut us off at Avranches and stop our drive into Brittany. Hell of a plan—if we were asleep!

They hit us hard at first, but we didn’t blink. Our boys dug in, held those lines with guts and grit. And don’t forget—our flyboys were on ‘em like hounds on a fox, raining steel and fire from the skies until those Nazis were howling for mercy.

The result? Germany’s counterattack went up in smoke—smashed, scattered, and thrown back with a hell of a lot of their tanks and men left behind in the dust. That’s the way to fight, boys—no retreat, no surrender, and always give ‘em hell!

~~ General Howitzer

4 VP’s

Card Balance:

Allies – 6

Axis – 5

Complexity:

3

Conditions:

Countryside

Location:

France

Year:

1944

Theater:

Western Front

Campaign:

Codename:

Operation Luttich

Summary:

As it was historically, the Allies are very well protected, and controlling most of the field of play.

Objectives:

4 VP’s, and one Objective Medal for Axis

Battlefield:

This scenario has a nice combination of hills, forests, and hedgerows scattered across the battlefield. There is also a river in one corner making it difficult for extra infantry and armor to engage in the war.

Troops:

Allies – 9 Infantry, 2 Armor, 2 Artillery

Axis – 7 Infantry, 6 Amor

Allied Strategy:

1. You have the advantage of terrain control, defensive positions in hedgrows, forests and towns. But you need to take advantage of it by quickly attacking where you can.

2. Your right flank is your weak one, being outnumbered by enemy forces, 5 to 2.  Use your infantry on Hill 317 to attack the no-retreat armor before it moves away.

3.  Note that as long as you have your forces on either of the two hexes of Hill 317, you can use any Recon (on the right) cards to call down Airpower attacks against the Axis. Use it, and bomb them back to Berlin!

4.  Then move your infantry in the back of the right flank forward into the town of Mortain to support your other infantry unit on the hill, and to box in the enemy even more than they are already.

5. If you have the movement points, you can place your infantry at I1 into the village to defend the Objective Medal.

6. Get your armor in your left corner into the action ASAP. If you can get over to the river before the enemy has moved into safety, you can score one or two VP’s by attacking them in their no-retreat positions.

Axis Strategy:

1.  Your forces on the left flank are bunched up, and you have a no-retreat armor ready to get hit by the infantry hidden in the woods. You need to create some mobility on your left and some of your troops into the woods to attack the enemy.

2. Your right flank is equally problematic. You are a sitting duck back against the border. So you need to get those troops into safety into the nearby towns, at least. Even better if you have the cards to move them out into the action. Or else when the enemy armor in the upper right flank becomes mobile, they will make their way down and easily destroy one or two units.

3.  It is going to be difficult to get all four VP’s, so you should target the Objective Medal in the village on your left flank. If your armor can survive the infantry attacks as you make your way there, it will be an important VP for you. 

4. You only need four Medals to win this scenario, and three of them are on your left flank, ready for the taking. Just take out the two Infantry units and roll into the town of St. Hilaire. 

Classic Battle Reports

(percentage of Allied victories):

39%

24
BR - Mortain

Author:

Days of Wonder

Link:

Arracourt

Arracourt

scenario_Arracourt_start_Axis

The Battle of Arracourt (September 18–29, 1944) was one of the largest tank engagements on the Western Front — a dramatic clash between the U.S. 4th Armored Division and German Panzer forces near the village of Arracourt, in northeastern France.

After the breakout from Normandy, U.S. forces under General Patton’s Third Army raced across France, outpacing their supply lines. The German High Command, desperate to halt the advance, launched a counteroffensive using newly arrived Panzer brigades from the 5th Panzer Army. Their goal was to cut off the American spearhead and regain the city of Nancy.

By the end of September, the Germans had lost over 200 tanks and assault guns, compared to about 25 U.S. tanks. The American victory at Arracourt shattered the Panzer brigades, halted the German counterattack in Lorraine, and confirmed the U.S. Army’s growing mastery of combined-arms tactics.

Listen up—Arracourt was no accident. That fight proved what I’ve said all along: steel alone doesn’t win battles—men do. When you’ve got training in your bones, clear orders on the radio, and the guts to move fast and hit hard, you can take on any tank the Krauts can throw at you.

Our boys out there turned the rolling fields of Lorraine into a graveyard for German armor. Outnumbered? Maybe. Outclassed? Never. We didn’t dig in and wait—we maneuvered, struck from the flanks, and crushed them before they knew what hit ’em.

Arracourt wasn’t just a victory—it was a lesson to every soldier in this Army: brains, speed, and discipline beat brute strength every damn time.

~~ General Howitzer

6 VP’s

Card Balance:

Allies – 6
Axis – 4

Complexity:

4

Conditions:

Location:

France

Year:

1944

Theater:

Western Front

Campaign

Codename

Summary:

The Arracourt scenario is dominated by a hilly ridge of five hexes which cut across a flank and into the central section, and another smaller ridge in front of that. When the armor comes over the ridge, it becomes a mighty tank battle.

Allied Strategy:

1.   Be careful to not launch a premature attack on the left flank. If you are not ready, you will be entering a kill box. It may be wiser to pull back to the secondary row of ridges, to get prepared for attack.

2. The Axis forces are together in the upper right section behind the Marne-Rhine Canal. If you can move in with your armor and some artillery attacks, you are may be able to score at least one medal before they can respond.

3. You have three artillery. Use them to your advantage. If you can move your center one forward a bit, it will improve your attack and control of the center section.


Axis:

1.  Your right and center sections are strong; the left units stuck behind the canal is your weak side. As you are able, get them out of harms way, or they will be easy pickings for the Allies.

2.  Grand Strategy for Axis: the battle will be fought on your right flank with the armor from both sides on the two ridges and the valley between.  You need to get your tightly condensed and no-retreat armor out into the open so you can battle well. If you stay backed up against the border on the right flank, your troops will be destroyed.

3.  Early goal: eliminate the enemy Infantry at G7, or they will do unnecessary harm to your forces in the center section. 


Battle Reports:

(percentage of Allied victories)

 60%

20
BR - Arracourt

Author:

Link: View Here


Arnhem Bridge

Arnhem Bridge

Scenario_ArnhemBridge_start

Listen up! Arnhem Bridge was no Sunday stroll — it was a fight for the throat of Germany. Market Garden was a bold gamble, a thrust straight through Holland to end the war by Christmas. The plan was simple: grab those bridges, roll our armor across, and cut into the Reich’s belly.

But Arnhem was the lynchpin, the prize. The British Red Devils dropped in with guts and steel, holding that bridge like bulldogs against tanks, artillery, and everything the Germans could throw at them. For days they fought, house to house, street to street, under constant fire. Outnumbered, outgunned, and cut off, they refused to quit.

In the end, the bridge could not be held, and the operation fell short of its lofty goal. But don’t mistake it for failure — Arnhem showed the world the courage of men who held their ground against impossible odds. They didn’t just fight for a bridge; they fought for honor, and you know what? They earned it.

~~ General Howitzer

5 VP’s

Card Balance:

6 – 6

Complexity:

3

Conditions:

Countryside

Location:

Netherlands

Year:

1944

Theater:

Western Front

Codename: 

Operation Market Garden

Context:

Historical

Summary:

Despite its apparent simplistic appearance, this scenario presents some interesting strategy, as it really is all about the Arnhem bridge crossing.

Objectives:

This is a five VP scenario, with no other objective medals.

Battlefield:

The principle battle field characteristics are the lower Rhine River cutting across the width of the field, and of course, Arnhem Bridge which is the focus on the planned Axis invasion.

Troops:

Although the Axis have more forces, many of them are trapped in the right flank behind the impassable Rhine River.

Allied Strategy

1.  Your artillery will be your most powerful defensive protection in this scenario. Use your center Section cards to keep pounding the enemy. Make sure that you always keep at least one central section card in reserve, should the enemy try to make a run across the bridge.

2.  When you are not defending against a bridge run in the center, use your long-range artillery to slowly degrade the forces on each wing. Because if they come at you with full force, you will have a difficult time holding them off.

3.  Do your best to keep your infantry safely behind the sandbags until you are totally ready to come out for an attack. Although your most forward infantry can become easy prey to the enemy still behind the river, so if you can move that infantry back towards your side of the battlefield, do so. That will provide you with one extra infantry force to attack the enemy in the flanks.

Axis Strategy

1.  The main problem: Axis must get out from behind the river blockade, by crossing the Arnhem bridge without being destroyed, once across.

2.  Flank Attacks: The extra infantry in each corner can be used to maximum advantage to clear out the enemy, or at least distract them, while you cross the bridge. But you will need to wait until you have the right combination of cards to be able to launch an attack from one of the flanks.

3.  Do not rush it: while you remain on the far side of Arnhem Bridge you are generally safe from enemy attacks unless they get an extraordinary collection of Combat cards. The principle mistake made by Axis is to rush out too quickly across the bridge and then to get slaughtered in the kill box which awaits you across the Arnhem Bridge. So take your time to assemble your forces, and move extra troops into the central section, ready to cross the bridge.

4.  With the right combination of cards, you can begin an attack on one (or both!) flanks, while you attempt to cross the bridge. The goal is to distract the enemy, and force them to divide their defensive energies so that your forces can cross the bridge successfully.

Class Battlefield Reports:

(percentage of Allied victories)

81%

26
BR - Arnhem

Author:

Days of Wonder

Link: