Battle of Bataan

Battle of Bataan: Abucay Line

Scenario_Battle-Bataan_setup

On January 7th, 1942 Japan invaded the Philippines. Under orders from General MacArthur American troops and their allies retreated to a defensive line that stretched from Mt. Bataan to the China Sea. The American troops, although outnumbering Japan, were of mixed quality and had low morale. After three months of hard fighting and with American supplies dwindling, the line broke and thousands of American troops were forced to surrender.

6 VP’s

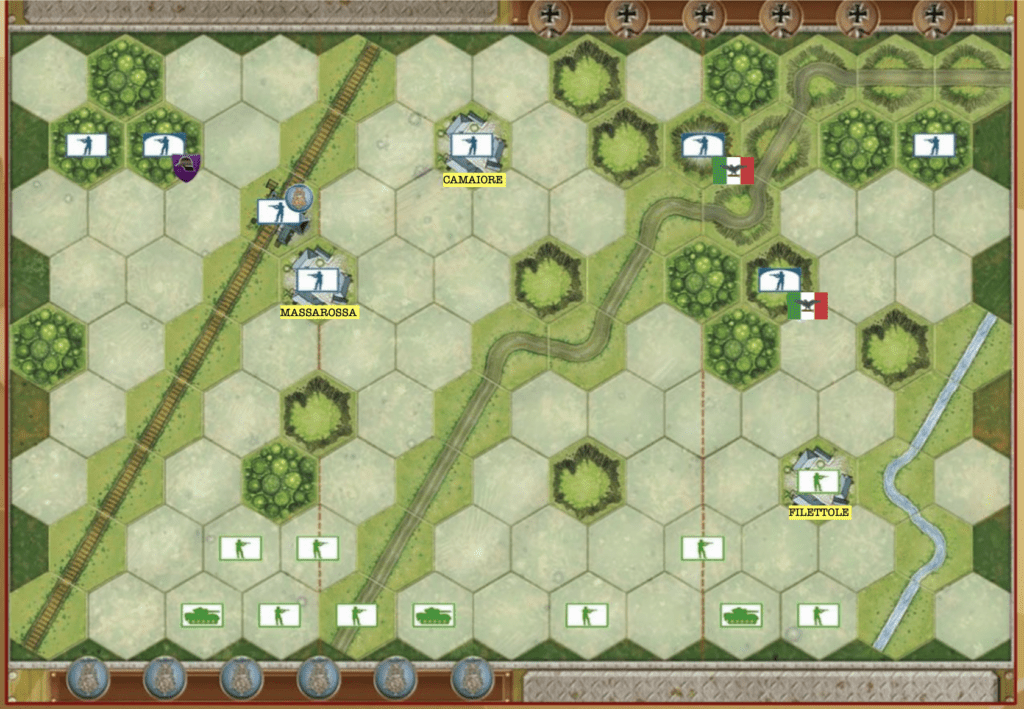
2 victory metals are placed at the bottom of the American line. Japanese units who make it to the hexs between the metals count as a victory point and are moved to the Japanese players victory stand.

Card Balance:

Allies – 5

Axis – 6

For the Air Power card Japan will roll 2 dice and America will roll 1

Complexity:

2

Conditions:

Jungle

Context:

Historical

Location:

Year:

1942

Theater:

Pacific Theater

Campaign:

Codename:

Summary:

Requires base Memoir ’44 and Pacific Theater Expansion. Imperial Japanese army command rules are in effect. Marine rules are in effect for units marked with the Marine emblem. Units marked with Chindits emblem are Philippino guerilla fighters and follow same rules as French resistance.

Objectives:

This is a six VP scenario, with Medal Objectives

Battlefield:

Jungle

Troops:

(There is no indication from the author of the troop deployments.)

Allies – 

Axis –     

Allied Strategy:

Axis Strategy:

Author:

Fan Creation

Link:

TAKING CAMAIORE

TAKING CAMAIORE (BEF)

Once settled into their new environment, the FEB faced a baptism of fire on September 16 1944. With the support of 3 armored units of the US 5th Army, they took control of Massarosa and Camaiore, north of Pisa. This gave them access to an important network of roads and railways which served as an arterial supply route in the area. The challenge of maintaining the positions led to the Germans retreating further back into the mountains, to establish more efficient defences.

5 VP’s

Card Balance:
Allies – 4
Axis – 5

Complexity:

3

Conditions:  

Countryside

Context:

Historical

Location:

Italy

Date:

Sept. 16-18, 1944

Theater:

Western

Campaign:

Brazilian Expeditionary Force

Code Name

Context:

Historical

Summary:

Objectives:

5 VP’s, including Temporary Medal Objective

Battlefield:

Battlefield has a railway line, a road, and a river cutting through the field of play at an angle, making movement very interesting.

Troops:

Allies – 8 Infantry, 3 Armor

Axis – 8 Infantry

Allied Strategy

Axis Strategy:

Battle Reports:

0
BR - TAKING CAMAIORE

Author:

Icles Rodriquez & Memoir 44 Japan

Breakthrough to Gembloux

Breakthrough to Gembloux

Historical Background

The Breakthrough to Gembloux was part of the early German invasion of Belgium during May 1940, in the larger Battle of France. German Panzer divisions advanced through central Belgium aiming to break Allied lines near Gembloux, where French forces had fortified positions in the so-called Gembloux Gap—one of the few tank-suitable areas in the region.

Fierce fighting erupted between German armored units and French mechanized divisions, resulting in one of the few early confrontations where French forces held their ground and inflicted significant tank losses. However, the battle was ultimately bypassed when German forces broke through further south in the Ardennes, rendering the defense of Gembloux strategically moot.

General Howitzer summarizes:

At Gembloux, the French finally stood their ground and gave the German Panzers a bloody nose—one of the rare times early in the war they didn’t fold. But while they were trading blows up north, the real storm came through the Ardennes. The fight was solid, but it ended up guarding the wrong damn door.

VP’s

12 VPs

Card Balance:

Allies – 5

Axis – 6

Complexity:

4

Conditions:

Countryside

countryside

Context:

Historical

Location:

France 

Date:

May 13, 1940


Theater:

Western

Campaign:

The Battle of France

Codename:

Summary:

Objectives:

12 Victory Points, plus one Exit by an Axis unit

Battlefield:

Deep breakthrough battlefield with countryside terrain

Troops:
Allies – 8 Infantry, 7 Armor, 1 Artillery

Axis –  10 Infantry, 8 Armor, 2 Artillery

Big Picture Strategy

The challenge for the Axis is escaping a unit out the Exit Hex at K1. 
Winning battle is easy; escaping the battlefield is not.

🔥 Winning as Allies

1.  If you want to have any hope of holding out against the Germans, as the French did for two days historically, you will need to hold the line right at the beginning with the three towns on row 13.  Get your armor up their to reinforce your infantry.  The Axis have overwhelming force, so if you retreat, they will be able to pick you off one by one. Make your stand immediately!

2.  Once you get pushed back, the final victory medal for the Axis has to come through escaping on the hex at K1.  Guard that with your armor and infantry, and you have some hope of gaining another medal.

3. While you may lose a lot of forces as the Axis pushes you back, be sure to have enough forces to make a good stand to guard the final exit hex at K1.  The Axis can be made to suffer much as they try to get one unit out that escape hex.  In fact, once Axis have achieved their 12 victory points,  you can sacrifice as many Allied forces as you need to in order to prevent them from escaping.

🔥 Winning as Axis

1.  Remember that no matter how many Allied units you destroy, you will have to get one of your units out the exit row at the end of the battlefield.

2.  The very best way to end the game well, and escape your final Axis unit off the board is to save up a Behind Enemy Lines. Then maneuver an infantry within six rows of the border, and make your move.

Battle Reports:
(percentage of Allied victories)


5
BR - Breakthrough to Gembeloux

Author:

jdrommel

Link:

Wake Island

Wake Island

Wake Island was a little speck in the Pacific, but in December ’41 it became a fortress of American grit. Right after Pearl Harbor, the Japanese thought they’d steamroll it. On the 11th, they charged in—and got their noses bloodied. Our Marines and gunners blasted ships out of the water and sent the enemy packing, the first time in the war a U.S. force had thrown back an amphibious assault.

But the enemy came back heavier on the 23rd, with more ships, more planes, and more men than that tiny garrison could handle. The Marines fought like crazy, but Wake was finally overrun. Even so, their stand proved to the world that Americans don’t just roll over—we fight, we bleed, and we make the enemy pay dearly for every inch. Wake Island was no surrender; it was a warning shot that the United States was in this war to the finish.

~~ General Howitzer

6 VP’s

Card Balance:

5 – 5

Complexity:

2

Conditions:

Beach

Location:

North Pacific

Year:

1941

Theater:

Pacific

Campaign

Codename

Summary:

The Wake Island scenario has the Japanese attacking Marines who are defending. The beachfront is barricaded with a row of wire. But if they can get past that barrier, every town and fortress hex is a victory medal objective for them.

Objectives:

6 VP’s, plus the Axis have potentially 10 (!) Medal Objectives.

Battlefield:

A flat beach defended with wire and Marines in bunkers and one artillery.

Troops:

Allies – 5 Infantry, 1 Artillery

Axis – 12 Infantry!

Allied Strategy:

1.  Historically the Allies were overwhelmed in the second attack when 1500 invaders attacked, so the goal is to get some quick hits before they reach the Medal Objectives.

2.  Use your artillery at every opportunity, especially early in the game before they move away from it. 

Axis Strategy:

1.  As a general rule, avoid the artillery in the center-right.  Move your troops to the left and attack the left flank. There are plenty of VP’s available on the left side without even having to go anywhere near the artillery.

2. However if you have the cards for a sustained and rapid attack on the right, do it. The fact that there are two hexes unprotected by wire allows the you to very quickly reach the enemy bunkers. 

3.  You can use your advance infantry unit to quickly gain control of the field bunker at M6, and its VP. Then three more Objective Medals are available to you in the towns.  Then as you quickly bring other infantry forward the advance unit can attack the enemy infantry in the town at K8. That’s a total of 5 VP’s relatively unprotected. If you can survive the artillery attacks while you seek out your 6th VP on the left flank, you could have a win to brag about!

DoW Battle Reports

(percentage of Allied victories):

32%

24
BR - Wake

Author:

Days of Wonder

Link:

Villers-Bocage

Villers-Bocage

The Battle of Villers-Bocage took place on June 13, 1944, during the Normandy Campaign in World War II. It was a significant tank engagement between British and German forces near the town of Villers-Bocage in France, shortly after the D-Day landings.

Listen up, men—this was no parade down the Champs-Élysées. The British 7th Armoured Division—the famed “Desert Rats”—thought they’d found a hole in the German line near Caen and charged in, hungry for glory. But out of the hedgerows came Michael Wittmann and his awesome Tigers, ambushing them in the narrow streets of Villers-Bocage. In minutes, British columns were burning wrecks—armor smashed, morale shaken.

But here’s the thing: Wittmann’s brilliance bought the Germans nothing lasting. The Rats pulled back, regrouped, and the Tigers couldn’t press the advantage. The town lay in ruins, but the campaign rolled on. Villers-Bocage stands as a brutal reminder—urban fighting is hell, and courage alone doesn’t win the day. You need discipline, coordination, and the will to keep moving forward, no matter what roars out of the fog.

~~ General Howitzer

VP’s: 

Allies – 3 medals

Axis – 5 medals

card

Card Balance:

Allies – 3

Axis – 6

Complexity:

3

Conditions:

Countryside

countryside

Location:

Normandy

Year: 

1944

Theater:

Western Front

Campaign:

Normandy Invasion

Summary:

This scenario is really unique with the battle between the just five German Tiger tanks vs. 24! Allied tanks, 16 infantry figures. And yet the battle is fairly balanced.

Objectives:

Allies – 3 Medals

Axis – 5 Medals, including two permanent medal exit objectives 

Terrain:

Countryside with a road cutting across the battlefield at an angle

Troops:

Allies – 4 Infantry, 8 Armor

Axis – 5 Tiger Tanks

medal allies

Allied Strategy

1. The only way you can hope to win is by bunching up your forces. Do not try to take on a Tiger Tank, one at a time.

2.  Attack the units without forest protection first, as you will be able to roll triple the attack power.  

3.  You will need to force them out of the forest. Once they leave the forest hex, they cannot return.  So a one-two punch is the way to go. Your first tank forces can attack, and hopefully roll a Flag, which will force the enemy out into the open. Then your second tank forces can roll a 3D attack and hopefully secure a kill.

4. As long as the Axis forces stay in their woods for protection, you can backoff and move out of attack range, while you get the rest of your forces on your right flank organized and into action. 

medal axis

Axis Strategy

1.  Stay in the woods as long as you can, and keep attacking the enemy from there as long as they are in range.  Because the enemy can only roll one dice against you in the woods, the odds of them rolling a hit, and then a second dice with a grenade are exceedingly low.

2.  One of your Tigers is already out in the open, so plan on moving and attacking with that one first, but stay close to your other Tigers for support.  Do not venture into a forward position where the enemy can surround you from behind. 

18
BR - Villers

Author:

Days of Wonder

URL

Utah Beach

Utah Beach

The invasion of Utah Beach was part of the Allied D-Day landings on June 6, 1944, during World War II. Utah Beach was the westernmost landing area, assigned to U.S. forces, primarily the 4th Infantry Division, under Major General Raymond O. Barton. The objective was to secure the beachhead, push inland, and link up with airborne troops dropped earlier to capture key roads and bridges.

Strong currents caused some landing craft to drift about a mile south of the intended target area. This accidental landing proved advantageous, as it placed the troops in a less heavily defended section of the beach. The U.S. forces quickly overwhelmed the German defenses, suffering relatively few casualties compared to other D-Day beaches.

Listen up.

At Utah we hit fast, secured the sand, and drove inland until we shook hands with the paratroopers. That link-up turned a strip of beach into a springboard—men, guns, and fuel pouring ashore to feed the advance. With the beachhead anchored, momentum was ours. That’s how you start a liberation: seize, link, expand—and keep moving.

~~ General Howitzer

5 VP’s

Card Balance:

Allies – 6

Axis – 4

Complexity:

3

Conditions:

Beach

Location:

Normandy

Year:

1944

Theater:

Western Front

Campaign:

D-day Invasion

Codename

Summary:

The challenge for the Allies in this scenario is to get off the beach as quickly as possible, and exit out one of the three exit hexes. The Axis are protected in towns and bunkers in order to slow down the advance of the Allies.

1. Objectives

This is a 5 VP game, so it moves rather quickly, and the Allies will need to minimize losses while they pick away at the Axis forces inside their bunkers, all the while making their way towards the exit hexes.

2. Battlefield

There are three exit hexes at the top of the battlefield. The Allies can seek two objectives: First to destroy enemy units, Second to exit out the back.

3. Troops

Allies – 10 Infantry, 4 Armor

Axis – 5 Infantry, 1 Artillery

Allied Strategy:

1. Allies begin with their forces congested together in the left and center sections. This is not all bad, as they need to stay away from the artillery in the right flank. But they do need to disengage their forces from one another and create some separation from the shores of the beach.

2. Keep attacking! As you approach the enemy forces in their bunkers, you may be tempted to pause and amass more forces for the attack. This depends on your circumstances. If you are out in the open and under enemy attack with two-dice attacks, you need to just keep attacking with those forces. Create the beachhead by continuing to attack, attack, attack.

3. You can expect to receive a fair number of casualties as you progress up the beach. But as soon as you get your armor out of the water, things will change for any enemy units unfortunate enough to be found outside their bunkers.

4.  The big picture strategy for Utah Beach is to: Stay Left, Take Out the Infantry, Escape out the back.  The scenario only needs 5 VP’s.  All five of those are available to you on the left and middle section.  Take out the three infantry for your first three points; then send two units out the escape hexes, and you are golden!

Axis Strategy:

1. The general rule for this scenario, is to stay in your bunkers! With no hilly ridge slowing the movement of the Allies onto the beach, they are able to very quickly reach your bunkers and begin attacking. If you make a fool-hardy rush forward in an attempt to knock out a few more figures, they will make you pay with an overwhelming retaliation of their forces. The only exception to this is your infantry unit in the bunker at M7 on your left flank. The Allies are going to avoid much of that section due to your artillery at J7, so it is best to get that unit into play in the central section as soon as you can. Also, there are so many wire bails in your left flank, that they will severely slow down any troops who try to come in there, allowing your artillery to demolish them.

2. The goal for Axis is to slow down their movement. Besides actual hits, retreat flags on the Allies are your friend, as it will push them back and give you more time to build up your deck with powerful attack cards. A last ditch effort, if needed would be to move your infantry onto or in front of the exit hexes, to prevent the Allies from escaping before you have given them a good beating.

3. Your one saving grace as the Axis player is your artillery. Use it as much as you can, especially while the enemy is still in the water, where retreat flags count as hits.

Scales-Allies-Weighted
18
BR - Utah

Author:

Days of Wonder

Link: