Across the River Roer
Across the River Roer

Across the River Roer wasn’t just another bridgehead — it was the kind of operation that tests an army’s guts and grit. In February ’45, the Germans tried to drown the Allies out of the Rhineland by blowing their dams and turning the Roer into a boiling, flooded barrier. They figured the rising water would halt us cold. It didn’t. It just delayed the inevitable.
When the river finally dropped, our boys moved with discipline and fury. Under artillery, machine-gun fire, and every trick the enemy could throw, they forced that crossing, yard by yard, boat by boat. The Germans were dug in, determined, and desperate — but they couldn’t stop an army that had momentum, purpose, and the will to finish the job.
The Roer crossing cracked open Germany’s western shell and put us on the doorstep of the Rhine itself. And once you reach the Rhine, you’re cutting straight into the enemy’s heart. This operation proved again that no flood, no fortress, no line of resistance can hold back an Allied force that’s hell-bent on victory.
~~ General Howitzer
6 VP’s
![]()
Card Balance:
6 Allies
4 Axis
Complexity:
3
Conditions:
Countryside

Location:
Germany
Year:
1945
Theater:
Western Front
Campaign:
Rhineland
Codename:
Operation Grenade
Summary
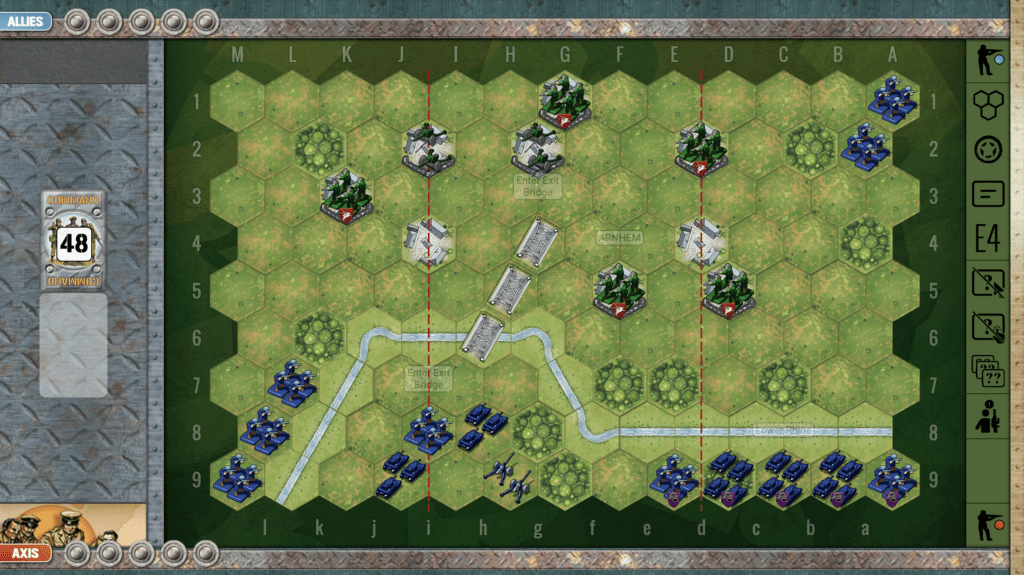
Objectives:
Six VP’s including all three town objectives and an exit hex for the Allies, if they can get there.
Terrain:
Troops:
Allies – 10 Infantry, 3 Artillery
Axis – 7 Infantry, 2 Armor, 1 Artillery

Allied Strategy:
1. Attack Vector Options: Left Flank:
If you are going for a left flank assault, the enemy artillery will pick off your forces as you advance. So gather at the river first, since that barrier will stop your troops for one turn. Once everyone has breached it, then you will have to attack en masse and quickly attack before the artillery takes you out.
2. Your artillery on the right can provide support fire for your troops if you pursue a central or right flank attack. But if you can move them forward at least one row before the battle begins, do that. The result will be that the sandbagged infantry in the center will be subject to 2D attacks from the artillery.
3. Attack Vector Options: Right Flank
An attack on the right flank is going to be a challenge as long as the enemy armor can move in and attack your infantry on the open plain before the town with the victory hex. And then should you even reach it, you have to hold it until the end of the game to get the VP’s.

Axis Strategy:
1. Historically, the Allies were able to move across the Roer and establish a 3-mile beachhead. This means that the scenario is stacked against you, if you attempt to come out from your defensive positions and launch an assault. You may be able to do it, especially with your armor on your left flank, but be careful, as the Allied artillery is powerful.
2. Keep your armor mobile. You will most likely need them on your left flank to defend the town hex medal objective.
3. Move your infantry in the back of the center section forward to replace the infantry you will lose in the center and right flanks.
Author:
Days of Wonder
URL: