Wake Island

Wake Island

Wake Island was a little speck in the Pacific, but in December ’41 it became a fortress of American grit. Right after Pearl Harbor, the Japanese thought they’d steamroll it. On the 11th, they charged in—and got their noses bloodied. Our Marines and gunners blasted ships out of the water and sent the enemy packing, the first time in the war a U.S. force had thrown back an amphibious assault.

But the enemy came back heavier on the 23rd, with more ships, more planes, and more men than that tiny garrison could handle. The Marines fought like crazy, but Wake was finally overrun. Even so, their stand proved to the world that Americans don’t just roll over—we fight, we bleed, and we make the enemy pay dearly for every inch. Wake Island was no surrender; it was a warning shot that the United States was in this war to the finish.

~~ General Howitzer

6 VP’s

Card Balance:

5 – 5

Complexity:

2

Conditions:

Beach

Location:

North Pacific

Year:

1941

Theater:

Pacific

Campaign

Codename

Summary:

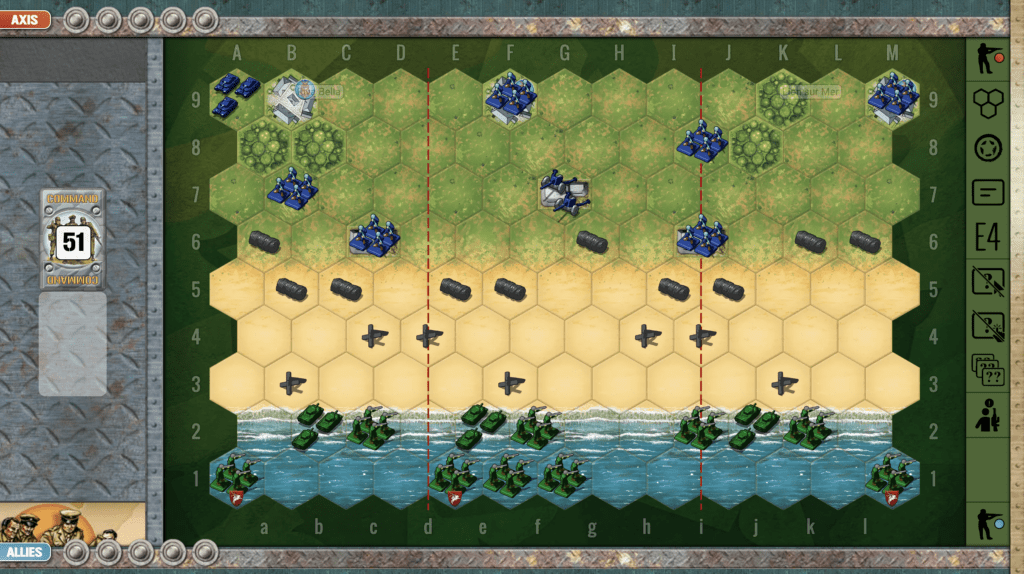
The Wake Island scenario has the Japanese attacking Marines who are defending. The beachfront is barricaded with a row of wire. But if they can get past that barrier, every town and fortress hex is a victory medal objective for them.

Objectives:

6 VP’s, plus the Axis have potentially 10 (!) Medal Objectives.

Battlefield:

A flat beach defended with wire and Marines in bunkers and one artillery.

Troops:

Allies – 5 Infantry, 1 Artillery

Axis – 12 Infantry!

Allied Strategy:

1.  Historically the Allies were overwhelmed in the second attack when 1500 invaders attacked, so the goal is to get some quick hits before they reach the Medal Objectives.

2.  Use your artillery at every opportunity, especially early in the game before they move away from it. 

Axis Strategy:

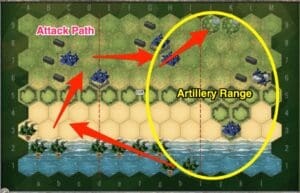
1.  As a general rule, avoid the artillery in the center-right.  Move your troops to the left and attack the left flank. There are plenty of VP’s available on the left side without even having to go anywhere near the artillery.

2. However if you have the cards for a sustained and rapid attack on the right, do it. The fact that there are two hexes unprotected by wire allows the you to very quickly reach the enemy bunkers. 

3.  You can use your advance infantry unit to quickly gain control of the field bunker at M6, and its VP. Then three more Objective Medals are available to you in the towns.  Then as you quickly bring other infantry forward the advance unit can attack the enemy infantry in the town at K8. That’s a total of 5 VP’s relatively unprotected. If you can survive the artillery attacks while you seek out your 6th VP on the left flank, you could have a win to brag about!

DoW Battle Reports

(percentage of Allied victories):

32%

24
BR - Wake

Author:

Days of Wonder

Link:

Utah Beach

Utah Beach

The invasion of Utah Beach was part of the Allied D-Day landings on June 6, 1944, during World War II. Utah Beach was the westernmost landing area, assigned to U.S. forces, primarily the 4th Infantry Division, under Major General Raymond O. Barton. The objective was to secure the beachhead, push inland, and link up with airborne troops dropped earlier to capture key roads and bridges.

Strong currents caused some landing craft to drift about a mile south of the intended target area. This accidental landing proved advantageous, as it placed the troops in a less heavily defended section of the beach. The U.S. forces quickly overwhelmed the German defenses, suffering relatively few casualties compared to other D-Day beaches.

Listen up.

At Utah we hit fast, secured the sand, and drove inland until we shook hands with the paratroopers. That link-up turned a strip of beach into a springboard—men, guns, and fuel pouring ashore to feed the advance. With the beachhead anchored, momentum was ours. That’s how you start a liberation: seize, link, expand—and keep moving.

~~ General Howitzer

5 VP’s

Card Balance:

Allies – 6

Axis – 4

Complexity:

3

Conditions:

Beach

Location:

Normandy

Year:

1944

Theater:

Western Front

Campaign:

D-day Invasion

Codename

Summary:

The challenge for the Allies in this scenario is to get off the beach as quickly as possible, and exit out one of the three exit hexes. The Axis are protected in towns and bunkers in order to slow down the advance of the Allies.

1. Objectives

This is a 5 VP game, so it moves rather quickly, and the Allies will need to minimize losses while they pick away at the Axis forces inside their bunkers, all the while making their way towards the exit hexes.

2. Battlefield

There are three exit hexes at the top of the battlefield. The Allies can seek two objectives: First to destroy enemy units, Second to exit out the back.

3. Troops

Allies – 10 Infantry, 4 Armor

Axis – 5 Infantry, 1 Artillery

Allied Strategy:

1. Allies begin with their forces congested together in the left and center sections. This is not all bad, as they need to stay away from the artillery in the right flank. But they do need to disengage their forces from one another and create some separation from the shores of the beach.

2. Keep attacking! As you approach the enemy forces in their bunkers, you may be tempted to pause and amass more forces for the attack. This depends on your circumstances. If you are out in the open and under enemy attack with two-dice attacks, you need to just keep attacking with those forces. Create the beachhead by continuing to attack, attack, attack.

3. You can expect to receive a fair number of casualties as you progress up the beach. But as soon as you get your armor out of the water, things will change for any enemy units unfortunate enough to be found outside their bunkers.

4.  The big picture strategy for Utah Beach is to: Stay Left, Take Out the Infantry, Escape out the back.  The scenario only needs 5 VP’s.  All five of those are available to you on the left and middle section.  Take out the three infantry for your first three points; then send two units out the escape hexes, and you are golden!

Axis Strategy:

1. The general rule for this scenario, is to stay in your bunkers! With no hilly ridge slowing the movement of the Allies onto the beach, they are able to very quickly reach your bunkers and begin attacking. If you make a fool-hardy rush forward in an attempt to knock out a few more figures, they will make you pay with an overwhelming retaliation of their forces. The only exception to this is your infantry unit in the bunker at M7 on your left flank. The Allies are going to avoid much of that section due to your artillery at J7, so it is best to get that unit into play in the central section as soon as you can. Also, there are so many wire bails in your left flank, that they will severely slow down any troops who try to come in there, allowing your artillery to demolish them.

2. The goal for Axis is to slow down their movement. Besides actual hits, retreat flags on the Allies are your friend, as it will push them back and give you more time to build up your deck with powerful attack cards. A last ditch effort, if needed would be to move your infantry onto or in front of the exit hexes, to prevent the Allies from escaping before you have given them a good beating.

3. Your one saving grace as the Axis player is your artillery. Use it as much as you can, especially while the enemy is still in the water, where retreat flags count as hits.

Scales-Allies-Weighted
19
BR - Utah

Author:

Days of Wonder

Link:

Sword Beach

Sword Beach

Scenario_SwordBeach_start_Allies

June 6th, 1944—Sword Beach. The British came in swinging on the eastern flank of Normandy, and they made it count.

Under General Miles Dempsey, the 3rd Infantry Division, backed by tanks, naval guns, and airborne troops, hit that beach like a battering ram. Their mission? Take the beach, punch inland, link up with the Canadians on the left and airborne boys on the right, and grab the city of Caen.

They ran headfirst into resistance from the German 716th Infantry, dug in and waiting. But it didn’t matter—Allied firepower and planning turned those bunkers into scrap. The Brits cleared the beach, pushed several miles inland, and set up a strong foothold by nightfall.

They didn’t take Caen on Day One—but they owned Sword Beach, and that was the damn prize. That success helped anchor the whole eastern flank of the invasion and gave us the momentum we needed to crack open Nazi-occupied France.

Sword Beach was no walk in the park—but it was a well-executed, hard-hitting assault that helped open the gate to Western Europe.

~~ General Howitzer

5 VP’s

Card Balance:

Allies – 5

Axis – 4

Complexity:

2

Conditions:

Beach

Location:

Normandy

Year:

June 5th, 1944

Theater:

Western Front

Campaign:

D-Day Invasion

Codename:

Overlord

Summary:

Like all Normandy beach invasions, this is a battle between well-defended but overwhelmed Axis forces who are trying to slow down the Allied onslaught.

Objectives:

This is a five VP game with three town hexes as Objective Medals. The goal for the Allies is to get to the town VP Objective hexes ASAP, and for the Axis it is all about slowing down the Allied advance enough to get a few knockout Tactic cards against them.

Battlefield:

Sword Beach has no hills or bluffs to slow the Allied advance off the beach

Troops:

Axis –
6 Infantry,
1 well-placed artillery in the center of the field,
1 badly positioned armor unit stuck in the corner behind a forest.

The Allies –  9 Infantry,  3 Armor

medal allies

Allied Strategy:

1.  As with all beach scenarios, the challenge is for the Allies to get off the beach as quickly as possible.

2.  The three! objective medals in the towns against the back border represent a clear and compelling goal for the Allies. If the Allies can maximize their movement cards off the beach and blitz past the defenders for the town hexes, victory can be had rather quickly.

3.  The Axis artillery in the center of the battlefield is very dangerous and unless the Allies have an excellent set of cards, should not be attacked. The best strategy – as indicated by Alexis Beuve in the Memoir 44 Tactics & Strategy Guide is to attack on the flanks in order to avoid the devastating pounding from the centrally placed artillery.

4.  You have three Elite Infantry which are capable of moving two hexes and still attacking. This is imminently valuable for a beach assault. They all start way back in the ocean hexes, but if you take the time in the early gameplay to get them moved forward, they will help you to quickly approach and attack the enemy forces.

5.  Possible Attack Vector:  split your forces in a “V” formation, and send half to the left, and half to the right, so that you can avoid the enemy Artillery in the center sector.  It is set so far back from the beach that if you try to assault it with your Infantry, they will get decimated before they get close to it, so unless you have a Bombard or Airpower card, it is best to avoid it. 

medal axis

Axis Strategy:

1. The Axis armor in the corner is hidden away and of no use. Therefore, as early as possible, the Axis needs to move the tank into the forest hex, where it will have to stop for one turn. But from there it can make its way out to the battlefield. The decision as to whether to place the armor in the center section or the right flank, will depend in part on where the Allies choose to deploy their forces. But once this armor gets out the Axis player should be able to score one or two VP’s, especially if he catches the Allied forces while they still have their back to the water, resulting in some no-retreat hits.

2. Use your artillery as much as possible, before the enemy takes it out with Barrage or Air Power, or an Infantry Assault. This will be one of the Allies’ early objectives. So use it well while you have it.

3. Should you pull your infantry from the back row where they are defending Objective Medals? Early on, if you have the opportunity, they could bolster your forces which are trying to prevent the Allies from coming off the beach. But once the full scale Allied invasion begins to form, they will be sitting ducks in the open terrain, and should be pulled back to guard a Medal Objective.

Battle Reports

(percentage of Allied victories):

46%

20
BR - Sword Beach

Author:

Days of Wonder

Link

Pointe-du-Hoc

Pointe-du-Hoc

scenario_PointeHoc_start_Allies

The Battle of Pointe du Hoc was a critical part of the D-Day invasion on June 6, 1944. Pointe du Hoc, a steep cliff overlooking the English Channel between Utah and Omaha beaches, was targeted because it housed a German gun battery capable of threatening the Allied landings.

U.S. Army Rangers were tasked with scaling the 100-foot cliffs to neutralize the German artillery positions believed to be in bunkers at the top.  About 225 Rangers from the 2nd and 5th Ranger Battalions led by Lieutenant Colonel James Rudder.  Using ropes, ladders, and grappling hooks under intense German fire, the Rangers climbed the cliffs while under heavy fire.  The Rangers discovered the artillery guns had been moved inland. They located and destroyed the guns using thermite grenades. The Rangers suffered heavy losses—fewer than half were still capable of fighting after the battle.

General Howitzer sums up its importance:

Listen up, men—Pointe du Hoc wasn’t just another hill; it was the lynchpin in the whole damned invasion. Our boys scaled those cliffs under fire, ripped out the German artillery, and made damn sure nothing could rain hell on Utah and Omaha. It was guts, grit, and glory—one of the boldest strikes of D-Day, and it damn well helped crack open Fortress Europe.

~ General Howitzer

4 VP’s

Card Balance:

Allies – 6

Axis – 4

Complexity:

2

Conditions:

Beach

Location:

Normandy

Year:

1944

Theater:

Western Front

Campaign:

Invasion of Normandy

Codename:

Part of Operation Overlord

Briefing:

This scenario is a tough one for the Germans, as the Allies have a 69% success rate.

Objectives:

Because this is a 4 VP scenario, every single hit matters, so both Axis and Allies need to carefully target and concentrate their fire.

Battlefield:

This scenario has a ridge running across the entire battlefield. It is a two-hex move to climb the hill, so it is a challenge for the Allies to mount it. But once they do, it is a short trip to the forest in the corner containing additional victory points. 

Troops:

Allies – 9 Infantry

Axis – 5 Infantry, 1 Artillery

🔥 Winning as Allies

1. Like all beach scenarios, the goal is to get off the beach as quickly as possible. But the ridge running across the beach, does allow Allies to assemble their forces just behind the ridge, massing together, until they are ready to climb the ridge together and attack.

2. Watch out for the infantry hex on the Pointe, and for the artillery on your right flank. You will need to shift your forces to the left as quickly as possible, or the enemy could gain one VP before you even get out of the water. You can move your infantry in a straight lateral move while still in the water, to get away from the Pointe.

3. The best pathway to the VP’s in the forest on your right flank, is to overwhelm the enemy on the left flank, and work your way all the way across the middle section into the forest. Once you make your way off the beach on the left flank, you can take a bit of time to assemble all of your forces, and gather the cards you need for your center section attack.  This will keep you out of the Artillery range.

Memoir 44 scenario Pointe de Hoc

🔥 Winning as Axis

1. Take advantage of the ridge facing the shore. If you have the infantry movement cards, get to the ridge and batter the troops as they approach. If you just sit in your bunkers or sandbags, and wait for them to mass and attack, you will be overwhelmed.

2. First moves are to attack with your infantry from on the point, and your artillery while Allies are still in the water. This will force them up the coast away from your artillery, and most importantly, away from the victory points in the woods.

3. Use your artillery well to slow down, harass, and destroy the troops while they are still on the beach.

4. Once the Allies make it up onto the ridge, if you can restore your remaining forces back into your bunkers, it may give you enough time to degrade the enemy forces enough to prevent their achievement of the VP’s in the forest on your left flank.

Battle Reports

(percentage of Allied victories):

69%

30
BR - Pointe

Author:

Days of Wonder

Link:


Juno Beach

Juno Beach

The invasion of Juno Beach was part of the Allied D-Day landings on June 6, 1944, during World War II. Juno Beach, one of the five beaches targeted in the Normandy invasion, was assigned to Canadian forces from the 3rd Canadian Infantry Division and the 2nd Canadian Armoured Brigade. Their mission was to secure a beachhead, push inland, and capture key objectives such as the town of Caen.

Juno Beach was no picnic—it was hell from the start. The Canadians hit the shore under rough seas, late and scattered, with German guns pouring lead and shells across the sand. Machine guns, artillery, mines—everything the enemy could throw at them was waiting.

But those Canadians didn’t back off. They regrouped fast, pushed inland with infantry and armor working shoulder to shoulder, and smashed through the fortifications. By nightfall, they hadn’t just taken Juno—they’d driven farther inland than any other Allied unit on D-Day.

They paid dearly in blood, but their victory cracked open Hitler’s wall, anchored the Allied foothold in France, and lit the road that led to the liberation of Europe. Juno Beach proved it plain: Canadian steel and courage could punch just as hard as any force in the world.

~~ General Howitzer

6 VP’s

Card Balance: 

Allies – 6

Axis – 4

Complexity:

2

Conditions:

Beach

Location:

Normandy

Year:

1944

Theater:

Western Front

Campaign:

D-Day

Codename

Summary:

Objectives:

6 Victory Points, including the possibility of four! Objective Medals for the Allies.

Battlefield:

With the River Seulles going through the center of the battlefield, the Juno Beach scenario is almost two different battles taking place at once. There is no beach ridge to slow down the advance of the Allies.

Troops:

Allies – 10 Infantry, 3 Armor

Axis – 7 Infantry, 1 Artillery

🔥 Winning as Allies

1. The Allies need to be aware of the VP goal of six points, and then count up the number of medals and forces on the right side of the map: three Objective Medals (two towns and one bridge) and three infantry. This means, that with the “right” set of cards, an Allied player could win the battle completely just by focusing on the right flank. Now it will rarely happen that such a single-minded focus can occur based on the luck of the cards. But keeping the enemy off-balance by occasional forays on the left flank is a good strategy also. But this scenario reminds us of an important principle, to always keep your overall objectives and plan in mind throughout the battle. And do not deviate unless cards, or circumstances dictate otherwise.

2.  Of course, the left flank is a little more secure, as it is outside the range of the artillery.

3.  With the River Seulles splitting your center section, you will need to make a determination of which direction your troops will head to. This will need to be determined by the cards in your hand.

4.  As you move off the beach, the two Medal Objectives on the bridges look very tempting. But they are quite close to the enemy artillery, so you will not want to take those bridges until near the end of the game, so they cannot be chased away.

🔥 Winning as Axis

1. Your Infantry in the bunker at ‘I5’ is in a great location to make some early hits on the enemy while they are still in the water, or backed up against it.

2. Stay in your bunkers and towns.  Do not come out, as there are Armor in the area which will make you pay for that mistake.

Battle Reports (percentage of Allied victories):
64%

22
BR - Juno Beach

Author:

Days of Wonder

Link:


Guam Landings

Guam Landings

“Alright, listen up, boys! The Guam Landings in the summer of ‘44 were a hell of an operation—an amphibious smash right into the gut of the Japanese defenses in the Marianas. The island was crawling with enemy troops, but that didn’t stop our boys from hitting the beaches on July 21st and driving straight inland.

They fought through thick jungles, coral ridges, and all the damn bunkers the enemy could build, pushing those defenders back inch by inch until Guam was ours by August 10th. We didn’t just take an island—we seized a launchpad for bigger things, setting the stage for bombing Japan into rubble.

That’s how you take the fight to the enemy, boys—you land, you fight, and you don’t stop until the flag is flying over every square inch!

~~ General Howitzer

6 VP’s

Card Balance:

Allies – 6

Axis – 5

Complexity:

4

Conditions:

Historical

Location:

Guam

Year:

1944

Theater:

Pacific Theater

Campaign:

Pacific Campaign

Codename

Summary:

There is a massive invasion force of Marines coming on shore with infantry, armor and artillery.

Objectives:

6 VP’s and one Objective Medal for the Marines.

Battlefield:

The battlefield is marked by a v-shaped river flanked on one side by a series of hills, and on the other by rice paddies. 

Troops:

Allies – 10 Infantry, 8 Armor, 3 Artillery

Axis – 11 Infantry

🔥 Winning as Allies

1.  You have an overwhelming force to assist you. You have a lot of armor. Start with that and attack the sandbagged enemy from a distance. You will be able to wipe out several front-line units very quickly using your armor.

2.  There is a Medal Objective on your right flank. You can target it, but will need to deal with the enemy infantry unit close to the beach at hex M3.

3.  Deal with the two enemy infantry units right on the beach first, or they will be able to score a hit on every retreat flag they throw against your forces.

🔥 Winning as Axis

 1. The Japanese are well-protected behind sandbags, and would need a pretty good reason to break cover, while they wait for the Marines to attack.

2.  You have a forward unit in the village of Asan, which you can use to take out some figures, maybe a full unit before you are destroyed.

3. And you have a forward unit in the jungle and sandbagged at M3, which you can also use for some quick hits against the enemy.

Battle Reports (percentage of Allied victories):

67%

Scales-Allies-Weighted
27
BR - Guam Landings

Author:
Days of Wonder

URL: