Tenaru

Tenaru

“Listen up! In August ‘42 on Guadalcanal, those Japanese under Colonel Ichiki thought they’d just waltz in and knock the Marines off their perch at Henderson Field. Hell, they didn’t know what they were walking into!

The Marines were dug in deep along the Ilu River, machine guns at the ready and artillery on call. When the Japanese hit the line, they slammed into a wall of hot lead and cold steel. All night those Marines fought like hell, and by dawn, the Japanese were stacked up like cordwood.

That wasn’t just another scrap, boys—that was a message. The Japanese learned the hard way that the U.S. Marines don’t back down, and we sure as hell don’t run. The Battle of Tenaru was the first big test on Guadalcanal, and the Marines passed it with flying colors.

That’s how you win a campaign, boys—you dig in, you hold the line, and you don’t let the enemy push you back an inch!

~~ General Howitzer

6 VP’s

Card Balance:

5 – 5

Complexity:

3

Conditions:

Jungle


Location:

Guadalcanal

Year:

1942

Theater:

Pacific

Campaign:

Guadalcanal Campaign

Codename

Summary:

Objectives:

6 VP’s

Battlefield:

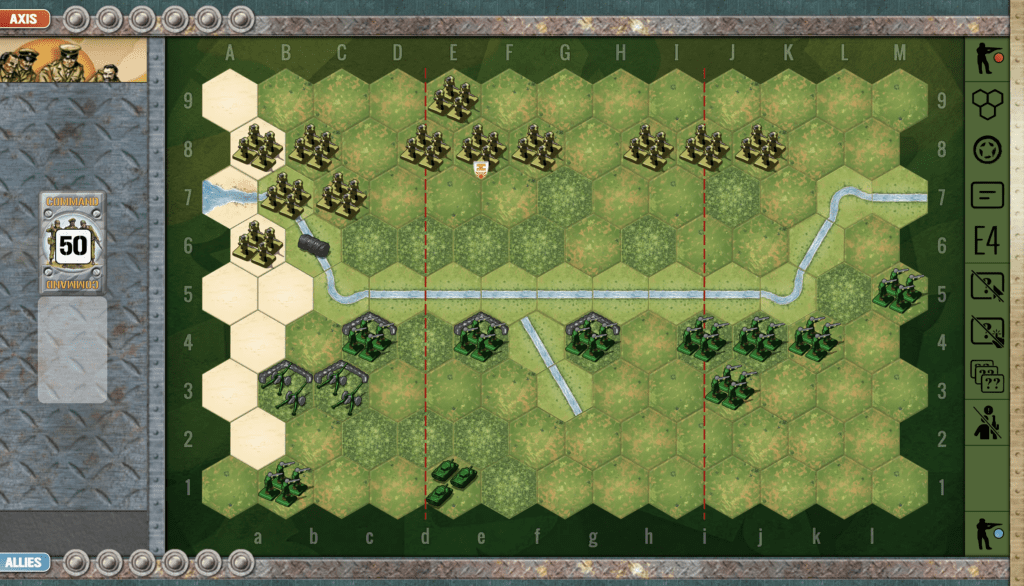
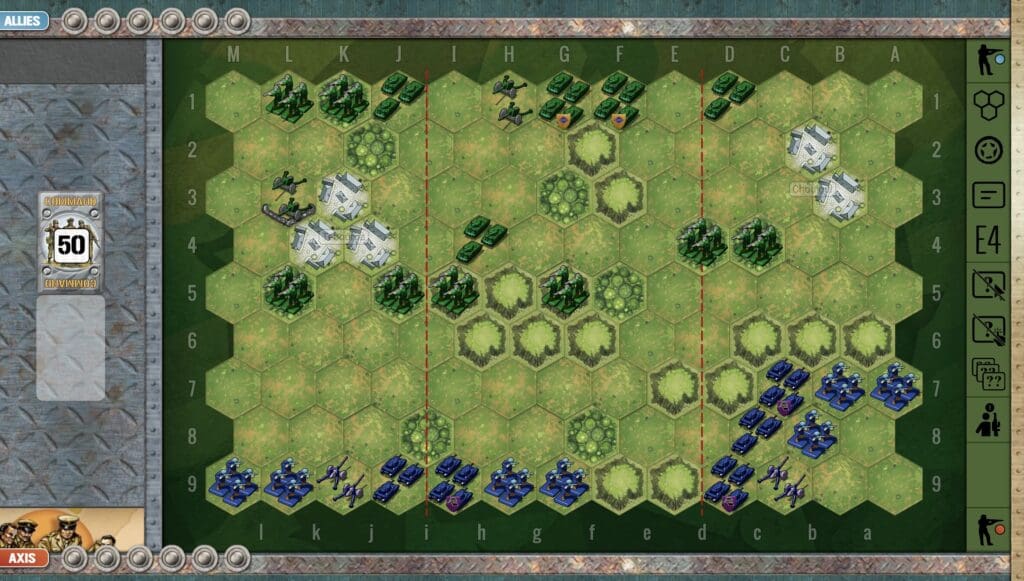
The primary strategic elements to consider in the Tenaru scenario is the navigable river going across the battlefield, and the beach hexes along one flank which allows for rapid troop movement. But the most formidable element of this scenario are the two American artillery units on the beach section.

Troops:

Allies – 9 Infantry, 1 Armor, 2 Artillery

Axis – 12 Infantry

Allied Strategy:

1. Use your Artillery at every opportunity. The enemy will be able to make rapid progress along the beach, so you need to attack while you can.

2.  You have one Armor, but it starts off in the back. You need to get it into play as soon as possible, so that you can attack the enemy forces from a distance and diminish their attack ability.

3.  Do what you can to destroy at least one figure in every Japanese Infantry unit, in order to nullify the Seishin Kyoiku Principle advantage. 

Axis Strategy:

1. Because this is a long scenario, you may need to consider destroying the American artillery near the beach. Fortunately, the beach allows for rapid progress of the Japanese infantry to its objectives.

2.  However, it is possible for the Axis to win this scenario if they focus their energies to the left and center sections.  

3.  Take advantage of the Banzai War Cry, and the Seishin Kyoiku principle to rapidly attack and destroy the enemy. 

20
BR - Tenaru

Author:

Link:

Rzhev – The Meat Grinder

Rzhev (the Meat Grinder)

scenario_Rzhev_1turn

“Listen up, men! The Battle of Rzhev in that God-forsaken winter of ‘42 was a real bloodbath—some called it the ‘Rzhev Meat Grinder’ and they weren’t kidding. Those Russians threw everything they had at the Germans, trying to smash their lines and give Stalin a breather for Moscow. But the Germans had their trenches dug deep and those Red boys paid for every inch of dirt with buckets of blood.

The snow and ice turned the whole mess into a living hell—no damn place for a man or a tank. Despite all that, the Soviets never stopped coming. Sure, they didn’t take Rzhev right then and there, but they hammered the Germans so hard they finally had to pack up and haul ass out of there later on.

So here’s the lesson, boys: courage is the fuel, and persistence is the blade—but even the toughest steel can wear down when you keep pounding it. The Rzhev campaign was brutal, but it was one more nail in the coffin of that damn Nazi war machine.”

~~ General Howitzer

6 VP’s

Card Balance:

Allies – 4

Axis – 6

Complexity:

4

Conditions: 

Winter

winter

Location:

Russia

Year:

1942

Theater:

Eastern Front

Summary:

Rzhev is a complex scenario recreating the Soviet counter-offensive with a 10 VP goal. This requires a long-term plan, as quick tactical hits will not win such a long battle.  Night rules are in effect.

Objectives:

10 VPs,
including Objective medals for both Axis and Allies, plus Exit objectives for Allies.

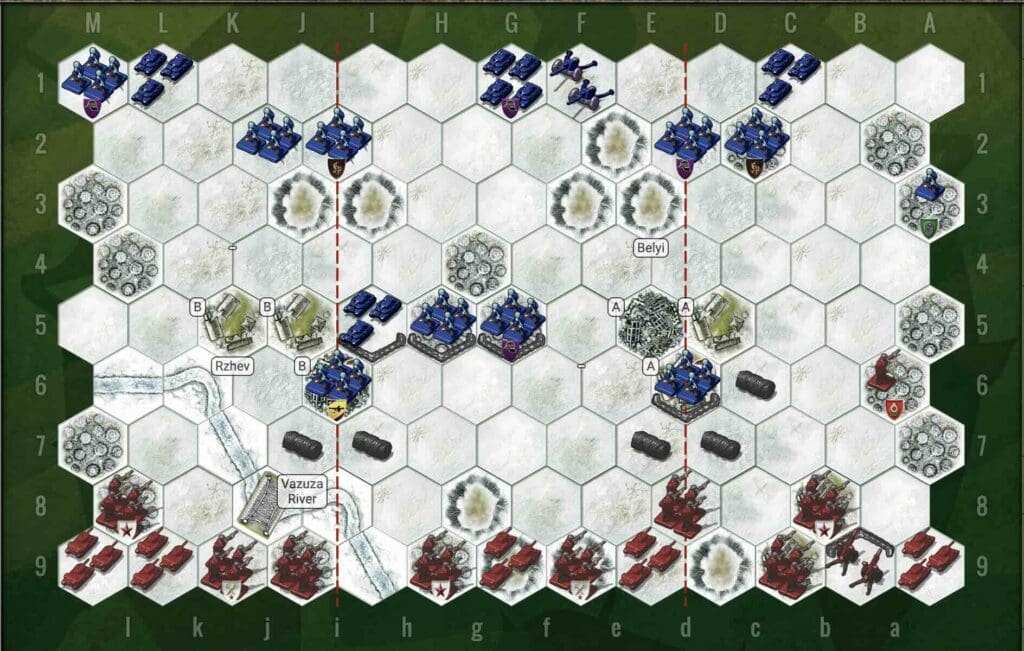
The town of Belyi is a temporary medal objective worth 1 medal for both sides. If any unit occupies any of the three hexes marked with an ‘A’ they gain a medal irregardless if an opponent occupies any of the other hexes. Both sides can earn 1 medal at the same time.
The town of Rzhev is a temporary medal objective worth 2 medals for both sides. If any unit occupies any of the 3 hexes marked with a ‘B’ they gain 2 medals irregardless if an opponent occupies any of the other hexes. 

Terrain:

The Axis forces already control much of the battlefield, as sandbagged troops who are very difficult to dislodge, while the Russians are pressed up against the wall.

Troops:

Allies – 10 Infantry, 5 Armor, 2 Artillery

Axis – 9 Infantry, 2 Armor, 1 Artillery

medal allies

🔥 1. Winning as the Soviets (Allies)

Soviets must be surgical, not brute-force.
Your troops have numbers but terrible defensive terrain.
So your victories come from forcing the Axis out of their woods.

Do NOT Push the Center First

The center looks juicy… but it’s a trap.

If you push center:

  • You feed medals to the German artillery in the woods

  • You take 2-dice fire from multiple directions

  • You lose tempo

2.   You can attack the well-protected Axis Infantry units by placing your Armor in the forest and degrading them over several turns. Time is on your side, so there is no need to rush the attack until you are ready.

3. You have a well-placed Artillery right in the center of the battlefield.  Use it at every opportunity to take out enemy forces. If you get the chance to concentrate firepower using a card like Firefight, Barrage, or Airpower, then use it to destroy the enemy Artillery against the back border before it moves forward.

medal axis

🔥 1. Winning as the Germans (Axis)

Because this is a Russian counter-attack scenario, the Germans are primarily in a defensive position and out-numbered. So use your protections well.  You must get your Armor into a good defensive tactical position to allow for mobility when needed, and defense of open terrain in the center and left section.

2. Your artillery is well-placed in the center. Use it to good effect before it is overwhelmed by the enemy.

Battle Reports

(percentage of Allied victories):

31%

26
BR - Rzhev

Author:

Days of Wonder

Panzers vs. Grants

Panzers vs. Grants

“Listen up, boys! In May ‘42, in the blazing North African desert, the British 7th Armoured Division rolled out their shiny new Grants—those big 75mm guns looked damn impressive on paper. They thought they’d finally have the edge over Rommel’s Panzers.

But let me tell you, those German 15th Panzer boys weren’t in the habit of rolling over for anyone! They didn’t give a damn about new tanks—they had the tactics, the guts, and the desert smarts. The British fought hard, but the Germans danced circles around them, turning that desert into a killing ground.

In the end, those Grants put up a hell of a fight, but the Germans sent ‘em packing. That’s the lesson of that day, boys—firepower alone don’t win the battle; it’s the man in the tank and the way he fights that makes the difference!

~~ General Howitzer

5 VP’s

Card Balance:

Allies – 4

Axis – 6

Complexity:

2

Conditions:

Desert

Location:

North Africa

Year:

1942

Theater:

Mediterranean Theater

Campaign:

Battle of Gazala

Codename

Summary:

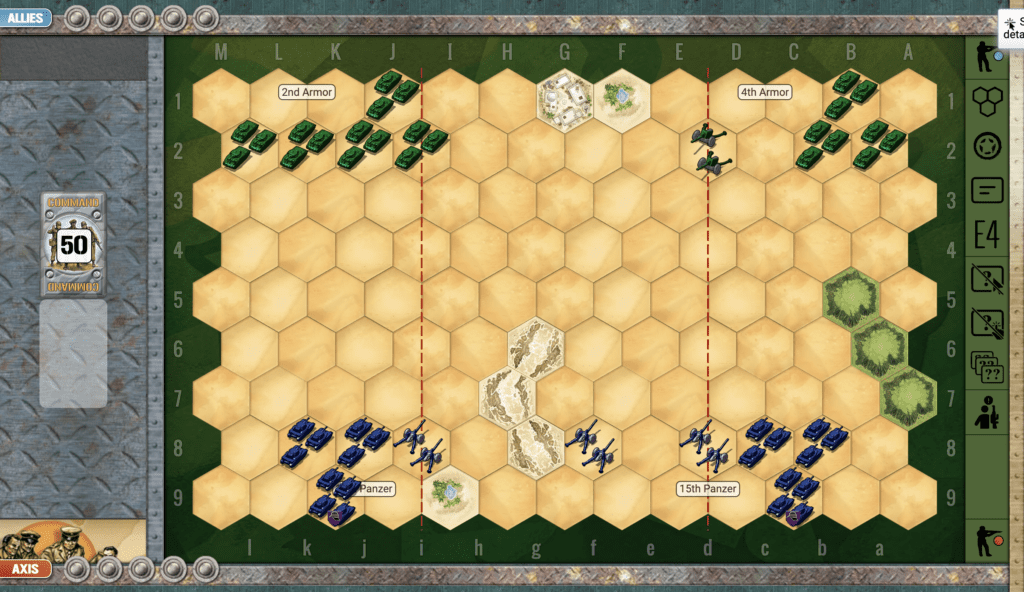
This scenario is played out on an almost wide-open sandy battlefield with tanks battling it out. It is a great test of the attacking power of the Allied Grants vs. the German Panzers.

Objectives:
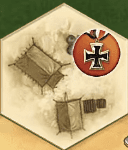
This is a 5 VP game, and since it is on an open desert battlefield, it will proceed rather quickly. There is one Medal Objective hex for the Axis in the form of the British HQ and Supply Tents.

Battlefield:
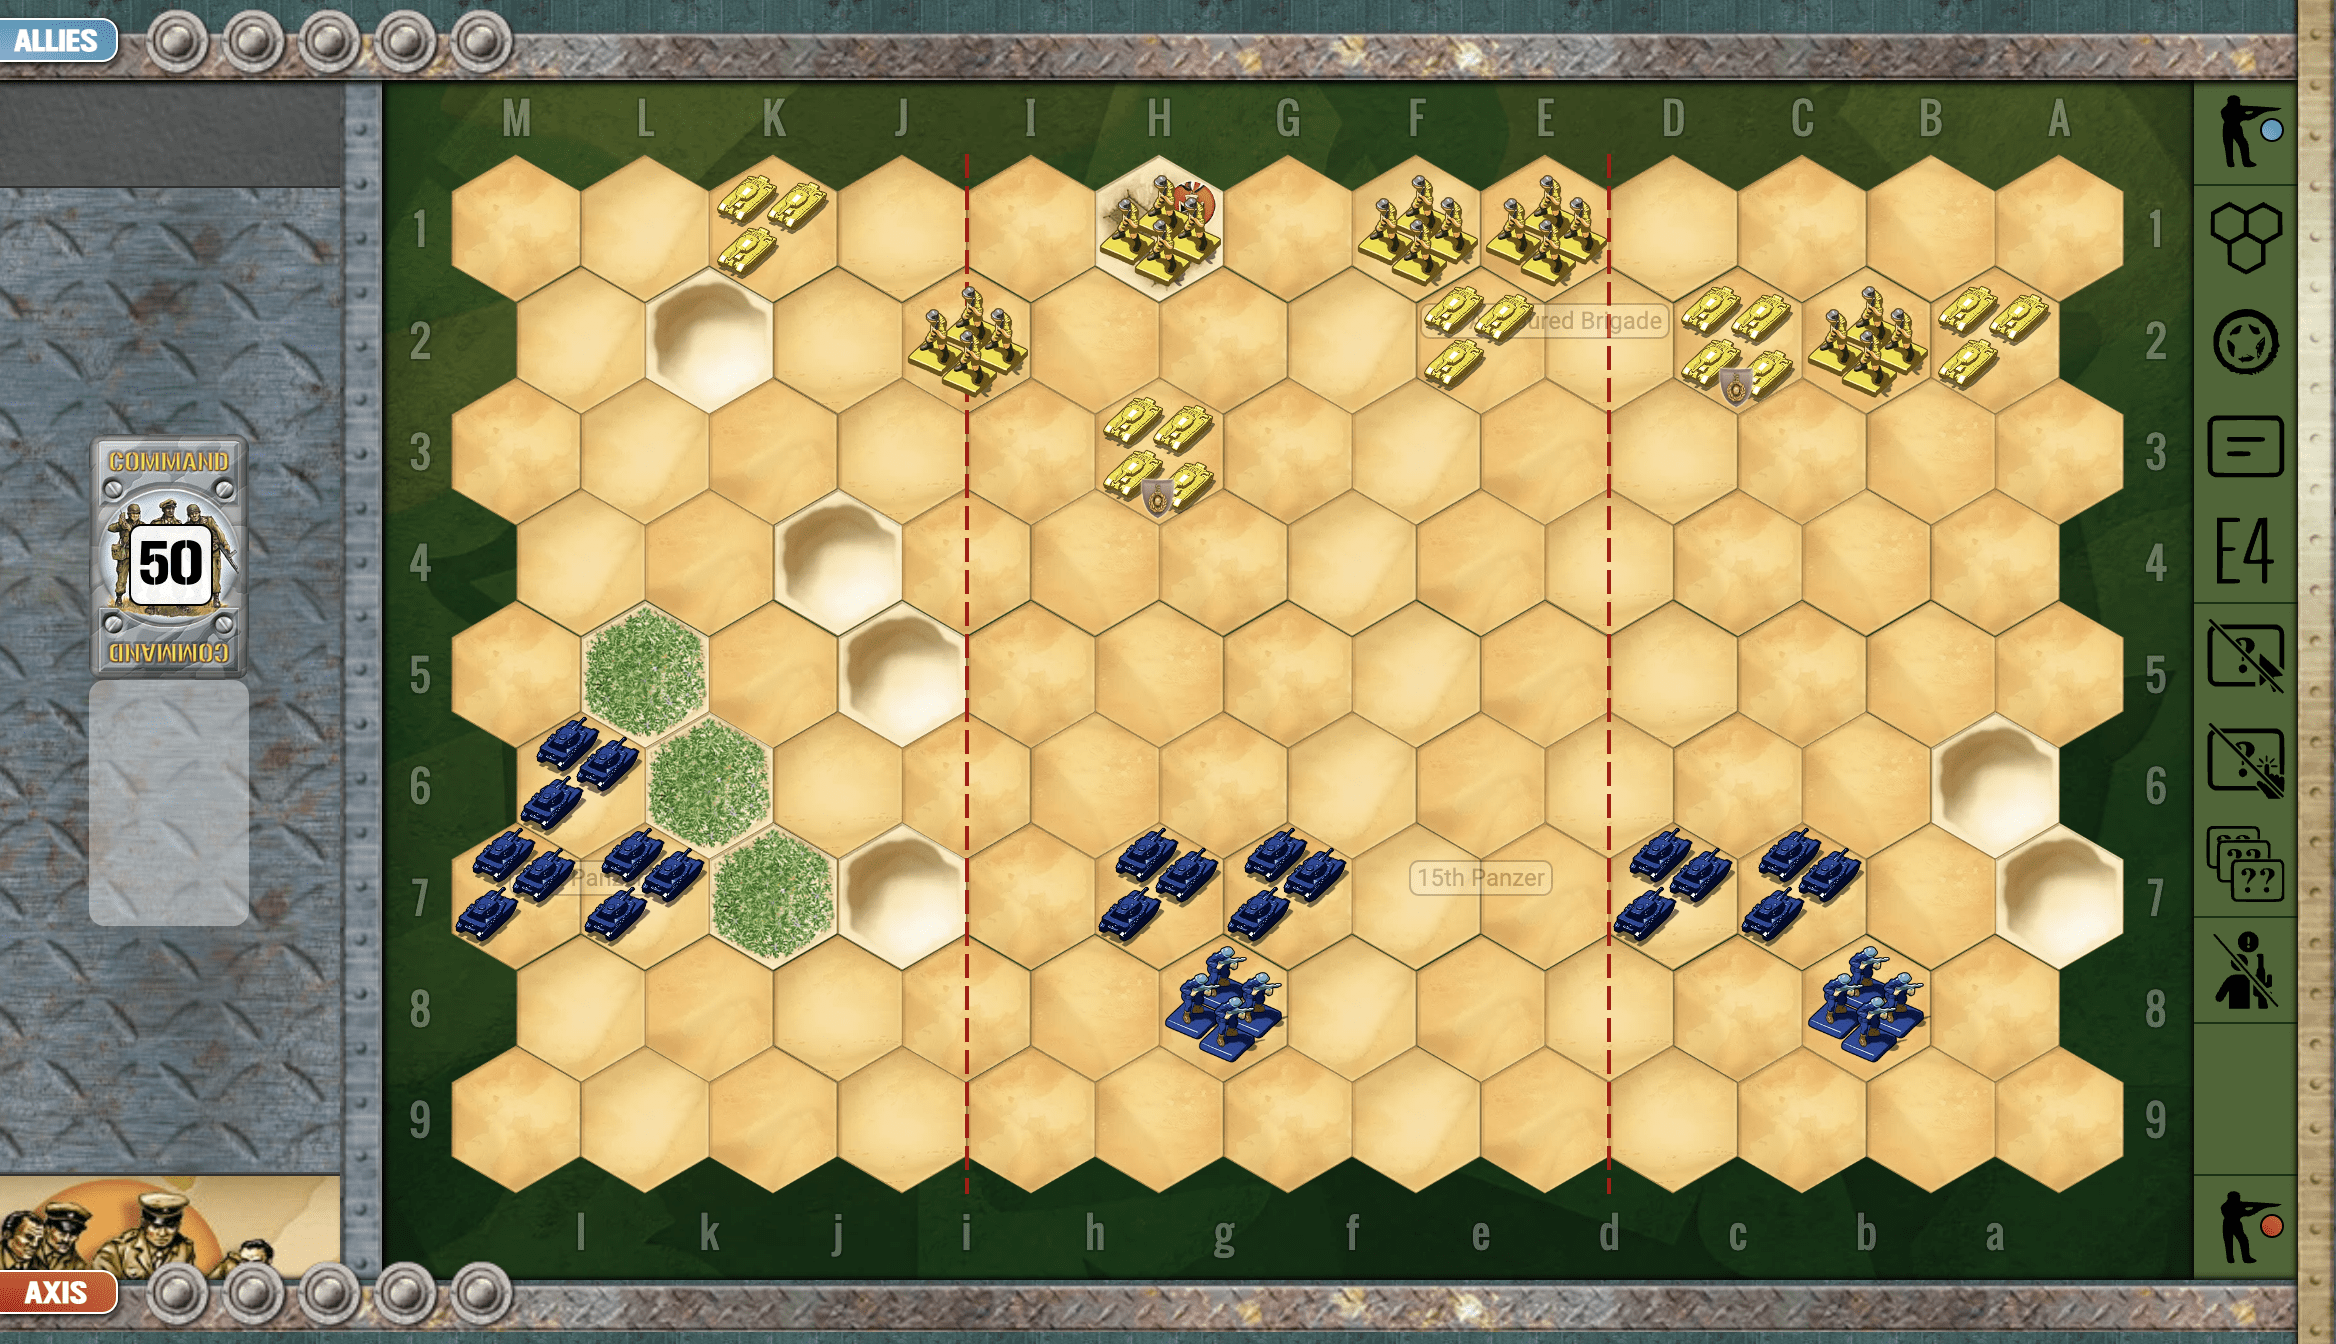
An open desert terrain with just a few sand dunes and an oasis.

Troops:
Seven Panzers vs five Grants, balanced by the fact the Axis only have 1 infantry, and the British have five. No artillery.

Allied Strategy:

1. As the Allies, you are at an armor disadvantage. The enemy starts the scenario with most of the armor misplaced on the flanks, and only two in the center section. But as soon as they consolidate their forces together, you will feel the might of their firepower. Therefore you need to work your units, infantry and armor as a cohesive force. Do not let your armor get out way ahead of the infantry. Work them together for a stronger attack.

2. Focus your effort and cards, as they will allow, on the center section where you can defend against attacks from either flank.

3. The goal is five VP’s, and since the enemy only has two infantry, this means you will have to take out at least three Panzer units.

Axis Strategy:

1.  Your Panzers in the center and right flank are outnumbered due to the four-figure tank units of the British, so you will need to get your Panzers which are stuck behind the palm forest on left flank into the game as soon as you can.

2.  Do not attack on your right flank until you have the material and cards to do it.

Classic Battle Reports:

(percentage of Allied victories)

32%

13
BR - Panzers

Author:

Days of Wonder

URL

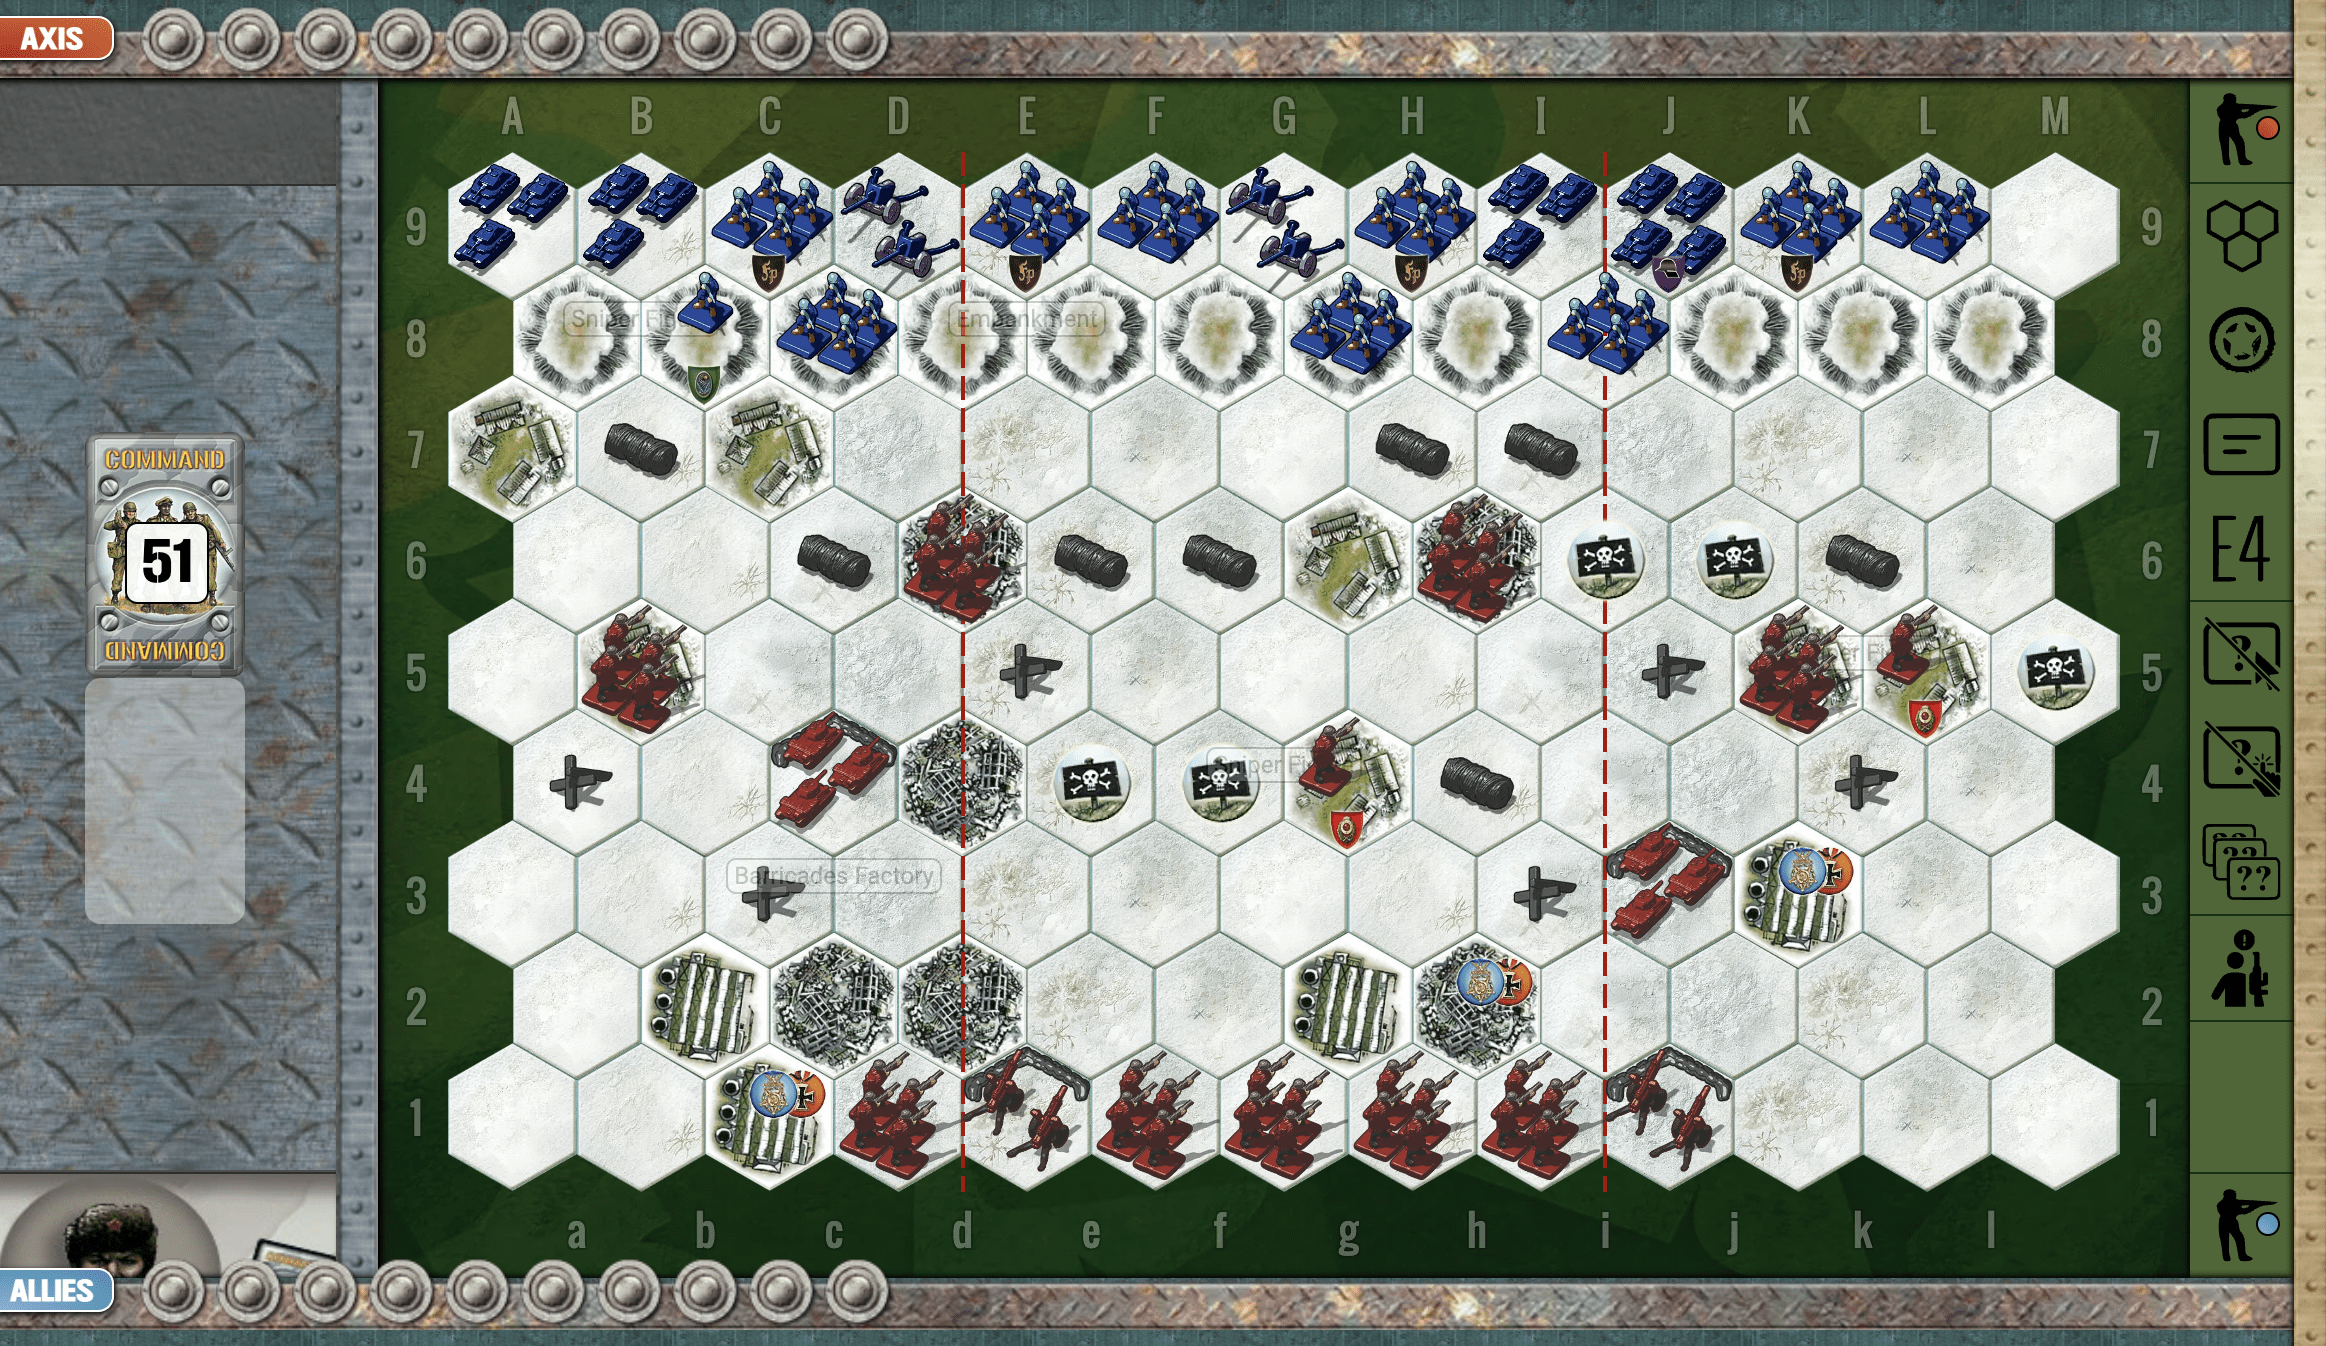
Red Barricades Factory (Stalingrad)

Red Barricades Factory (Stalingrad)

By October ’42, the Germans were throwing more and more of their 6th Army into the meat grinder at Stalingrad. On the 22nd, the 79th Infantry, backed by engineers, tanks, and guns, went charging across the railroad embankment straight at the Red Barricades Factory.

It was hell—Russian snipers in every shadow, tanks dug in like fortresses, fire pouring in from every angle. The Germans clawed their way forward inch by inch, breaking the Soviet line by sheer weight. But after all that blood and fury, by nightfall they had only managed to seize a corner of the factory. A costly gain, proving again that in Stalingrad, every brick was paid for with lives.

~~ General Howitzer

10 VP’s

Card Balance:
Allies – 3
Axis – 5

Complexity:

5

Conditions:

Urban / Winter

Location:

Stalingrad

Year:

1942

Theater:

Eastern Front

Campaign:

Battle of Stalingrad

Summary:

The scenario is complex battle with a lot of different terrain, both urban and winter, that complicates troop movement. There are also snipers which add an extra element of suspense.

Objectives:

10 VP’s , including 3 Objective Medals for either side

Battlefield:

Battlefield is the Red Barricades Ordnance factory in the winter, surrounded by rubble.

Troops:

Allies – 9 Infantry, 2 Armor, 2 Artillery, and 2 Sniper

Axis – 9 Infantry, 4 Armor, 2 Artillery, and 1 Snipers

Allied Strategy:

1.  You can quickly grab the Medal Objectives which are very close to you in the city ruins and the factory, and then try to hold them for the game. This will give you an early advantage and force the enemy to come to you, and fight against you while you are in a well-protected positions.

2. You have two Snipers which can fire five! hexes away. You can use them to harass the enemy and force them to pay attention to the Sniper, even though it doesn’t count as a VP, thus diverting energy away from other units.

3.  Use your forward infantry to attack the enemy before they destroy you.  At two hexes away, you should be able to get some good hits in first.

4. The strategic reality is that your forward units will get destroyed rather quickly, so the real battle will take place along the second front in rows 3,4,5 where you have armor protected behind sandbags, and city ruins for your infantry.

5.  Give careful consideration before moving your armor away from their sandbags. The enemy outnumbers your armor two to one, and once they become mobile, will be coming for yours.

6.  This scenario makes it easy for Allies to quickly grab 4 medal objectives by entering the town and factory hexes, but the trick comes in trying to hold them. The enemy will push through your first line of defense pretty quickly, and then you will need to hold your second line on rows 3,4,5, in order to prevent the enemy from taking out your units on those town and factory hexes.

Axis Strategy:

1.  Mobility is the first order of business when you start. In fact, at the start of the game, the Axis have 16 units, and not  a single one can retreat. [ Admiral Frigate ] You have a lot of firepower stuck against your back wall, and hidden behind the hills.  You need to move it out and begin attacking the Allies immediately.

2.  You have three no-retreat Infantry units that are only two hexes away from the enemy.  You either need to bring your Armor up between the enemy and your infantry, or, better yet, move in and attack the enemy at close assault range.

3.  Once you get some mobility going to avoid the no-retreat attacks, you can use your Artillery to degrade the forward enemy units which are barricaded in the City Ruins.

4.  Use your Sniper to good effect. They can move two and battle against Infantry, hitting on grenade, infantry, or star dice faces, increasing your odds of a hit to 67%.

5. Most of the middle game of this battle will take place with your forces arrayed across the sixth row, while the Allies are defending from rows 4 and 5. So once you take out the advanced Allied forces, you can overtake those same city ruins and launch your attack from there against the Allies.  

Battle Reports
( percentage of Allied victories ):

57%

28
BR - Barricades

Author:

Days of Wonder

Link:

Knightsbridge, Battle of Gazala

Knightsbridge

scenario_Knightsbridge_start

“Listen up! In early June ‘42, out there in that hot Libyan desert at a place they called Knightsbridge, our British allies were in for the fight of their lives. The place was nothing but a road junction, but it was as valuable as gold when the shooting started.

Rommel came at ‘em with his Panzers and those nasty 88s, aiming to cut ‘em off, encircle ‘em, and finish the job. The British Eighth Army fought back with everything they had, but those German guns chewed up their tanks like a buzz saw through dry timber.

Even though the Brits took a beating and left a lot of metal in that desert, Rommel couldn’t crack the line. He overreached, and the whole thing bogged down into a stalemate.

Let that be a lesson, boys—in the desert, mobility is king. You gotta hit hard, move fast, and never let the enemy pin you down. Knightsbridge wasn’t the final blow, but it sure as hell was the warning shot that the real fight was just getting started!”

~~ General Howitzer

5 VP’s

Card Balance:

Allies – 4

Axis – 6

Complexity:

2

Conditions:

Desert

Location:

Libya

Year:

1942

Theater:

Mediterranean Theater

Campaign:

Western Desert Campaign

Context:

Historical

Summary:

Objectives:

5 Victor Points

Battlefields:

Knightsbridge is an almost open desert battlefield in which tanks engage in head-on warfare, interspersed with the occasional artillery fire and infantry assault.

Troops:

Allies – 8 Infantry, 1 Artillery

Axis – 6 Infantry, 3 Artillery

Allied Strategy:

1.  Big picture goal for Knightsbridge, like many desert scenarios is to hit first and hit hard.  

2. The Axis have three Artillery which will assist the Armor if you venture too close.  With your limited movement, it would be best to keep your forces together on your end of the battlefield.

3.  Get to the ridge on your left section as quickly as possible. You cannot move as fast as the Axis, so you need to start right away.  Do not get caught back against the border, or the enemy will wipe you out with the additional flag hits. 

4. You are strong on your right flank, so move your units forward together to defend against the on-coming Axis attack.


Axis Strategy:

1.  Because of the wadi in the middle of your end of the battlefield, your forces are divided.  Your Armor on the left flank is outnumbered five to two, but you do have your artillery.  If you can entice the Allies to move forward, you can get some support from your Artillery fire.

2. Take advantage of the ridgeline on your right flank by parking your units there and wait for the Allies to attack. The height advantage may count in your favor in the ensuring battle. 

3.  Grab the heights on the ridge as quickly as you can. Whoever gets on top of the hill first will gain a 17% hit advantage.


Battle Reports

22
BR - Knightsbridge

Author:

Days of Wonder

Link:


Into the Cauldron

Into the Cauldron

Scenario_IntoTheCauldron_start

Rommel’s Panzers had bloodied the British 7th Armoured, but they’d shot their bolt. The Afrikakorps was jammed into what we’d call a pressure cooker—“the Cauldron.” To the south, Bir Hakeim held firm. To thea north, Tobruk was still in enemy hands. East and north, the tattered remains of British armor blocked the way. And to the west, minefields stretched like a wall of steel.

The Brits, blind to how short the Germans were on fuel and shells, failed to strike while the iron was hot. That hesitation let Rommel dig in around the ridges of Sidi Muftah, while his Italian allies clawed through minefields under heavy fire to drag supplies forward. When the British finally counterattacked on June 5th, it was sloppy and ill-timed—broken against the German anti-tank guns. A golden chance to smash the Desert Fox had slipped right through their fingers.

~~ General Howitzer

6 VP’s

Card Balance:

Allies – 4

Axis – 5

Complexity:

3

Conditions:

Desert

Context:

Historical

Location:

North Africa

Year:

1942

Theater:

Mediterranean Theater

Campaign:

Battle of El Almein

Summary:

Objectives:

6 VP’s, plus Exit Hex Medals

Battlefield:

This desert scenario has a series of sand dunes across the center of all three sections on which are perched sandbagged Axis troops ready for battle. The challenge for the Allies is with their greater armored forces are to force their way through to victory.

Troops:

Allies –  7 Infantry, 7 Armor

Axis – 8 Infantry, 5 Armor

Winning as Allies:

1.  The Allies have numerical superiority on the left flank, which can be exploited. Also note that the Allies have a 7 -5 advantage with armor. It is important to quickly take advantage of this superiority, as desert warfare can very quickly turn around with a few well-rolled armor attack dice.

2. Use any attack cards you get, to pull your armor forward one hex, and aim their turrets at the enemy three hexes away on the dunes. In this way, you can start to degrade the enemy attack from the dunes. With some well-rolled dice, you can attack the sandbagged infantry from a distance, and possibly score a quick VP. But be wary of the sandbagged armor units on each flank, which are well protected, and can very quickly knock out your armor units with a few attacks. Also the sandbagged anti-tank units can score against your armor with stars, thus raising the likelihood of a successful armor hit from 33% to 50% per dice roll.

3. You have two units of hexes in bunkers deep in the enemy territory, next to the exit hexes. Be very careful about moving them from the bunkers. Once you do so, all their protection is gone, and since they are surrounded by enemy troops, will be destroyed quickly. But if you keep them in the bunkers and use them as harassment, they can distract the Axis troops from applying all of their fire-power at the unprotected Allied troops trying to make an attack uphill against the sandbagged Axis defenders.

Winning as Axis:

1. One special Victory Point which the Axis can take advantage of is the escape hex through the minefield. Don’t waste a lot of your forces trying to find it, but one unit assigned to opening the escape path while the rest battle the British could be a path to an ‘easy’ VP.

2.  The Allies have a numerical superiority of armor.  Don’t launch an armor attack prematurely.  Use your sandbagged infantry and armor units to slowly degrade the enemy. Be prepared should they try to launch an assault. Keep your responsiveness ready so you are prepared for whichever direction they come.

3.  Watch out for the two enemy infantry units lodged in the bunkers along the backrow. Have an armor unit ready to respond with devastating force should they venture out of the bunkers.

Battle Reports

(percentage of Allied victories):

48%

15
BR - Cauldron

Author:

Days of Wonder

Link: