Gold Beach

Gold Beach

The Invasion of Gold Beach was one of the five beachheads landed by Allied forces during the D-Day invasion of Normandy, France, on June 6, 1944, during World War II. The invasion was part of Operation Overlord, the Allied effort to liberate Nazi-occupied Western Europe and begin the push toward Germany. Gold Beach was the landing zone assigned to British forces, primarily the 50th (Northumbrian) Infantry Division and supporting units from the Royal Marines and Canadian forces.

General Howitzer summarizes its impact:
Gold Beach—June 6, 1944—wasn’t just sand and sea, it was a damned doorway to Germany. The British 50th Northumbrian boys, backed by Royal Marines and tough Canadian allies, slammed ashore under fire as part of the grandest show on earth—Operation Overlord. Their job? Bust through Nazi defenses, plant the Union Jack on French soil, and start the long march east to drive a knife straight into Hitler’s gut.

6 VP’s

Card Balance:

Allies – 6

Axis – 4

Complexity:

2

Conditions:

Beach

Location:

France

Year:

1944

Theater:

Western Front

Campaign:

D-Day

Codename:

Operation Overlord

Summary:

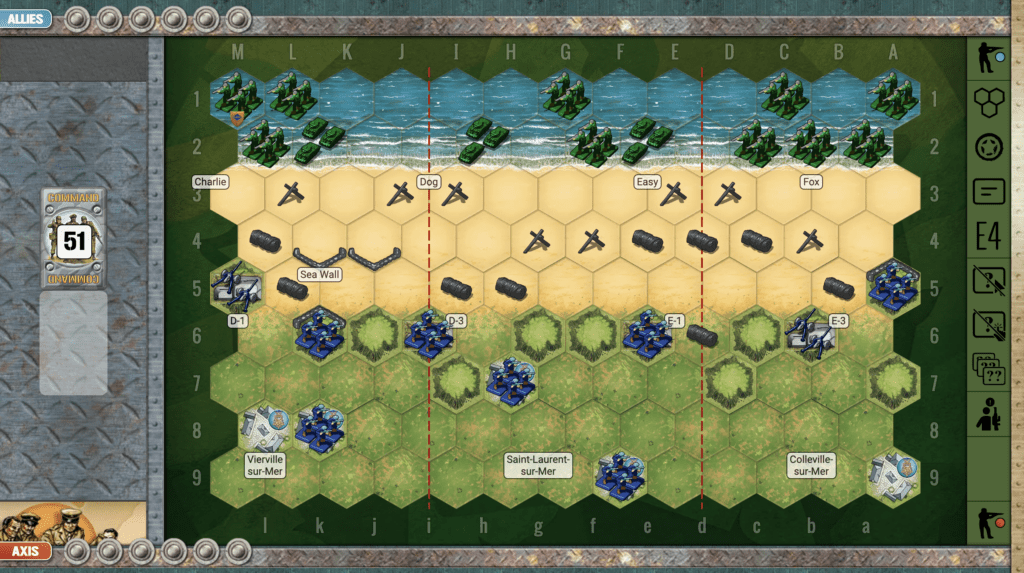
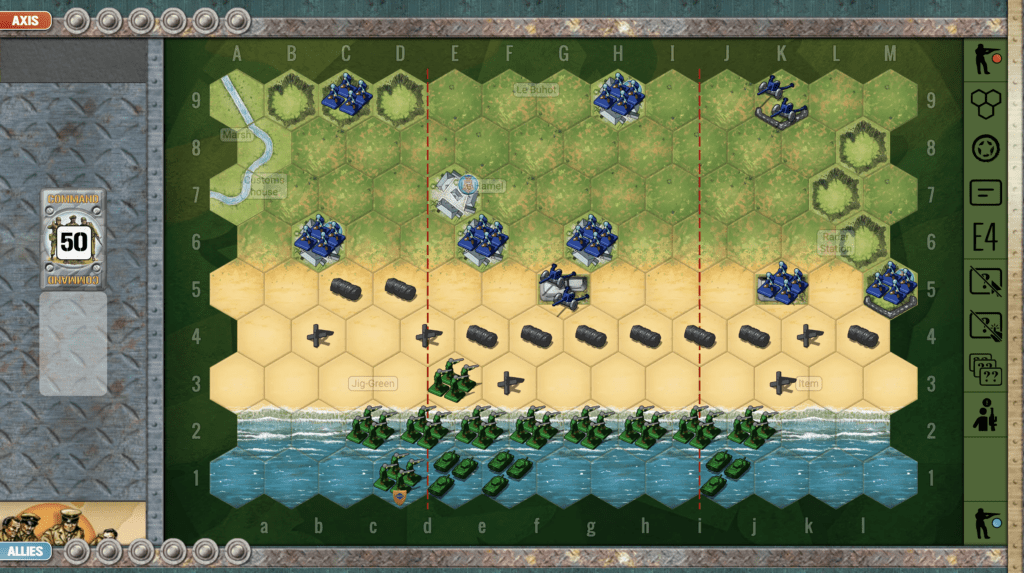
Unlike many other beach scenarios, Gold Beach does not have a hill or ridge slowing down the Allied advance. Therefore the Allies are able to very rapidly move up the beach. But Axis forces are protected in bunkers and cities, allowing them more time to attack the unprotected Allies.

Objectives:

This is a six VP scenario, so rather long, with one Objective Medal for the Allies in the town of LeBuhot.

Battlefield:

Beach scenarious are all about getting the Allies off the beach as fast as possible, while the Axis try to push them back and slow them down to allow more time for attack.

Troops:

Allies – 10 Infantry, 3 Armor

Axis –  7 Infantry, 2 Artillery       

Allied Strategy:

1. You must eliminate the Axis artillery as rapidly as possible, or it will decimate your forces.

2.  Because there is no enemy artillery on the left flank, it generally poses the best chance of advancement, should the cards allow it.  Once you get off the beach on the left side, you can proceed with your forces toward the right until you capture all the VP’s you need.

3. You have three Armor. Get them out of the water and into the action quickly. But they must coordinate their attack with the infantry. It is very difficult to win this scenario, unless you quickly get your artillery off the beach and into the back ranks where you can attack the enemy from behind. 

Axis Strategy:

1. Axis has two artillery, which compensate for the overwhelming Allied forces coming at them. The one in the center section near the beach is a powerful force. Every single beach hex in the central section is within the range of full two-dice artillery attacks. This is a very powerful weapon in the Axis arsenal. Use it at every opportunity you have.

2.  If you can move the artillery on your left flank forward to a more central position, it will improve your ability to attack the enemy coming up the center section. Of course, you will lose your sandbags when you move, so this move forward is safest if you have a Dig In card at the ready.

16
BR - Gold Beach

Author:

Days of Wonder

Link:

First Assault Wave (Omaha Beach)

First Assault Wave (Omaha Beach)

scenario_FirstAssaultWave_start_Axis

The invasion of Omaha Beach on June 6, 1944, was a pivotal part of the D-Day landings during World War II’s Operation Overlord. Omaha Beach, one of five landing sites in Normandy, was assaulted by U.S. forces, primarily the 1st and 29th Infantry Divisions, supported by specialized units.

Heavily fortified by German defenders from the 352nd Infantry Division, the beach presented challenging terrain with high bluffs, barbed wire, and entrenched gun emplacements. American troops faced intense machine-gun fire, artillery, and obstacles as they landed, resulting in high casualties, particularly in the initial waves.

Despite the heavy losses, small groups of soldiers managed to breach the German defenses, scaling the bluffs and neutralizing key positions. By the end of the day, the U.S. forces had secured a tenuous foothold, paving the way for the larger Allied advance into occupied France. The success at Omaha Beach, though costly, was crucial to the ultimate liberation of Europe from Nazi control.

General Howitzer’s perspective:

“Let me tell you something—Omaha Beach was no picnic. The enemy had the high ground, the machine guns, and every advantage. But our boys? They didn’t stop. Through smoke, blood, and hell itself, small squads clawed their way up those bluffs, took out key positions, and broke through the defenses.

By day’s end, we had ourselves a fragile foothold—but it was ours. And that patch of bloody sand became the launch point for the drive to liberate France and crush the enemy war machine.

So don’t ever forget—victory doesn’t come easy. It comes from courage, sacrifice, and the will to fight forward when every instinct says to drop. That’s what won Omaha. That’s what wins wars.

6 VP’s

Card Balance:

Allies – 4

Axis – 5

Complexity:

2

Conditions:

Beach

Context:

Historical

Location:

France

Year:
1944

Theater:

Western Front

Campaign:

D-Day

Codename

Summary:

True to history, this is a tough battle for the Allies to win.

Objectives:

5 VP’s including Medal Objectives

Battlefield:

Omaha Beach is well-guarded with hedgehogs, barbwire, and numerous hills to slow down the Allied advance. If they successfully make it off the beach, there are three towns at the edge of the battlefield with victory points for them.

Troops:

Allies – 10 Infantry, 3 Armor

Axis – 7 Infantry, 2 Artillery

Allied Strategy:

1.  Get off the beach as quickly as possible!

2.  Keep your armor and infantry attack cohesive. They are both needed to successfuly breach the bunkers. The armor fires from a safe distance, and then when ready, the infantry moves in for the kill and take over.

3.  One of your Infantry on the right flank is a special forces which can move two hexes and still attack.  Get it up to the enemy as quickly as possible.

Axis Strategy:

1.  The Axis have artillery on each flank, which gives you control over nearly every hex on the beach. Use them to good effect.

2.  There are five! town medal objectives which need to be defended for this scenario. If you can slow down the advance of the Allies, it will give time for your artillery to hit them.


Battle Reports (percentage of Allied victories):

19%

25
BR - First Assault Wave

Author:

Days of Wonder

Link:


Counter-Attack of the BEF

Counter-Attack of the BEF

Counter-Attack of the BEF

Memoir 44 scenario Counter-Attack of the BEF

France, May ’40—Guderian cuts to the Channel and splits the front. Gort answers with a punch at Arras: Franckforce—Matildas and Durhams—drives south of the city, hits Rommel by surprise, scatters his cyclists, and rolls over light guns like they’re tin. Then Rommel does what winners do—drags up heavy artillery and 88s, fires direct, and stops the thrust. Dusk brings the Luftwaffe; the counterattack bleeds out. By nightfall the BEF falls back, and the only road left is the sea—Dunkirk.

Lesson: shock opens the door, but you hold it with guns and air. Mass your armor, keep your flanks covered, bring the big artillery, own the sky—and don’t stop moving.

~~ General Howitzer

VP’s

12

card

Card Balance

Allies – 6

Axis – 5

Complexity:

4

Conditions:

Countryside

countryside

Location:

France

Year:

1940

Theater:

Western

Campaign

Codename

Summary:

This scenario accurately reflects the difficult job the British had in 1940 to try to stop the Axis onslaught with a courageous Counter-Attack by the British Expeditionary Force (BEF).

medal allies

Allied Strategy:

1.  There are a couple of medal objectives available to you, just beyond the train tracks (row 8) at the towns of Agny and Wailly (row 11).  If you can position two of your forces within movement distance of both of them, you can set yourself up for a final medal capture and win.

2.  Attack Plan: do not cross the railroad tracks on row 8, until you have eliminated all enemy forces on row 7.  Just line up – with appropriate safety spacing – your Armor and Artillery and pick off the Infantry units on that row until they are gone. Deal with any enemy Armor that gets moved into the battle as well.

3.  It is going to be difficult to protect and hold control of the town of Arras at A9.  If you can get enough forces over there in time,  you may be able to put up a good fight.  But you will be in enemy territory the entire time, and it will be difficult to control.  You could consider either a strategic withdrawal, to preserve your Infantry unit, or stay and fight, attempting to take out as many enemy forces as possible before your demise.

4.  Your weak section is your right flank. With the enemy 88 Artillery in the woods, they present a formidable challenge to advance in that sector. You will need to deal with it first.  The way to do this is to get your Artillery unit in the region up to row 4 or 5. You will be out of reach of the 88, and will be able to pick it off. 

5.  Your Artillery units are too far back. Take every opportunity to move them forward.  

medal axis

Axis Strategy:

1.  You can actually win this one without crossing the railroad tracks on row 8. But the BEF must cooperate by attempting to come in for the kill. You can finish them off, and then save your final coup-de-grace for the Medal in the town at A9.

2.  Possible Attack Vector:  Target the town of Arras at A9, which has an Axis Temporary Medal Objective.  Start moving forces up in that direction. It will have two benefits of concentrating your firepower into one sector, and then after a successful destruction of the enemy in that region, you can capture the town of Arras – and hold it – for an additional medal. This attack plan could potentially yield two to three medals, maybe more.

3.  Your Armor is misplaced at the start of the battle. Take every opportunity to move it forward, so it can begin to attack across the railroad tracks at the enemy. 

Battle History Results

13
BR - CounterAttack of BEF

Author.

URL

Counter-Attack at Arras

Counter-Attack at Arras

Counter Attack at Arras

The Counterattack at Arras occurred on May 21, 1940, during the Battle of France in World War II. It was a British and French counteroffensive aimed at halting the rapid German advance during the Blitzkrieg.

Launched by British forces (the 1st Army Tank Brigade and elements of the 50th Infantry Division) and supported by French infantry, the attack targeted German positions around Arras, where General Erwin Rommel’s 7th Panzer Division was advancing. The Allies hoped to disrupt German momentum and relieve pressure on retreating Allied forces.

The counterattack initially achieved surprise, with British Matilda tanks proving highly effective against German anti-tank weapons. However, the Germans quickly regrouped, bringing in heavy artillery and air support to repel the attack. The Allies were eventually forced to withdraw due to superior German numbers and coordination.

General Howitzer summarizes the battle’s impact:
The counterattack didn’t win the day, but it sure kicked sand in the Germans’ gears and bought the time we needed to pull our boys out at Dunkirk. It was a hard lesson in early tank warfare—fast and mean, but still full of cracks if you knew where to hit.

Background

6 VP’s

Card Balance:

Allies – 6

Axis – 5

Complexity:

3

Conditions:

Countryside

Location:

France

Year:

1940

Theater:

Western Front

Campaign:

Battle of France

Codename:

Operation Frankforce

Summary:
This scenario has a set of hills on one flank, and a row of forests on the other flank, with a three-hex town in the center. It is around these obstacles that the battle ensues.

Objectives:

Six VP’s, so strategy comes into play; not just tactics.

Battlefield:

Countryside with the three-hex town of Arras in the center.

Troops:

Allies, 6 Infantry, 5 Armor, 1 Artillery;

Axis, 9 Infantry, 6 Armor,1 Artillery

Allied Strategy:

1.  Axis is very close to Agny, and may secure it quickly. So use your flanks to provide more lucrative avenues of attack. The ridgeline of trees on your left flank give your infantry, and especially your armor great cover to attack the enemy.  On your right flank, secure it with both infantry and armor. Don’t leave infantry behind.

2.  Move your artillery forward one row to have better hit strength on the entire town of Arras.

Axis Strategy:

1. Your Axis forces begin the scenario very close to Agny. Seize control of the town so that the enemy will have to pay dearly to gain it.

2. There is a path between the forest on your right flank. Seize the town at the end of it, to challenge any forces which may attempt to come through the pass. And as the cards allow, use it yourself to attack the enemy armor at the end of that pass.

3.  Move your artillery forward at least one row to gain more dominance in the center section.

4.  Remember that as Axis in this scenario, blitz rules are in effect, so you can use a Recon card to call in an airstrike against adjacent units. This is most useful in the beginning when the Allied forces are still lined up agains the back border. The Axis airpower only drops one dice per hex, but since it is a six VP game, this kind of softening up of the enemy in the beginning can pay dividends later on.

16
BR - Arras

Author:

Days of Wonder / RBorg

URL

Mignano Monte Lungo

Mignano Monte Lungo

Listen up, men—

The Battle of Mignano Monte Lungo was a damn fine example of grit and redemption. After switching sides, the Italian troops had something to prove—and by God, they did it. That mountain was no cakewalk. The Germans were dug in deep, with every ridge covered by fire, and the terrain was as unforgiving as a mule kick to the gut.

But those Italians, with the Yanks watching, clawed their way up that blasted rock from December 8 to the 16th, 1943. Took casualties. Took hell. But they took the mountain too. That wasn’t just a hill—it was a message: Italy was back in the fight, and they were fighting on the right side this time.

Monte Lungo wasn’t just a tactical win. It was a morale sledgehammer. And it cracked open the road to Cassino. That’s how you turn the tide—with steel in your spine and fire in your gut.

~~ General Howitzer

6 VP’s

Card Balance:

Allies – 6

Axis – 5

Complexity:

3

Conditions:

Countryside

Context:

Historical

Location:
Italy

Year:

1943

Theater:

Western

Campaign:

The Italian Campaign

Codename

Summary:

The Axis forces begin this scenario in control of the hexes across two-thirds of the battlefield, protecting two VP town hexes. The challenge for the Allies is to cross the open plain with out being decimated before they can control the hills and get to the VP’s.

Objectives:

6 VP’s, plus Monte Lungo and Monte Rotondo are temporary Medal Objectivese for the Allies.

Battlefield:

Troops:

Allies – 

Axis – 

Allied Strategy

1.  Big Picture Strategy:  the Axis forces have an Artillery guarding the left flank, and it’s objective medal. But there is an objective medal on the right flank.  Head all of your forces in that direction.

2.  If you can move your Artillery forward one row, you will be able to hit more of the enemy with 2D attacks.


Axis Strategy

1.  Big Picture Strategy: Guard the Objective Medal on your left flank.  If the enemy gets the right cards, they can very quickly come upon your forces and overwhelm them.

Battle Reports:

(percentage of Allied victories)

18
BR - Mignano

Author:

Days of Wonder

ID:

Link:

Arracourt

Arracourt

scenario_Arracourt_start_Axis

The Battle of Arracourt (September 18–29, 1944) was one of the largest tank engagements on the Western Front — a dramatic clash between the U.S. 4th Armored Division and German Panzer forces near the village of Arracourt, in northeastern France.

After the breakout from Normandy, U.S. forces under General Patton’s Third Army raced across France, outpacing their supply lines. The German High Command, desperate to halt the advance, launched a counteroffensive using newly arrived Panzer brigades from the 5th Panzer Army. Their goal was to cut off the American spearhead and regain the city of Nancy.

By the end of September, the Germans had lost over 200 tanks and assault guns, compared to about 25 U.S. tanks. The American victory at Arracourt shattered the Panzer brigades, halted the German counterattack in Lorraine, and confirmed the U.S. Army’s growing mastery of combined-arms tactics.

Listen up—Arracourt was no accident. That fight proved what I’ve said all along: steel alone doesn’t win battles—men do. When you’ve got training in your bones, clear orders on the radio, and the guts to move fast and hit hard, you can take on any tank the Krauts can throw at you.

Our boys out there turned the rolling fields of Lorraine into a graveyard for German armor. Outnumbered? Maybe. Outclassed? Never. We didn’t dig in and wait—we maneuvered, struck from the flanks, and crushed them before they knew what hit ’em.

Arracourt wasn’t just a victory—it was a lesson to every soldier in this Army: brains, speed, and discipline beat brute strength every damn time.

~~ General Howitzer

6 VP’s

Card Balance:

Allies – 6
Axis – 4

Complexity:

4

Conditions:

Location:

France

Year:

1944

Theater:

Western Front

Campaign

Codename

Summary:

The Arracourt scenario is dominated by a hilly ridge of five hexes which cut across a flank and into the central section, and another smaller ridge in front of that. When the armor comes over the ridge, it becomes a mighty tank battle.

Allied Strategy:

1.   Be careful to not launch a premature attack on the left flank. If you are not ready, you will be entering a kill box. It may be wiser to pull back to the secondary row of ridges, to get prepared for attack.

2. The Axis forces are together in the upper right section behind the Marne-Rhine Canal. If you can move in with your armor and some artillery attacks, you are may be able to score at least one medal before they can respond.

3. You have three artillery. Use them to your advantage. If you can move your center one forward a bit, it will improve your attack and control of the center section.


Axis:

1.  Your right and center sections are strong; the left units stuck behind the canal is your weak side. As you are able, get them out of harms way, or they will be easy pickings for the Allies.

2.  Grand Strategy for Axis: the battle will be fought on your right flank with the armor from both sides on the two ridges and the valley between.  You need to get your tightly condensed and no-retreat armor out into the open so you can battle well. If you stay backed up against the border on the right flank, your troops will be destroyed.

3.  Early goal: eliminate the enemy Infantry at G7, or they will do unnecessary harm to your forces in the center section. 


Battle Reports:

(percentage of Allied victories)

 60%

20
BR - Arracourt

Author:

Link: View Here