Red Barricades Factory (Stalingrad)
Red Barricades Factory (Stalingrad)

By October ’42, the Germans were throwing more and more of their 6th Army into the meat grinder at Stalingrad. On the 22nd, the 79th Infantry, backed by engineers, tanks, and guns, went charging across the railroad embankment straight at the Red Barricades Factory.
It was hell—Russian snipers in every shadow, tanks dug in like fortresses, fire pouring in from every angle. The Germans clawed their way forward inch by inch, breaking the Soviet line by sheer weight. But after all that blood and fury, by nightfall they had only managed to seize a corner of the factory. A costly gain, proving again that in Stalingrad, every brick was paid for with lives.
~~ General Howitzer
10 VP’s
![]()
Card Balance:
Allies – 3
Axis – 5
Complexity:
5
Conditions:
Urban / Winter

Location:
Stalingrad
Year:
1942
Theater:
Eastern Front
Campaign:
Battle of Stalingrad
Summary:
The scenario is complex battle with a lot of different terrain, both urban and winter, that complicates troop movement. There are also snipers which add an extra element of suspense.
Objectives:
10 VP’s , including 3 Objective Medals for either side
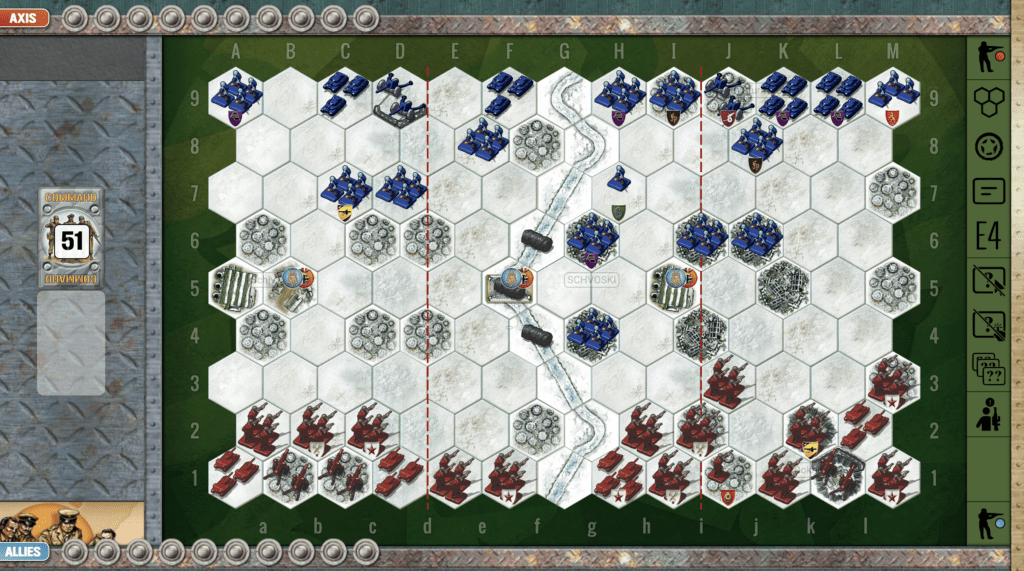
Battlefield:
Battlefield is the Red Barricades Ordnance factory in the winter, surrounded by rubble.
Troops:
Allies – 9 Infantry, 2 Armor, 2 Artillery, and 2 Sniper
Axis – 9 Infantry, 4 Armor, 2 Artillery, and 1 Snipers

🔥 Winning as Allies
1. You can quickly grab the Medal Objectives which are very close to you in the city ruins and the factory, and then try to hold them for the game. This will give you an early advantage and force the enemy to come to you, and fight against you while you are in a well-protected positions.
2. You have two Snipers which can fire five! hexes away. You can use them to harass the enemy and force them to pay attention to the Sniper, even though it doesn’t count as a VP, thus diverting energy away from other units.
3. Use your forward infantry to attack the enemy before they destroy you. At two hexes away, you should be able to get some good hits in first.
4. The strategic reality is that your forward units will get destroyed rather quickly, so the real battle will take place along the second front in rows 3,4,5 where you have armor protected behind sandbags, and city ruins for your infantry.
5. Give careful consideration before moving your armor away from their sandbags. The enemy outnumbers your armor two to one, and once they become mobile, will be coming for yours.
6. This scenario makes it easy for Allies to quickly grab 4 medal objectives by entering the town and factory hexes, but the trick comes in trying to hold them. The enemy will push through your first line of defense pretty quickly, and then you will need to hold your second line on rows 3,4,5, in order to prevent the enemy from taking out your units on those town and factory hexes.

🔥 Winning as Axis
1. Mobility is the first order of business when you start. In fact, at the start of the game, the Axis have 16 units, and not a single one can retreat. [ Admiral Frigate ] You have a lot of firepower stuck against your back wall, and hidden behind the hills. You need to move it out and begin attacking the Allies immediately.
2. You have three no-retreat Infantry units that are only two hexes away from the enemy. You either need to bring your Armor up between the enemy and your infantry, or, better yet, move in and attack the enemy at close assault range.
3. Once you get some mobility going to avoid the no-retreat attacks, you can use your Artillery to degrade the forward enemy units which are barricaded in the City Ruins.
4. Use your Sniper to good effect. They can move two and battle against Infantry, hitting on grenade, infantry, or star dice faces, increasing your odds of a hit to 67%.
5. Most of the middle game of this battle will take place with your forces arrayed across the sixth row, while the Allies are defending from rows 4 and 5. So once you take out the advanced Allied forces, you can overtake those same city ruins and launch your attack from there against the Allies.
Battle Reports
( percentage of Allied victories ):
57%
Author:
Days of Wonder
Link: