Escape via the Coastal Road

Escape via the Coastal Road
In May of ’40, the Germans came roaring into France, and the Allies—Brits, French, and Commonwealth alike—were staring down the barrel of encirclement. So they fell back, fighting tooth and nail toward Dunkirk. One lifeline was that damned coastal road, hugging the Channel, choked with men, guns, and danger at every turn. It was no pleasure cruise—enemy fire, chaos, and desperation were the order of the day. But by God, they held on long enough for Operation Dynamo to haul over 330,000 soldiers out of the trap and back to Britain, ready to fight another day.
~~ General Howitzer

6 VP’s

Card Balance:

5 – 5

Complexity:

2

Conditions:

Desert

Location:

North Africa

Year:

1942

Theater:

Mediterranean Theater

Campaign:

Dunkirk Evacuation

Codename:

Operation Dynamo

Summary:
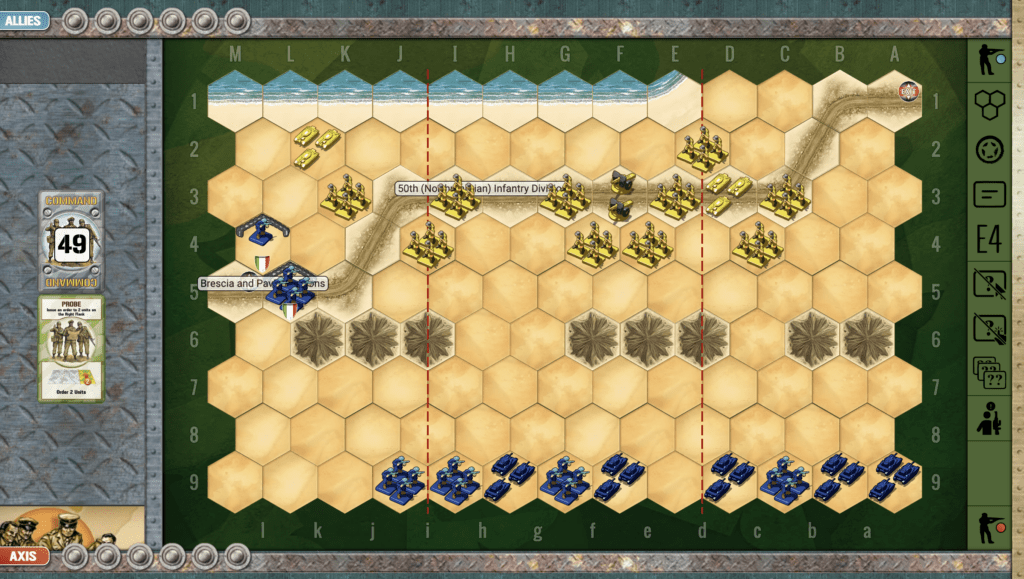
The Escape scenario is a race to the edge, to either escape or prevent escape. If the Allies can prevent the Axis from getting through the gaps in the escarpment, they can win easily. But if the Axis can move fast enough, and get in front of the Allied troops, they will have the time they need to bring in the rest of the armor and pound the enemy into the dust before they can escape via the Coastal Road.

Objectives:
Six VP’s, combined with the escape hexes on the edge for the Axis.

Battlefield:
Desert, divided in half by an escarpment with three gaps in it.

Troops:
Allies – 10 Infantry, 1 Armor, 1 Artillery
Axis – 6 infantry, 5 Amor

Allied Strategy:

1. For Allies, it is all about providing a protected retreat. Take advantage of the easy VP’s gained by escaping out of the exit markers. The unprotected left exit will be the easiest course of action. Use your tanks to protect your escape, by holding off the Axis long enough to go. Fortunately, the Axis armor has to make it way through the escarpments. This slows down their advance and their ability to mass against the Allies. If you can block entrance through an escarpment with a combination of infantry and armor, it may provide enough tie for the rest of the troops to escape to the left.

2.  The right exit is heavily defended by sandbagged infantry, so don’t attack that unless you have overwhelming force.

Axis Strategy:

1. The goal is to get through the escarpments with your armor as quickly as possible and begin attacking the escaping troops.

2. If you can get an armor unit to sit on the unguarded exit marker to block the exit to your right, you will be in a position to pound the Allied infantry into dust with the rest of your armor.

Classic Battle Reports:

(percentage of Allied victories)

52%

19
BR - Coastal

Author: 

Days of Wonder

Link:

Dug in at Sidi Omar

Dug in at Sidi Omar

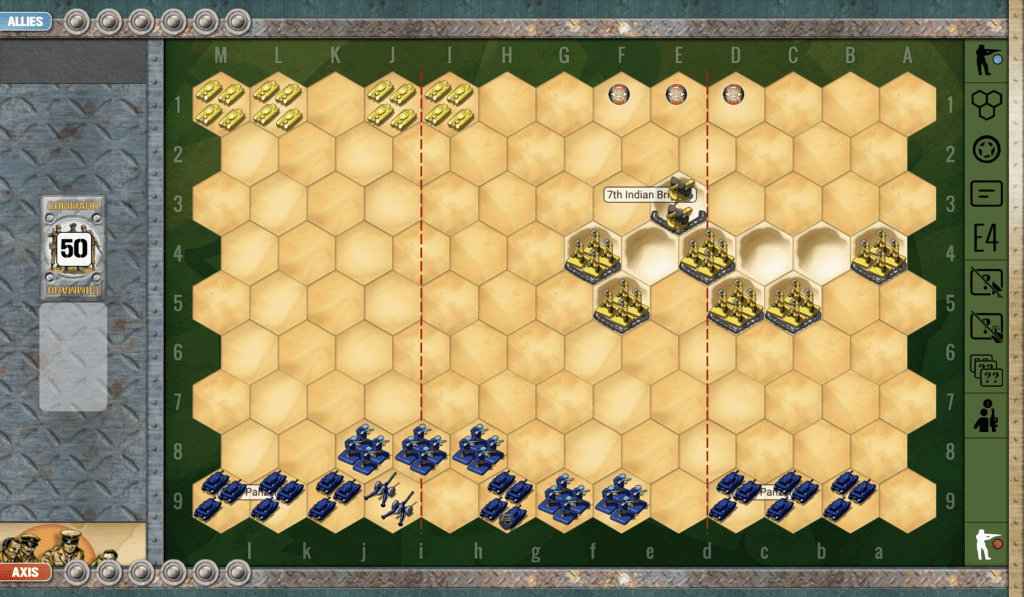
scenario_DugInSidiOmar_start

The Battle of Sidi Omar (November 1941) occurred during the broader Operation Crusader in the North African Campaign of World War II. Sidi Omar, located on the Libyan-Egyptian border, was a heavily fortified Axis stronghold defended by Italian and German forces.

On November 25, 1941, British and Commonwealth forces, particularly the 4th Royal Tank Regiment and elements of the 2nd New Zealand Division, launched an assault to capture the position. The defenders, dug in with anti-tank guns and artillery, inflicted significant casualties on the attacking tanks.

At Sidi Omar the enemy fought hard, but it wasn’t enough. Our boys hammered their defenses, smashed the garrison, and bagged hundreds of Italians as prisoners. That victory didn’t just clear the ground—it locked down the left flank for the advance, gave us breathing room, and drove Operation Crusader forward. With Tobruk relieved and the Axis grip on North Africa broken a little more, Sidi Omar proved again: when the Allies hit with weight and will, the enemy breaks.

~~ General Howitzer

6 VP’s

Card Balance:

5 – 5

Complexity:

2

Conditions:

Desert

Context:

Historical

Location:

Libyan – Egyptian border

Year:

1941

Theater:

Mediterranean Theater

Campaign:

North African Campaign

Codename:

Operation Crusader

Summary:

Objectives:

6 VP’s and Exit hexes for the Axis

Battlefield:

The dominant elements of this scenarios are the hilly dunes controlled by the Allied infantry, and the wide open battlefield for the armor units of both sides to meet in the middle section and one flank.

Troops:

Allies – 6 Infantry, 4 Armor, 1 Artillery

Axis –  5 Infantry 7 Armor, 1 Artillery

Allied Strategy:

1.  Your infantry on the dunes can hold off the enemy for a long time. This should give you enough time to get your armor, which is stuck in the corner on your right flank, into the field of play.

2.  Because your armor can only move two hexes at a time, it may take a couple of turns before you pose enough of a threat for them to stop attacking your infantry on the dunes.

3.  Quickly get to the center section with your forces, in order to prevent any of the enemy from thinking about escaping out of the Exit hexes.

4.  With your artillery in the center section on the dune, you are able to attack any enemy in the center section. Use it to good effect.

Axis Strategy:

1. The principle advantage which the Axis have in this desert scenario, is that the Axis armor can move three hexes vs. the Allies who can only move two. This give you the opportunity to move in quickly on the Allies and take out some armor before they can respond.

2. The enemy have full control of the sand dunes in the middle of the center section and its adjoining flank. But you can keep your armor at a three-hex distance, and just keep attacking them until one or two hexes are eliminated.

3. Remember that there are some Exit hexes in the back of the battlefield for the Axis. If you are able to overwhelm the forces on the dunes, and close in on them, some of your troops may be able to make their way off the field (and make a few attacks on their way).

Battle Reports 
(percentage of Allied victories):

47%

25
BR - Dug-In

Author:

Days of Wonder

Link:

1st Armored to the Rescue

1st Armored to the Rescue

Back in May of ’42, out in that godforsaken sandbox they call North Africa, the British under General Ritchie were getting their clocks cleaned by that desert fox Rommel. That son of a gun was no slouch—he came flanking hard near the Gazala Line, punching through like a knife through warm butter.

So what do they do? They throw in the 1st Armoured Division to stop the bleeding. Good men, tough tanks—but they went up against a well-oiled machine. Rommel’s boys had coordination, momentum, and those damn Panzers that could turn faster than ours and hit harder too.

The Brits fought like hell, but their tanks were choking on dust, breaking down, and couldn’t take a hit like the German steel. The result? A tactical retreat that turned into a full-on fall of Tobruk—a damn tough loss for the Allies.

But here’s the lesson, and you’d better believe I paid attention: in desert warfare, you don’t win with brute strength alone. You win with mobility, logistics, and bringing everything—armor, air, and artillery—to bear in perfect harmony. That’s how you beat a fox like Rommel.

We may have taken a hit there—but it lit a fire under us. And that fire led us straight to victory later on.

~~ General Howitzer

5 VP’s

Card Balance:
Allies – 5
Axis – 6

Complexity

2

Conditions

Desert

Location:

North Africa

Year:

1942

Theater:

Mediterranean Theater

Campaign

Context:

Historical

Summary:

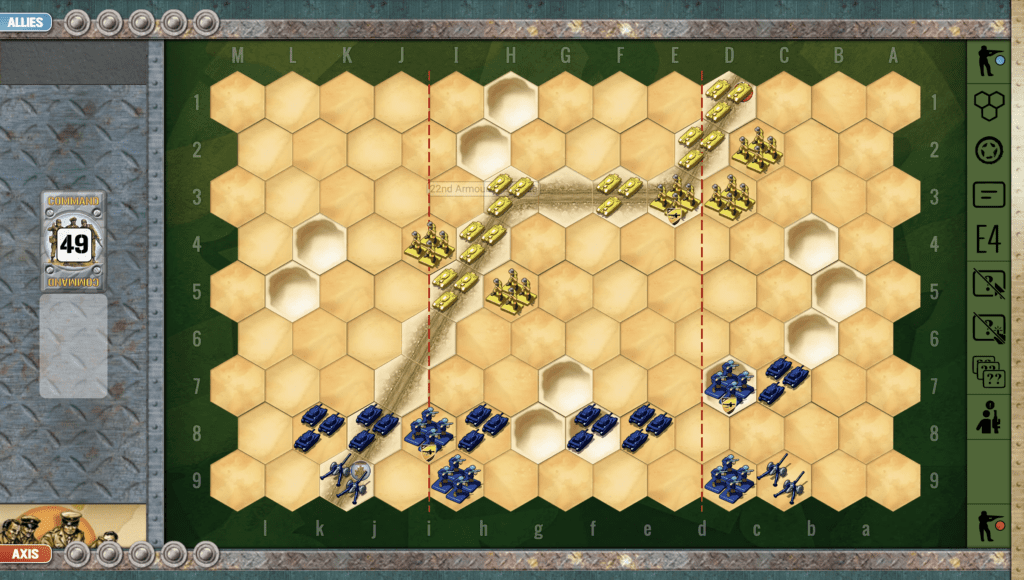
1st Armored is a wide open tank battle with a road running at an angle through the field. Any units of either side could escape of the field via the road. This adds a strategic movement element to the armored battle.

Objectives:

5 VP’s, plus each side has an escape hex at the end of the road.

Battlefield:

Desert battlefield with a road angling through from one corner to the other, surrounded by various sand dunes.

Troops:

Allies – 5 Infantry, 6 Armor

Axis – 4 Infantry, 6 Armor, 2 Artillery

Allied Strategy:

1.  Big picture is that historically the British lost this due to mobility and coordination factors with their forces (besides being outgunned by the Axis Artillery).  So with the Artillery on the flanks, you will need to focus your efforts in the central section, where at least the two guns have a bit less impact.

2. You have two units that begin the scenario in a no-retreat position. Get those dispersed as soon as you can.

Axis Strategy:

1.  The Axis have two artillery which you may not be able to use until the tank battles cool down a bit.

2.  With your armor mobility, you want to strike first and strike hard.

3.  The British have a few units with no retreat, such as the armor at I5, and the infantry at D3.  If you can attack those before the forces move, you can get some quick wins.

DoW Battle Reports: 28%
(Percentage of Allied Victories)

27
BR - 1st Armored

Author:
Days of Wonder

Link: