Vassieux, Vercors

Vassieux

The Battle of Vassieux-en-Vercors was a significant engagement during World War II, part of the German offensive against the French Resistance in July 1944. Located in the Vercors Plateau, the battle was a key moment in the resistance movement in southeastern France. 

General Howitzer summarizes the results and lessons learned:

In July of ’44, high in the Vercors Plateau, the French Resistance had the guts to carve out their own patch of freedom before the Allies rolled in. These Maquis fighters didn’t have much—just grit, rifles, and the will to spit in the enemy’s eye. But on the 21st, the Germans came in from the sky, parachutes blooming like death over the hills.

They smashed into that stronghold hard, and the Maquis, outgunned and outnumbered, fought like hell but couldn’t hold. It was courage in its purest form—men standing their ground knowing the odds were stacked to the heavens. But it was also a brutal reminder: bravery without firepower is a damn fine way to get killed.

~~ General Howitzer

4 VP’s

Card Balance:

4 – 4

Complexity:

2

Conditions:

Countryside

Location:

France

Year:

1944

Theater:

Western Front

Summary:

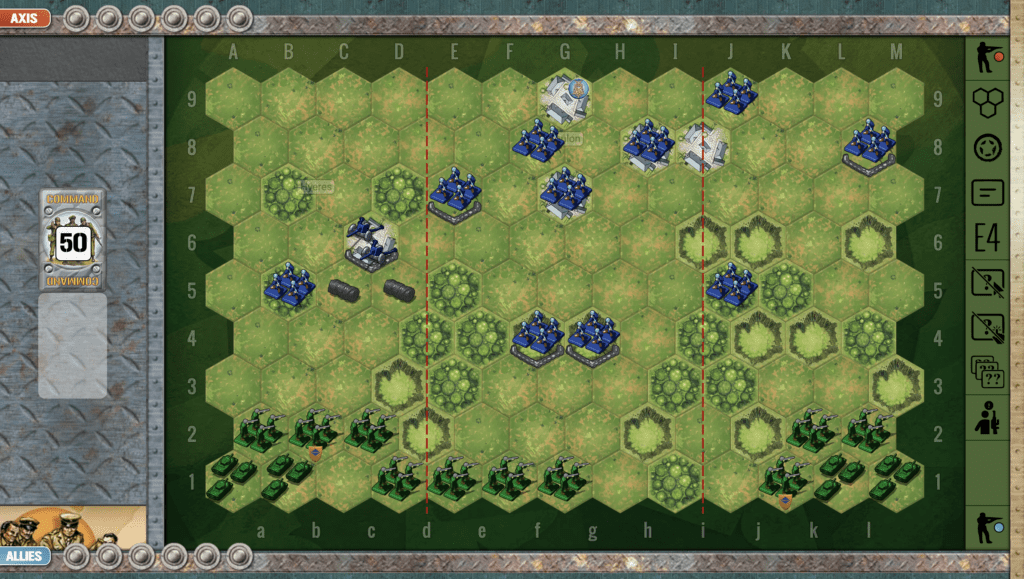
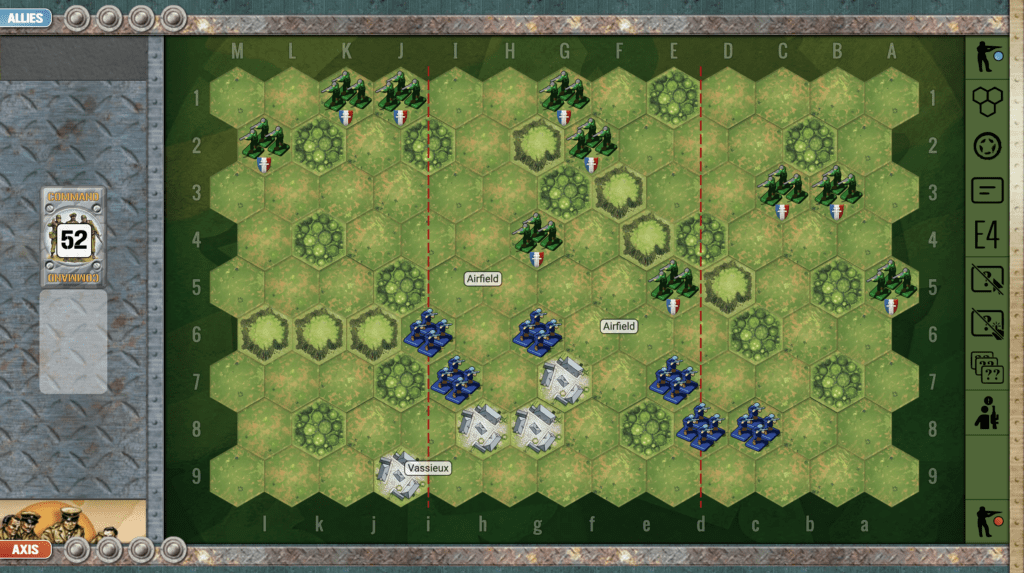
 The Vassieux scenario starts with a chaotic situation between both sides, and makes for an intriguing infantry-only scenario.

Objectives:

It is a short four VP scenario, which must be completed before the deck runs out or the Axis side wins

Battlefield:

The center of the battlefield represents the airfield where the battle took place. It is surrounded by hills, forests, and town hexes.

Troops:

Allies – 10 Infantry

Axis – 6 Infantry

Allied Strategy:

1.  The Allies lack infantry cohesian, so one of the early goals is to pull the troops together, and form a united attack.

2. You will need to bring in your units on the flanks towards the center where most of the battle will take place.

3. Your two units in the center section begin the game in a very exposed position. One of them is going to get hit hard and possibly eliminated right away, unless you pull them back until your forces are consolidated.

4.  These are French Resistance fighters, so they can move into woods and still attack. So the place to put them is BEHIND the woods, so when the enemy approaches, they can enter the woods and attack the enemy from a position of cover. The enemy will never know what hit them!

Axis Strategy:

1. The Axis forces are quite outnumbered in this scenario. They will need to work together as a cohesive unit to have any hope of either destroying or at least holding off the French Resistance forces. If they can hold out for an entire deck, they will win.

2. If you can get some rapid movement infantry cards, you may be able to take out one unit or more before the rest of the Resistance fighters come in to support.

3. If you are unable to get the attack cards needed for your forces, you may need to perform a tactical retreat into the town of Vassieux to provide some extra protection while you build up your hand.

DoW Battle Reports

(percentage of Allied victories):

34%

16
BR - Vassieux

Author:

Days of Wonder

Link:

Utah Beach

Utah Beach

The invasion of Utah Beach was part of the Allied D-Day landings on June 6, 1944, during World War II. Utah Beach was the westernmost landing area, assigned to U.S. forces, primarily the 4th Infantry Division, under Major General Raymond O. Barton. The objective was to secure the beachhead, push inland, and link up with airborne troops dropped earlier to capture key roads and bridges.

Strong currents caused some landing craft to drift about a mile south of the intended target area. This accidental landing proved advantageous, as it placed the troops in a less heavily defended section of the beach. The U.S. forces quickly overwhelmed the German defenses, suffering relatively few casualties compared to other D-Day beaches.

Listen up.

At Utah we hit fast, secured the sand, and drove inland until we shook hands with the paratroopers. That link-up turned a strip of beach into a springboard—men, guns, and fuel pouring ashore to feed the advance. With the beachhead anchored, momentum was ours. That’s how you start a liberation: seize, link, expand—and keep moving.

~~ General Howitzer

5 VP’s

Card Balance:

Allies – 6

Axis – 4

Complexity:

3

Conditions:

Beach

Location:

Normandy

Year:

1944

Theater:

Western Front

Campaign:

D-day Invasion

Codename

Summary:

The challenge for the Allies in this scenario is to get off the beach as quickly as possible, and exit out one of the three exit hexes. The Axis are protected in towns and bunkers in order to slow down the advance of the Allies.

1. Objectives

This is a 5 VP game, so it moves rather quickly, and the Allies will need to minimize losses while they pick away at the Axis forces inside their bunkers, all the while making their way towards the exit hexes.

2. Battlefield

There are three exit hexes at the top of the battlefield. The Allies can seek two objectives: First to destroy enemy units, Second to exit out the back.

3. Troops

Allies – 10 Infantry, 4 Armor

Axis – 5 Infantry, 1 Artillery

Allied Strategy:

1. Allies begin with their forces congested together in the left and center sections. This is not all bad, as they need to stay away from the artillery in the right flank. But they do need to disengage their forces from one another and create some separation from the shores of the beach.

2. Keep attacking! As you approach the enemy forces in their bunkers, you may be tempted to pause and amass more forces for the attack. This depends on your circumstances. If you are out in the open and under enemy attack with two-dice attacks, you need to just keep attacking with those forces. Create the beachhead by continuing to attack, attack, attack.

3. You can expect to receive a fair number of casualties as you progress up the beach. But as soon as you get your armor out of the water, things will change for any enemy units unfortunate enough to be found outside their bunkers.

4.  The big picture strategy for Utah Beach is to: Stay Left, Take Out the Infantry, Escape out the back.  The scenario only needs 5 VP’s.  All five of those are available to you on the left and middle section.  Take out the three infantry for your first three points; then send two units out the escape hexes, and you are golden!

Axis Strategy:

1. The general rule for this scenario, is to stay in your bunkers! With no hilly ridge slowing the movement of the Allies onto the beach, they are able to very quickly reach your bunkers and begin attacking. If you make a fool-hardy rush forward in an attempt to knock out a few more figures, they will make you pay with an overwhelming retaliation of their forces. The only exception to this is your infantry unit in the bunker at M7 on your left flank. The Allies are going to avoid much of that section due to your artillery at J7, so it is best to get that unit into play in the central section as soon as you can. Also, there are so many wire bails in your left flank, that they will severely slow down any troops who try to come in there, allowing your artillery to demolish them.

2. The goal for Axis is to slow down their movement. Besides actual hits, retreat flags on the Allies are your friend, as it will push them back and give you more time to build up your deck with powerful attack cards. A last ditch effort, if needed would be to move your infantry onto or in front of the exit hexes, to prevent the Allies from escaping before you have given them a good beating.

3. Your one saving grace as the Axis player is your artillery. Use it as much as you can, especially while the enemy is still in the water, where retreat flags count as hits.

18
BR - Utah

Author:

Days of Wonder

Link:

Toulon

Toulon

Scenario_Toulon_start_Allies

The Battle of Toulon (August 20–26, 1944) was a key engagement during the Allied invasion of southern France in World War II, as part of Operation Dragoon. The objective was to liberate the strategic port city of Toulon, essential for supplying the advancing Allied forces.

Now here’s a fight that showed the grit of France reborn. General de Lattre and his men from the French Army of Africa hit Toulon like a hammer on an anvil. The Germans had dug in—guns, bunkers, street traps—you name it. Every block was a battlefield. But the French didn’t flinch. They fought yard by yard, with their artillery pounding and the Navy blasting from offshore.

Six bloody days later, the tricolor flew over the port, and the German garrison laid down its arms. Toulon was free, Marseille followed, and the Allies had their supply lifeline to drive deeper into France. It wasn’t just a victory of arms—it was France standing up, shoulder to shoulder with her liberators, and proving she still had fire in her soul.

~~ General Howitzer

6 VP’s

Card Balance:

Allies – 6

Axis – 4

Complexity:

4

Conditions:

Countryside

Context:

Historical

Location:

France

Year:

1944

Theater:

Mediterranean

Campaign:

Codename:

Operation Dragoon

Summary:

Objectives:

6 VP’s, plus the City of Toulon

Battlefield:

Because of the two sets of thick hilly forests cutting across the left and right flanks at an angle, it limits movement of both forces from section to section. Thus proper placement of troops in the early moves of the game can have a dramatic effect on its final outcome.

Troops:

Allies – 10 Infantry, 4 Armor

Axis – 10 Infantry, 1 Artillery


medal allies

Allied Strategy:

1.  The key objective for the Allies is to capture the town of Toulon. If the Allies occupy three of the town hexes at the end of any turn, they win immediately. So, besides the need to simply destroy Axis units, the Allied player should keep up a relentless push toward the center section which contains Toulon. This will force the Axis player to not only defend individual hexes, but also to move troops toward defending the center, thus dislodging some from behind sandbags.

2. The most imminent need for the Allies is to get their infantry away from the back wall and into the fight against the two sandbagged hexes right in front of them. Any retreat flags thrown by the Axis powers will increase odds of a hit from 50% to 67% against the Allies.

medal axis

Axis Strategy:

1.  Because the Allies have four Armor units, the Axis are outnumbered. So the scenario is primarily defensive. Given the right cards, some offensive operations may be possible. But historically, the Germans had to eventually pull back, so be aware, and be careful.

2.  Your forward infantry in the center section may get overwhelmed by the Allies, so you will want to get in your hits while you can. If appropriate, you may consider a strategic retreat to let your infantry fight another day.

3. Because you are outnumbered in terms of forces, your best chance of scoring hits will be to remain in your defensive positions and hit the enemy as they approach.

4. Be sure to protect the four hexes of Toulon, for should the enemy gain control of three hexes, you will lose instantly.

Memoir 44
Classic Battle Reports

(percentage of Allied victories):

66%

27
BR - Toulon

Author:

Days of Wonder

Link:

Sword Beach

Sword Beach

Scenario_SwordBeach_start_Allies

June 6th, 1944—Sword Beach. The British came in swinging on the eastern flank of Normandy, and they made it count.

Under General Miles Dempsey, the 3rd Infantry Division, backed by tanks, naval guns, and airborne troops, hit that beach like a battering ram. Their mission? Take the beach, punch inland, link up with the Canadians on the left and airborne boys on the right, and grab the city of Caen.

They ran headfirst into resistance from the German 716th Infantry, dug in and waiting. But it didn’t matter—Allied firepower and planning turned those bunkers into scrap. The Brits cleared the beach, pushed several miles inland, and set up a strong foothold by nightfall.

They didn’t take Caen on Day One—but they owned Sword Beach, and that was the damn prize. That success helped anchor the whole eastern flank of the invasion and gave us the momentum we needed to crack open Nazi-occupied France.

Sword Beach was no walk in the park—but it was a well-executed, hard-hitting assault that helped open the gate to Western Europe.

~~ General Howitzer

5 VP’s

Card Balance:

Allies – 5

Axis – 4

Complexity:

2

Conditions:

Beach

Location:

Normandy

Year:

June 5th, 1944

Theater:

Western Front

Campaign:

D-Day Invasion

Codename:

Overlord

Summary:

Like all Normandy beach invasions, this is a battle between well-defended but overwhelmed Axis forces who are trying to slow down the Allied onslaught.

Objectives:

This is a five VP game with three town hexes as Objective Medals. The goal for the Allies is to get to the town VP Objective hexes ASAP, and for the Axis it is all about slowing down the Allied advance enough to get a few knockout Tactic cards against them.

Battlefield:

Sword Beach has no hills or bluffs to slow the Allied advance off the beach

Troops:

Axis –
6 Infantry,
1 well-placed artillery in the center of the field,
1 badly positioned armor unit stuck in the corner behind a forest.

The Allies –  9 Infantry,  3 Armor

Allied Strategy:

1.  As with all beach scenarios, the challenge is for the Allies to get off the beach as quickly as possible.

2.  The three! objective medals in the towns against the back border represent a clear and compelling goal for the Allies. If the Allies can maximize their movement cards off the beach and blitz past the defenders for the town hexes, victory can be had rather quickly.

3.  The Axis artillery in the center of the battlefield is very dangerous and unless the Allies have an excellent set of cards, should not be attacked. The best strategy – as indicated by Alexis Beuve in the Memoir 44 Tactics & Strategy Guide is to attack on the flanks in order to avoid the devastating pounding from the centrally placed artillery.

4.  You have three Elite Infantry which are capable of moving two hexes and still attacking. This is imminently valuable for a beach assault. They all start way back in the ocean hexes, but if you take the time in the early gameplay to get them moved forward, they will help you to quickly approach and attack the enemy forces.

5.  Possible Attack Vector:  split your forces in a “V” formation, and send half to the left, and half to the right, so that you can avoid the enemy Artillery in the center sector.  It is set so far back from the beach that if you try to assault it with your Infantry, they will get decimated before they get close to it, so unless you have a Bombard or Airpower card, it is best to avoid it. 

Axis Strategy:

1. The Axis armor in the corner is hidden away and of no use. Therefore, as early as possible, the Axis needs to move the tank into the forest hex, where it will have to stop for one turn. But from there it can make its way out to the battlefield. The decision as to whether to place the armor in the center section or the right flank, will depend in part on where the Allies choose to deploy their forces. But once this armor gets out the Axis player should be able to score one or two VP’s, especially if he catches the Allied forces while they still have their back to the water, resulting in some no-retreat hits.

2. Use your artillery as much as possible, before the enemy takes it out with Barrage or Air Power, or an Infantry Assault. This will be one of the Allies’ early objectives. So use it well while you have it.

3. Should you pull your infantry from the back row where they are defending Objective Medals? Early on, if you have the opportunity, they could bolster your forces which are trying to prevent the Allies from coming off the beach. But once the full scale Allied invasion begins to form, they will be sitting ducks in the open terrain, and should be pulled back to guard a Medal Objective.

Battle Reports

(percentage of Allied victories):

46%

16
BR - Sword Beach

Author:

Days of Wonder

Link

St. Vith, Ardennes

St. Vith

Scenario_StVith_start_Axis

The Battle of St. Vith, fought in December 1944 during the Battle of the Bulge, was a critical engagement on the Western Front in World War II. Located in Belgium, St. Vith was a key road junction that the German Army sought to capture to facilitate their advance into the Ardennes.

Men — what you saw at St. Vith was grit forged in steel. Outnumbered, outgunned, and half-frozen, those boys of the 106th Infantry and 7th Armored stood toe-to-toe with the damned 5th Panzer Army and said, “You’ll move through us only over our dead bodies.”

They fought for every yard of ground, every shell hole and hedgerow, and by God, they made the Germans pay for every inch. Their stand wrecked the enemy’s timetable, blunted his spearhead, and bought the time our armies needed to gather their strength for the counterblow.

When they finally withdrew on December 23rd, it wasn’t defeat — it was a tactical victory paid in blood and courage. St. Vith was no retreat; it was a wall of American willpower that helped break Hitler’s last gamble in the west.

~~ General Howitzer

6 VP’s

Card Balance:

Allies – 4

Axis – 5

Complexity:

4

Conditions:

Countryside

Context:

Historical

Location:

Belgium

Year:

1944

Theater:

Western Front

Campaign:

Ardennes

Context:

Historical

Summary:

Objectives:

6 VP’s

Battlefield:

The St. Vith scenario has a large central battlefield surrounded by forests blocking access to each of the flanks, and a long ridge of impassible mountain hexes (the Prumerberg) across the back of the field. It makes for intense warfare of armor, infantry and artillery battling it out for dominance in the center.

Troops:

Allies – 7 Infantry, 6 Armor

Axis – 10 Infantry, 4 Armor, 1 Artillery

Allied Strategy

1. The Allies are on the defensive here, receiving only 4 cards vs. the Axis’ 5 cards. You have sandbags; use them, and don’t be too quick to move out from them.

2. The center section with the impassable mountains behind and the enemy artillery in front is kind of a kill-zone unless you are prepared for it. Your best assault tactics may be found on the flanks.

Axis Strategy

1.  Your forces are bunched together making for many no-retreat situaions. Move your Infantry into the woods as soon as possible.

2. Note that the enemy has their backs to the wall with the impassable mountains behind them.  Once your infantry are deployed in the woods, use your armor and artillery to hit any forces in the center section. Most of your hits will be enhanced by another 17% because of the no-retreat situation in which the Allied forces find themselves.

3.  Note that although the Allies have a 6-4 armor advantage, their two armor in the back center section will be slow to get into the action. If you can hit or eliminate one or more of the forward armor units before the others come into play, it will even out the battle for you.  

Battle Reports

(percentage of Allied victories):

45%

20
BR - St. Vith

Author:

Days of Wonder

Link:

Saverne Gap, Vosges

Saverne Gap

scenario_SaverneGap_start_Allies

Listen up, soldiers. The Saverne Gap is the low door through the Vosges—and the key to Strasbourg. On 21 November, XV Corps under Haislip hit the line at Phalsbourg and started prying that door open. While our infantry pressed the pass, Leclerc did exactly what I like—speed and audacity—splitting his 2e DB into two hard-driving task forces: one swinging north via La Petite-Pierre, the other knifing south through the woods by Dabo. They struck Saverne from both flanks, and a southern column punched in from the west, climbing to the Gap and rolling the defenses from behind. The enemy fought, but without depth or reserves you can’t stop a three-pronged hammer. Result: Saverne falls, the hinge breaks, and the road to Strasbourg yawns wide.

Lesson: find the gap, hit it fast, hit it twice, and exploit without blinking. Keep moving—because momentum, not caution, wins cities and ends campaigns.

~~ General Howitzer

5 VP’s

Card Balance:

Allies – 6

Axis – 4

Complexity:

4

Conditions:

Moutaneous Countryside

Location:

France

Year:

1944

Theater:

Western Front

Campaign

Codename

Summary:

Because of the impassable mountains, Saverne Gap is almost like three separate battles taking place.

Allied Strategy:

1. As Allies, there is very little opportunity to move troops from one section to another, so you need to watch your tactics carefully and be careful with your attack.

2. One possible opportunity for attack is up the center, if you have the right combination of cards, such as Infantry Assault, you goal is to quickly overwhelm the first town in your way. While they enemy controls that town they can force you back against the wall and score some extra hits with retreat flags. The wire bales in front of the town will definitely decrease your attacking power, but with two or three good center section attack cards, you will eventually be successful. From there, your forces will be able to spread out a bit for the attack against the forces defending town of Saverne.

3. Your right flank will be the most difficult one to maneuver through. With the tight quarters and the enemy protected in a town and forest hex, it will be difficult for your tanks to succeed agains them. The tanks can only fire with one dice at a time. And you only have one infantry force to attack the town and forest hexes. If you can lead with your infantry, they will be more successful by being able to throw two dice at a time for each close assault attack.

4. Watch your card play, and when you get the right combination of special Combat cards, use that as the basis for your decision of which section to pursue your victorious attack.

5.  With a number of left flank cards, you can attack the infantry in the woods and town at a distance.  Degrade and eliminate them, and then move in to attack the town of Saverne itself from the flank, surprising the enemy, just as they did historically.

Axis Strategy:

1. Note that because the mountains are impassible, you will not be able to fire your artillery at the outer sections.

2. The center section will be the most important to guard as the town of Saverne represents one VP. If you can delay the advance of the infantry up the center, you may be able to wait for the right combination of cards to assist you with the task of preventing their forward advance.

3. Keep your forces in the forests and town hexes and never leave them. Just stay safely hidden inside as you continuously attack them relentlessly degrading their attacking power.

Battle Reports

(percentage of Allied victories):

46%

20
BR - SaverneGap

Author:

Days of Wonder

Link: