The Defense of Wanssum Woods

The Defense of Wanssum Wood
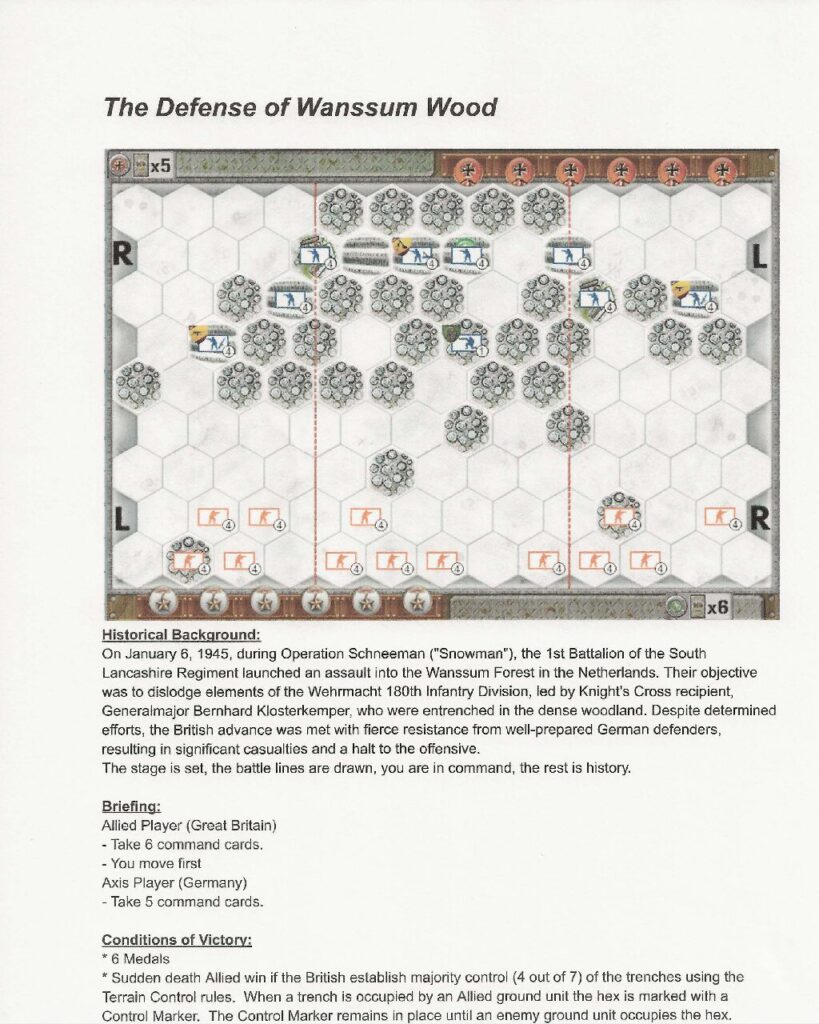
The Defense of Wanssum Woods in 1945 was part of Operation Snowman, a late World War II engagement in the Netherlands. German forces mounted a stubborn defense in the wooded area near Wanssum to delay the Allied advance.

General Howitzer has some thoughts on this battle:
Wanssum Woods was a thick, muddy brawl—Germans dug in deep, using every tree and shadow to stall us. The Brits and Canucks had to fight for every damn yard, ambush after ambush. But they didn’t quit. They rooted the enemy out, inch by inch, and kept the advance rolling into northern Germany. Forest or no forest, when you’re relentless, no defense holds.

6 VP’s

card

Card Balance:

Allies (Great Britain) – 6

Axis – 5

Complexity:

3

Conditions:

Winter Forest

Context:

Location:

Netherlands

Year:

1945

Theater:

Western

Campaign:

Codename:

Summary:

Objectives:

6 VP’s

Battlefield:

Combination of woods and winter.

Troops:

Allies – 13 Infantry

Axis – 9 Infantry


medal allies

Allied Strategy:

1.  

medal axis

Axis Strategy

1.

Battle Reports

0
BR - Wanssum Woods

Author:

Days of Wonder

Resource:

Campaign Book, Volume 2

Reichswald – The Siegried Line

Reichswald - The Siegried Line

Reichswald-TheSiegriedLine_small

February 9th, 1945. The Reichswald—five miles of hell standing between us and the Ruhr, the industrial heart of Hitler’s war machine. You want to break Germany? You punch through there.

We stacked the odds—brought in the numbers, massed near Groesbeek, and started pushing toward Kleve. The Krauts had about 11,000 defenders, and hell, some of ’em were barely fit to fight—one unit full of men with stomach problems, another made up of deaf troops. Sounds easy, right?

Wrong.

Because they were dug into the Siegfried Line—pillboxes, dragon’s teeth, minefields—you name it. They’d flooded the land to the north and south, squeezing us into a freezing, muddy kill zone. And just when you think it couldn’t get worse? The sky opens up with six days of cold, soaking rain. Floods everywhere. Roads turned to soup. Trucks bogged down. Men freezing.

But don’t forget this: they still had paratroopers in reserve. Hardened, mean, disciplined bastards with nothing to lose.

That was the hand we were dealt. The map was a mess, the weather was hell, and the Germans were desperate—but we were coming anyway.

You are in command now. The question ain’t whether it’s hard—the question is: do you have the guts to drive through it and break their damn line?**

Because history doesn’t wait. You either make it—or get buried under it.

~~ General Howitzer

6 VP’s

Card Balance:

Allies – 5

Axis – 5

Complexity:

4

Conditions:

Countryside

Context:

Historical

Location:

Netherlands

Year:

1945

Theater:

Western

Campaign:

Codename:

Summary:

Objectives:

6 VP’s, plus two city temporary Objective Medals

Battlefield:

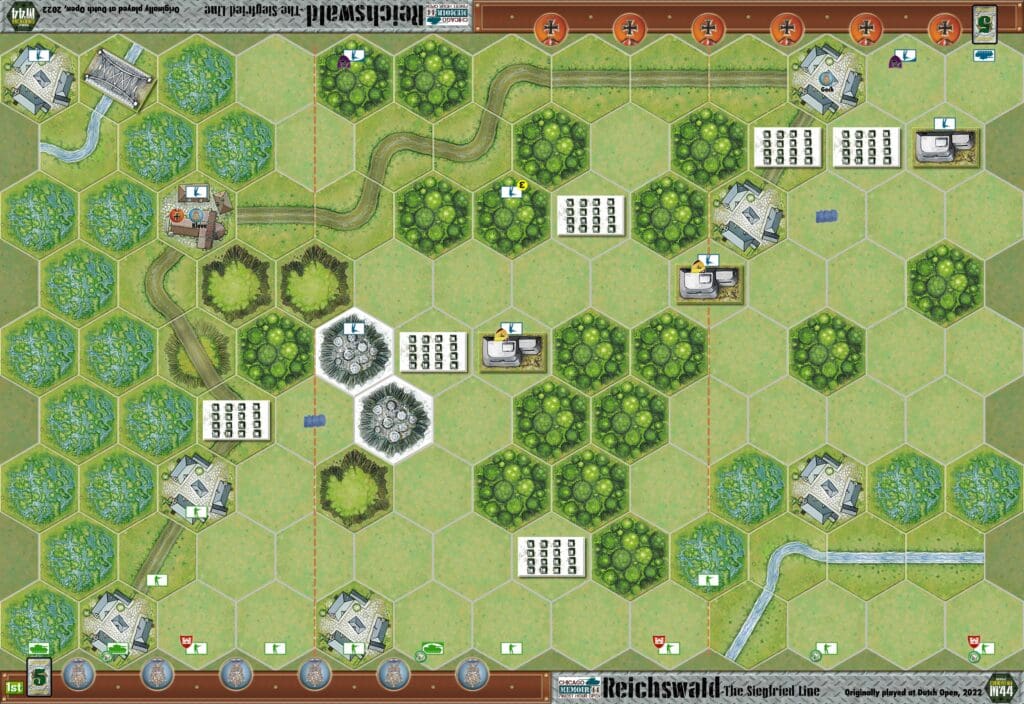
Countrsyide with marsh on one side, a road running through much of it, and numerous ‘dragon’s teeth’ roadblocks which can only be removed by use of the Allied Dozer tanks. 

Troops:

Allies – 10 Infantry, 3 Armor

Axis – 9 Infantry, 1 Armor


Allied Strategy:

1. 

Axis Strategy

1. 

Battle Reports

0
BR - Reichswald

Author:

Originally played in the Dutch Open, 2022; and in The Finest Hour Open, Chicago 2025.

Link:

Medeera Pocket

Medeera Pocket

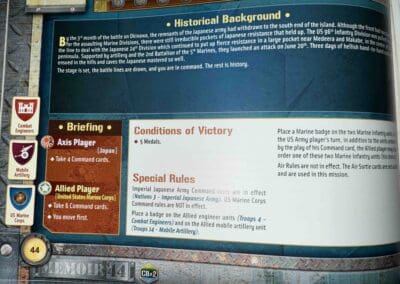
The Battle of the Medeera Pocket in June 1945 was a late-stage engagement during the Marianas and Palau Islands campaign of World War II.

Located on northern Peleliu, the Medeera Pocket was one of the last strongholds of Japanese resistance. U.S. Marines and Army forces faced fierce, dug-in Japanese defenders who refused to surrender, fighting from caves and fortified positions. The battle involved intense close-quarters combat, flamethrowers, explosives, and coordinated assaults to clear the terrain.

Despite being outnumbered and cut off, Japanese troops fought to the death, inflicting significant U.S. casualties before being wiped out.

The elimination of the Medeera Pocket marked the final clearing of organized resistance on Peleliu, securing the island for Allied operations and reinforcing the brutal nature of Pacific island warfare.

General Howitzer summarizes:

The Medeera Pocket was one hell of a last stand—the Japanese  were holed up in caves, dug in deep, and determined to die where they stood.  They fought like fanatics, even when they were cut off and outgunned, but our Army and Marines finished the job. Clearing that pocket sealed Peleliu for good and reminded everyone that in the Pacific, every inch costs blood.

5 VP’s

card

Card Balance:

Allies – 6

Axis – 4

Complexity:

3

Conditions:

Jungle

Context:

Historical

Location:

Palau Islands

Year:

1945

Theater:

Pacific

Campaign:

Codename:

Operation Iceberg

Summary:

Objectives:

5 VP’s 

Battlefield:

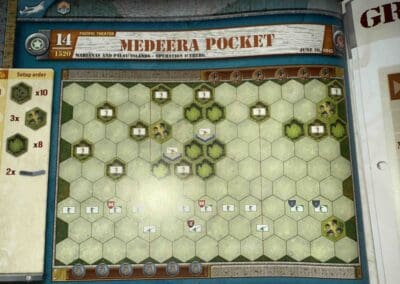
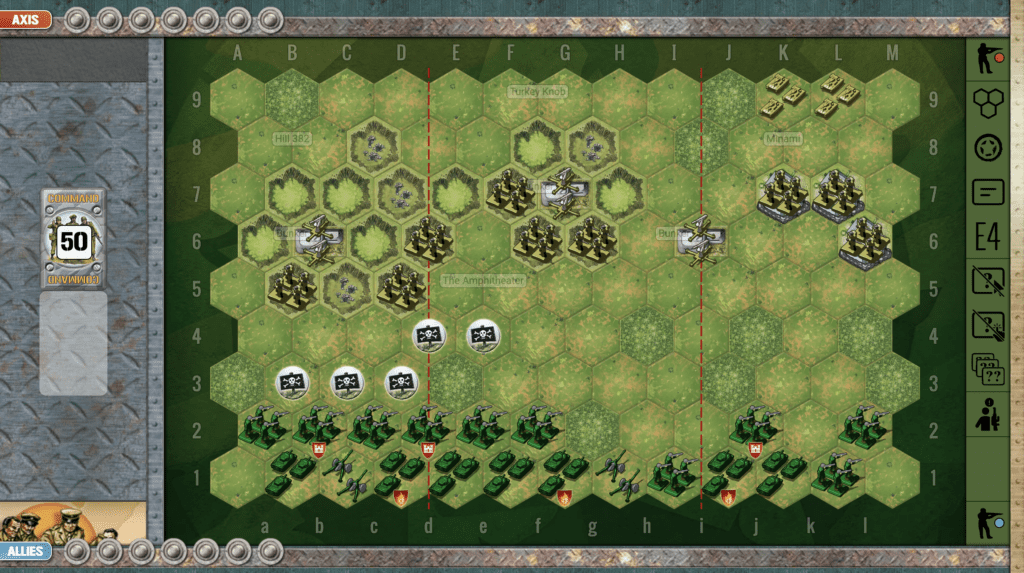
Jungle terrain , hills with caves and some small villages.

Troops:

Allies – 8 Army Infantry, 2 Marine Infantry, 3 Artillery including a Mobile Artillery

Axis – 10 Infantry


medal allies

Allied Strategy:

1.  The center section is the key to victory.  You have a Mobile Artillery, plus two other Artillery units which can all focus their firepower upon the center.  

2.  You have two Engineer units which can overcome the terrain disadvantages of caves on hills.  Use them to clear out the entrenched enemy.

3.  You have two Marine units which can be commanded every single turn, so they can conduct their own operation on your right flank, if they are supported by the Artillery unit on that side. 

medal axis

Axis Strategy

1.  Remember the three special abilities of your Japanese forces (Seishin Kyoiku Doctrine, Yamato Dashi Concept, and the Banzai War Cry).  You will need these to stand up against the enemy.

2.  There are many Caves on Hills which give you both a defensive and mobile advantage.  Infantry units can quickly move from one Cave on a Hill to another one, so that you can rapidly replenish your forces when they are destroyed.  

3.  You have two Artillery units well-protected in the center of the battlefield.  Use them at every opportunity to push back the attacking Infantry, and when it comes into range, to also destroy the Mobile Artillery.

Battle Reports

1
BR - Medeera Pocket

Author:

Days of Wonder

Resource:

Campaign Book, Volume 2

Iwo Jima – The Meat Grinder

The Meat Grinder (Iwo Jima)

The “Meat Grinder” was a term used by U.S. Marines to describe a particularly brutal section of the Battle of Iwo Jima, fought from February to March 1945.  Japanese forces had heavily fortified positions with bunkers, tunnels, and artillery, making them incredibly difficult for the Marines to capture.

Fighting in the Meat Grinder was intense and grueling, with Marines facing fierce resistance and suffering high casualties as they advanced yard by yard. The Japanese defenders used every advantage, including concealed machine gun nests and artillery, to inflict maximum damage on U.S. forces.

After days of relentless combat and heavy losses, the U.S. Marines eventually overcame the Japanese defenses in the Meat Grinder. The capture of this area was crucial to securing Iwo Jima, allowing U.S. forces to move further across the island and ultimately achieve victory.

 7 VP’s

Card Balance:

Allies – 5

Axis – 5

Complexity:

3

Conditions:

Jungle


Context:

Historical

Location:

Iwo Jima


Year:

1945


Theater:

Pacific


Summary:

Objectives

7 VP’s

Battlefield:

Island jungles and hills with caves, allowing for quick movement by Japanese

Troops:
Allies – 10 Infantry, 7 Armor, 2 Artillery 

Axis –  9 Infantry, 2 Armor, 3 Artillery

Allied Strategy:

1. Because the Engineers can avoid terrain restrictions during close assault, you need to quickly get them up to the sandbagged hills where the enemy are lodged, and dislodge them!

2.  Use your artillery to soften up the enemy before the assault.

3.  You need 7 VP’s to win, so you are going to have to address the artillery and deal with it.

4.  Your forces on the right and center sections are really bunched together. You need to get some early movement for your infantry, or they will be subjected to some no-retreat hits.

Axis Strategy:

1.  You are outnumbered in the center and right sections. Your left flank has more units than the enemy. If you can get your armor into position to defend the open terrain, it will make it difficult for the enemy to move approach.

2.  You outnumer the enemy with artillery, 3-2, so use it to soften up the enemy as they approach.

3. Make good use of your full-powered units through the Seishin Kyoiko Doctrine (SKD), to advance on the enemy and roll the extra dice to quickly knock them senseless.

Classic Battle Reports:

(percentage of Allied victories)

30%

15
BR - Iwo Jima

Author:

Link:

Sugar Loaf and Half Moon

Sugar Loaf and Half Moon

The Battle of Sugar Loaf and Half Moon took place during the Battle of Okinawa in May 1945, one of the final and bloodiest battles of World War II. Sugar Loaf Hill and Half Moon Hill were heavily fortified Japanese positions that U.S. Marines needed to capture to advance on the island.

The Marines faced fierce resistance, as Japanese forces had entrenched themselves in well-concealed bunkers and tunnels. Fighting was brutal, with the Marines enduring relentless artillery, machine-gun fire, and counterattacks. After days of intense combat, heavy casualties, and repeated assaults, the Marines eventually secured both hills.

The capture of Sugar Loaf and Half Moon was crucial to the Allied effort in Okinawa, allowing further progress toward the island’s southern defenses. The intense fighting and high casualties highlighted the challenges of the Pacific Campaign and foreshadowed the potential cost of an invasion of mainland Japan.

6 VP’s

Card Balance:

USA – 6

Japanese – 4

Complexity:

2

Conditions:

Jungle


Location:

Pacific

Year:

1945

Theater:

Pacific

Campaign:

Battle of Okinawa

Codename:

Summary:

Objectives:

6 VP’s
(Special Rule: Note that if the Marines clear out an entire section of Japanese forces, it counts as a temporary VP.)

Battlefield:

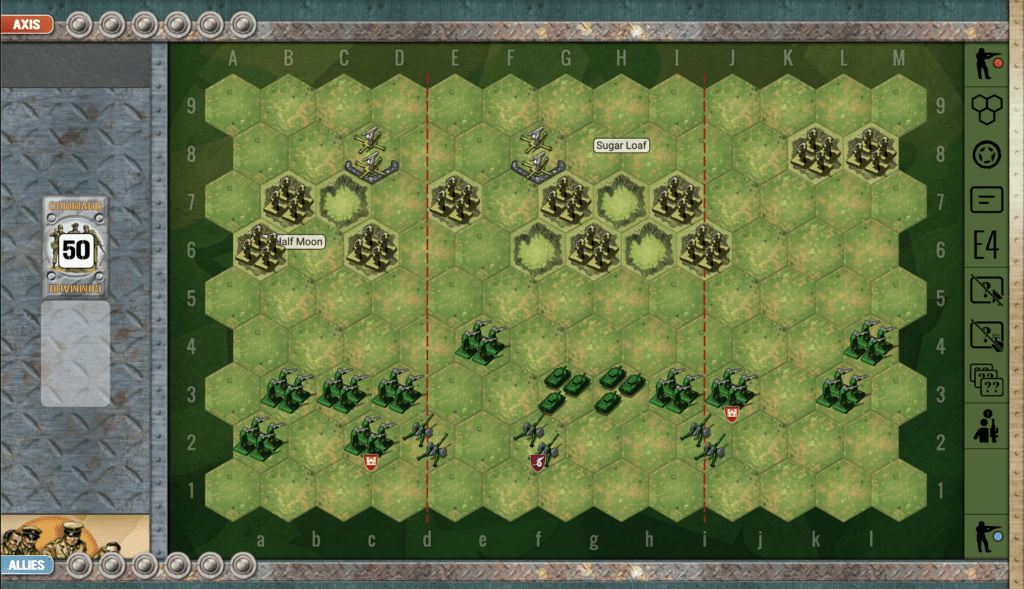
This scenario begins with both forces arrayed across the battlefield and ready to engage in immediate warfare. It is a countryside with hills and caves spread across all three sections. The caves allow for rapid movement of Japanese troops.

Troops:

Allies – 10 Infantry, 2 Armor, 2 Artillery

(Infantry practices the Gung-Ho! rule.)

Axis – 10 Infantry, 2 Artillery

(Japanese Infantry practices the Seishin Kyoiku Doctrine (SKD), and the Yamato Damashi Concept, and the Banzai War Cry.)

Allied Strategy:

1. The enemy is weak on your right flank. They have no artillery protection on half the flank. With your artillery, you have a slight numeric advantage. If you can work up the cards, you could launch an attack on tht side, and gain half the VP’s you need. Once you overwhelm that section, your remaining forces can combine with your center section troops to finish off the job and gain your final three VP’s.

2.  Use your Artillery to hit every full force Infantry unit at least once in order to cancel out the SKD advantage they have.

3.  Note that one of your artillery is mobile, so you can move in and fire. But do not move in too close prematurely, or the Japanese forces will overwhelm you with their SKD power.

4.  Strategic consideration based on this special rule:
“When all the Japanese units in a section of the battlefield (right, center or left) are eliminated, the Marines gain one Victory Medal.”  This means that if you can concentrate all of your attacks in one section, you will gain not only the medals for eliminating units, but also one extra Victory Medal for clearing out the section. 

Axis Strategy:

1.  Use the Banzai War Cry combined with the Seishin Kyoiku Doctrine to quickly advance your full-power Infantry units to attack any enemy who are within striking range. With the additional dice roll that SKD provides, you can quickly weaken the enemy.

2. Remember to use the tunnel system to quickly move infantry from hill to hill to get your forces into the action.

3. Use your artillery at every opportunity on any enemy forces that approach.

Battle Reports

(classic percentage of Allied victories):

68%

15
BR - SugarLoaf

Author:

Days of Wonder

Link:

Strasbourg

Strasbourg

On January 7, 1945, the German Nineteenth Army launched an attack south of Strasbourg against the First French Army in an operation code-named Sonnenwende (“Winter Solstice”). This offensive was part of a broader German effort to counter the Allies’ advance in Alsace and maintain control over key territory in eastern France.

The attack aimed to push back the French forces and threaten Strasbourg, a strategically vital city for the Allies. Despite initial German gains, the French First Army, with support from American forces, mounted a resilient defense. Allied artillery and air support helped to stall the German assault, ultimately preventing the Nineteenth Army from achieving its objectives.

The failure of Sonnenwende weakened German forces in the region and contributed to the broader collapse of German defenses in Alsace, allowing the Allies to solidify their hold on Strasbourg and continue their push toward Germany. 

General Howitzer’s summary:  

Sonnenwende was a damn flop for the Germans—it drained their strength, cracked their lines in Alsace, and handed us the keys to Strasbourg. From there, it was full steam ahead, straight into the heart of Germany.


5 VP’s

Card Balance:

Allies – 6

Axis – 4

Complexity:

4

Conditions:

Winter

Location:

France

Year:

1945

Theater:

Western Front

Campaign

Codename:

Sonnenwende (“Winter Solstice”)

Summary:

Objectives:

5 VP’s, and two Medal Objectives for Axis

Battlefield:

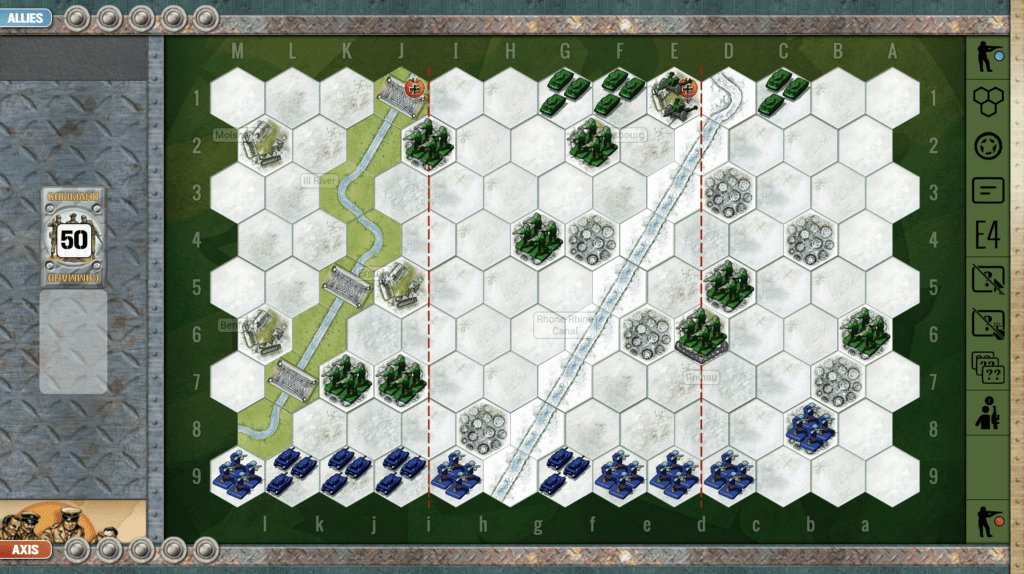
Strasbourg is a winter scenario with a frozen river cutting diagonally across the battlefield. It is passable. There is also an impassable river with three bridges crossing it. Each set of troops are squeezed against opposite corners causing an exciting asymmetrical warfare experience.

Troops:

Allies – 8 Infantry, 3 Armor, 1 Artillery

Axis – 6 Infantry, 4 Armor

Allied Strategy:

1. You need to defend the medals in the town and bridge hexes because the Axis are going to come at you with everything they’ve got.  They have you outnumbered by armor and there is a lot of open territory, so you will need to get your forces into defensive positions.  

2.  Your infantry in the forward right flank are in a position to attack the enemy forces backed up against the border so hit them while you can. 

Axis Strategy:

1.  Big picture strategy for you is to push your forces down the cener section and to pursue the two medal objectives in the town and bridge hex. 

2.  Because your forces are pushed up against the back wall, you need to get them mobile as soon as possible. 

16
BR - Strasbourg

Author:

Days of Wonder

URL