Slopes of Mount Austen (Gaudalcanal)

Slopes of Mount Austen
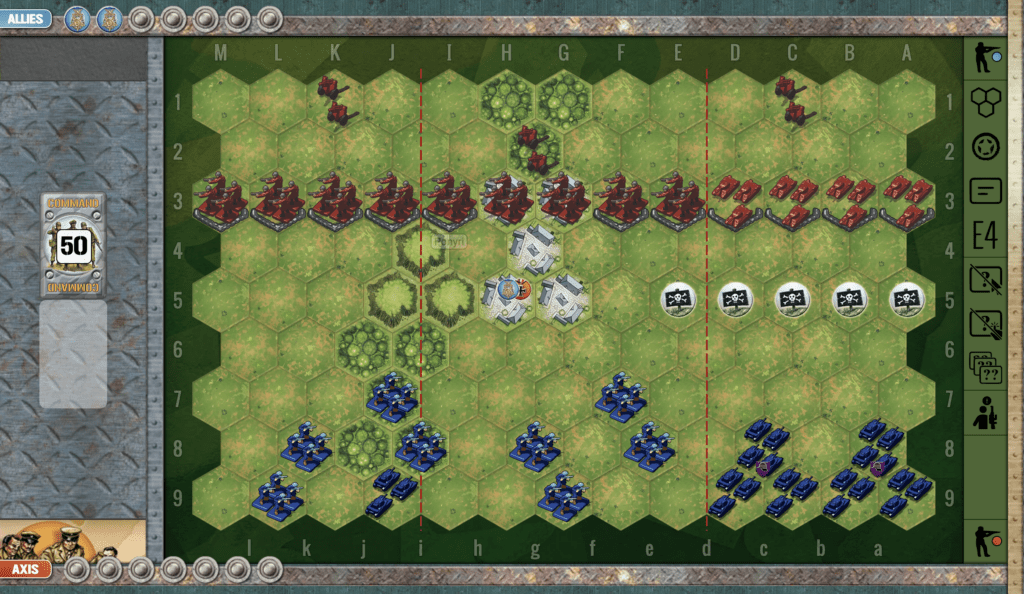
scenario_SlopesMtAusten_start_Allies

The Battle of the Slopes of Mount Austen (December 1942–January 1943) was a critical engagement during the Guadalcanal Campaign in the Pacific Theater of World War II. Mount Austen, a strategic high point on Guadalcanal, was vital for controlling the surrounding terrain and protecting Henderson Field, a key Allied airbase.

The battle involved intense fighting between U.S. forces, primarily the Americal Division, and entrenched Japanese defenders, including the elite Ichiki and Kawaguchi Detachments. The Japanese had fortified positions on the rugged slopes, including a stronghold known as the Gifu.

The fight for Mount Austen was no Sunday stroll—it was a slugfest in choking jungle against an enemy dug in like ticks and mean as hell. The Japs were camouflaged, stubborn, and ready to die where they stood. But our boys hammered them with infantry, blasted them with artillery, and pounded them from the air until every inch was ours. By mid-January ’43, we owned that mountain and the ground around it—breaking their grip on Guadalcanal and shoving the whole damned campaign toward victory.

~~ General Howitzer

5 VP’s

card

Card Balance:

Allies – 6

Axis – 5

Complexity:

2

Conditions:

Jungle

Location:

Gaudalcanal

Year:

1943

Theater:

Pacific Theater

Campaign:

Guadalcanal Campaign

Codename

Summary:

Objectives:

5 VP’s

Battlefield:

The battlefield is pretty wide open, except for three hilly hexes spread across all three sections.

Troops:

Allies – 10 Infantry, 2 Armor, 3 Artillery

Axis – 9 Infantry, 1 Artillery 

Allied Strategy:

1.  The right flank has no artillery defending, so it presents a possible path for attack for the Allies.

2. The Allies have three artillery. This is a powerful assist to the Marines. Use the artillery to soften the Japanese forces. The goal is to knock out at least one figure per hex, in order to elminate the Seishin Kyoiku advantage.

3. Get your armor into fire positions as soon as you can. The open pathway between the jungle hexes will provide you with the quickest access to the enemy.


Axis Strategy:

1.  Make use of your artillery on the right flank. There are a couple of Allied units with no retreat, which you can hit with 2D attacks.

2.  You have a couple of infantry units that are well behind the field of play.  Bring them forward so that they can have some fun too!

Classic Battlefield Reports

(percentage of Allied victories):

63%

19
BR - Mount Austen

Author:

Days of Wonder

Link:

Ponyri (Kursk)

Ponyri (Kursk)

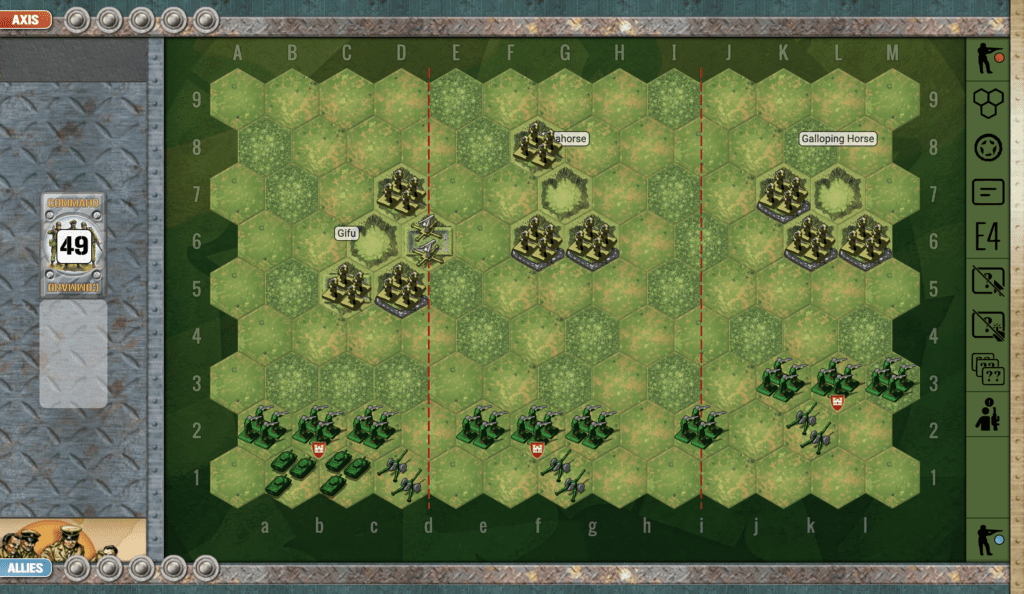
scenario_Ponyri_start

The Battle of Ponyri took place in Ponyri, a small town in the Kursk Oblast of Russia, during World War II. It occurred in July 1943 as part of the larger Battle of Kursk, one of the biggest tank battles in history.

General Howitzer summarizes:

Ponyri was a slugfest in the mud and blood of Kursk—like a Stalingrad on a smaller scale. The Germans threw their Panzers and infantry at that rail junction with everything they had, trying to break through to Kursk, and the Soviets met them with steel, fire, and sheer grit. House to house, trench to trench, they held the line. The enemy never got past it—and Ponyri became the anvil that broke the German spear.

7 VP’s

Card Balance:

Russian – 4

Axis – 6

Complexity:

3

Conditions:

Countryside

Location:

Russia

Year:

1943

Theater:

Eastern Front

Campaign:

Battle of Kursk

Codename:

part of Operation Citadel

Summary:

Objectives:  7 VP’s.

The key to winning Ponyri is controlling the town. It is worth two VP’s. Whichever side controls the town will cause the opponent to waste a lot of troops trying to gain control.

Terrain:

Countryside with forest and hills on one side, mines on the other, and the five-hex town of Ponyri in the center.

Troops:

Allies – 9 Infantry, 4 Armor, 3 Artillery

Axis – 8 Infantry, 7 Armor

medal allies

Allied Strategy:

1. The town of Ponyri is worth two VP’s. You begin with control of it, but since it has 5 hexes, you should take control of the central hex of Ponyri so that you have majority control. This will force the enemy to waste a lot of forces throwing themself against this well-defended town.

2. The Allied role in this scenario is primarily defensive. Use your sandbags and be slow to leave them. But if the enemy begins pummeling your armor on the left flank, you may need to consider a more aggresive approach, if your cards allow it.

3. You have three artillery. Take the time to move them forward one row early in the battle while you still have time, so that they can improve their hit rate against the enemy.

medal axis

Axis Strategy:

1.  Because the town of Ponyri is worth two VP’s! , you should attempt to get your infantry into it pretty quickly, before the enemy occupies all town hexes.  But only take it, if you can keep them there, as they will be surrounded by the enemy on all sides.

2. On your left flank, use the forest and hills to advance your infantry under cover. If you try to make a direct assault in the open countryside, they will get decimated.

3. On your right flank, you have an armor superiority, so you can place yourself behind the mines and continuously degrade the enemy’s strength. But be aware of the artillery on the right. If the Allies move it one row forward, your armor directly behind the row of mines will be subject to 2D rolls against your forces.

4.  When the enemy is sufficiently degraded, you may consider breaching the mines. (Expect some hits, but if you use your elite forces that begin with 4 armor figures, you should have a sufficient survival rate to continue the attack.) If you find the opening, you can push through for direct assaults against the enemy armor. 

Battle Reports:

( percentage of Allied Victories):

54%

24
BR - Ponyri

Author:

Days of Wonder

Link:

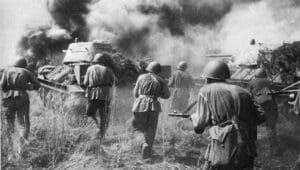
Soviet_troops_and_T-34_tanks_counterattacking_Kursk_Voronezh_Front_July_1943

Battle of Kursk
(Copyright: www.mil.ru)

Mignano Monte Lungo

Mignano Monte Lungo

Listen up, men—

The Battle of Mignano Monte Lungo was a damn fine example of grit and redemption. After switching sides, the Italian troops had something to prove—and by God, they did it. That mountain was no cakewalk. The Germans were dug in deep, with every ridge covered by fire, and the terrain was as unforgiving as a mule kick to the gut.

But those Italians, with the Yanks watching, clawed their way up that blasted rock from December 8 to the 16th, 1943. Took casualties. Took hell. But they took the mountain too. That wasn’t just a hill—it was a message: Italy was back in the fight, and they were fighting on the right side this time.

Monte Lungo wasn’t just a tactical win. It was a morale sledgehammer. And it cracked open the road to Cassino. That’s how you turn the tide—with steel in your spine and fire in your gut.

~~ General Howitzer

6 VP’s

Card Balance:

Allies – 6

Axis – 5

Complexity:

3

Conditions:

Countryside

Context:

Historical

Location:
Italy

Year:

1943

Theater:

Western

Campaign:

The Italian Campaign

Codename

Summary:

The Axis forces begin this scenario in control of the hexes across two-thirds of the battlefield, protecting two VP town hexes. The challenge for the Allies is to cross the open plain with out being decimated before they can control the hills and get to the VP’s.

Objectives:

6 VP’s, plus Monte Lungo and Monte Rotondo are temporary Medal Objectivese for the Allies.

Battlefield:

Troops:

Allies – 

Axis – 

Allied Strategy

1.  Big Picture Strategy:  the Axis forces have an Artillery guarding the left flank, and it’s objective medal. But there is an objective medal on the right flank.  Head all of your forces in that direction.

2.  If you can move your Artillery forward one row, you will be able to hit more of the enemy with 2D attacks.


Axis Strategy

1.  Big Picture Strategy: Guard the Objective Medal on your left flank.  If they enemy gets the right cards, they can very quickly come upon your forces and overwhelm them.

Battle Reports:

(percentage of Allied victories)

14
BR - Mignano

Author:

Days of Wonder

ID:

Link: