Closing the Gap

Closing the Gap

Memoir 44 scenario Closing the Gap

The Battle of Closing the Gap near Falaise from August 19–22, 1944, marked the final phase of the Falaise Pocket, where British, Canadian, Polish, and American forces worked to encircle and destroy retreating German units in Normandy.

Fighting was intense as the Allies tightened the noose, with the Polish 1st Armored Division holding key high ground at Mont Ormel against desperate German breakout attempts. Despite some Germans escaping, the Allies captured or killed tens of thousands, crushing what remained of German Army Group B in the West.

Closing that pocket slammed the door on the German army in Normandy—choked ’em off, chewed ’em up, and cleared the road straight to Paris. From there, it was full speed ahead into the heart of France.

~~ General Howitzer

6 VP’s

card

Card Balance:

Allies – 5

Axis – 5

Complexity:

3

Conditions:

Countryside

countryside

Context:

Historical

Location:

France

Year:

1944

Theater:

Western

Campaign:

The Battle of Normandy

Codename:

Operation Tractable

Summary:

Objectives:

6 VP’s, plus Territorial Objective Medals for Allies, and Exit Objectives for Axis
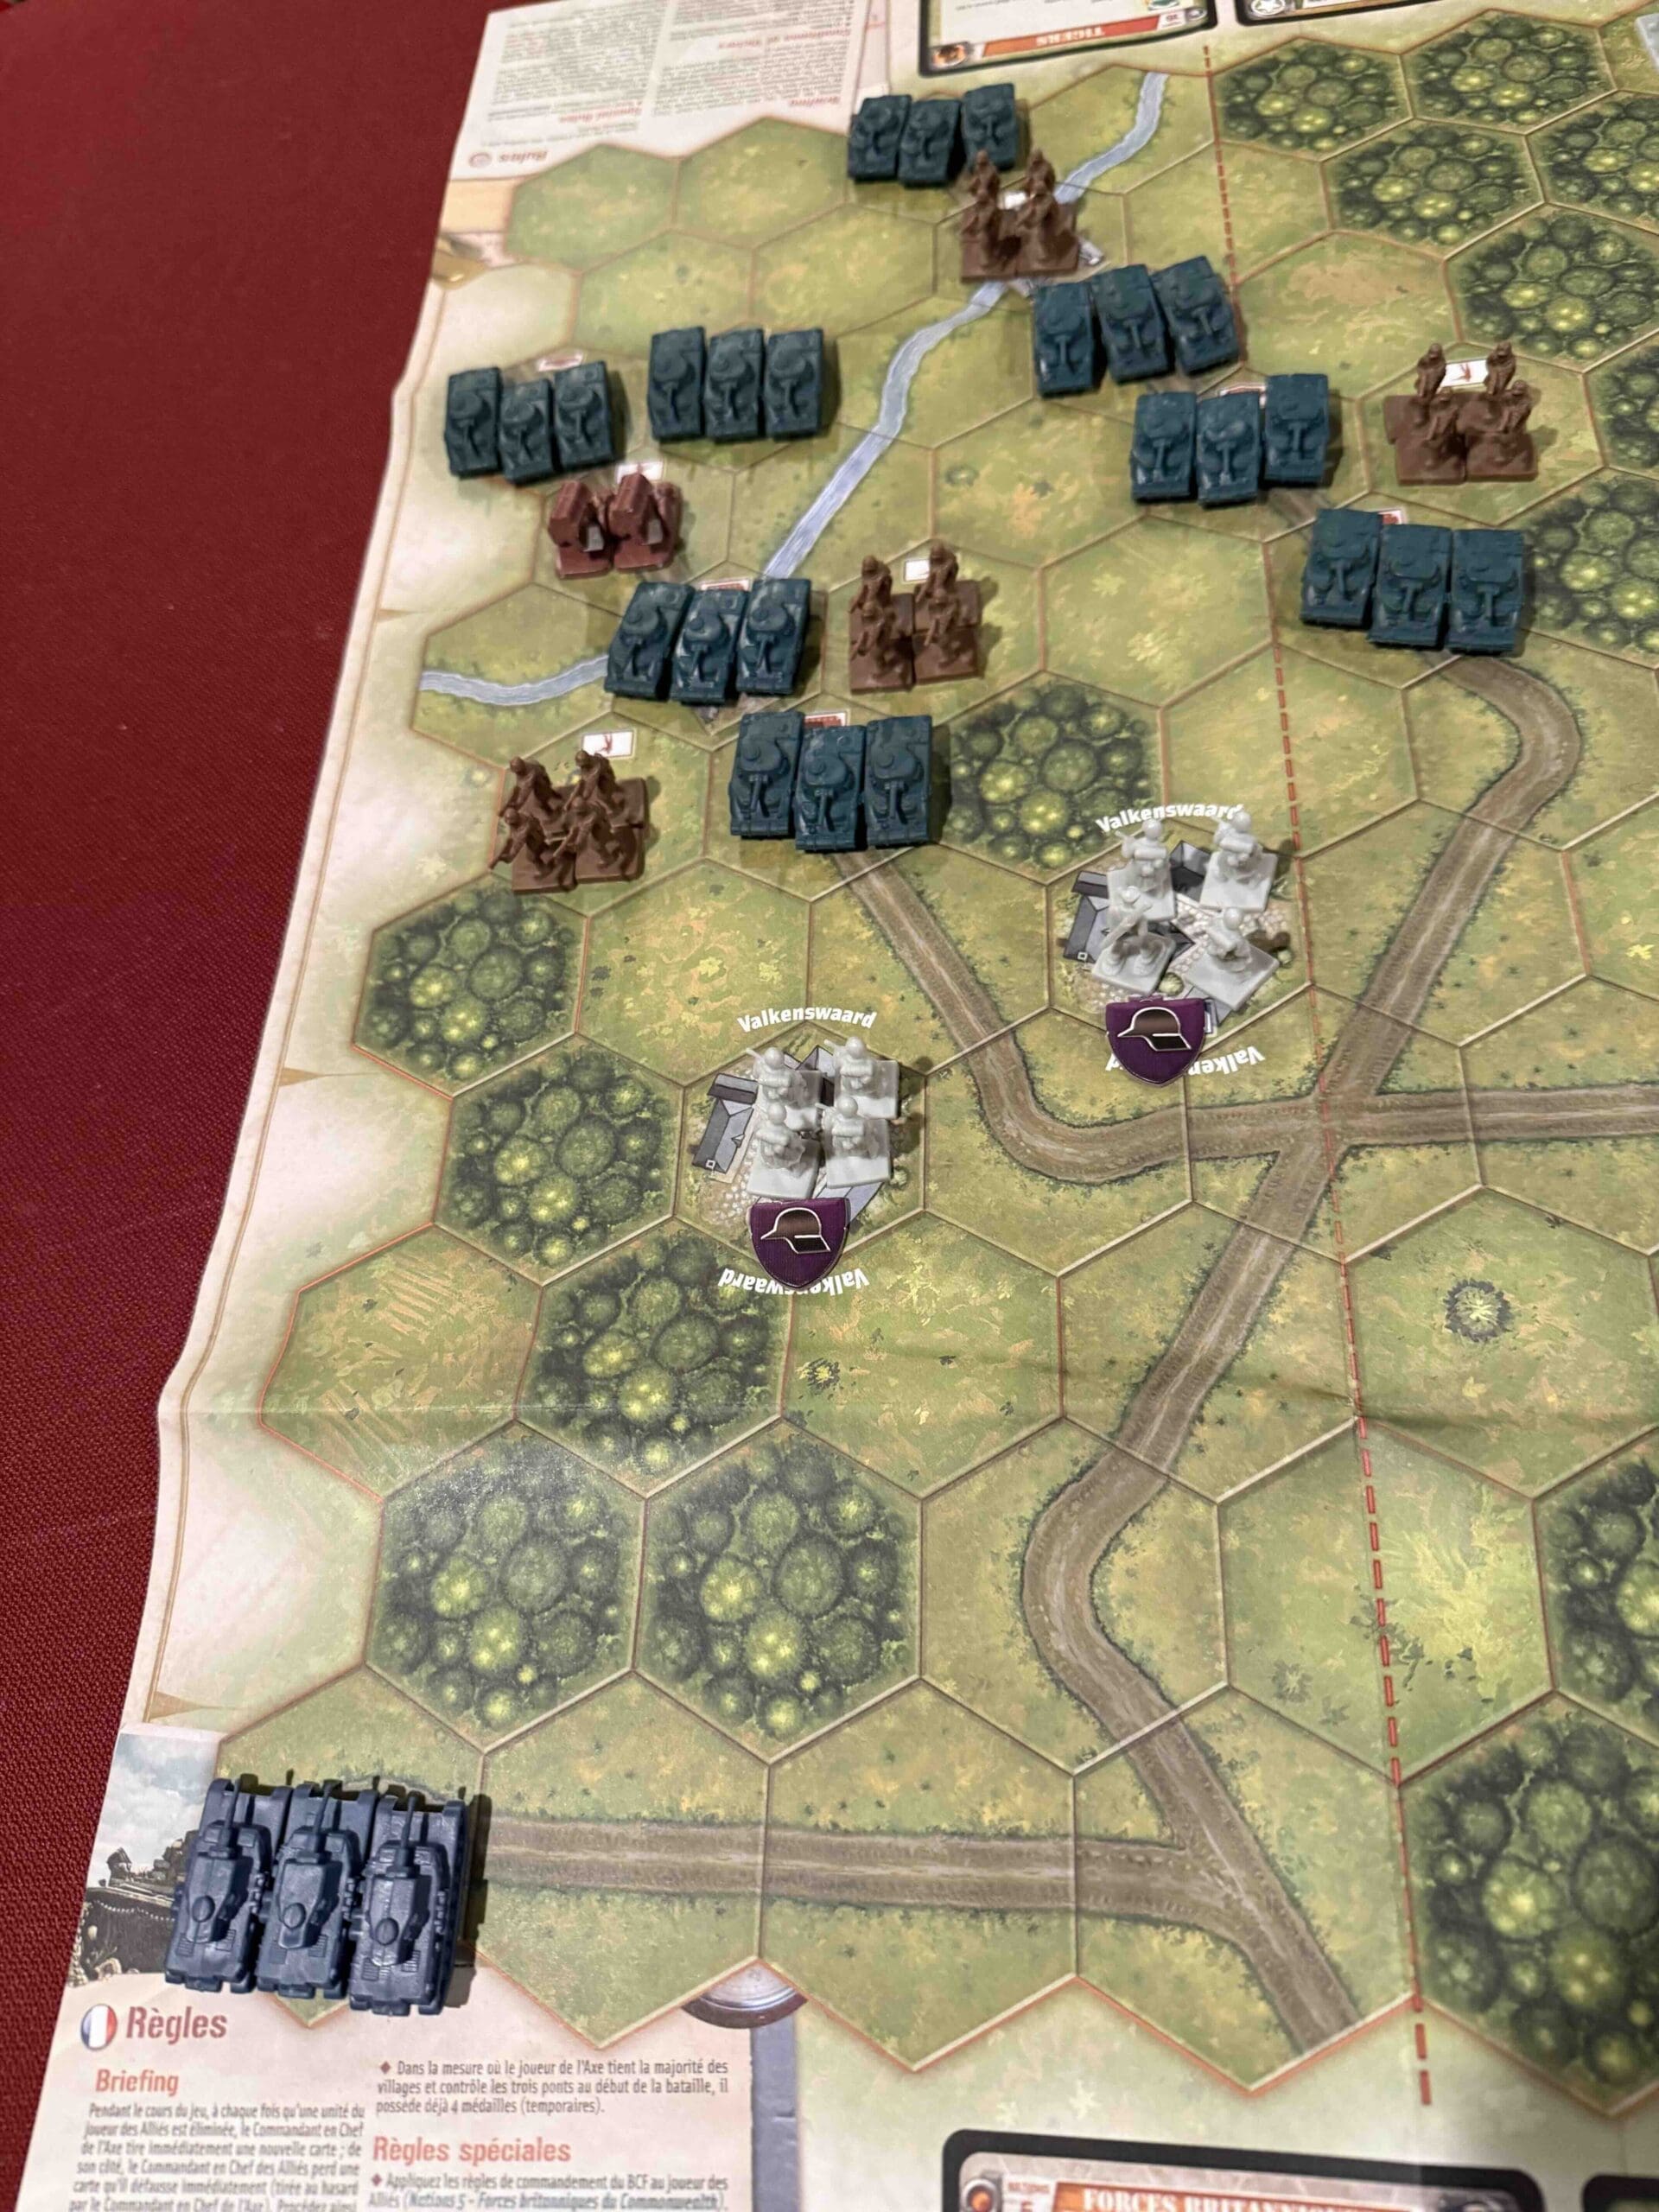
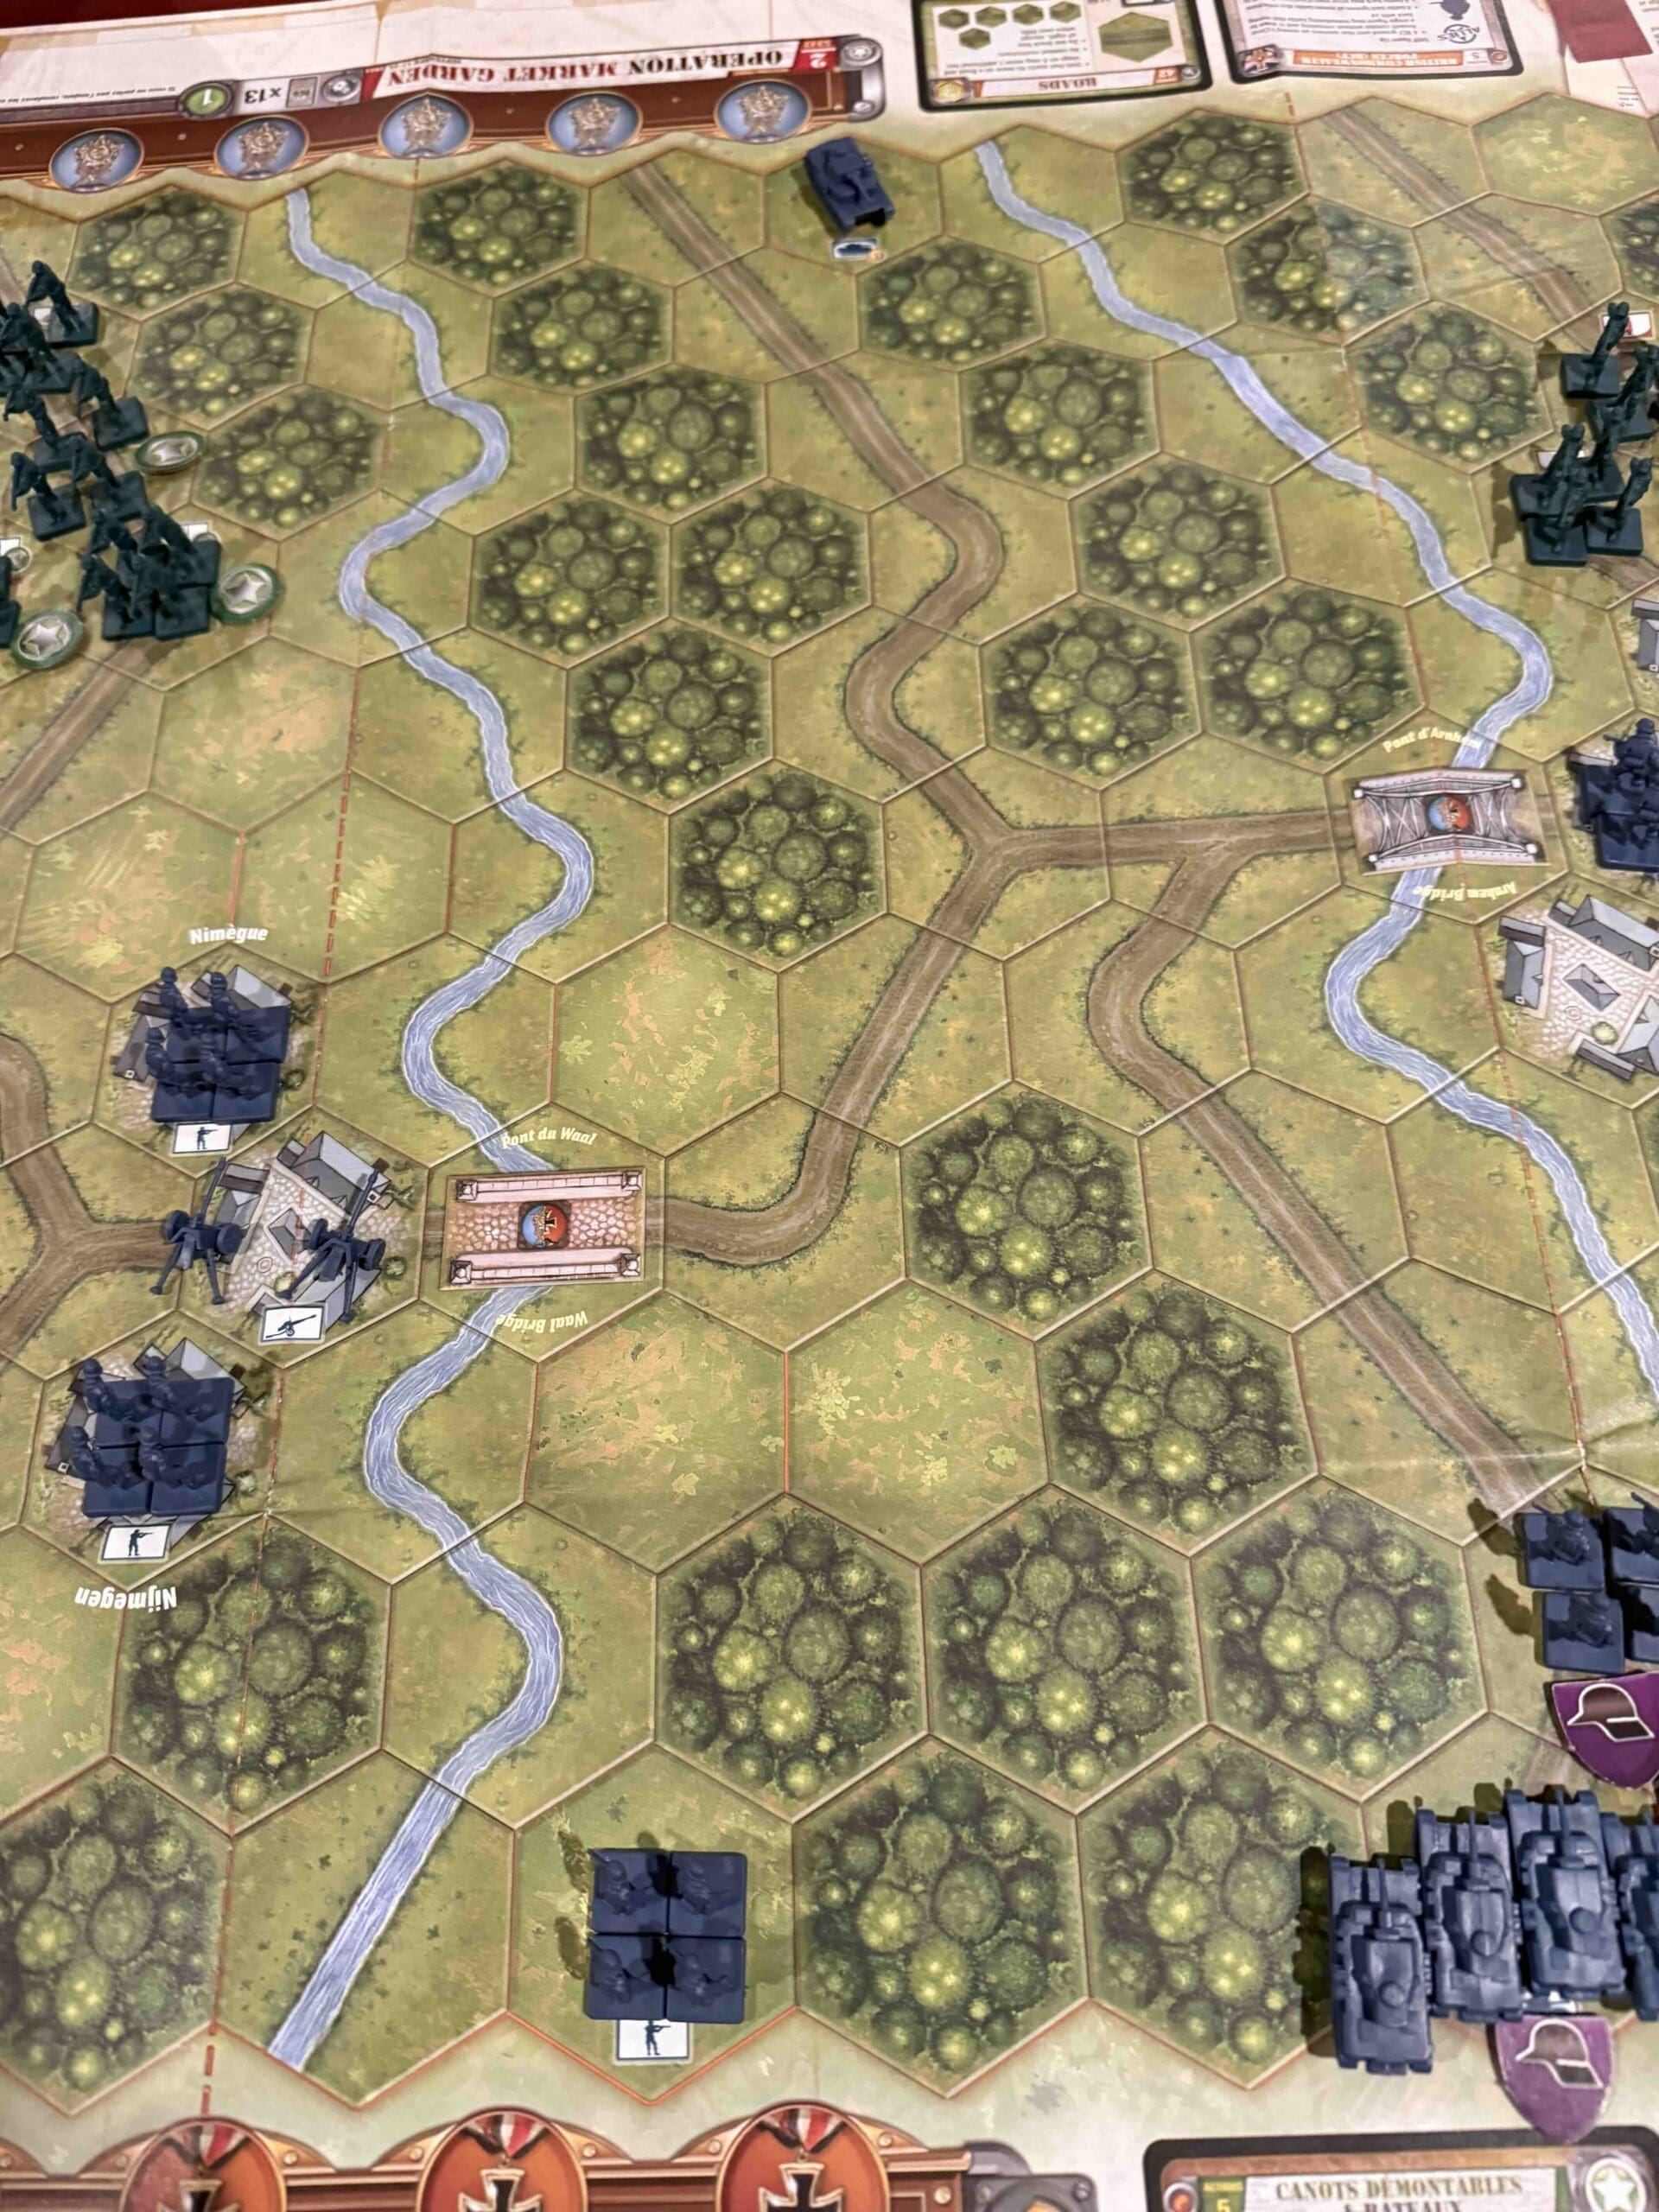
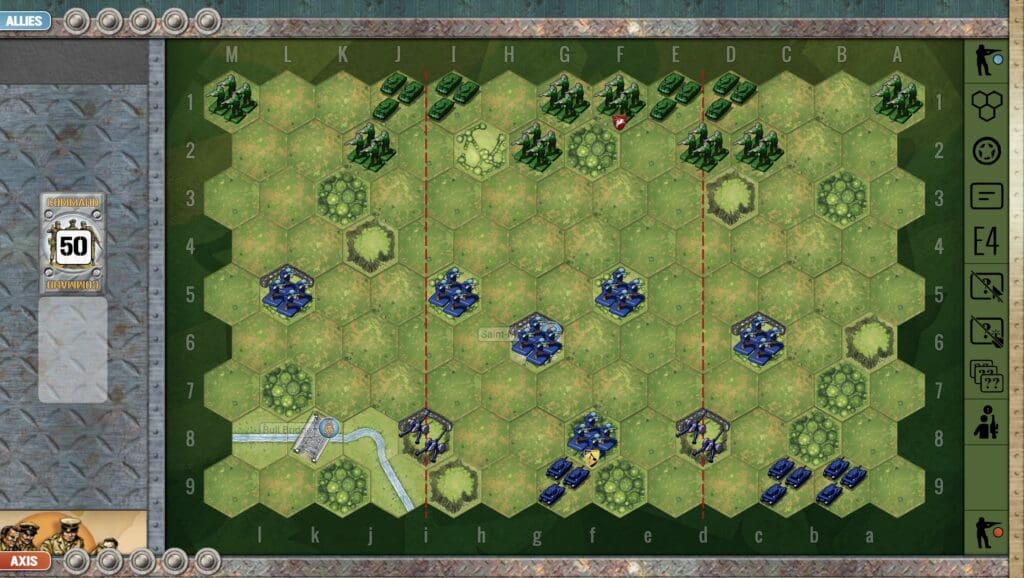
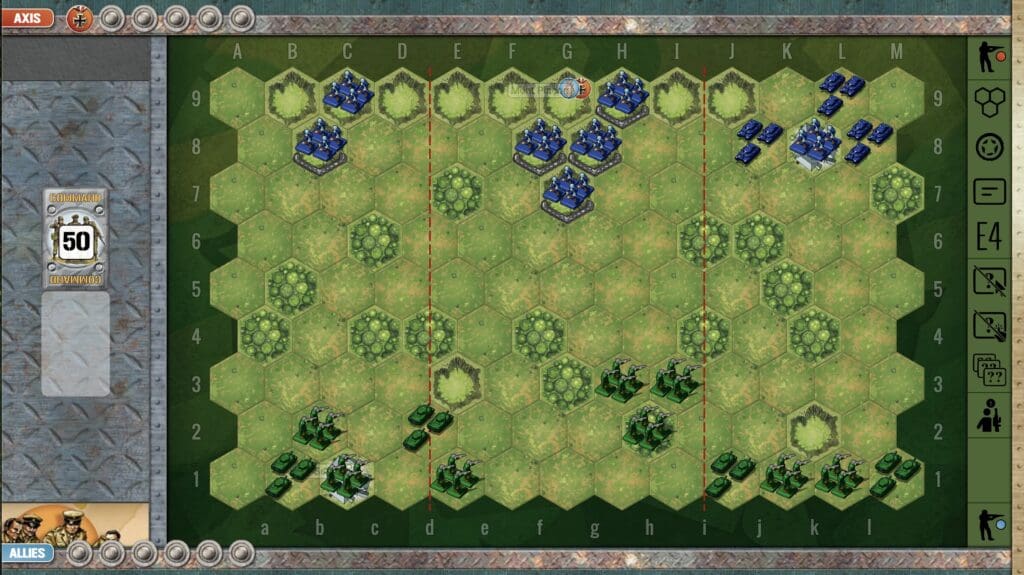
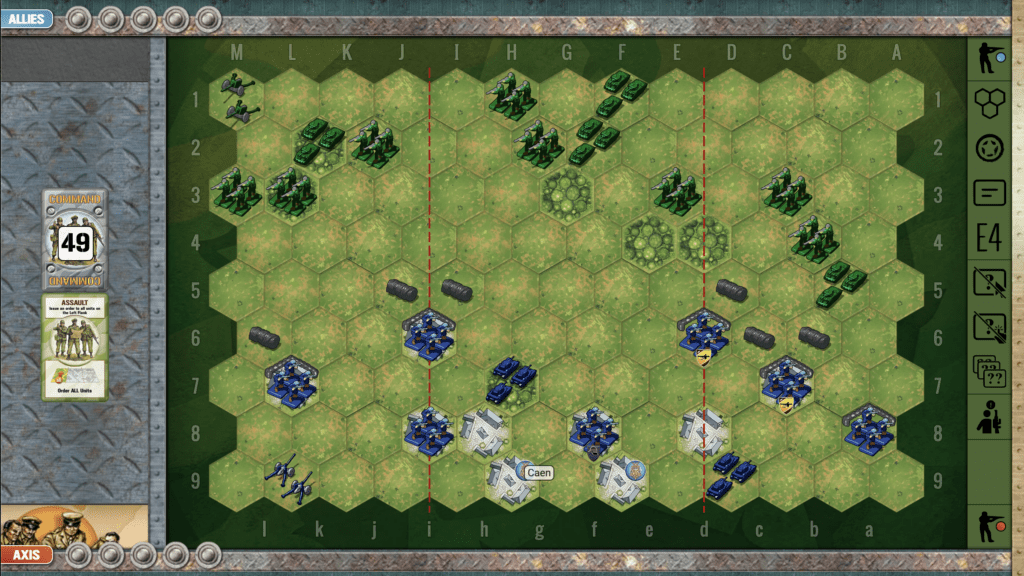
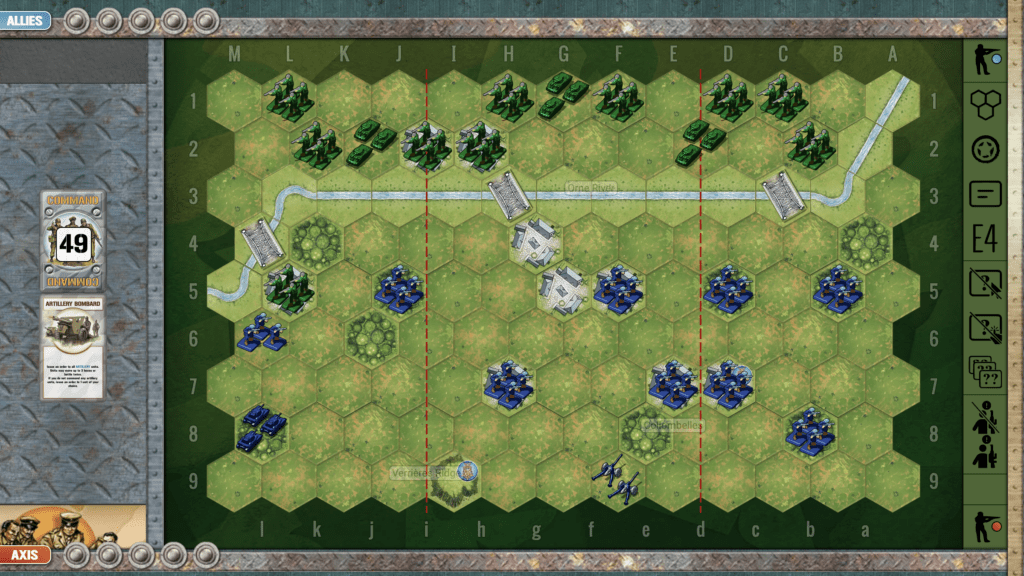
Battlefield:

Countryside with a road and the Dives River cutting off the Axis forces from their objective.

Troops:

Allies – 8 Infantry, 3 Armor

Axis  – 10 Infantry, 2 Armor

 Special Rules:

Rescue attempt aspect: Each side may order up to 2 armor units into battle as Armor Breakthroughs. Axis armor units that are sent in to rescue cannot escape through any of the Exit hexes.

Overall Strategy

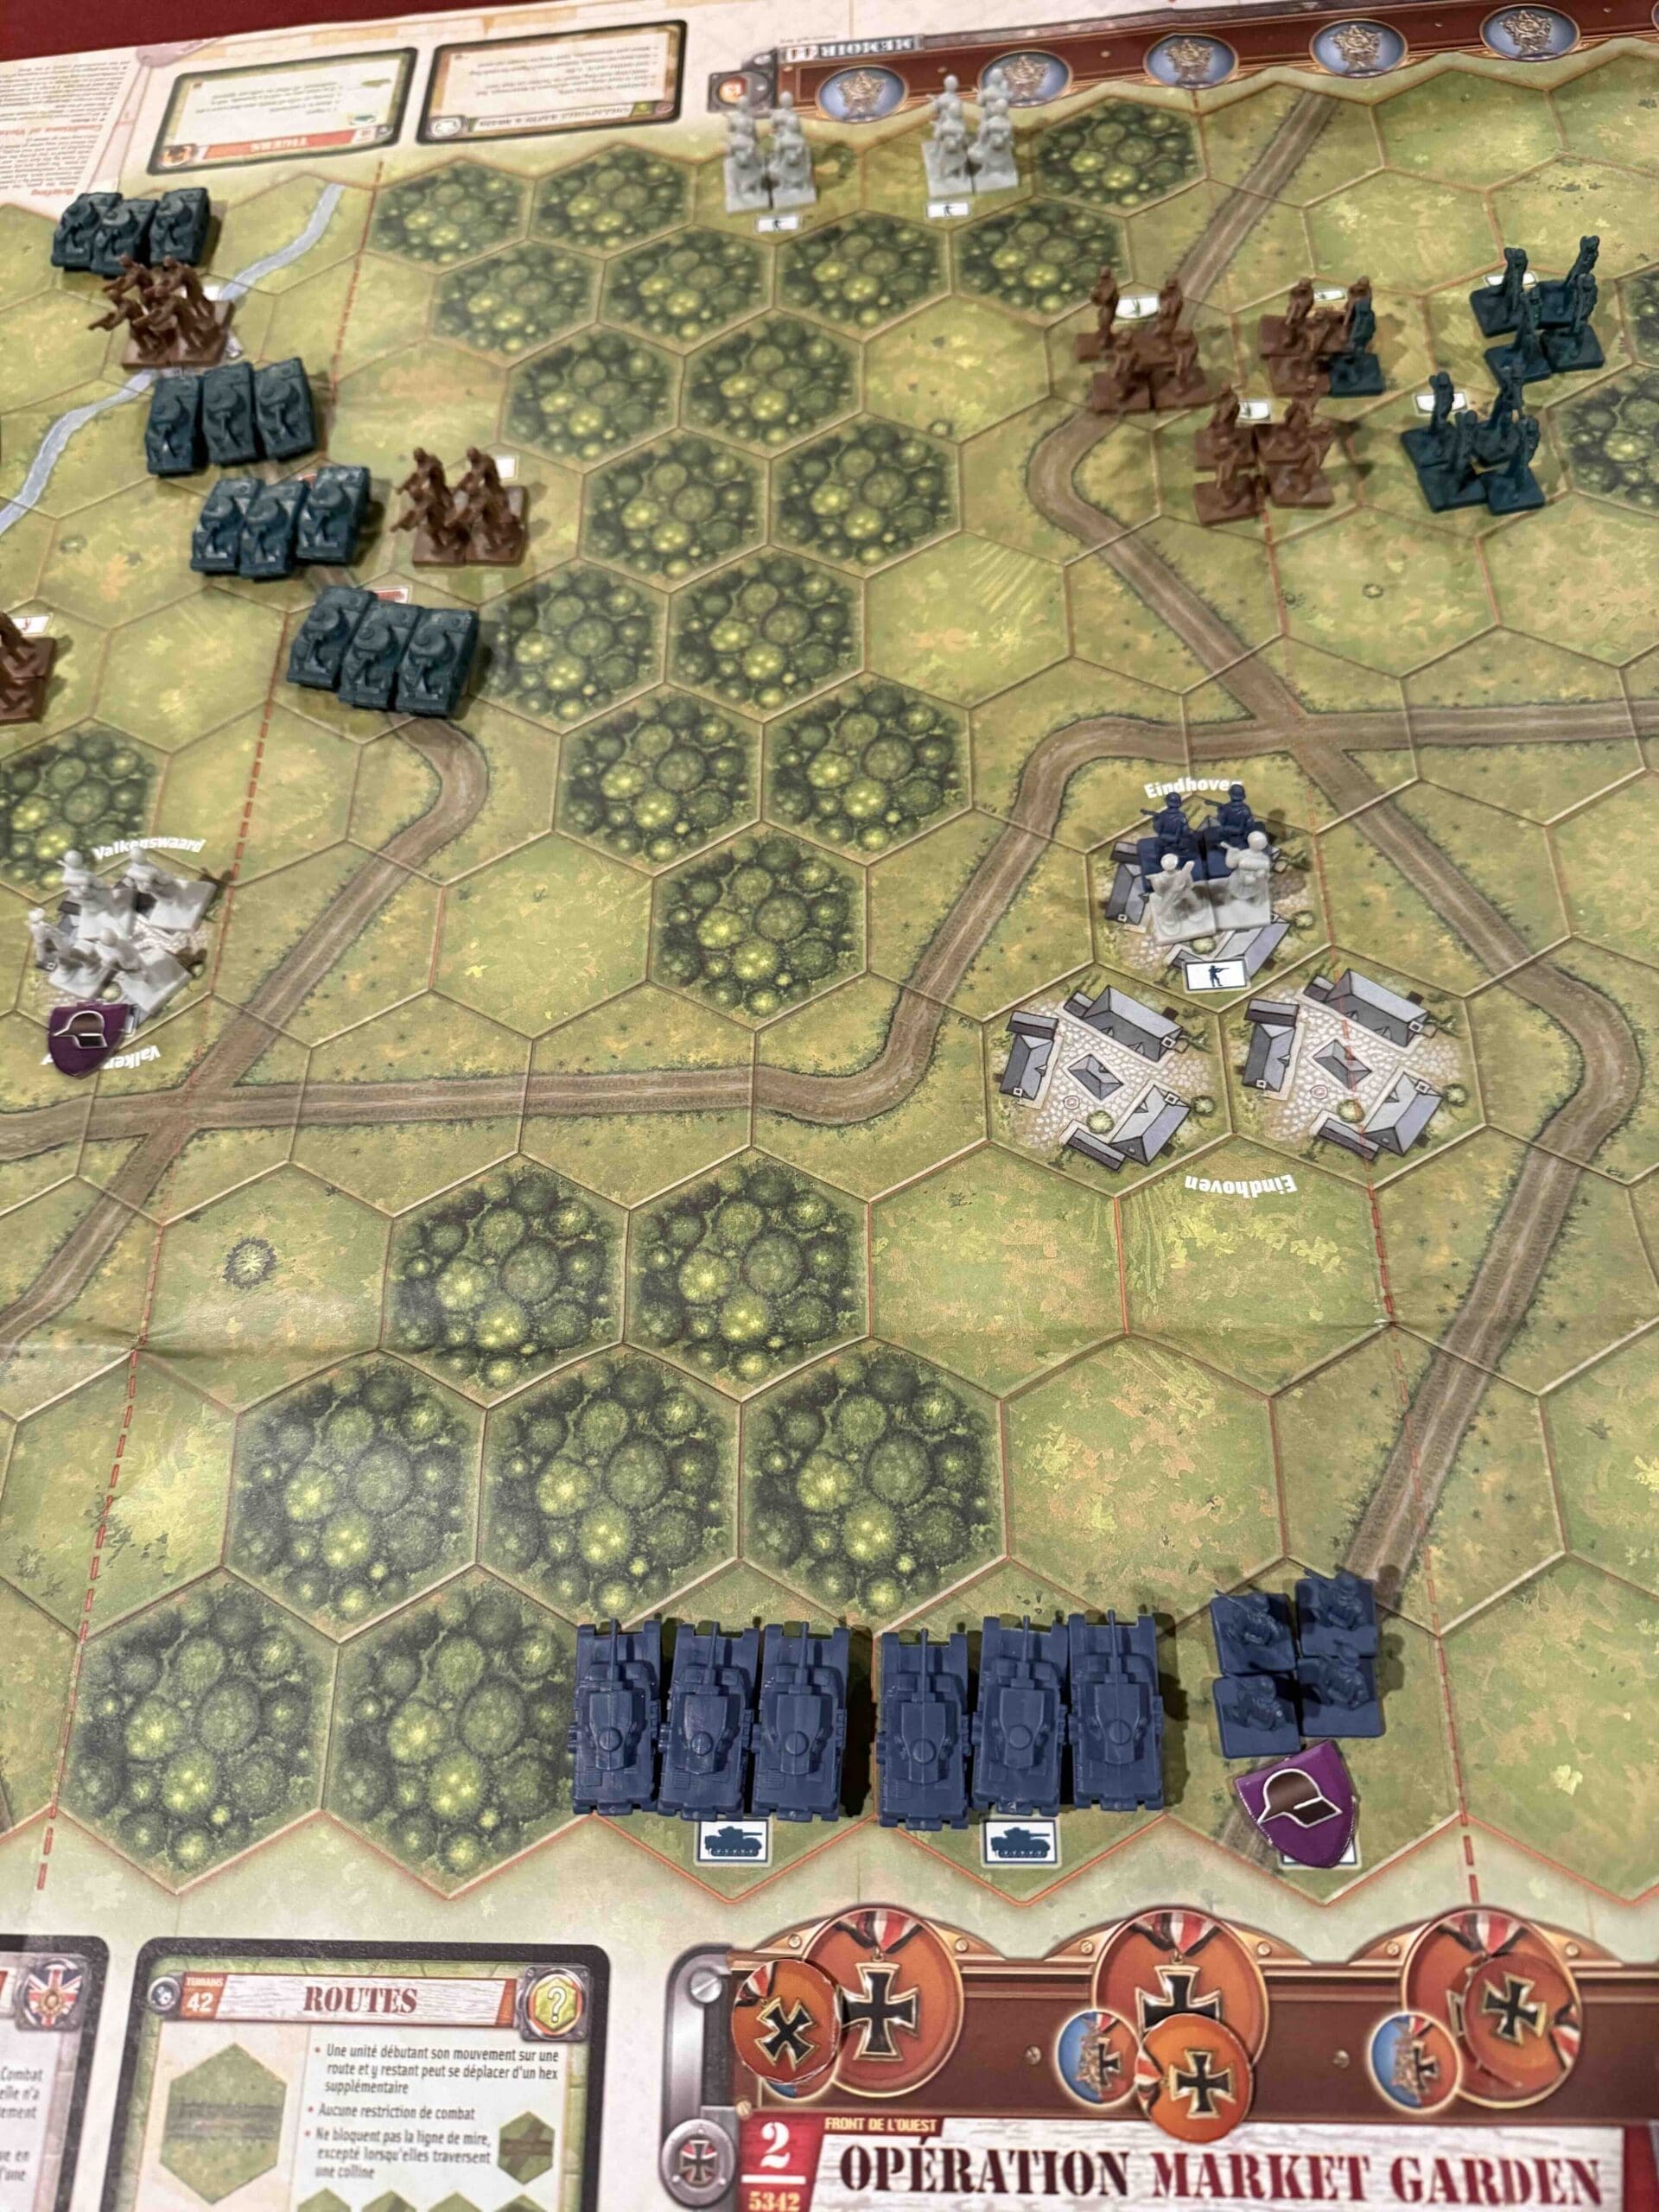
This game is interesting because each side is given the opportunity to bring in two Armor units into the battle, right into the heart of the enemy territory.  And so within the first couple of turns it is a crazy mixed-up battle with enemy forces attacking from multiple directions. You must learn to engage in a two-front war.

medal allies

Allied Strategy:

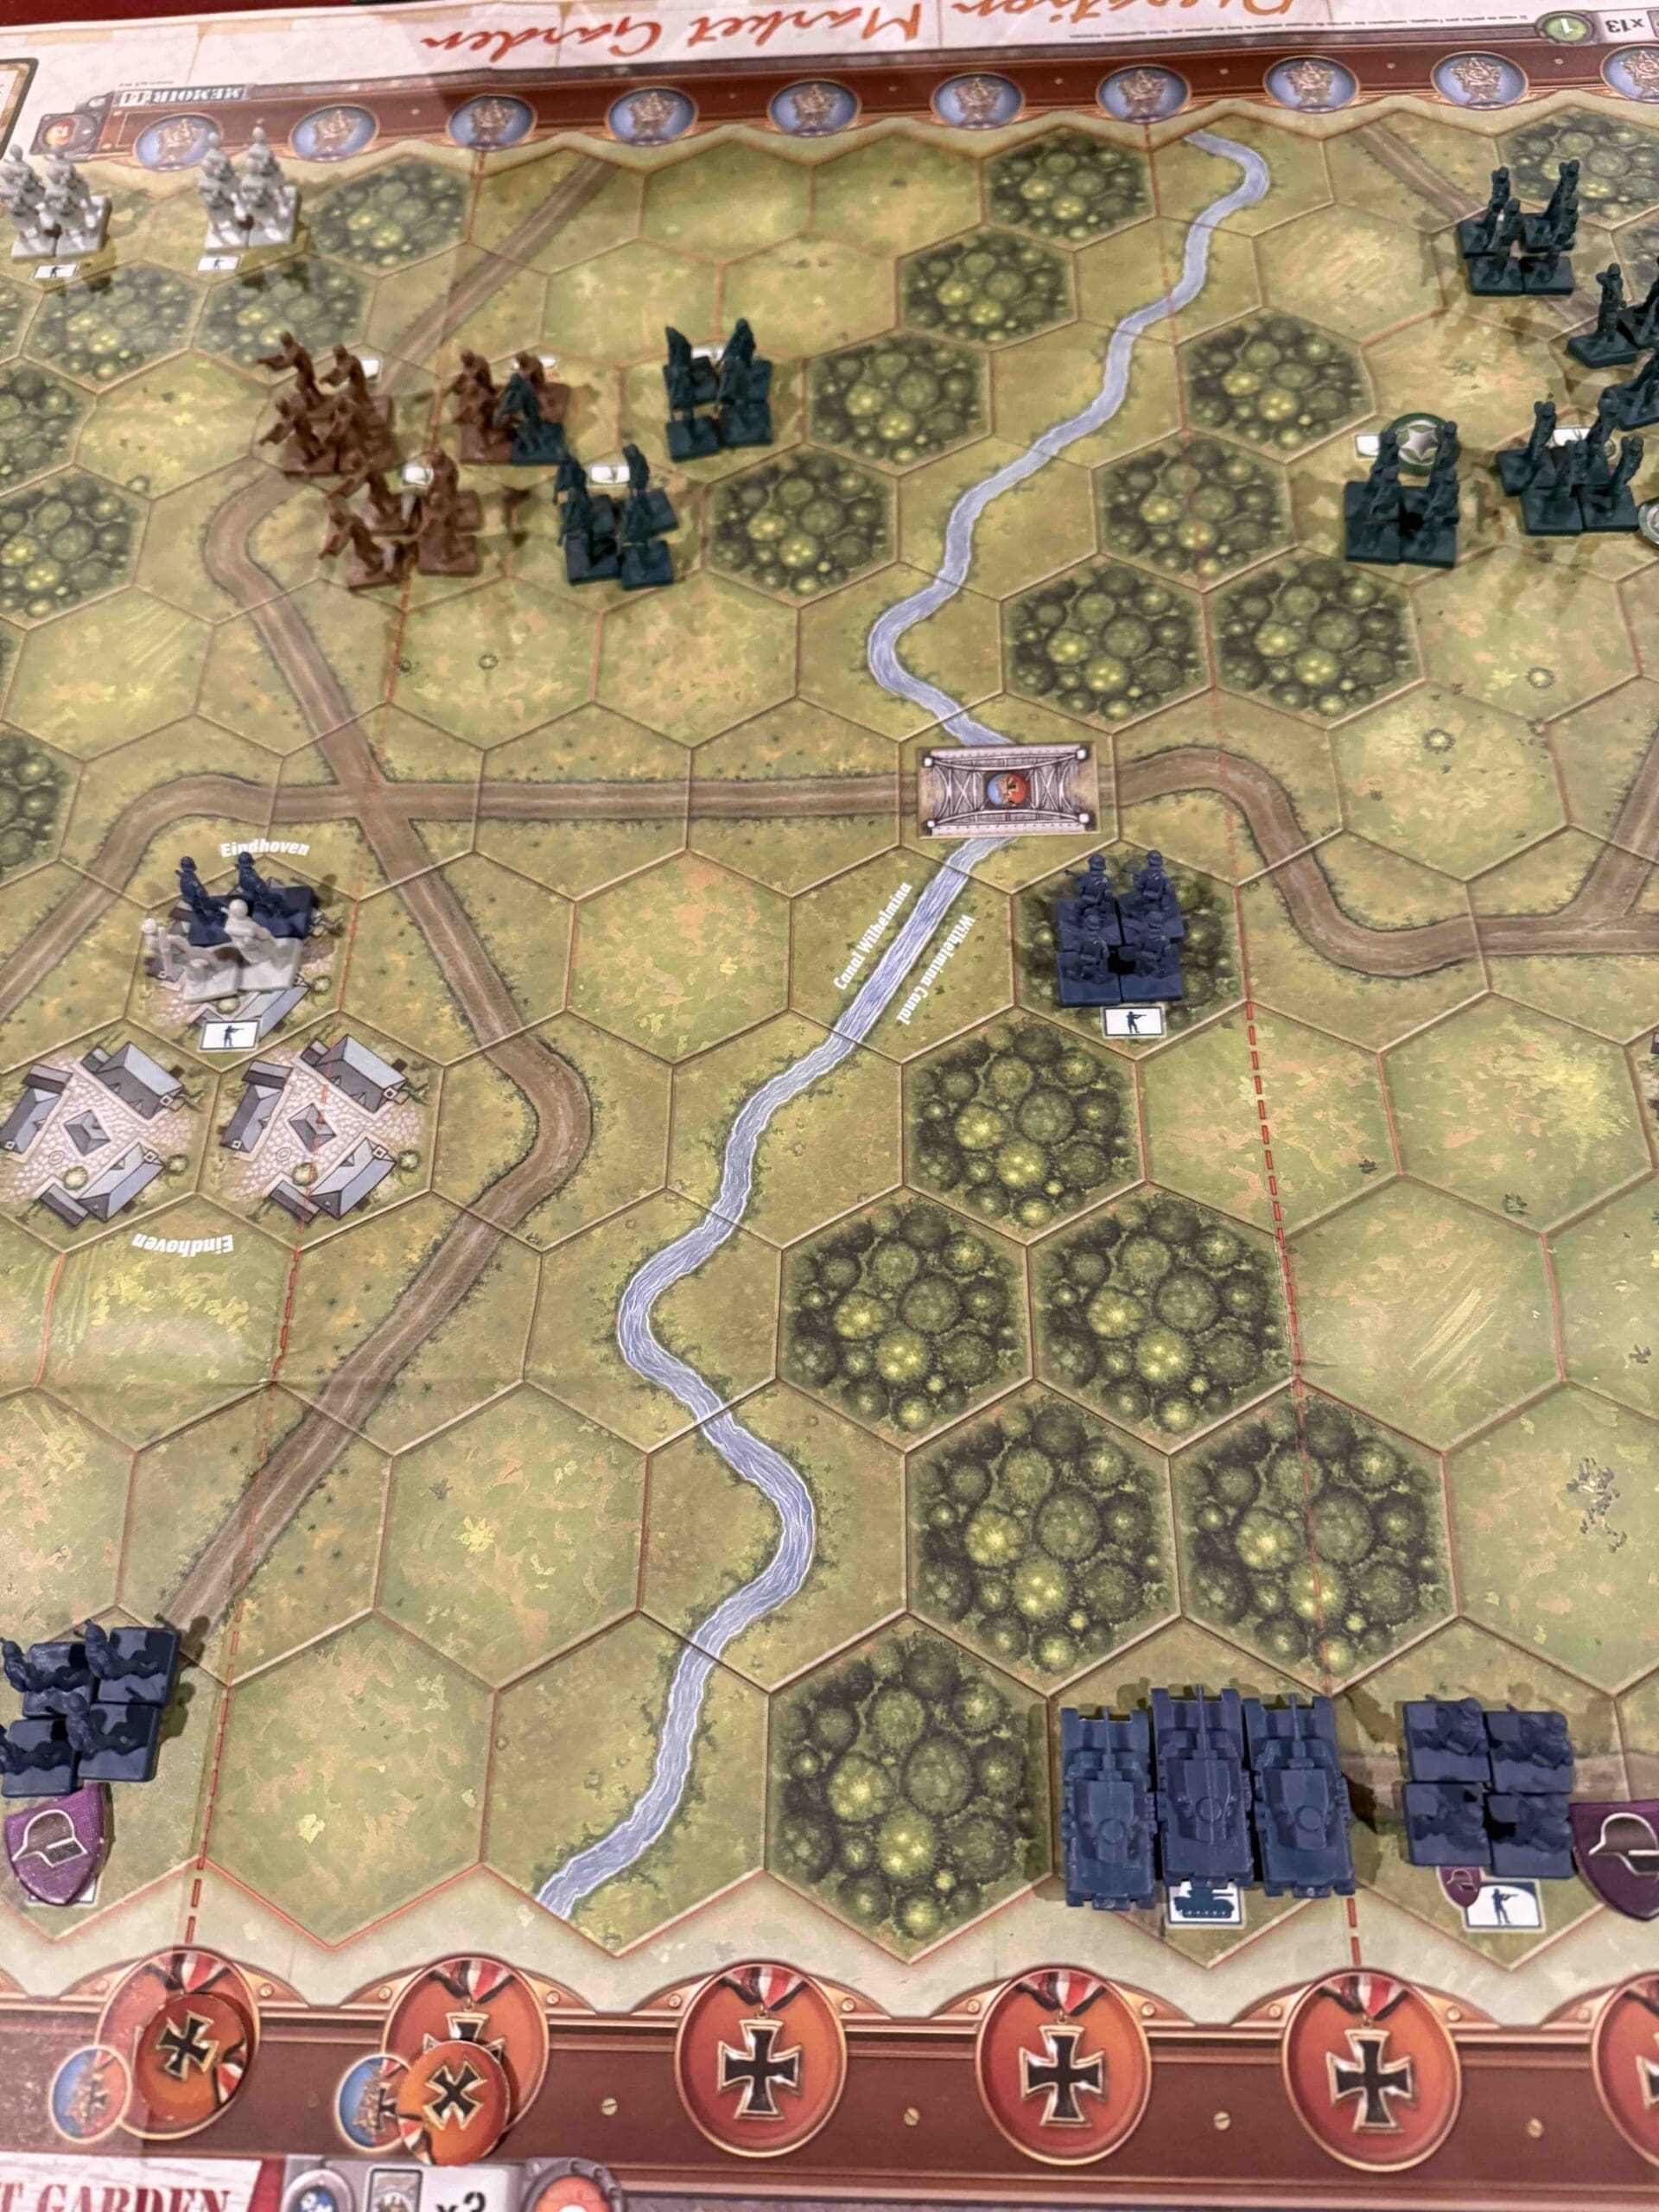
1.  The challenge for the Allies is to get your forces across the bridges. Otherwise, you will be blocked and congested in your attack efforts. Of course, you also have to deal with the enemy armor that will show up on your end of the battlefield.

2.  If any of the original Axis forces (not the ones which spawned on that side) make it across the river, you must prevent them from exiting. 

3.  You can hide out in the towns near the river for a while and attack the enemy forces in an attempt to degrade their fighting ability, but eventually you may have to cross over and attack if the enemy doesn’t come to you.

medal axis

Axis Strategy

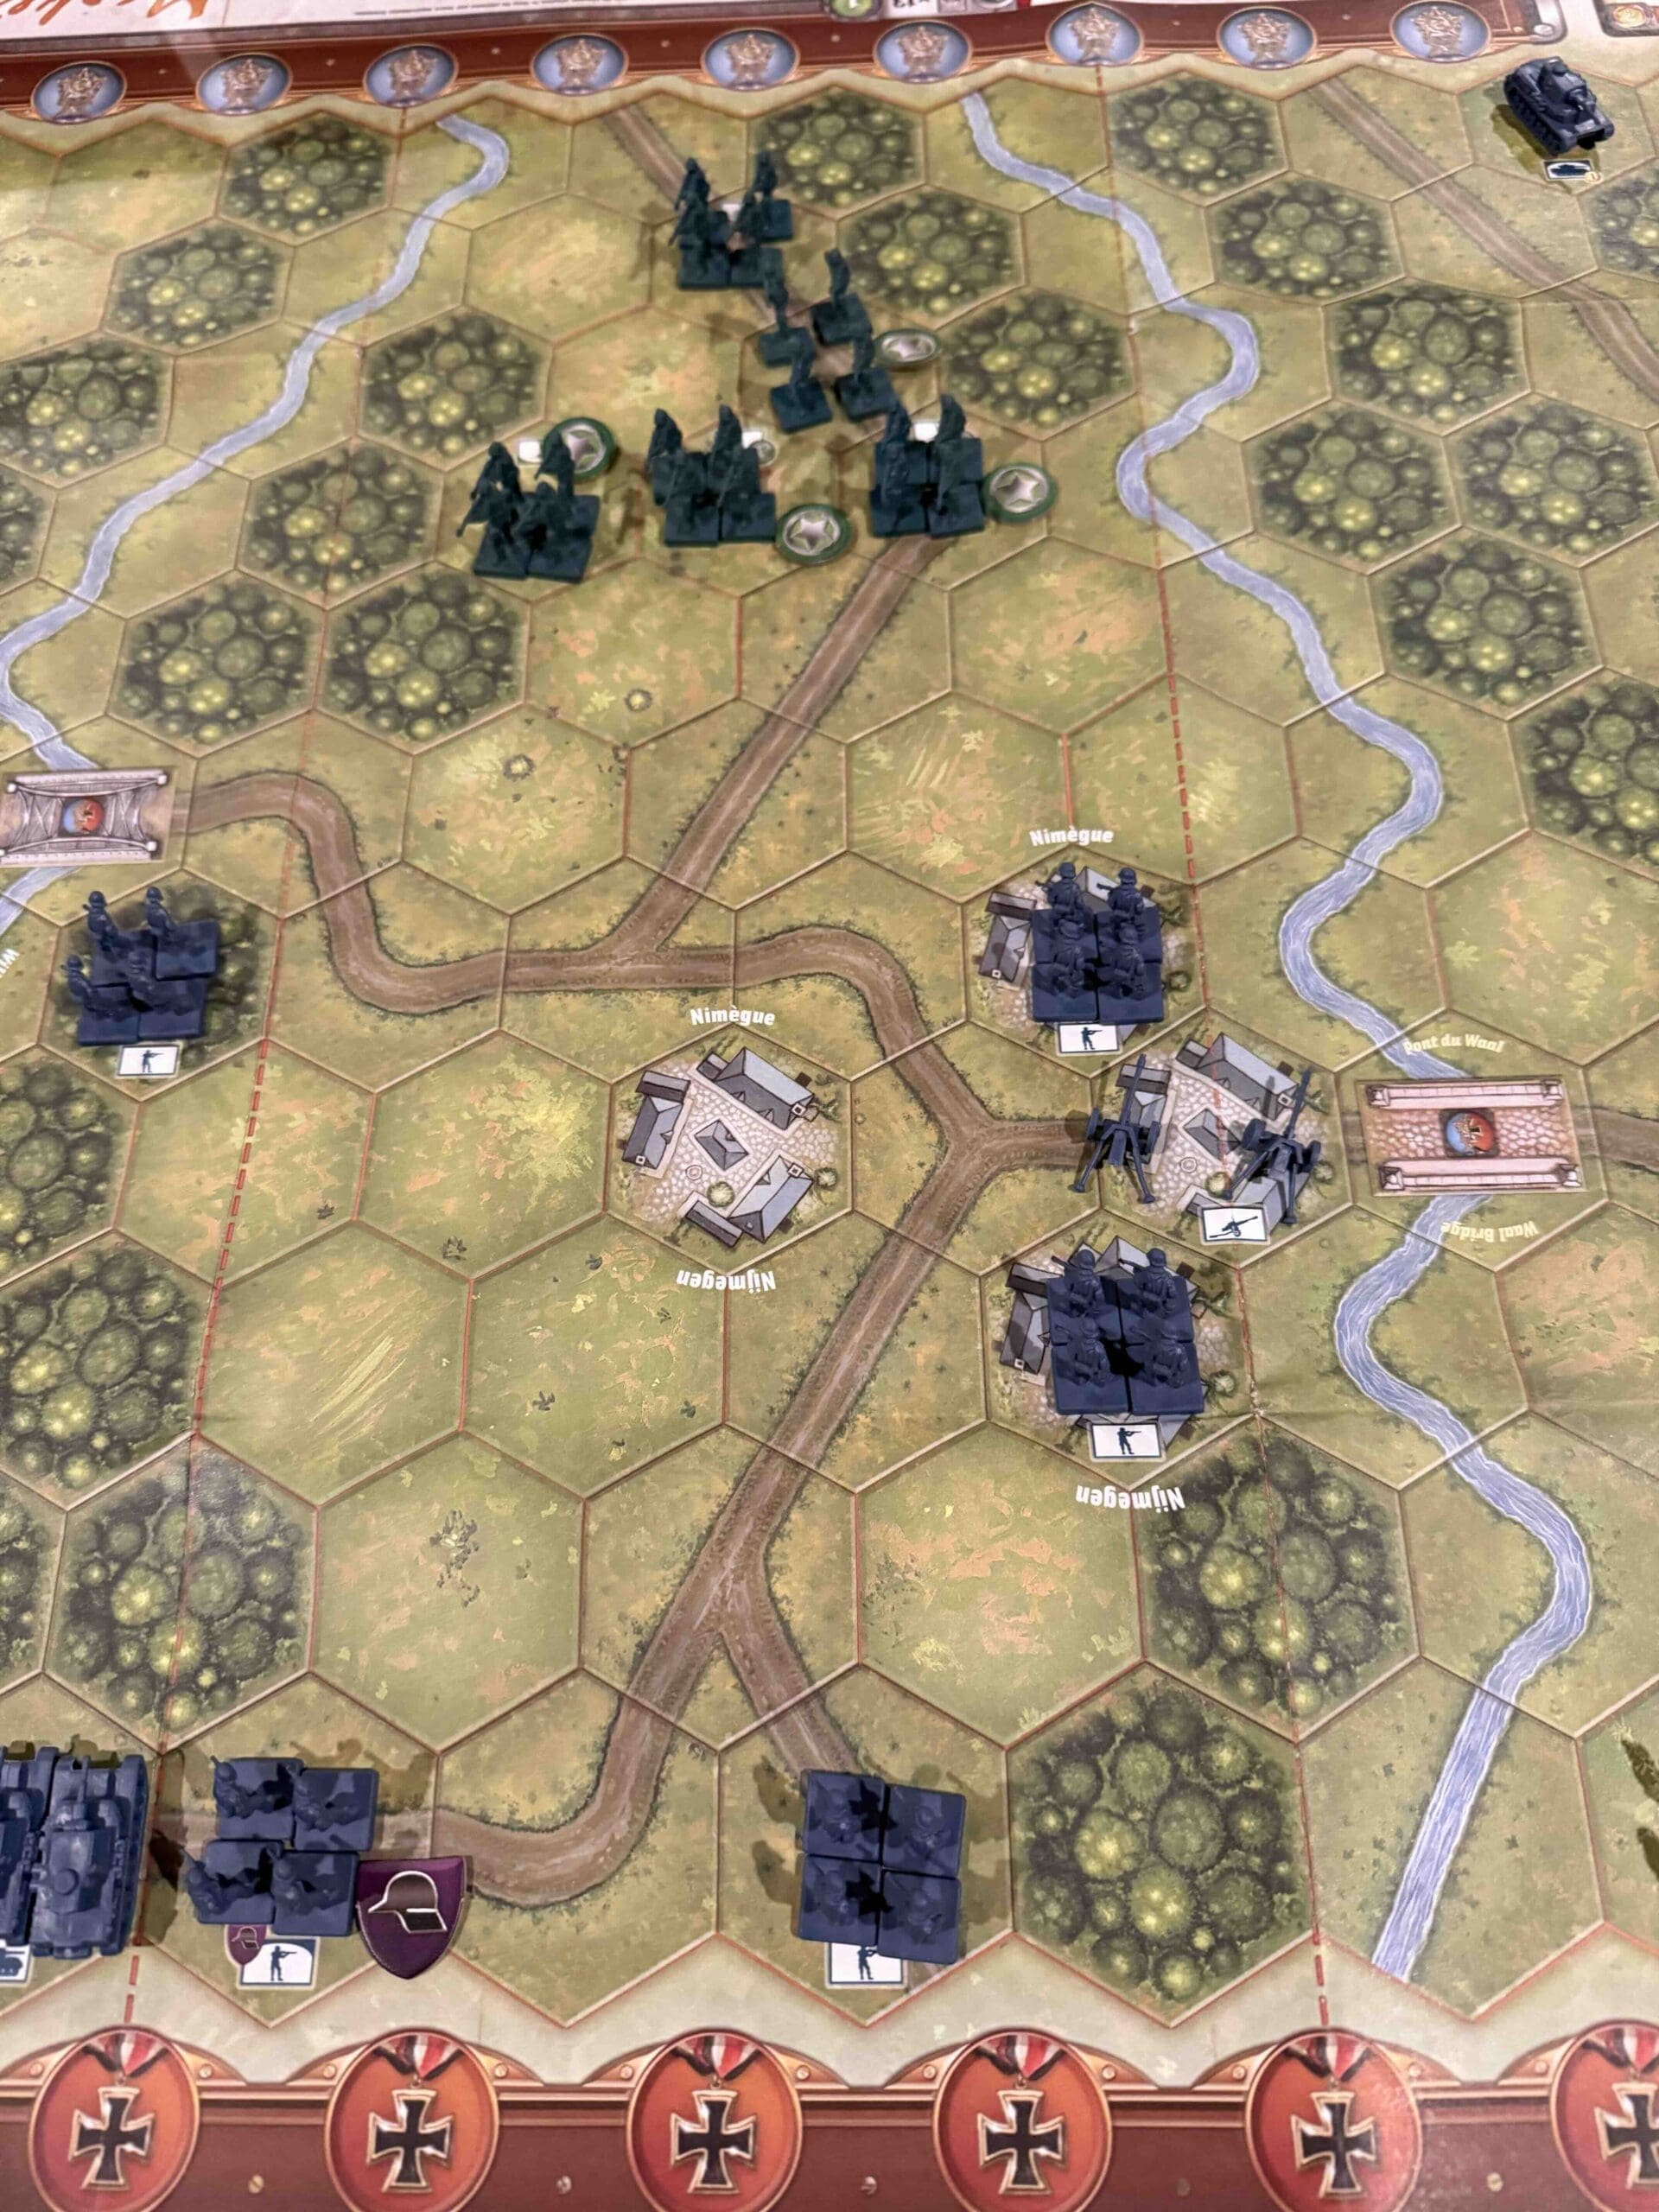
1.  On your right flank, you are evenly matched with the Allied forces with four Infantry units each. Due to their congested starting postion, there is an opportunity to move in and claim control of the town of Moisy and prevent the Allies from getting objective medal without a bitter fight.  Then from there, it is a short 3 hex run to exit through the Exit hex and gain a medal.

2.  You have a lot of forces, but you will need to get them up to the river to attack the enemy. But keep some in reserve to deal with the enemy forces that will show up to rescue their troops.

Battle Reports

19
BR - Closing the Gap

Author:

Days of Wonder

Operation Market Garden (Overlord)

Operation Market Garden (Overlord Map)

Operation Market Garden, fought in September 1944, was a major Allied offensive during World War II aimed at ending the war quickly by capturing key bridges in the Netherlands and entering Germany’s industrial heartland.

The operation combined a massive airborne assault (Market) by British, American and Polish paratroopers with a ground advance (Garden) by British XXX Corps. The goal was to seize bridges over several rivers, including the Rhine at Arnhem, to create a direct route into Germany.

Listen up, men—Operation Market Garden was bold, daring, and damned near brilliant on paper. Our boys dropped from the sky and stormed bridges across Holland like thunder on the move. They seized their early targets with guts and grit—but at Arnhem, the lion met the cage. The British 1st Airborne fought like hell for every inch, surrounded, outgunned, and cut off from relief.

In the end, the last bridge stayed in enemy hands. The link-up failed, and what was meant to end the war early turned into a costly lesson in overreach. We aimed for glory—and came up “a bridge too far”.

~~ General Howitzer

13 VP’s

Card Balance:

Allies – 13 (!)

Axis – 3 (!)

Complexity:

4

Conditions:

Countryside

countryside

Context:

Historical

Location:

Netherlands

Year:

1944

Theater:

Western

Campaign:

Codename:

Operation Market Garden

Summary:

Objectives:

13 VP’s with Temporary Majority Medal Objectives for whomever holds the majority of the 13 town hexes; plus Turn Start Temporary Uncontested Medal Objectives for the three key bridges.

Battlefield:

Countryside with many roads, towns, rivers, and forests

Troops:

Allies  – 20 Infantry, 8 Armor, 1 Artillery

Axis  – 17 Infanty, 7 Armor, 1 Artillery


  medal allies

Allied Strategy:

1.  The Allies have an overwhelming tank force on their right flank. They will need to attack vociferously and eliminate all enemy forces in that section, so that they can turn their armor to attack the central sections. 

2. You can get some early medals by attacking the enemy forces which were surprised and surrounded by your forces in the left and right sections. There are two infantry units on each side which you can quickly take out, and gain some early medals.

3.  Watch out for the Tiger Tank on your left flank. It can only be taken out with two successful rolls, first an armor or grenade roll, and then the second roll must be a grenade.

medal axis

Axis Strategy

1.  As Axis, because of the surprise nature of this attack, you only start with three Combat Cards vs. the Allies 13!.  But every time you take out an Allied unit, the Allied Commander loses a card (which you get to pull from his hand), and you are given a new card from the deck (not the one from his hand) and your total cards to use each turn increases.  So as the battle progresses the card ratio will begin to even out, until eventually the Axis will have more cards than the Allies.  Cards are attack-ability, so your attack-ability will increase, as the other’s declines.

2.  Your tanks, since you were not suspecting the airborne attack, are not in play at the start of the game. You will need to use some of your early turns to get them into attack positions.  And because the tanks can only move two hexes in this scenario (unless start and ending on a road, when they can move 4 hexes), it will take two to three turns to get them into place. So you need to start early.

3.  Control of the three bridge medals is based on being either on the bridge hex, or in the nearby vicinity of the six hexes surrounding it.  But note that if the enemy is able to get into the proximity of the bridge, you will lose that bridge medal until you clear them out. If the bridge is contested, then no one gets the medal. So keep the enemy forces well away from your bridges!  

Battle Reports

1
BR - Op. Market Garden

Author:

Days of Wonder

Link:

Saint-Martin and Bull Bridge

Saint-Martin and Bull Bridge

Bull Bridge
  • After the Allied breakout from Normandy (Operation Cobra, late July 1944), U.S. forces rapidly advanced across northern France. As they pursued retreating German forces, small but fierce battles flared up at key defensive points.

  • Battle Overview:
    In early August 1944, elements of the U.S. Army (likely from Patton’s Third Army) encountered stiff German resistance at St. Martin and the nearby Bull Bridge, vital crossings over local waterways.
    The Germans, using hastily organized rear-guard units, attempted to delay the American advance by holding these positions. Fighting involved close-quarters combat, sniper fire, artillery strikes, and quick assaults to seize the bridge intact before the Germans could demolish it.

  • Outcome:
    U.S. forces ultimately captured St. Martin and secured Bull Bridge, helping to maintain the momentum of the Allied advance toward the Seine River.
    German forces were forced into further retreat, suffering losses in men and equipment.

  • Significance:
    Though a relatively small engagement compared to larger battles like Falaise, holding key river crossings like Bull Bridge was critical for sustaining the speed of the Allied liberation of France.

General Howitzer’s observation:
We took St. Martin and locked down Bull Bridge—small on the map, but damned vital. Every bridge we held kept our boys rolling toward the Seine and sent the Germans running with their tails between their legs, bleeding men and steel all the way.

5 VP’s

Card Balance:

Allies – 5

Axis – 5

Complexity:

3

Conditions:

Countryside

Context:

Historical

Location:

France

Year:

1944

Theater:

Western

Campaign:

Operation Cobra

Codename:

Summary:

Objectives:

5 VP’s, plus the temporary Allied Objectives of city of St. Martin and Bull Bridge

Battlefield:

Countryside with forests and hedgerows, and a small river in the corner with Bull Bridge crossing it.

Troops:

Allies – 8 Infantry, 4 Armor

Axis – 6 Infantry, 3 Armor, 2 Artillery


Allied Strategy:

1.  Big picture strategy is that you can put the pressure on the enemy by both attacking units, and pushing towards the Bull Bridge medal objective.  This is only a 5 medal game, so there is not a lot of time for deep strategy.  You mainly just have to get into good attacking positions, and take out the enemy.

2.  The Axis have two Artillery units and a Mortar Infantry unit. This means they have a lot of range for their attacks. It may be best to hunker down in hedgerows and on hills and wait for the enemy to attack you. Use your Armor to attack the enemy Infantry while you wait. 

Axis Strategy

1.  Big picture strategy is that you need to defend the town of St. Martin and the Bull Bridge.  Historically, the bridge was completely undefended, so you need to get some forces near there to protect it from enemy capture.  

2.  You have an Infantry Mortar unit.  With it you can ignore terrain restrictions and attack anything that comes near you with a range of 3,2,1,1.  Use it to defend the town of St. Martin.

3.  Defensive Response: the enemy has more Armor and Infantry than you, so stay in your protective stance, in your hedgerows and the sandbagged town. Let them come to you, and then attack them from a safe position.  This should even things out a bit. Your Armor needs to spread itself out across all three sectors fo the battlefield to be prepared for wherever the enemy may try to attack. 

Battle Reports

45
BR - St. Martin

Author:

Link:

Mount Pincon

Mount Pinçon

scenario_MtPincon

“Listen up! In July ‘44, our British allies climbed that Mount Pinçon, the highest ground in Normandy, and they weren’t going to let anything stop them.

That hill was a fortress—machine guns, mortars, and some of the toughest terrain you could imagine. The 43rd Wessex Infantry Division took it step by step, pushing through hedgerows and driving the enemy out of their defenses.

This wasn’t just about one hill—it was about the whole campaign. Taking Mount Pinçon meant commanding the area, opening the door to Falaise and Paris. That’s how you win a fight—you secure the high ground and keep the enemy on the move!

~~ General Howitzer

6 VP’s

card

Card Balance:

Allies – 5

Axis – 5

Complexity:

4

Conditions:

Countryside

countryside

Context:

Historical

Location:

France

Year:

1944

Theater:

Mediterranean

Campaign:

Normandy

Codename:

Operation Bluecoat

Summary:

Objectives:

6 VP’s, plus the Mount Pincon

Battlefield:

The terrain is covered with trees scattered across field, with the six hexes of Mount Pincon hugging one border.

Troops:

Allies – 8 Infantry, 4 Armor

Axis – 7 Infantry, 3 Armor


medal allies

Allied Strategy:

1.  Historically, the Allies are on the advance and won this battle. So in this scenario, the Allies have one extra armor, and one more Infantry than the Axis. Use your additional strength to push against the enemy forces and put them under extreme pressure.

2.  Watch the corridor on your right flank. The enemy has three armor in that section, and you need to get into the forest next to it to defend.  If they make it past that corridor, they will decimate your infantry forces in the rear.

medal axis

Axis Strategy

1. Historically, this is a defensive scenario for the Axis, which is why you begin with one territorial medal already secured, which you must defend.  But you can do great damage to the enemy on your left flank with your armor. 

2.  Be wary of moving your defensive Infantry in the center section, unless you have a tremendous set of attack cards. You must keep at least two units on the hilltop. If the enemy gets a Behind Enemy Lines card, they could destroy an infantry unit, and then lodge on the hill to get an additional medal, so be careful! 

33
BR - Mount Pincon

Author:

Days of Wonder

Link:

Drive on Caen

Drive on Caen

scenarios_DirveOnCaen_1

The “Drive on Caen” was a series of battles during the Normandy Campaign in World War II, aimed at capturing the city of Caen in France. This was a key objective for British and Canadian forces following the D-Day landings on June 6, 1944. The battle unfolded in multiple phases, including Operations Perch, Epsom, Charnwood, and Goodwood, as the Allies attempted to break through German defenses.

The city of Caen was heavily defended by the German 21st Panzer Division and SS Panzer units, leading to intense urban combat and bombardment. While the British and Canadian forces faced stiff resistance, they gradually secured portions of Caen by mid-July 1944. The battle played a crucial role in drawing German forces away from the U.S. sector, aiding the overall success of Operation Overlord.

“Listen up! The Drive on Caen wasn’t just one fight—it was a whole series of hammer blows aimed at the heart of the German line in Normandy. The British and Canadians were tasked with taking that key city after D-Day, and by God, they were going to get it.

It wasn’t easy—21st Panzer, SS Panzer, and every last German who could hold a rifle was dug in deep. It turned into a meat grinder—street fights, rubble, tanks trading shots at point-blank range. Operations Perch, Epsom, Charnwood, Goodwood—each one was another turn of the screw, breaking those Germans down piece by piece.

By mid-July, they finally cracked Caen open. It didn’t just put that city back on the map for the Allies—it kept Germany’s attention right there, which meant the Americans could make their big breakout in the west.

So remember, boys—it’s not always about speed; it’s about grinding down the enemy, one bloody inch at a time, until they crack! That’s how you win a campaign!

~~ General Howitzer

5 VP’s

card

Card Balance:

Allies – 5

Axis – 5

Complexity:

3

Conditions:

Countryside

Context:

Historical

Location:

France

Year:

1944

Theater:

Western Front

Campaign:

Battle of Normandy Campaign

Codename:

Operation Charnwood

Summary:

Objectives:

5 VP’s, plus the objective medals

Battlefield:

Countryside with a few forests

Troops:

Allies – 8 Infantry, 4 Armor, Artillery

Axis – 7 Infantry, 2 Armor, 1 Artillery


medal allies

Allied Strategy:

1.  Big picture strategy for Allies is to make a relentless push towads the town of Caen, which has medal objectives, as you also attack the enemy.

2.  Be aware that on your left flank, are Anti-tank equipped Infantry forces.  And on your right flank, the enemy has an Artillery.  This means, the center section may actually be your best way forward.

medal axis

Axis Strategy:

1.  Big picture strategy for the Axis is that this is primarily a defensive scenario for the Axis as they attempt to prevent the historical push of the Allies toward the city of Caen.

2.  The Allies have you outnumbered with armor, but if you put your two Anti-Tank Infantry to good use, you may be able to even the score.  

3.  You have two Medal Objectives to protect in the city of Caen.  Make sure the enemy does not get close enough to capture it.

4.  Be careful of moving your Armor into unprotected territory in the center section. The Allies have two armored units which can very quickly attack.

20
BR - Drive on Caen

Author:

Days of Wonder

Link:

Pushing Through Caen

Pushing Through Caen

scenario_PushingThroughCaen_start
The battle for Caen, often referred to as “Pushing Through Caen,” was a key engagement during the Allied invasion of Normandy in World War II, taking place between June and August 1944. The city of Caen was a strategic objective for the Allies due to its road networks and its importance to German defenses in the region.

Initially targeted to be captured on D-Day (June 6, 1944) by British and Canadian forces, heavy German resistance, including elite Panzer divisions, delayed the city’s capture. The fighting around Caen involved multiple operations, such as Operation Perch, Epsom, Charnwood, and Goodwood, which aimed to break through German defenses and secure the city.

General Howitzer’s summary:

Caen turned into a meat grinder—street-by-street brawls and bombing runs leveled the place, but the Allies hammered through and took the city by mid-July. That win locked down our eastern flank, shoved the Germans back, and opened the gates for the breakout at Normandy. One more step on the road to crushing them for good.

5 VP’s

card

Card Balance:

Allies – 6

Axis – 4

Complexity:

3

Conditions:

Countryside

Codename:

Operation Atlantic

Context:

Historical

Location:

France

Date:

June 18-21, 1944

Theater:

Western Front

Campaign:

Normandy Campaign

Summary:

Objectives:

5 VP’s, plus Verrieres Ridge for the Allies

Terrain:

The battlefield is scattered with hills, towns, hedgerows, and forests.

Troops:

Allies – 10 Infantry, 3 Armor

Axis – 9 Infantry, 1 Armor, 1 Artillery


medal allies

Allied Strategy:

1. Get your forces across the Orne River as quickly as possible.  Behind the river, you are sitting ducks; across the river, you will have battlefield movement.

medal axis

Axis Strategy:

1. You need to get your armor and artillery into the fight as quickly as possible, while the Allies are still on the other side of the Orne River.  Your artillery will need to be moved one hex row forward so that you can breach the river with your shells.  Your armor needs to move forward to attack the enemy armor while it is still behind the river.

23
BR - Pushing Caen

Classic DoW Battle Reports:  Allies win 36% of the time

Author:

Campaign Book, Vol. 1

Link: