1st Armored to the Rescue

1st Armored to the Rescue

Back in May of ’42, out in that godforsaken sandbox they call North Africa, the British under General Ritchie were getting their clocks cleaned by that desert fox Rommel. That son of a gun was no slouch—he came flanking hard near the Gazala Line, punching through like a knife through warm butter.

So what do they do? They throw in the 1st Armoured Division to stop the bleeding. Good men, tough tanks—but they went up against a well-oiled machine. Rommel’s boys had coordination, momentum, and those damn Panzers that could turn faster than ours and hit harder too.

The Brits fought like hell, but their tanks were choking on dust, breaking down, and couldn’t take a hit like the German steel. The result? A tactical retreat that turned into a full-on fall of Tobruk—a damn tough loss for the Allies.

But here’s the lesson, and you’d better believe I paid attention: in desert warfare, you don’t win with brute strength alone. You win with mobility, logistics, and bringing everything—armor, air, and artillery—to bear in perfect harmony. That’s how you beat a fox like Rommel.

We may have taken a hit there—but it lit a fire under us. And that fire led us straight to victory later on.

~~ General Howitzer

5 VP’s

Card Balance:
Allies – 5
Axis – 6

Complexity

2

Conditions

Desert

Location:

North Africa

Year:

1942

Theater:

Mediterranean Theater

Campaign

Context:

Historical

Summary:

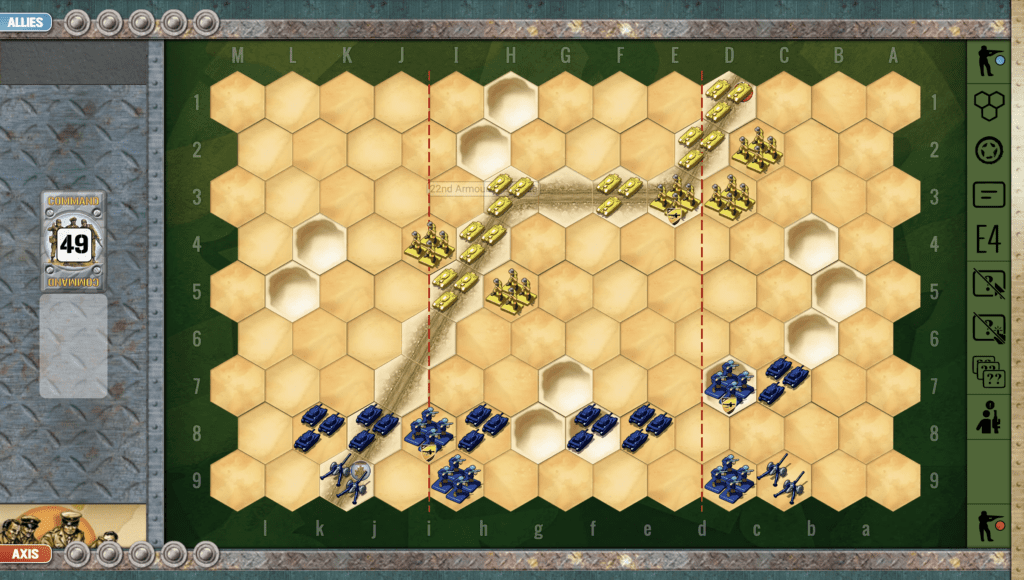
1st Armored is a wide open tank battle with a road running at an angle through the field. Any units of either side could escape of the field via the road. This adds a strategic movement element to the armored battle.

Objectives:

5 VP’s, plus each side has an escape hex at the end of the road.

Battlefield:

Desert battlefield with a road angling through from one corner to the other, surrounded by various sand dunes.

Troops:

Allies – 5 Infantry, 6 Armor

Axis – 4 Infantry, 6 Armor, 2 Artillery

🔥 Winning as Allies:

1.  Big picture is that historically the British lost this due to mobility and coordination factors with their forces (besides being outgunned by the Axis Artillery).  So with the Artillery on the flanks, you will need to focus your efforts in the central section, where at least the two guns have a bit less impact.

2. You have two units that begin the scenario in a no-retreat position. Get those dispersed as soon as you can.

3.  Note that the enemy Artillery at K9 is an unprotected unit at the edge of the battlefield. And it is sitting on top of a Medal Objective. It is relatively easy to kill off such a unit, and would result in two medals for you, after you do the Armor Overun.

🔥 Winning as Axis:

1.  The Axis have two artillery which you may not be able to use until the tank battles cool down a bit.

2.  With your armor mobility, you want to strike first and strike hard.

3.  The British have a few units with no retreat, such as the armor at I5, and the infantry at D3.  If you can attack those before the forces move, you can get some quick wins.

DoW Battle Reports: 28%
(Percentage of Allied Victories)

38
BR - 1st Armored

Author:
Days of Wonder

Link:

Armored Attack!

Normandy – Vaumicel Manor

Take a look at this situation. The Armor is ready to move. But where should it move, and what should it attack. There are so many choices!

Based on the cards in hand, what should the Axis attack?

Options:

1.  Attack the Armor against the back border?

2.  Attack the Infantry against the back border?

3.  Attack the Armor in the right flank?


Pros vs. Cons of each:

1.  Armor is dangerous and the armor against the back border is in a no-retreat situation.

Odds increase for each die rolled from 33% hit to 50% hit per figure! Throwing three dice will result in 1.5 armored figures being destroyed.

That is good, but the problem is that an armored unit with only 1 or 2 figures is just as powerful and dangerous as one with full forces.


2.  Attack the infantry ?  Because it is pressed-up against the border, the odds of a hit is 66% for each roll of the dice. So for a three-dice attack from armor, you could kill of three of the four infantry.  That’s good, but again, the unit will remain, ready to attack again, and no VP is gained.

3.  Attack the Armor on the right flank?

This one has more possibilities because they armor will attack with three dice and the infantry right next to it, will also hit it for three more dice, for a total of six dice.  Even if the armor is forced back from the first roll one hex in a retreat, the infantry can attack with two dice. Total diced rolled will be 5. The odds of a good result increase dramatically.

Let’s see the results of choice #3.

The first attack wiped out two armor figures leaving just one armor left to be destroyed by the next three dice. And that is just what happened.

But what if the dice went against us (as they seem to do way too often)? We always have to ask the question “What then?”.  Look at the cards in hand. There are two right flank cards, and no middle section attacks.  So a failed attack in the middle would have left enemy forces to retaliate. But a failed attack on the right flank, would still allow the Axis to respond to the eventual Allied retaliation. 

So sometimes units pressed up against the back border are good fodder for destruction, but not always.  In this case, and with the cards in hand, an attack on the right flank was the best choice.


But Commander, what do you think?  What orders would you have issued if you had been in control?  Feel free to leave a comment.