Sidi Rezegh Airfield

“Listen up, boys! Back in November ‘41, the battle for Sidi Rezegh Airfield was one hell of a dust-up in the North African sands. The South Africans and the British 7th Armoured Division—those Desert Rats—were gunning to knock the Axis on their heels and bust open that siege at Tobruk.
The Germans and their Italian pals weren’t about to give up that airfield without a fight. Our boys slammed into those anti-tank guns and Panzers like a battering ram, and at first, they made some headway. But Rommel, that desert fox, came roaring back with his own counterattack, and it turned into a slugfest—blood, sweat, and tanks grinding it out in the sand.
In the end, the Brits had to pull back from the airfield, but they gave Rommel a bloody nose and knocked his supply lines out of whack. And don’t forget—Operation Crusader didn’t end there. That airfield scrap was part of the bigger plan that finally lifted the siege of Tobruk and turned the tables in North Africa.
So remember this, men: sometimes you take a few lumps, but you keep punching, and that’s how you win the war!”
~~ General Howitzer
5 VP’s
![]()
Card Balance:
Allies – 4
Axis – 5
Complexity:
2
Conditions:
Desert

Location:
North Africa
Year:
1941
Theater:
Mediterranean
Campaign:
Operation Crusader
Summary:
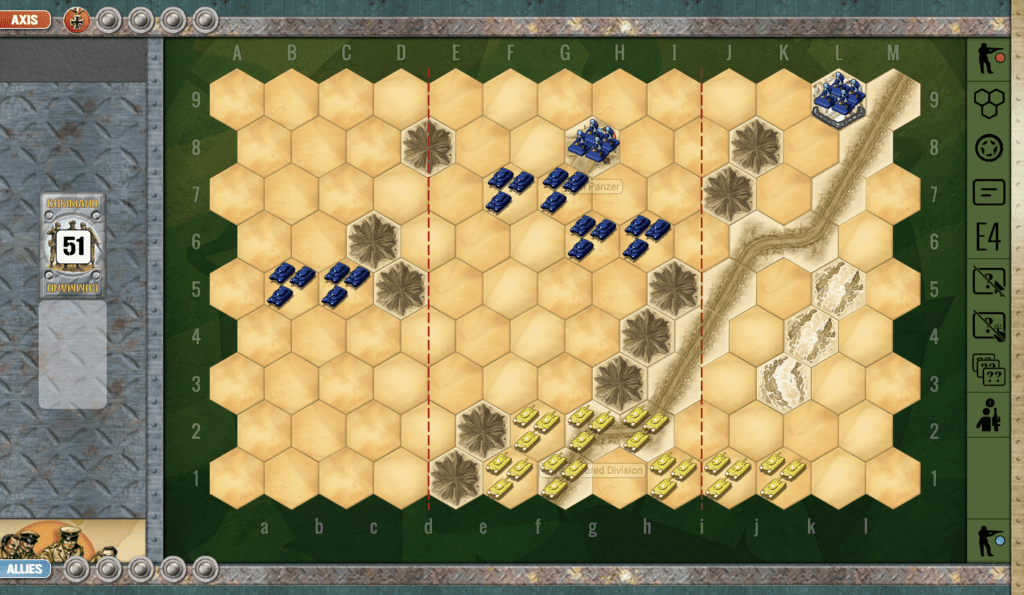
This desert scenario has a roadway passing through two sections cutting at an angle, blocked by escarpments. This is a tank battle ‘mano-a-mano’ and in many cases the attacker with the early momentum can gain the upper-hand and win.
Objectives:
This is a 5 VP game, and since it is a tank battle will go very quickly. The Axis begins with one point already, thanks to their control of the airfiled. 2.
Battlefield:
The field of play is all desert, with an escarpment and road running at any angle through much of the right flank. The small opening between escarpments is where the Axis will have to attack. The British can attempt to use the road for rapid progress towards the top of the map where the airfield lies.
Troops:
The Axis begin with an armor and mobility advantage to their side. The British also have no infantry, so some of infantry command cards will be converted to sigle armor unit commands.

🔥 Winning as Allies
1. Allies need to remember that because of North African Desert rules, your armor can only move two hexes, while Axis can move three. Watch your armor placement carefully to avoid a series of close assault attacks.
2. The Allied armor begins in a congested formation with several units having no retreat options. This places the Allies in a position, since they move first of attacking the Axis armor immediately, before they are attacked – while they are still pinned against the back border – by the three-hex moving Axis units. So even if the card do not allow you to move a lot of units, you simply must attack and get your forces forward.
3. The British will need to attack an overwhelming tank force which has greater mobility than them (3 hex moves vs. 2 hex moves). In order to do this, it may help to threaten an attack on the airfield, thus diverting some Axis armor resources towards defense of said airfield.

🔥 Winning as Axis
1. Axis begins with one victory medal for the airfield. As long as they hold the airfield, they keep the medal. So part of Axis’ considerations and planning must not only include the outright attack on the Allies in the sand, but also thought must be given to defending the airfield. Do not allow the Allies to distract you, while they prepare for an assault against it.
Battle Reports
(percentage of Allied victories):
28%

Author:
Days of Wonder
Link:

