Into the Cauldron

Rommel’s Panzers had bloodied the British 7th Armoured, but they’d shot their bolt. The Afrikakorps was jammed into what we’d call a pressure cooker—“the Cauldron.” To the south, Bir Hakeim held firm. To thea north, Tobruk was still in enemy hands. East and north, the tattered remains of British armor blocked the way. And to the west, minefields stretched like a wall of steel.
The Brits, blind to how short the Germans were on fuel and shells, failed to strike while the iron was hot. That hesitation let Rommel dig in around the ridges of Sidi Muftah, while his Italian allies clawed through minefields under heavy fire to drag supplies forward. When the British finally counterattacked on June 5th, it was sloppy and ill-timed—broken against the German anti-tank guns. A golden chance to smash the Desert Fox had slipped right through their fingers.
~~ General Howitzer
6 VP’s
![]()
Card Balance:
Allies – 4
Axis – 5
Complexity:
3
Conditions:
Desert

Context:
Historical
Location:
North Africa
Year:
1942
Theater:
Mediterranean Theater
Campaign:
Battle of El Almein
Summary:
Objectives:
6 VP’s, plus Exit Hex Medals
Battlefield:
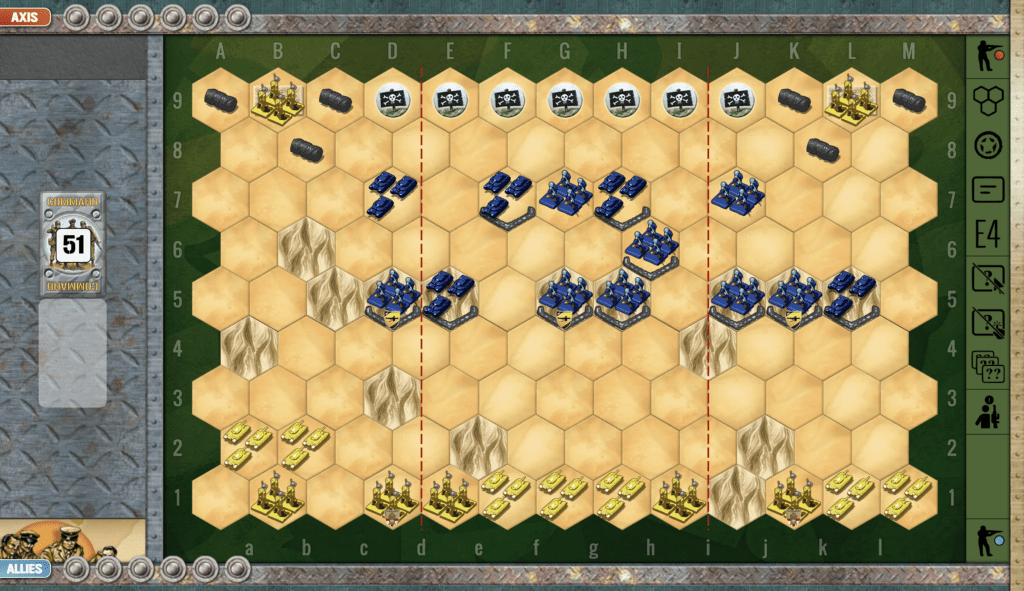
This desert scenario has a series of sand dunes across the center of all three sections on which are perched sandbagged Axis troops ready for battle. The challenge for the Allies is with their greater armored forces are to force their way through to victory.
Troops:
Allies – 7 Infantry, 7 Armor
Axis – 8 Infantry, 5 Armor

🔥 Winning as Allies:
1. The Allies have numerical superiority on the left flank, which can be exploited. Also note that the Allies have a 7 -5 advantage with armor. It is important to quickly take advantage of this superiority, as desert warfare can very quickly turn around with a few well-rolled armor attack dice.
2. Use any attack cards you get, to pull your armor forward one hex, and aim their turrets at the enemy three hexes away on the dunes. In this way, you can start to degrade the enemy attack from the dunes. With some well-rolled dice, you can attack the sandbagged infantry from a distance, and possibly score a quick VP. But be wary of the sandbagged armor units on each flank, which are well protected, and can very quickly knock out your armor units with a few attacks. Also the sandbagged anti-tank units can score against your armor with stars, thus raising the likelihood of a successful armor hit from 33% to 50% per dice roll.
3. You have two units of hexes in bunkers deep in the enemy territory, next to the exit hexes. Be very careful about moving them from the bunkers. Once you do so, all their protection is gone, and since they are surrounded by enemy troops, will be destroyed quickly. But if you keep them in the bunkers and use them as harassment, they can distract the Axis troops from applying all of their fire-power at the unprotected Allied troops trying to make an attack uphill against the sandbagged Axis defenders.

🔥 Winning as Axis:
1. One special Victory Point which the Axis can take advantage of is the escape hex through the minefield. Don’t waste a lot of your forces trying to find it, but one unit assigned to opening the escape path while the rest battle the British could be a path to an ‘easy’ VP.
2. The Allies have a numerical superiority of armor. Don’t launch an armor attack prematurely. Use your sandbagged infantry and armor units to slowly degrade the enemy. Be prepared should they try to launch an assault. Keep your responsiveness ready so you are prepared for whichever direction they come.
3. Watch out for the two enemy infantry units lodged in the bunkers along the backrow. Have an armor unit ready to respond with devastating force should they venture out of the bunkers.
Battle Reports
(percentage of Allied victories):
48%
Author:
Days of Wonder
Link:

