|
|
|
|
The Command Card
April 29, 2026
|
|
|
Play Smarter. Strike Harder.
|
|
|
|
|
|
|
|
Memoir '44 News
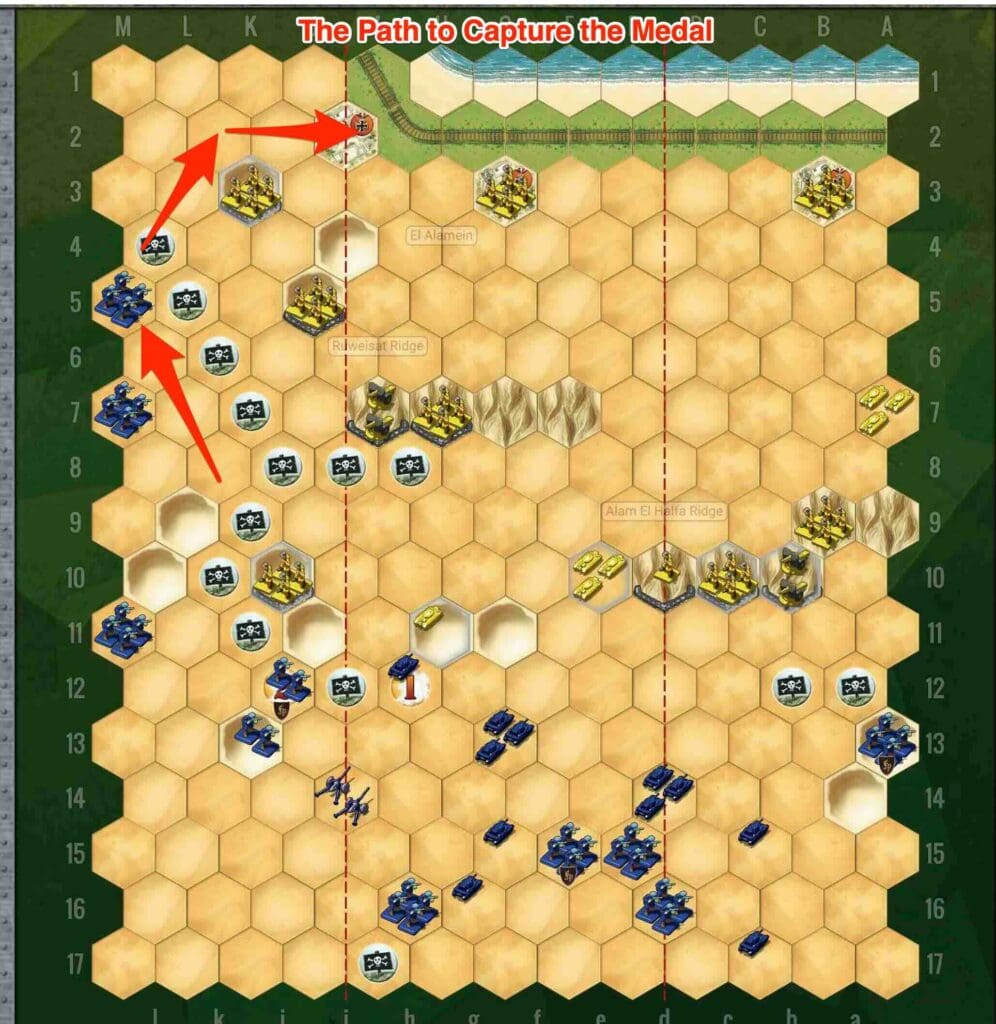
THE FOCUS OF THE COMMAND CARD IN THIS EDITION IS THE "BATTLE OF ALAM EL HALFA".
|
|
1. Read the Strategy Tip to learn how to win this scenario
|
2. Read the History Tip to learn a little more about his real-life battle in North Africa in 1942.
|
Now available in the General Howitzer store:
|
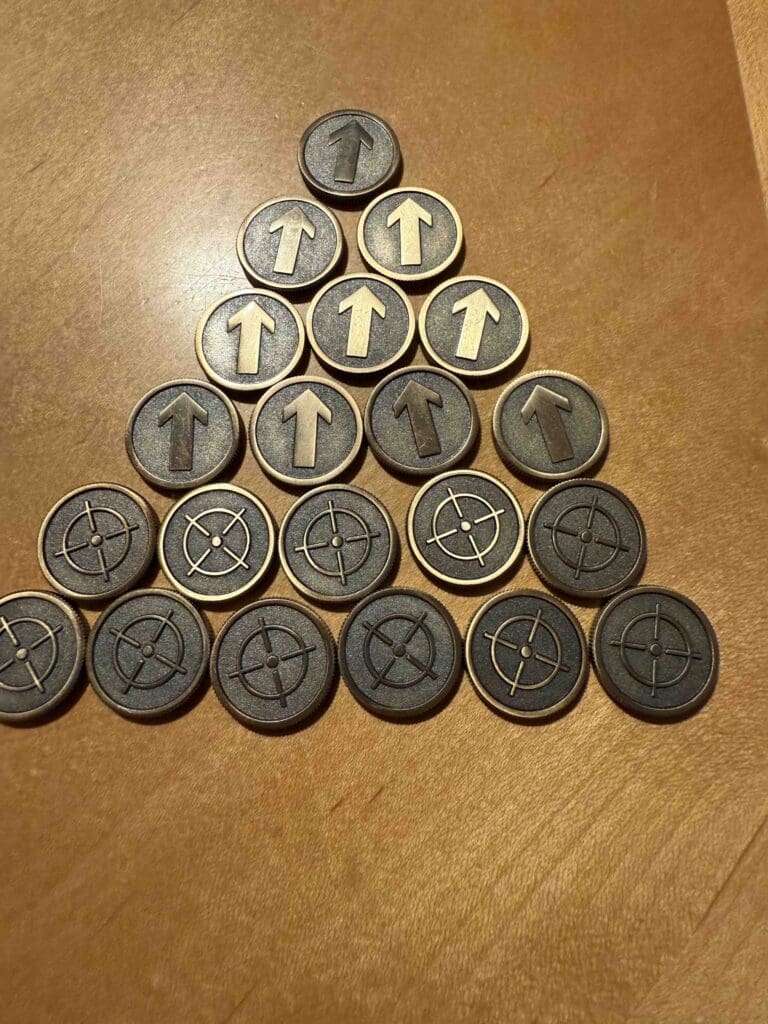
Elite Metal Attack & Movement Tokens for Memoir ’44
|
|
Designed exclusively for serious Memoir ’44 commanders, these elite attack and movement tokens elevate both clarity and immersion at the table.
|
|
|
|
Unlike common plastic markers, these tokens are solid metal—substantial in weight, unmistakably premium in feel. The moment you pick one up, you know it belongs on a serious battlefield.
|
Each token serves a dual purpose:
|
- Movement Side – Place it beside units scheduled to move during the turn.
- Targeting Reticule Side – Flip the token to clearly mark units that will execute attacks.
During combat resolution, simply slide the token from the attacking unit to the target unit. This single, deliberate motion removes all ambiguity about who is attacking whom, even in the most complex engagements. No second-guessing. No table disputes. Just clean, professional play.
|
This method mirrors the clarity and discipline used in competitive and tournament-level Memoir ’44 play, where precision matters and time is valuable.
|
If you take your Memoir ’44 games seriously—and want components that feel as decisive as the orders you issue—these metal tokens belong in your command kit.
|
|
Play like a professional.
|
|

|
STRATEGY & TACTICS
|
The Surprise Path to Win a Permanent Medal
|
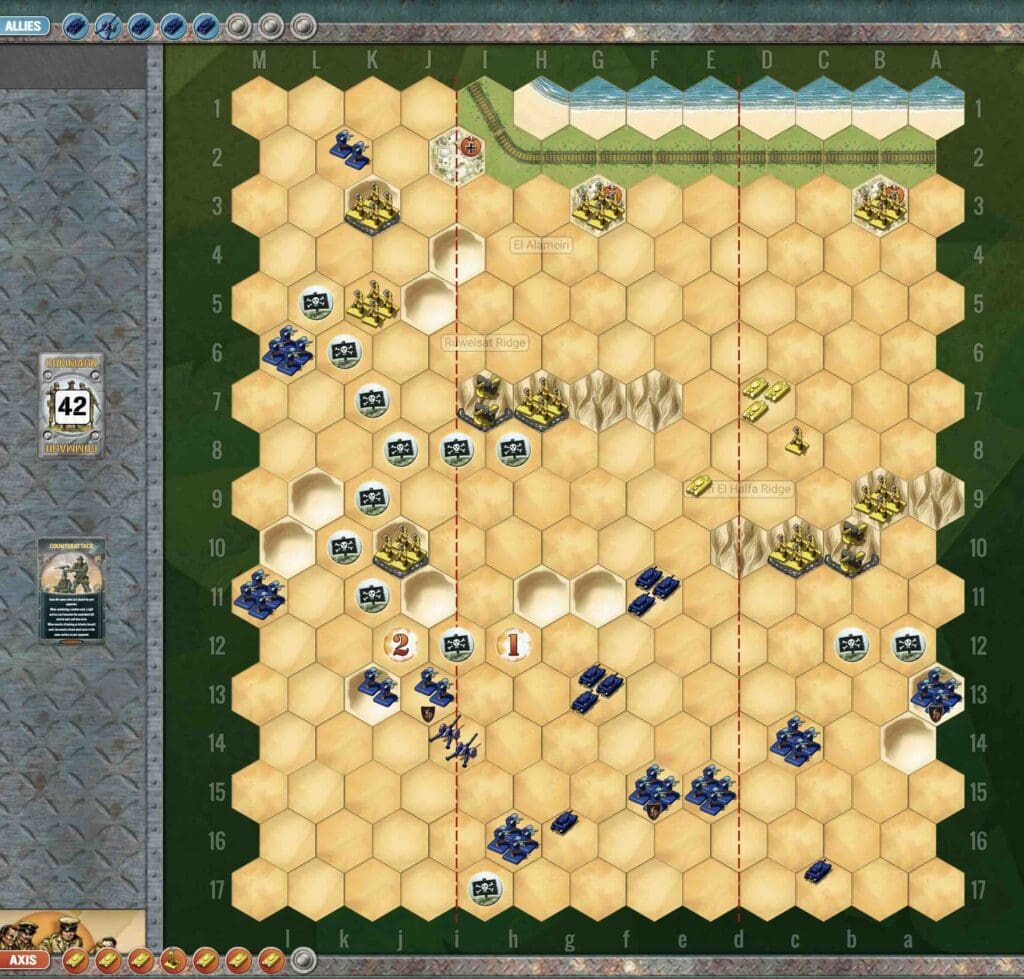
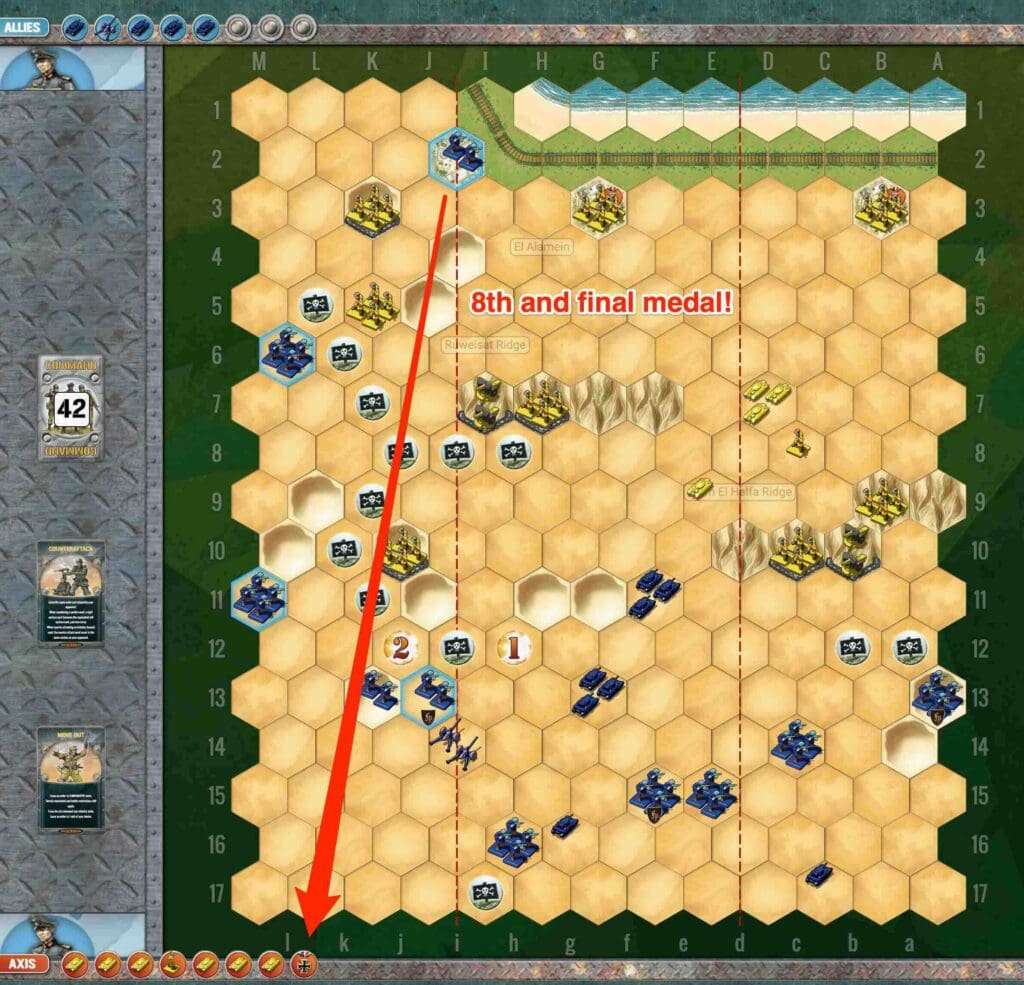
The Battle of Alam El Halfa shows how fun it can be to pursue a Permanent Objective Medal.
|
|
The Allied forces in 1942 are defending some key points along the railroad line. These are marked with Permanent Objective Medals. This proves to be an irresistible temptation for the Axis forces who sneak up the natural corridor formed behind the sand dunes to make a run for the medal.
|
|
|
|
Key move is the Infantry at k2; it moved two hexes the turn before from M3 to k2, Instead of attacking the Allied Infantry at K3, the Axis Infantry moved right next to it, in the hopes of grabbing the Permanent Victory Medal at i2.
|
|
|
And as suspected the Allied Infantry was unable to repel him. He killed two infantry figures, but thankfully, no retreat flag was thrown. His error was in attacking. He should not have done that. Instead, he simply should have moved his Infantry unit at K3, into the town hex at 'i2', where the Permanent Medal was. Then he could have fought off the Axis infantry successfully from there, and preserved the medal capture.
|
|
But he didn't. He stay in his hex and attacked from there. This allowed the Infantry to walk into the Permanent Medal hex and win the victory for the Axis forces.
|
|
|
|
|
|
|
|
From General Howitzer:
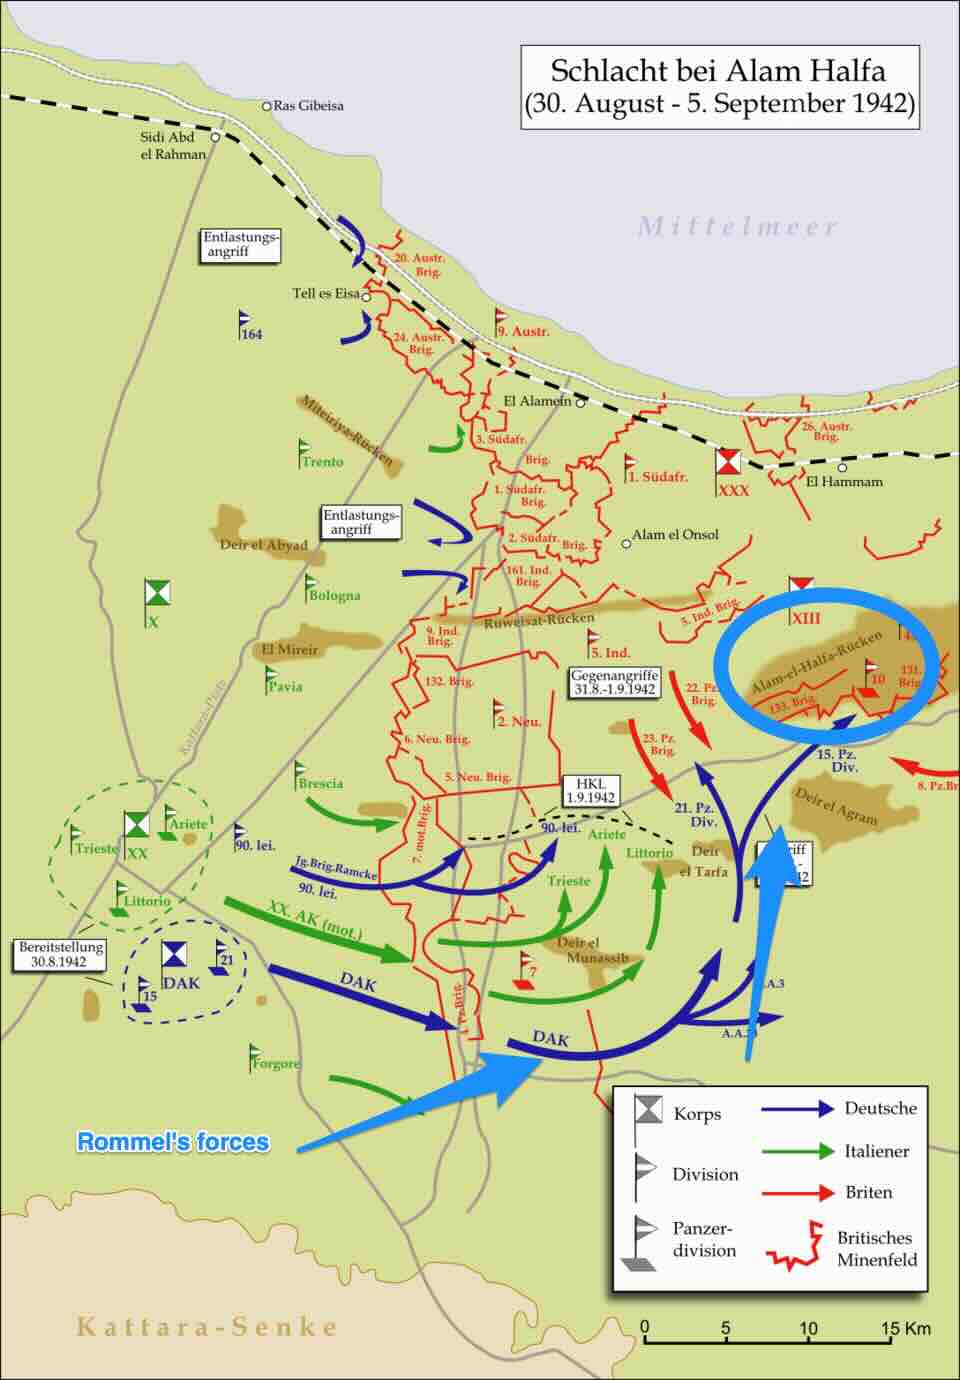
Battle of Alam el Halfa – Rommel’s Failed Flanking Surprise (Aug–Sep 1942)
|
The North African campaign in 1942 produced several tactically sophisticated surprise attacks—many of them shaped by deception, night movement, terrain exploitation, and intelligence asymmetry. Below is one of the most instructive and often under-appreciated examples.
|
|
Battle of Alam el Halfa – Rommel’s Failed Flanking Surprise (Aug–Sep 1942)
|
|
|
|
Map in German language showing the operations during the Battle of Alam el Halfa (1942).
|
|
(Permission is granted to copy, distribute and/or modify this document under the terms of the GNU Free Documentation License)
|
|
|
|
Rommel attempted a wide southern hook to outflank Montgomery’s defenses, expecting speed and surprise to compensate for fuel shortages. Instead, the British—forewarned by ULTRA—let the maneuver unfold into prepared kill zones.
|
A core dynamic of Alam el Halfa is that Rommel’s plan depended on surprise and speed, but the British benefited from strong situational awareness and an integrated approach to intelligence and operations. What Rommel did not know is that the British had deciphered the Ultra code, so they were ready and waiting for him!
|
Why it mattered: This was a counter-surprise: Montgomery won by anticipating Rommel’s move and refusing to be baited into a counterattack.
|
Final Lesson from General Howitzer:
|
Intelligence wins battles before the first shot is fired. You can march with all the daring in the world and still walk straight into a trap if the enemy already knows your plan. Surprise is a weapon—but knowledge of that surprise disarms it. When your opponent sees you coming, your bold maneuver turns into a target, and your brilliance dies under prepared guns.
|
|
How this relates to Memoir 44: A surprise is only a surprise until you make the first move. Then your opponent responds. If you do not have the firepower to backup your daring move, you will die in a hail of gunfire, or limp away like a wounded dog.
|
|
|
|
|
There are many campaigns on the GeneralHowitzer.com site.
|
|
You can play battles in historical order if you like, and follow the Campaign Guidelines which are also available.
|
|
https://generalhowitzer.com/campaigns/
|
|
|
|
|
|
|
Recent Updates to the General Howitzer Community
|
|
|
Battle at Ak Monai
|
|
6 VP'sCard Balance: Allies (Soviet Union) - 6 Axis (Germany) - 4Complexity: 2Conditions: Countryside Context: HistoricalLocation: CrimeaYear: 1941Theater: EasternCampaign: Codename: Summary: Objectives: 6 VP's Battlefield: Open countryside with trees Troops: Allies - Axis - Special Rules: Allied Strategy: Axis Strategy: Author: Link:
|
|
|
|
|
|
|
|
Capture of Foy
|
|
By January 1945, the Germans were battered but still fighting. Holding Foy was their last attempt to cling to the Ardennes. The men of the 101st Airborne, hardened by weeks of cold, shellfire, and misery in the woods of Bois Jacques, were ready to finish the job. On January 13th, those paratroopers charged across open snow under enemy fire and …
|
|
|
|
|
|
|
|
Okinawa Hacksaw Ridge
|
|
7 VP'sCard Balance: Allies - 6 Axis - 4Complexity: 4Conditions: Jungle Context: Location: OkinawaYear: Theater: PacificSummary: Objectives: 7 VP's There is one Medal Objective for the Allies, the Axis HQ. There is also an Exit Hex for the Allies which will result in one VP for every Allied unit that escapes. Battlefield: Jungle with a severe ridge and hills with …
|
|
|
|
|
|
Field Manual 4T: Terrain Pack Scenarios
|
|
|
Battlefield guides for all 8 Eastern Front Game Scenarios from Memoir 44.
|
$4.99
|
|
|
|
|
Scenario Field Guide: Schwammenauel Dam
|
|
|
|
|
|
|
Scenario Field Guide: Across the River Roer
|
|
|
|
|
|
|
Keep track of wins & losses for Axis vs. Allies in each scenario!
|
|
|
|
|
Battlefield & Strategy Tips
|
|
|
|
|
Events, Sitelinks, & Resources
|
|
|
|
|
|
|
|
|
|
|
|
|
|